每周的课程分为两部分,一个是理论部分,另外一个是实验室部分。
周一的理论课主要还是进行了简单的介绍,以及考试的项目等,上课讲的内容大致和panopto的内容差不多,但是Panopto没有开放下载,所以我可能会考虑录屏。下面的链接更新了教的内容,所以还需要再看看。
周二的实验课讲了一些简单的软件和命令,相较于课件的内容来说,实际讲的要丰富一些。
首先来说环境的搭建,我们强制要求使用Kali Linux,因为其就是为了cyber security和Forensics来设计的。那么搭建的方式有三种,U盘live模式,虚拟机模式和双系统模式。
安装的方式如附件所示:https://drive.google.com/file/d/1kYPHc-aUFskMZRtF68OhyKf9Ax59vkKJ/view?usp=sharing
我是采用的虚拟机模式,首先要安装虚拟机环境,使用轻量化的virtualbox,
https://www.virtualbox.org/wiki/Downloads
Kali Linux 则从下方链接下载,
https://www.kali.org/get-kali/#kali-platforms
如果需要旧版本,则是去
http://old.kali.org/virtual-images/
我尝试了2023和2021.4两个版本,而课上使用的是2022.2版本。
2021.4这个版本有个问题,下载安装dcfldd和dc3dd的时候会报错,如下图所示

然后尝试使用apt-get update来解决,然而就会出现新的错误,
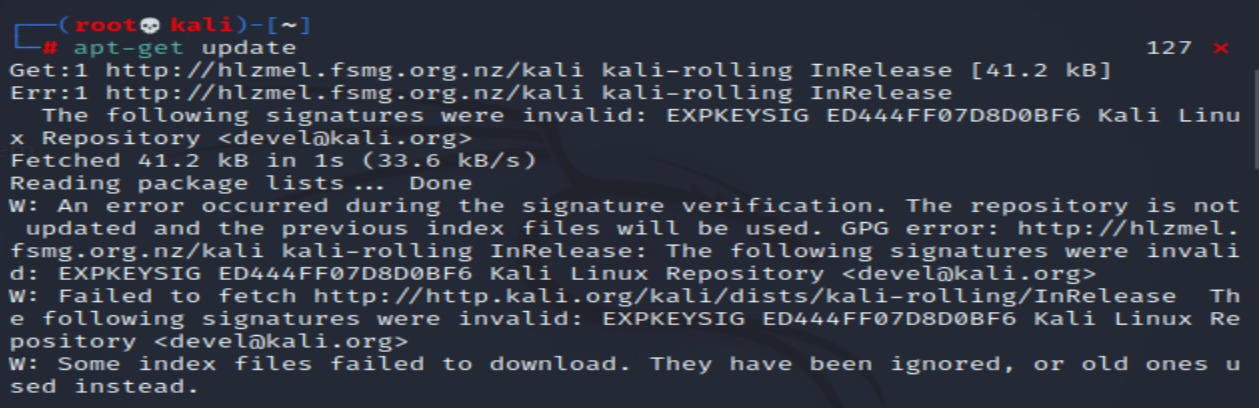
signature无效,这个问题可以修复,但是修复后仍然无法安装,新的错误我没进行细致研究,晚上老师使用的是2022.2,在apt-get update后就可以进行安装,所以我之后都是使用2022.2或者以后得版本。

成功安装好后如下图所示,

好啦,回到实验部分。
首先是基础命令fdisk -l,查看硬盘情况,

介绍了一个工具hexedit,该工具可以查看目标(U盘,硬盘等)的底层数据情况(通过十六进制来表达)。假如是全0,则说明是完全擦除状态,我们有时候格式化U盘,会被问到是否快速格式化,表面上看好像不选快速的话,PC会帮忙完全擦除数据,但是实际上并不会。
查看某U盘情况,命令:hexedit /dev/sdb 所以搭配fdisk -l 来使用,不然不知道路径,其中ctrl +s可以search

那么假如看到明明是没有任何文件的U盘,如何强制写0呢,记住下面这个命令,
dd if=/dev/zero of=/dev/sdb conv=sync,noerror

接下来的内容是文件的signature,我们知道文件储存在设备中其实有两个部分,一个是真实的数据,另外一个类似于一个指针,用于指向这一块数据。这一块数据是allocate的,无法被覆盖。但是假设我们删除掉该文件,从文件浏览系统里看似乎是清空了,但是实际上我们只是修改文件的指针系统,没记错的话首字母变成了e,然后数据并没有被删除,只是变为非allocate状态,其他文件可以覆盖写入。但是假如还没有被覆盖写入的话,该文件是可以被恢复的,那么这个也就是数据恢复的原理。大部分文件都是有固定的signature,包括the beginning的和the end的,下面的链接来自于维基百科,一些常见的文件signature,这一块我回头需要继续研究一下常见的文件系统。这里记住txt是没有signature的,所以回复比较难。另外市面上很多恢复软件都不一样,有的会查看指针部分,所以可以恢复出文件名称等,但是有的不查看。
https://en.wikipedia.org/wiki/List_of_file_signatures
那么最后就是三种常见的工具用来创建dd文件,理论上kali linux挂载硬盘不会写入数据,不像windows一样,所以可以直接使用,但是为了保险起见,比如防止误操作等等,还是建议使用write blocker工具(我去淘宝看了看,这个破玩意儿居然要上千块)。
dd是built in kali system的,所以不需要下载安装,但是这个工具我个人最不喜欢,因为没有进度条显示,也无法计算哈希值,
dd if=/dev/sdb of=Desktop/myusb.dd conv=sync,noerror
md5sum /dev/sdb
md5sum Desktop/myusb.dd
sha1sum /dev/sdb
sha1sum Desktop/myusb.dd
dd if=/dev/sdb of=Desktop/myusb1.dd bs=1 count=3000000 conv=sync,noerror
bs 表示block start1 然后count 表示3000 000 byte 这样就是只做前3000,000的dd文件
hexedit也可以来查看dd文件,ctrl+s 可以search

dcfldd 就比dd强多了,多了很多功能,比如直接输出哈希值等,如果不加hashlog命令,则是直接输出在屏幕上
dcfldd if=/dev/sdb of=Desktop/myusb.dd hash=md5,sha1,sha256 conv=sync,noerror hashlog=Desktop/myusb.txt
bs count也是可以使用的

dc3dd 是我个人感觉最好的,因为可以查看实时进度 hash md5和sha1之间不能加逗号,只能写两次,也没有noerror sync
dc3dd if=/dev/sdb of=Desktop/myusb.dd hash=md5 hash=sha1 log=Desktop/myusb.txt
dc3dd 格式不一样 不能用ds count 而是ssz 和cnt
dc3dd 后面加 hof=myusb.dd 可以比较源文件和输出文件的哈希值

小技巧,如果屏幕内容太多,可以clear 清除掉

然后我们看一下这几个命令的help文档,应该不会考察这么细致,但是需要了解
Linux fdisk 是一个创建和维护分区表的程序,它兼容 DOS 类型的分区表、BSD 或者 SUN 类型的磁盘列表。
下文来自于菜鸟教程:
语法
fdisk [必要参数][选择参数]
必要参数:
-l 列出素所有分区表
-u 与 -l 搭配使用,显示分区数目
选择参数:
-s<分区编号> 指定分区
-v 版本信息
菜单操作说明
m :显示菜单和帮助信息
a :活动分区标记/引导分区
d :删除分区
l :显示分区类型
n :新建分区
p :显示分区信息
q :退出不保存
t :设置分区号
v :进行分区检查
w :保存修改
x :扩展应用,高级功能
下面则是来自fdisk的help文档
┌──(root㉿kali)-[~]
└─# fdisk --help
Usage:
fdisk [options] change partition table
fdisk [options] -l […] list partition table(s)
Display or manipulate a disk partition table.
Options:
-b, --sector-size physical and logical sector size
-B, --protect-boot don't erase bootbits when creating a new label
-c, --compatibility[=] mode is 'dos' or 'nondos' (default)
-L, --color[=] colorize output (auto, always or never)
colors are enabled by default
-l, --list display partitions and exit
-x, --list-details like --list but with more details
-n, --noauto-pt don't create default partition table on empty devices
-o, --output output columns
-t, --type recognize specified partition table type only
-u, --units[=] display units: 'cylinders' or 'sectors' (default)
-s, --getsz display device size in 512-byte sectors [DEPRECATED]
--bytes print SIZE in bytes rather than in human readable format
--lock[=] use exclusive device lock (yes, no or nonblock)
-w, --wipe wipe signatures (auto, always or never)
-W, --wipe-partitions wipe signatures from new partitions (auto, always or never)
-C, --cylinders specify the number of cylinders
-H, --heads specify the number of heads
-S, --sectors specify the number of sectors per track
-h, --help display this help
-V, --version display version
Available output columns:
gpt: Device Start End Sectors Size Type Type-UUID Attrs Name UUID
dos: Device Start End Sectors Cylinders Size Type Id Attrs Boot End-C/H/S
Start-C/H/S
bsd: Slice Start End Sectors Cylinders Size Type Bsize Cpg Fsize
sgi: Device Start End Sectors Cylinders Size Type Id Attrs
sun: Device Start End Sectors Cylinders Size Type Id Flags
OPTIONS
这个来自于hexedit的help文档
-s, --sector
Format the display to have entire sectors.-m, --maximize Try to maximize the display. --color Display colors. This feature is only available if your operating system supports it. -l<n>, --linelength <n> Explicitly set the number of bytes to display per line to <n>. -h, --help Show the usage.
COMMANDS (quickly)
Moving
<, > : go to start/end of the file
Right: next character
Left: previous character
Down: next line
Up: previous line
Home: beginning of line
End: end of line
PUp: page forward
PDown: page backward
Miscellaneous
F2: save
F3: load file
F1: help
Ctrl-L: redraw
Ctrl-Z: suspend
Ctrl-X: save and exit
Ctrl-C: exit without savingTab: toggle hex/ascii Return: go to Backspace: undo previous character Ctrl-U: undo all Ctrl-S: search forward Ctrl-R: search backward
Cut&Paste
Ctrl-Space: set mark
Esc-W: copy
Ctrl-Y: paste
Esc-Y: paste into a file
COMMANDS (full and detailed)
o Right-Arrow, Left-Arrow, Down-Arrow, Up-Arrow - move the cursor.
o Ctrl+F, Ctrl+B, Ctrl+N, Ctrl+P - move the cursor.
o Ctrl+Right-Arrow, Ctrl+Left-Arrow, Ctrl+Down-Arrow, Ctrl+Up-Arrow - move n times the cursor.
o Esc+Right-Arrow, Esc+Left-Arrow, Esc+Down-Arrow, Esc+Up-Arrow - move n times the cursor.
o Esc+F, Esc+B, Esc+N, Esc+P - move n times the cursor.
o Home, Ctrl+A - go the beginning of the line.
o End, Ctrl+E - go to the end of the line.
o Page up, Esc+V, F5 - go up in the file by one page.
o Page down, Ctrl+V, F6 - go down in the file by one page.
o <, Esc+<, Esc+Home - go to the beginning of the file. o >, Esc+>, Esc+End - go to the end of the file (for regular files that have a size).
o Ctrl+Z - suspend hexedit.
o Ctrl+U, Ctrl+_, Ctrl+/ - undo all (forget the modifications).
o Ctrl+Q - read next input character and insert it (this is useful for inserting control characters and bound keys).
o Tab, Ctrl+T - toggle between ASCII and hexadecimal.
o /, Ctrl+S - search forward (in ASCII or in hexadecimal, use TAB to change).
o Ctrl+R - search backward.
o Ctrl+G, F4 - go to a position in the file.
o Return - go to a sector in the file if --sector is used, otherwise go to a position in the file.
o Esc+L - display the page starting at the current cursor position.
o F2, Ctrl+W - save the modifications.
o F1, Esc+H - help (show the man page).
o Ctrl+O, F3 - open another file
o Ctrl+L - redisplay (refresh) the display (useful when your terminal screws up).
o Backspace, Ctrl+H - undo the modifications made on the previous byte.
o Esc+Ctrl+H - undo the modifications made on the previous bytes.
o Ctrl+Space, F9 - set mark where cursor is.
o Esc+W, Delete, F7 - copy selected region.
o Ctrl+Y, Insert, F8 - paste (yank) previously copied region.
o Esc+Y, F11 - save previously copied region to a file.
o Esc+I, F12 - fill the selection with a string
o Esc+T - truncate the file at the current location
o Ctrl+C - unconditional quit (without saving).
o F10, Ctrl+X - quit.For the Esc commands, it sometimes works to use Alt instead of Esc. Funny things here (especially for froggies :) egrave = Alt+H , ccedilla = Alt+G, Alt+Y = ugrave.
来自于md5sum的help文档
┌──(root㉿kali)-[~]
└─# md5sum --help
Usage: md5sum [OPTION]… [FILE]…
Print or check MD5 (128-bit) checksums.
With no FILE, or when FILE is -, read standard input.
-b, --binary read in binary mode
-c, --check read MD5 sums from the FILEs and check them
--tag create a BSD-style checksum
-t, --text read in text mode (default)
-z, --zero end each output line with NUL, not newline,
and disable file name escaping
The following five options are useful only when verifying checksums:
--ignore-missing don't fail or report status for missing files
--quiet don't print OK for each successfully verified file
--status don't output anything, status code shows success
--strict exit non-zero for improperly formatted checksum lines
-w, --warn warn about improperly formatted checksum lines--help display this help and exit --version output version information and exit
来自于sha1sum的help文档
┌──(root㉿kali)-[~]
└─# sha1sum --help
Usage: sha1sum [OPTION]… [FILE]…
Print or check SHA1 (160-bit) checksums.
With no FILE, or when FILE is -, read standard input.
-b, --binary read in binary mode
-c, --check read SHA1 sums from the FILEs and check them
--tag create a BSD-style checksum
-t, --text read in text mode (default)
-z, --zero end each output line with NUL, not newline,
and disable file name escaping
The following five options are useful only when verifying checksums:
--ignore-missing don't fail or report status for missing files
--quiet don't print OK for each successfully verified file
--status don't output anything, status code shows success
--strict exit non-zero for improperly formatted checksum lines
-w, --warn warn about improperly formatted checksum lines--help display this help and exit --version output version information and exit
来自于dd的help文档
┌──(root㉿kali)-[~]
└─# dd --help
Usage: dd [OPERAND]…
or: dd OPTION
Copy a file, converting and formatting according to the operands.
bs=BYTES read and write up to BYTES bytes at a time (default: 512);
overrides ibs and obs
cbs=BYTES convert BYTES bytes at a time
conv=CONVS convert the file as per the comma separated symbol list
count=N copy only N input blocks
ibs=BYTES read up to BYTES bytes at a time (default: 512)
if=FILE read from FILE instead of stdin
iflag=FLAGS read as per the comma separated symbol list
obs=BYTES write BYTES bytes at a time (default: 512)
of=FILE write to FILE instead of stdout
oflag=FLAGS write as per the comma separated symbol list
seek=N skip N obs-sized blocks at start of output
skip=N skip N ibs-sized blocks at start of input
status=LEVEL The LEVEL of information to print to stderr;
'none' suppresses everything but error messages,
'noxfer' suppresses the final transfer statistics,
'progress' shows periodic transfer statistics
N and BYTES may be followed by the following multiplicative suffixes:
c=1, w=2, b=512, kB=1000, K=1024, MB=10001000, M=10241024, xM=M,
GB=100010001000, G=102410241024, and so on for T, P, E, Z, Y.
Binary prefixes can be used, too: KiB=K, MiB=M, and so on.
Each CONV symbol may be:
ascii from EBCDIC to ASCII
ebcdic from ASCII to EBCDIC
ibm from ASCII to alternate EBCDIC
block pad newline-terminated records with spaces to cbs-size
unblock replace trailing spaces in cbs-size records with newline
lcase change upper case to lower case
ucase change lower case to upper case
sparse try to seek rather than write all-NUL output blocks
swab swap every pair of input bytes
sync pad every input block with NULs to ibs-size; when used
with block or unblock, pad with spaces rather than NULs
excl fail if the output file already exists
nocreat do not create the output file
notrunc do not truncate the output file
noerror continue after read errors
fdatasync physically write output file data before finishing
fsync likewise, but also write metadata
Each FLAG symbol may be:
append append mode (makes sense only for output; conv=notrunc suggested)
direct use direct I/O for data
directory fail unless a directory
dsync use synchronized I/O for data
sync likewise, but also for metadata
fullblock accumulate full blocks of input (iflag only)
nonblock use non-blocking I/O
noatime do not update access time
nocache Request to drop cache. See also oflag=sync
noctty do not assign controlling terminal from file
nofollow do not follow symlinks
count_bytes treat 'count=N' as a byte count (iflag only)
skip_bytes treat 'skip=N' as a byte count (iflag only)
seek_bytes treat 'seek=N' as a byte count (oflag only)
来自于dcfldd的help文档
┌──(root㉿kali)-[~]
└─# dcfldd --help
Usage: dcfldd [OPTION]…
Enhanced version of dd for forensics and security.
bs=BYTES force ibs=BYTES and obs=BYTES (default=32768)
cbs=BYTES convert BYTES bytes at a time
conv=KEYWORDS convert the file as per the comma separated keyword list
count=BLOCKS copy only BLOCKS input blocks
limit=BYTES similar to count but using BYTES instead of BLOCKS
ibs=BYTES read BYTES bytes at a time
if=FILE read from FILE instead of stdin
obs=BYTES write BYTES bytes at a time
of=FILE write to FILE instead of stdout
of:=COMMAND exec and write output to process COMMAND
seek=BLOCKS skip BLOCKS obs-sized blocks at start of output
skip=BLOCKS skip BLOCKS ibs-sized blocks at start of input
pattern=HEX use the specified binary pattern as input
textpattern=TEXT use repeating TEXT as input
errlog=FILE send error messages to FILE as well as stderr
hash=NAME do hash calculation (md5, sha1, sha256, sha384 or sha512)
hashlog=FILE send hash output to FILE instead of stderr
hashwindow=BYTES perform a hash on every BYTES amount of data
hashlog:=COMMAND exec and write hashlog to process COMMAND
ALGORITHMlog:=COMMAND also works in the same fashion of hashlog:=COMMAND
hashconv=[before|after] perform the hashing before or after the conversions
hashformat=FORMAT display each hashwindow according to FORMAT
totalhashformat=FORMAT display the total hash value according to FORMAT
status=[on|off] display a continual status message on stderr
statusinterval=N update the status message every N blocks
sizeprobe=[if|of|BYTES] what to use as value to percentage indicator
split=BYTES write every BYTES amount of data to a new file
splitformat=[TEXT|MAC|WIN] the file extension format for split operation
vf=FILE verify that FILE matches the specified input
verifylog=FILE send verify results to FILE instead of stderr
verifylog:=COMMAND exec and write verify results to process COMMAND
diffwr=[on|off] only write to output if destination block content differs
┌──(root㉿kali)-[~]
└─# dc3dd --help
usage:
dc3dd [OPTION 1] [OPTION 2] ... [OPTION N]*or*
dc3dd [HELP OPTION]where each OPTION is selected from the basic or advanced options listed below, or HELP OPTION is selected from the help options listed below.
basic options:if=DEVICE or FILERead input from a device or a file (see note #1 below for how to read from standard input). This option can only be used once and cannot be combined with ifs=, pat=, or tpat=.ifs=BASE.FMTRead input from a set of files with base name BASE and sequential file name extensions conforming to the format specifier FMT (see note #4 below for how to specify FMT). This option can only be used once and cannot be combined with if=, pat=, or tpat=.of=FILE or DEVICEWrite output to a file or device (see note #2 below for how to write to standard output). This option can be used more than once (see note #3 below for how to generate multiple outputs).hof=FILE or DEVICEWrite output to a file or device, hash the output bytes, and verify by comparing the output hash(es) to the input hash(es). This option can be used more than once (see note #3 below for how to generate multiple outputs).ofs=BASE.FMTWrite output to a set of files with base name BASE and sequential file name extensions generated from the format specifier FMT (see note #4 below for how to specify FMT). This option can be used more than once (see note #3 below for how to generate multiple outputs). Specify the maximum size of each file in the set using ofsz=.hofs=BASE.FMTWrite output to a set of files with base name BASE and sequential file name extensions generated from the format specifier FMT (see note #4 below for how to specify FMT). Hash the output files and verify by comparing the output hash(es) to the input hash(es). This option can be used more than once (see note #3 below for how to generate multiple outputs). Specify the maximum size of each file in the set using ofsz=.ofsz=BYTESSet the maximum size of each file in the sets of files specified using ofs= or hofs= to BYTES (see note #5 below). A default value for this option may be set at compile time using -DDEFAULT_OUTPUT_FILE_SIZE followed by the desired value in BYTES.hash=ALGORITHMCompute an ALGORITHM hash of the input and also of any outputs specified using hof=, hofs=, or fhod=, where ALGORITHM is one of md5, sha1, sha256, or sha512. This option may be used once for each supported ALGORITHM. Alternatively, hashing can be activated at compile time using one or more of -DDEFAULT_HASH_MD5,-DDEFAULT_HASH_SHA1, -DDEFAULT_HASH_SHA256, and -DDEFAULT_HASH_SHA512.log=FILE LogI/O statistcs, diagnostics, and total hashes of input and output to FILE. If hlog= is not specified, piecewise hashes of multiple file input and output are also logged to FILE. This option can be used more than once to generate multiple logs.hlog=FILELog total hashes and piecewise hashes to FILE. This option can be used more than once to generate multiple logs.mlog=FILECreate hash log that is easier for machine to read
advanced options:fhod=DEVICEThe same as hof=DEVICE, with additional hashing of the entire output DEVICE. This option can be used more than once (see note #3 below for how to generate multiple outputs).rec=offBy default, zeros are written to the output(s) in place of bad sectors when the input is a device. Use this option to cause the program to instead exit when a bad sector is encountered.wipe=DEVICEWipe DEVICE by writing zeros (default) or a pattern specified by pat= or tpat=.hwipe=DEVICEWipe DEVICE by writing zeros (default) or a pattern specified by pat= or tpat=. Verify DEVICE after writing it by hashing it and comparing the hash(es) to the input hash(es).pat=HEXUse pattern as input, writing HEX to every byte of the output. This option can only be used once and cannot be combined with if=, ifs=, or tpat=.tpat=TEXTUse text pattern as input, writing the string TEXT repeatedly to the output. This option can only be used once and cannot be combined with if=, ifs=, or pat=.cnt=SECTORSRead only SECTORS input sectors. Must be used with pat= or tpat= if not using the pattern with wipe= or hwipe= to wipe a device.iskip=SECTORSSkip SECTORS sectors at start of the input device or file.oskip=SECTORSSkip SECTORS sectors at start of the output file. Specifying oskip= automatically sets app=on.app=onDo not overwrite an output file specified with of= if it already exists, appending output instead.ssz=BYTESUnconditionally use BYTES (see note #5 below) bytes for sector size. If ssz= is not specified, sector size is determined by probing the device; if the probe fails or the target is not a device, a sector size of 512 bytes is assumed.bufsz=BYTESSet the size of the internal byte buffers to BYTES (see note #5 below). This effectively sets the maximum number of bytes that may be read at a time from the input. BYTES must be a multiple of sector size. Use this option to fine-tune performance.verb=onActivate verbose reporting, where sectors in/out are reported for each file in sets of files specified using ifs=, ofs=, or hofs=. Alternatively, verbose reporting may be activated at compile time using -DDEFAULT_VERBOSE_REPORTING.nwspc=onActivate compact reporting, where the use of white space to divide log output into logical sections is suppressed. Alternatively, compact reporting may be activated at compile time using -DDEFAULT_COMPACT_REPORTING.b10=onActivate base 10 bytes reporting, where the progress display reports 1000 bytes instead of 1024 bytes as 1 KB. Alternatively, base 10 bytes reporting may be activated at compile time using -DDEFAULT_BASE_TEN_BYTES_REPORTING.corruptoutput=onFor verification testing and demonstration purposes, corrupt the output file(s) with extra bytes so a hash mismatch is guaranteed.
上面的命令都比较多,回头需要研究一下。
这里课后练习有一个注意的,要求在assignment里也这样做,每一个恢复的文件都需要获得原始文件和复制文件的hash,我自己练习了一下,如下图
Step 1: Hash the original file for MD5 and SHA1 and save these values to a text file.
Step 2: Make a copy of the original file (using the cp command) and save it with a different name (_copy is conventional)
Step 3: Hash the new file for MD5 and SHA1 and save these values to a text file.
Step 4: Copy and paste the hash values from the text file(s) to your Court Report.

基本第一周就讲了这么多,我觉得主要的难点还是要熟悉一下命令。
最后上课没有讲,但是我看到往年视频里有说一下考试内容的一个举例,比如下面的命令你要找出问题出在哪里,比如dd里dev前面需要/ 而of后面desktop前面不需要/ d也要大写 hash=md5是dd不支持的,还有hashlog也不支持,最后conv=sync, noerror里 noerror前面不应该有空格,会报错。

最后也是往年视频里,讲了一下恢复数据的一个思路,首先找个dd文件里某个文件比如jpg的beginning signature 和end signature,通过他们的data位置计算出文件大小,然后也是用命令来恢复。这里用到了 skip,跳过多少多少数据。
如下图所示,先制作出dd文件,再从dd文件里找到jpg的signature,开始是FF D8 FF,结束是FF D9,确定一下位置。这里记住,结束的位置要记住的是接下来一位,而不是FF D9的位置。然后转换为十进制,计算出两者之差,就知道了文件的大小。然后就可以恢复了,理论上就是跳过前面的数据,然后是数据之差。这里记住数据从00开始的,所以跳过去的应该是数据开始的位置,而不是减去1。
我比较好奇的是,命令里用的是十进制计算内容,而不是二进制或者十六进制。